Posted 8-19-'02
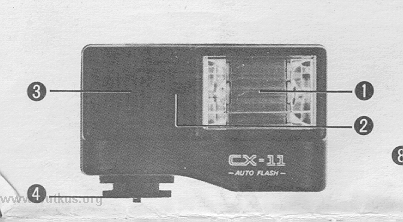
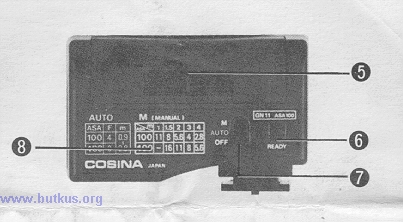
Description of Parts
(1) Diffuser
(2) Sensor Window
(3) Piezo-electric Buzzer Sound-holes
(4) Hot-shoe
(5) Battery Compartment Lid
(6) Ready Lamp
(7) Selector Switch
(8) Exposure Table
Technical Data
Type: Miniature Size Automatic Exposure Electronic Flash Unit with Ready Buzzer
Guide Number: 11 (ASA 100 in meter), 18 (ASA 25 in feet ) (on manual) 22 (ASA 400 in meter)
Angle of Cover: Horizontal 57O, Vertical 40
Effective Range: 0.9~2.8m (ASA 100 F:4) (on auto) 0.9~2.8m (ASA 400 F:8)
Recommended Aperture Setting: F:4 (ASA 100) (on auto) F:5.6 (ASA 200) F:8 (ASA 400)
Effective Sensing Angle: Approx.15°
Flash Duration: on manual 1 /3,000sec on auto 1 /22,000~1 /3,000sec
Recycling Time: W/alkaline bats. 1 o~3qsec
Number of Flashes: W/Alkaline batteries. 110 (10-30sec)
Recommended Power Source: One AA size: alkaline battery
Dimensions: 40 X 66 X 37mm
Weight: 70g (w/o battery)
* It may sound for a moment when neon lamp comes on.
* To determine the "Number of Flashes", a new battery was tested continuously in the strobo unit at 30 sec. intervals at temperatures of
20-25 degrees.C. 100 flashes were obtained before the Ready Lamp failed to function within cameras CX-1, CX-2.
* Always keep replacement batteries on hand to avoid unnecessary delays.
* This unit has been designed for our miniature cameras CX-1, CX-2 It will fit some other makes of camera but not all.
General Operation
1. Push and slide off Battery Compartment Lid (5) along the arrow mark.
2. Install battery according to the mark - + , and close lid.
3. Slide the unit into camera's hot-shoe.
4. Set the Power-off/Auto/Manual Selector Switch (7) to "Auto" or "M" position. At the same time power switch to "ON".
5. When the unit is ready for use, the Ready Lamp (6) comes on and the Buzzer
(3) will sound for a moment.
6. Press the Shutter Release Button.
7. After use, set the Power-off/Auto/Manual Selector Switch (7) to "OFF". Remove the battery when the unit is not in use for any length of time
save the batteries from draining.
Automatic Operation
1. Set the Power-off/Auto/Manual Selector Switch (7) to "AUTO".
2. Set the aperture on the camera to f/4 when using ASA 100 film, to f/8 for ASA 400 film, as shown in the Exposure Table
(8).
3. You have only to press the release button after the Ready light illuminates or buzzer sound.
Manual Operation
1. Set the Power-off/Auto/Manuai Selector Switch (7) to "M".
2. Use the distance between the subject and the camera and the ASA of the film to find the correct aperture setting on the table
(8)
3. The F-stop can also be found by calculating using the following formula
F (aperture) = GN (guide number)/D (distance)
(Example): At a
distance of 2 meters using ASA 100 film: F = 11 divided by 2 - 5.6
Correct Aperture = Guide Nunber (GN) divided by Distance
e.g. When the subject is two meters away
(GN) 11 divided by 2 meters = f/5.5--use f/5.6 for correct exposure