Film cameras
Chinon Handyzoom 5001 User manual
User manual for Chinon Handyzoom 5001. 33 pages in English. Read the original PDF, download or print a copy without registration.
33 pagesEnglish1.4 MB PDF
Loading your manual…Open PDF directly
Document details
- Brand
- Chinon
- Model / document
- Chinon Handyzoom 5001
- Document type
- User manual
- Language
- English
- Pages
- 33
- File size
- 1.4 MB
- Category
- Film cameras
- Document date
- Not specified in catalog
Search available document text
Find a term, then jump to its page in the original PDF. Image-only pages may not be searchable; check the PDF for exact wording and diagrams.
Page 3 · Read text
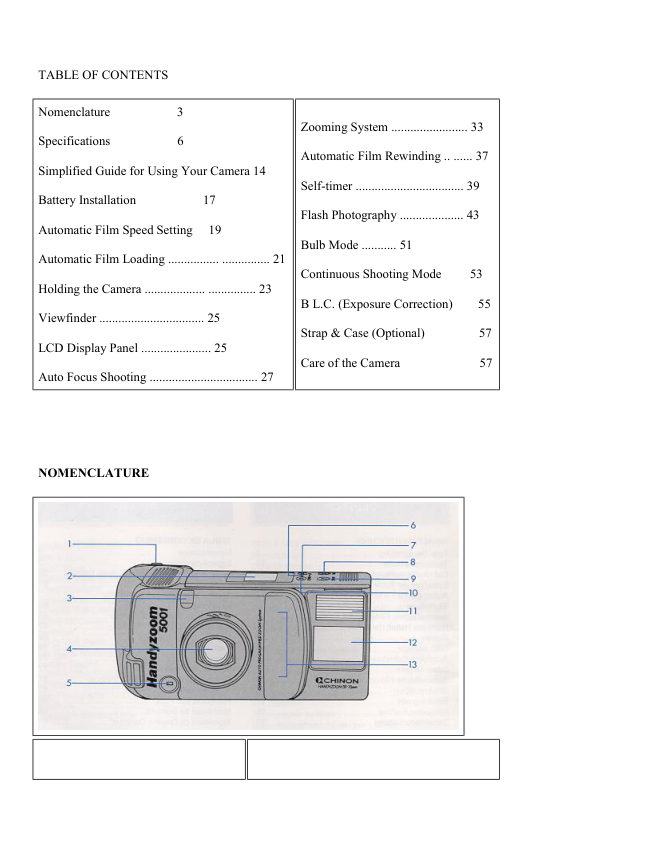
1. Shutter release button                   8. BLC (Back Light Control) button

2. LCD indication                          9. Spot AF button

3. Self-timer indication LED             10. Self-timer/Continuous button

4. Lens                            1 1. Flash

5. Exposure metering window            12. Viewfinder

6. Manual rewind bottom                13. Auto focus window

7. Flash mode button


                                                      19. Film type window
14. Film rewind shaft
                                                      20. Back cover
15. Viewfinder eyepiece
                                                      21. Take up spool
16. Film chamber
                                                      22. Film guide
17. Back cover release button
                                                      23. Film tip mark
18. Power zoom button (Tale/Wide)
                                                      24. Tripod socket
View original page 3Page 4 · Read text
SPECIFICATIONS


TYPE: 35 mm fully automatic AF zoom compact camera features:


· Built-in AF 35-70 mm zoom lens.
· Automatic picture composing system.
· Multi Auto Focusing system.
· Central Spot AF system.
· Auto Zoom Sensor Flash.
· Flash OFF mode.
· Fill-in flash mode. '
· Auto DX Program AK.
· Full automatic film transport system.
· Single & Continuous advancing modes.
· Built-in LCD information panel.

FILM TYPE: 35 mm films.

PICTURE FORMAT: 24x36 mm.

LENS: Chinon AF ZOOM lens. Focal Length: 35 mm-70 mm. F. number: F/3.7 (wide)-F6.8(tele)
Construction: 8 elements in 6 groups. Zooming: 2 way: 1 ) Fully automatic zoom for auto composition. 2)
Manual power zoom by zoom switch.

VIEWFINDER: Zoom finder with bright frame.
Magnification: Wide: 0.45x. Tele: 0.86x.
Diopter: -1.0 diopter.
Coverage: 82%.
Indications: Bright frame, Parallax compensation mark, AF mark, AF "OK" LED with close distance warning
(Green: Multi AF, Orange: SPOT AF), Slow shutter warning LED,
Bulb mode signal LED.

FOCUSING: Two way Active Infrared AF with 17 steps: (1 ) Multi-spot AF (3 infrared beams). (2) Central
spot AF (Single infrared AF beam).

AF range: 0.9 m (35.4")--Infinity for both tele & wide.
Focus lock: Possible by depressing shutter release half way (cancellable).

SHUTTER: Stepping motor controlled chargeless shutter.

Shutter speed: 1/4-1/300sec.+Buib.
Release type: Electromagnetic type.

EXPOSURE: Three mode Programmed AE:
1 ) Normal Program AE.
2) Slow shutter program AE.
3) Fill-in flash
View original page 4
Page 5 · Read text
Program AE.
Type of photocell: CdS.
EV range (ISO 100): Wide at Normal Program AK: EV 9-EV 17. Wide at Slow Program AK: EV 6-EV 17.
Tele at Normal Program AK: EV 10.8-EV 18.8. Tele at Slow
Program AK: EV 7.8-EV 18.8.
Film speed settings: Automatic for DX films, ISO 25 - 1600. (ISO 25 for non-DX films).
Back light control: Built-in for + 1.5 EV.

FILM TRANSPORT: Fully motorized.

Film loading: Automatic loading with auto advance to 1.
Film advance: Automatic by built-in motor.
Shooting mode: 2 way: (1 ) Single shooting mode. (2) Continuous shooting mode.
Film rewind: Automatic by built-in motor with automatic rewind start and stop mechanism.
Film counter: By LCD; additive for film advancing and reverse counting for film rewinding.
Midroll rewind: Possible by rewind switch.

FLASH: Auto Zoom Sensor flash with flashmatic.
Flash recycling: Fully automatic quick recharging.
Guide No.: Wide: Guide No. 11 (ISO 100/meter). Tele: Guide No. 13 (ISO 100/meter).
Flash effective distance: Wide: 0.9 to 4.2 meter (35.4" 13.8') (ISO 100). Tele: 0.9 to 2.7 meter (35.4"-8.9') (ISO
100).
Fill-in flash: Possible.
Flash OFF mode: Possible.
Recycle time: 3 seconds.

OTHER FEATURES:

Battery check: Yes, with LCD panel indication and shutter lock.
Film type window: Built-in.
Lens cover: Built-in.
Tripod screw: Built-in. Universal 1/4" screw.
Self-timer: Built-in for 10 sec. (electronically controlled).
LCD indications:

· Frame counter with film transport signal.
· Self-timer indication.
· Continuous mode indication.
· Fill-in flash indication (Fill-in flash Program AK).
· Flash OFF indication (Slow Program AK).
· Normal Program indication.
· Battery check indication.
· Flash recycle indication.

Strap: Attachable.
Release lock: Built-in.
Auto Shut Off: Built-in (Approx. 30 sec.).
Power source: User replaceable 2CR5, 6 volt Lithium battery.
Dimensions: 146x70x78 mm (W)x(H)x(D) Weight: 410 9 (14 ounces).

Specifications subject to change without notice.
View original page 5
Page 6 · Read text
SIMPLIFIED GUIDE FOR USING YOUR CAMERA


1. INSTALL LITHIUM BATTERY (FIG. A).

2. TURN THE MAIN SWITCH TO THE "AUTO" POSITION (FIG. B).

3. LOAD THE FILM CORRECTLY (FIG. C) AND CLOSE THE BACK DOOR.

4. BE SURE THE FRAME COUNTER ON THE LCD PANEL INDICATES "1" (FIG. D).
View original page 6
Page 7 · Read text
5. DIRECT THE MULTI AF FRAME TO WARD YOUR SUBJECT (FIG. E).

6. RELEASE THE SHUTTER BY PRESSING THE SHUTTER RELEASE GENTLY (FIG. F).

7. AUTOMATIC FILM REWINDING AT THE END OF THE ROLL. THE FRAME COUNTER WILL
SHOW "E" UPON COMPLETION (FIG. G).

8. REMOVE THE EXPOSED FILM (FIG. H).
View original page 7
Page 8 · Read text
BATTERY INSTALLATION


(1 ) Insert a pointed object such as a ball-point pen into the Battery Cover Release Hole on the bottom of the
camera and open the Battery Cover by sliding it in the direction of the arrow (Fig. 1).


(2) Place a 6 volt lithium battery (2CR-5) in the battery compartment in accordance with the positive (+) and
negative (-) marks shown inside (Fig, 2).


(3) Slide the Battery Cover back to its closed position (Fig 3).
View original page 8
Page 9 · Read text
Battery Check


(1 ) Tum the Main Switch to the "AUTO" (Auto Programmed Zoom) position (Fig. 4).


(2) The Battery check, frame counter and Auto Programmed Zoom symbol marks should appear on the LCD
panel (Fig. 5). With a fresh battery, the LCD indication should appear for 30 seconds until the automatic power
shut-off system goes into effect. Pressing the Shutter Release Button halfway, provided the main switch has not
been moved to the "off" position, will reactivate the LCD function for another 30 seconds.


(3) If nothing appears on the LCD panel, check the battery's polarity.
View original page 9
Page 10 · Read text
NOTE:

The Battery should be replaced if either of the following conditions occurs:

· The Battery check mark on the LCD panel blinks and the shutter cannot be released.

· Nothing appears on the LCD panel.

Battery life: Approximately 36-24 exposure rolls, using 50% flash (Chinon laboratory testing).

Battery Replacement

The Chinon Handyzoom incorporates a memory back-up capacitor which functions for two to three
hours even without a battery. After that, the film counter will go back to "0" even in the middle of a roll of
film. Therefore, it is recommended to replace the battery as quickly as possible to avoid losing the correct
frame number.
View original page 10
Page 11 · Read text
AUTOMATIC FILM SPEED SETTING
The film speed is automatically set when using a DX coded film of
ISO 25-1600 (Fig. 6). Non DX film will be set to ISO 25. When using reversal film (slide film), use films of
ISO 25, 50, 100, 200, 400, 1000 or 1600.

AUTOMATIC FILM LOADING
Always load and unload your camera in subdued light, and never in direct sunlight.
View original page 11
Page 12 · Read text
(1 ) Slide the Back Cover Release Button down to open the Back Cover (Fig. 7).

(2) Insert a film cartridge into the film chamber (Fig 8).


(3) Place the trimmed end of the film on the take-up spool up to the film tip mark. Make sure that the film lies
flat between the film guides. Engage the perforation of the film with the teeth of the sprocket (Fig. 9).
View original page 12
Page 13 · Read text
(4) Close the Back Cover. The film will automatically advance and "1" will appear on the LCD panel.


NOTE: If "0" is blinking on the LCD panel, the film did not advance properly (Fig. 10). Open the Back Cover
and reload the film. When placing the trimmed end of the film on the take-up spool, the length of the film
pulled out from the film cartridge should not be too long or too short relative to the film tip mark. If too much
film is pulled out from the cartridge, adjust the film length by pushing the film back into its cartridge so that the
trimmed end of the film will be precisely placed at the film tip mark.

Film Window

The Chinon Handyzoom is equipped with a convenient Film Window so that you can confirm what type of film
is being used (Fig. 11).
View original page 13
Page 14 · Read text
HOLDING THE CAMERA


· Hold the camera firmly in both hands with at least one elbow at your side to ensure camera steadiness when
taking a picture.

· Do not cover the lens, flash unit, exposure metering window or auto focus windows with your fingers. Always
press the shutter release button with a soft touch to prevent camera shake.


VIEWFINDER


1. Bright line frame

2. Multi AF frame

3. Central spot AF frame

4. Parallax marks

5. Exposure LED (red)
View original page 14
Page 15 · Read text
6. AF indicator LED (Two colors, Green/Orange)


NOTE: When taking a picture closer than 1.2 meters (3.9 ft), the image area is indicated by the two parallax
marks in the top left and top right corners of the viewfinder. Compose the photograph within the imaginary
zone extending from the corner of the parallax marks.


LCD DISPLAY PANEL


1. Auto Programmed Zoom Composing Mode

2. Self-timer Mode

3. Continuous Shooting Mode

4. Program AE Modes


  AUTO = Normal Program AE


  OFF = OFF Flash Program AE


  = Fill-in Flash Program AE

5. Frame Counter

6. Battery Checker
View original page 15
Page 16 · Read text
AUTO FOCUS SHOOTING


The Chinon Handyzoom is equipped with a unique foolproof multi-spot auto focus system where the optimum
focus distance is achieved by measuring several different spots within the range of the Multi AF frame area. In
addition, the traditional central spot auto focusing system is also readily available in the Chinon Handyzoom.
1. Multi AF frame
2. Central spot AF frame


Multi AF Mode


Normally, the camera utilizes the Multi AF mode which is effective for general shooting conditions. When the
subject is positioned off-center, this would require the use of a focus lock for conventional single spot AF
systems.

(1 ) Direct the Multi AF frame to the subject (Fig. 12).

(2) Gently press the Shutter Release Button halfway. The optimum focusing distance is determined by the
subject in the Multi AF frame area. The AF indication LED (green) in the viewfinder frame will light up (Fig.
13).

(3) Fully press the Shutter Release Button to take the photograph.
View original page 16
Page 17 · Read text
NOTE:


· The effective coverage angle of the multi autofocusing system varies with the lens focal length (Fig. 14), as
per the illustration below. In the telephoto lens setting the actual effective coverage angle is wider than the
Multi AF frame marks. However, at the wide angle setting, effective coverage will be narrower than the Multi
AF frame. Therefore, when taking a photograph of a small subject, it is recommended to point the central Spot
AF frame directly at the subject to obtain the best results.


Spot AF Mode


(1 ) Point the central Spot AF frame at the subject (Fig. 15).


(2) Press the Spot AF Button. While holding it down, press the shutter release button halfway The focus will be
locked and the AF LED (orange) on the viewfinder frame will light up (Fig. 16). Your finger can now be lifted
from the Spot AF button. The Spot AF mode will remain in effect as long as the Shutter Release Button is kept
halfway depressed.


(3) Gently press the Shutter Release Button completely to take the photograph.
View original page 17
Page 18 · Read text
Focus Lock System

This feature may be used when the main subject is located "off center" in the viewfinder.


1. Focus on the main subject (by placing the subject in the AF frame) and partially depress the shutter release
button. The AF indication LED (green) in the viewfinder will light up (Fig. 17).

2. Hold the shutter release button in the halfway position and recompose the subjects in the viewfinder and fully
depress the shutter release to take the picture (Fig. 18).


3. This focus lock feature can be cancelled by removing your finger from the release button and can be utilized
with either the multi AF or spot AF mode (Fig. 19).


NOTE:
· When a subject is too close to be autofocused, the AF indication LED signal blinks.
View original page 18
Page 19 · Read text
ZOOMING SYSTEM

The Chinon Handyzoom is equipped with the world's first Auto Programmed Zoom Composing system that
automatically selects an optimum picture composing angle based upon the dates of the subject distance and its
position relative to the camera.

A. Auto Programmed Zoom Composing


(1 ) Slide the Main Switch to the "AUTO" (Auto Programmed Zoom) position. The Auto Programmed Zoom
Composing symbol mark will appear on the LCD panel (Fig. 20).


(2) Point the Multi AF frame at the subject (Fig. 21).
View original page 19
Page 20 · Read text
(3) Press the Shutter Release Button halfway and the Handyzoom will automatically set the zoom lens to the
correct programmed focal length according to the subject composition (Fig. 22).


(4) Press the Shutter Release Button completely to take the photograph.


NOTE: The Auto Programmed Zoom Composing system is basically designed for portrait picture taking.
Therefore, when a picture with a wider perspective, such as scenery, is desired, use of the Manual Power
Zooming mode is recommended.


· When the camera is not in use, the Main Switch should be turned to the "OFF" position in order to protect the
lens system from accidental damage.

· Never push or twist the lens barrel as this may cause damage to the zoom lens.

· The zoom system will not function while the shutter release button is depressed.
View original page 20
Page 21 · Read text
B. Manual Power Zooming

When you prefer to set the zoom range yourself, use the Manual Power Zooming system.


(1) Slide the Main Switch to the "POWER" (Manual Power Zooming) position. The Auto Programmed Zoom
Composing symbol mark will disappear from the LCD panel (Fig. 23).

(2) Pressing the Manual Power Zoom Buttons (Tele or Wide) located on the bottom of the camera will change
the zoom range (Fig. 24).


(3) Select the ideal composition by pressing the Manual Power Zoom Button while looking at the subject
through the viewfinder.

(4) Press the Shutter Release Button completely to take the photograph.
View original page 21
Page 22 · Read text
NOTE: When the camera is not in use, the Main Switch should be turned to the "OFF" position in order to
protect the lens system from accidental damage. Never push or twist the lens barrel as this may cause damage to
the zoom lens. The zoom system will not function while the shutter release button is depressed.


AUTOMATIC FILM REWINDING


(1) When the roll of film is completed, a delay of from two to three seconds will occur before the
camera automatically starts rewinding the film. During the rewinding, the frame counter on the LCD panel will
count backwards.

(2) When the rewinding is completed, the motor will stop automatically and the frame counter on the LCD
panel will read "E" (Fig. 25).

(3) Push the Back Cover Release Button down to open the Back Cover and remove the cartridge from the film
chamber. Be sure the frame counter shows "E" before opening the Back Cover.

Manual Rewind

If you want to rewind the film before it has been fully exposed, push the rewind button. The camera will then
perform as it did under the "Film Rewinding" section (Fig. 26).


SELF-TIMER


The Self-timer feature allows the photographer to be In the picture.

(1 ) Place the camera on a tripod or other firm support, and direct the AF frame at the subject (Fig. 27).
View original page 22
From the M. Butkus archive. Original publisher and archive notices are retained.
Check the model and edition against your equipment.
PDF verified 2026-10-10.