Flashes & lighting
Chinon S-300 User manual
User manual for Chinon S-300. 6 pages in English. Read the original PDF, download or print a copy without registration.
6 pagesEnglish0.5 MB PDF
Loading your manual…Open PDF directly
Document details
- Brand
- Chinon
- Model / document
- Chinon S-300
- Document type
- User manual
- Language
- English
- Pages
- 6
- File size
- 0.5 MB
- Category
- Flashes & lighting
- Document date
- Not specified in catalog
Search available document text
Find a term, then jump to its page in the original PDF. Image-only pages may not be searchable; check the PDF for exact wording and diagrams.
Page 3 · Read text
Inserting the Batteries

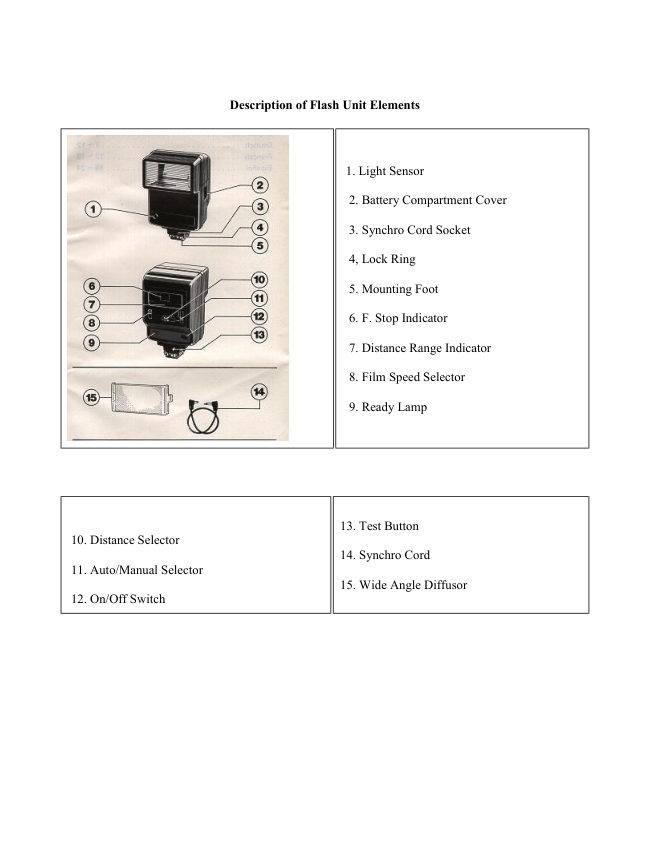
  Remove the Battery Compartment Cover (if) and insert 4 AA size batteries according to the diagram inside.
   (Caution: Incorrect insertion of the batteries will prevent proper operation of the flashgun, and may cause
                                             damage.)


                           Close the Battery Compartment Cover.

                             Attaching Your Flash to the Camera
                          Loosen the Lock Ring (4) . Insert the Mounting Foot (5) of your flash
                                into the camera's accessory shoe clip. Tighten the flash with the Lock
                             Ring.

                             Set the shutter speed of your camera to the proper setting for electronic
                                flash use, or to 1/60 seconds. (Read your camera owner's manual for
                                  details on the flash synchronization.)

                                      If your camera has a hot shoe contact, your flash is now fully
                            synchronized with the camera through the center and off center contacts
                                in the camera's shoe. In this case, the Synchro Cord is not necessary.

                                      If the camera has no hot shoe contact, use the Synchro Cord Which
                         comes with your flash unit.


                             Dedication System With CHINON Cameras

Used with Chinon CP-5, CE-5, CG-5, CE-4S or CE-4, the flash ready indicator in the viewfinder will glow
signaling the camera and flash are ready to operate when the flash is fully charged and ready to fire. Should a
long time be needed for the viewfinder signal or flash ready light to become lit (over 30 seconds), new batteries
will be needed soon.
View original page 3Page 4 · Read text
Battery Operation

Slide On/Off Switch (12) to the "On" ("B" mark) position and then F. Stop Indicator and Distance Range
Indicator will glow. In a few seconds the Ready Lamp (9) should glow, indicating the flash is ready to shoot.

Push the Test Button (A to make sure your flash unit works properly. If the flash discharges, then wait until the
Ready Lamp glows again.

                                 Manual Operation


                                                   1. Set the Film Speed Selector 8 to the position of the
                                              film speed used.

                                                   2. Set the AUTO / MANUAL Selector (11) to
                             "MANUAL" position.

                                                   3. Focus your camera and estimate (or check the lens
                                                   setting) the distance from the flash to subject and set the
                                              distance by Distance Selectors (10).

                                                   4. Read the proper F. Stop from F. Stop Indicator 6 and
                                                    set the F. Stop on your camera.

                                                   5. Aim your camera at the subject and take the picture
                                   when the Ready Lamp (9) glows.


                                    Thyristor System Automatic


                                               1. Set the Film Speed Selector (8) to the position of the
          Operation                                          fiIm speed used.

                                               2. Set AUTO/MANUAL Selector (11) to 1, 2, or 3
                                            position according to the flash range required, The
                                           distance range indicator (7) shows the maximum and
                                minimum distances for the automatic range selected.
                                          Please refer to the table below for the three automatic
                                              flash ranges,

                                               3. Set the aperture (F. Stop) of F. Stop Indicator A) on
                                       your camera.

                                               4. Focus your camera and take the picture when the
                                   Ready Lamp (9) glows.


        F - Stop setting to set your lens at, no adjustment is needed if subject is within ranges below
View original page 4Page 5 · Read text
Auto Switch Positon    ASA 100   ASA 200   ASA 400   ASA 800   Auto flash ranges

                       F - 8      F - 11       F- 16      F - 22       2.3 - 12 feet

                       F - 5.6     F - 8      F - 11      F - 16       3.3 - 18 feet

                       F - 2.8     F - 4      F - 5.6     F - 8       5 - 36 feet


                                     Auto Shut-Off

 Your flash is designed to automatically shut off the power supply to save the battery energy. When the unit is
    switched on, the F. Stop Indicator (6) and Distance Range Indicator (7) come on to indicate the start of
  charging. After some time, both indicators go off to indicate the power supply has shut-off and the charging
stopped, if the unit is not operated. The Ready Lamp (9) stays on until the charged energy runs out. You can fire
 your unit as long as the Ready Lamp is on, and the unit, if fired, resets to the original state. A short push of the
 On/Off switch (Reset Button) (12) will also charge the unit again. (if neither the Ready Lamp nor the F. Stop
     Indicator come on after the On/Off switch is turned on, push the On/Off Switch to reset the flash unit.)

                                  Bounce Photography
(this unit will not tilt or swivel, this is if you are able to have it off the camera with the flash sync cord attached)
 Use bounce flash when you wish to achieve a softer effect and to eliminate the shadow on your subject. When
 taking flash pictures indoors, bounce the light off the white or reflective colored walls, ceiling or reflective flat
                                                     surfaces.

 For bounce photography, it is very important to remember that the automatic flash range should refer the total
                                    distance of flash to reflector to subject.

                        Hints for Maintenance and Better Flash Photography


                          The use of flash eliminates squinting and shadows and help bring out
                                  natural facial expressions on the subject. When taking pictures, against
                                highly reflective surfaces like mirrors, glass or glittering water, use
                               automatic operation.

                       When not in use, switch the unit off. Take the batteries out when the
                                   flash unit is being stored or when it will be carried for a long time. Keep
                              your flash unit away from dust and moisture to prolong its life.

                      Do not try to open or repair your flash unit since the electric circuit
                                  inside carries a high voltage. If your flash needs repair or does not work
                                    correctly, take it to where you bought it from. Opening the unit voids the
                                warranty.
View original page 5From the M. Butkus archive. Original publisher and archive notices are retained.
Check the model and edition against your equipment.
PDF verified 2026-10-10.