Film cameras
Ricoh LX-22 User manual
User manual for Ricoh LX-22. 13 pages in English. Read the original PDF, download or print a copy without registration.
13 pagesEnglish1.8 MB PDF
Loading your manual…Open PDF directly
Document details
- Brand
- Ricoh
- Model / document
- Ricoh LX-22
- Document type
- User manual
- Language
- English
- Pages
- 13
- File size
- 1.8 MB
- Category
- Film cameras
- Document date
- Not specified in catalog
Search available document text
Find a term, then jump to its page in the original PDF. Image-only pages may not be searchable; check the PDF for exact wording and diagrams.
Page 2 · Read text
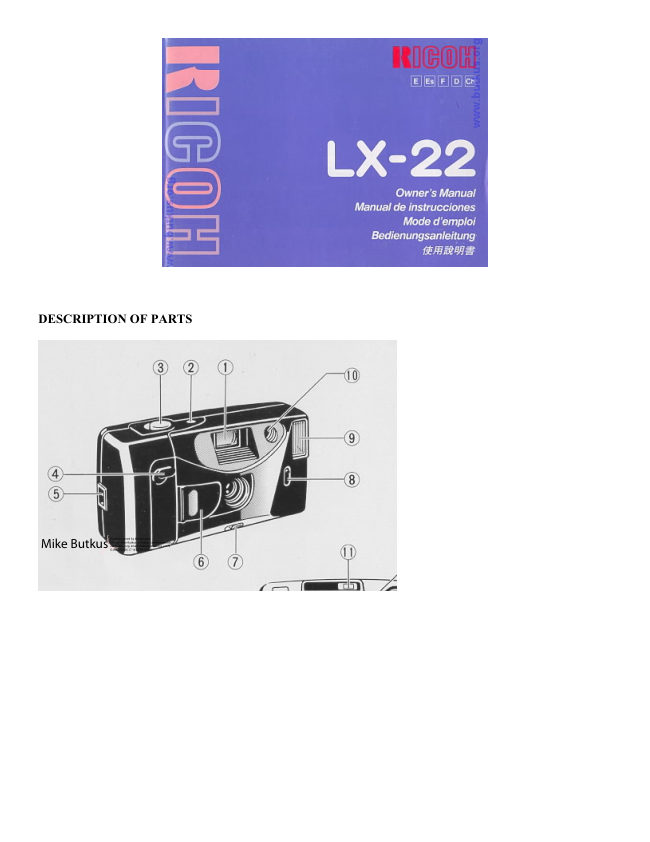
DESCRIPTION OF PARTS


                                                             Digitally signed by Mike Butkus
                                              DN: cn=Mike Butkus, o=Butkus camera manuals,
                                                   ou=butkus.org, email=mike@butkus.org, c=USMike Butkus  Date: 2023.05.17 14:55:29 -04'00'
View original page 2Page 3 · Read text
www.butkus.us


CONTENTS


Locating the controls ....................12                 Taking a picture ........14

Attaching the strap ...........12                          Flash photography 15

Inserting the battery ..... 2                          Rewinding the film (auto reverse)............

Opening the lens cover ...                           Using the Self-Timer........
Checking the battery........
                                                       (Optional) Databack settings .............15
Setting the film speed............................
                                                    Proper care of your camera............
Loading the film..........
                                                         Specifications .............18
Holding your camera
View original page 3Page 4 · Read text
We are most gratified that you have selected a RICOH camera. Before using your camera, please be sure

We suggest that you become familiar with your new camera by shooting and processing at least one roll of film
before using your camera to record an important occasion


LOCATING THE CONTROLS


1. Viewfinder
                                   14. Manual Film Rewind Switch
2. Film Counter Window
                                   15. Film Guides
3. Shutter Release Button
                                   16. Tripod Socket
4. Self-Timer Lever
                                   17. Film Rewind Shaft
5. Strap Holder
                                   18. Battery Compartment Cover
6. Lens Cover
                                   19. Battery Compartment Latch
7. Infinity Switch
                                   20. Back Cover
8. Film Speed Selector
                                   21. Film Loaded Window
9. Flash Unit
                                   22. Film Chamber
10. Photocell
                                   23. Sprocket
11. Viewfinder Eyepiece
                                   24. Film Counter Switch
12. Back Cover Latch

13. Film Take-up Spool


ATTACHING THE STRAP

1. Insert the small loop at the end of the Strap under the Strap Holder. (Fig. 1)

2. Insert the other end of the Strap through the loop to tie the Strap onto the Strap Holder. (Fig. 2)
View original page 4Page 5 · Read text
www.butkus.us


INSERTING THE BATTERY

1. Push the Battery Compartment Latch to pull open Battery Compartment Cover. (Fig. 3)

2. Insert two AA-size batteries (Alkaline or Manganese) following the polarity information inside the Battery
Compartment. (Fig. 4)

3. Close the Cover by pushing it shut until it latches. (Fig. 5)

* Do not use Nickel Cadmium batteries.

* Remove AA batteries from the camera when you do not expect to use it for a long period time.

* With fresh batteries, the green LED lights when the shutter is depressed halfway. Replace the batteries when
the green LED takes more than 30 seconds to light.

* In cold conditions the capacity of the battery decreases, and the camera may not operate correctly. In that
case, you should warm the battery (carry them in your pocket for example) before using the camera.

OPENING THE LENS COVER

1. Slide the Lens Cover in the direction of the arrow. (Fig. 6)

2. The Lens Cover is interlocked with the safety mechanism of the camera. You can fire the camera only when
the Lens Cover is completely open.
View original page 5
Page 6 · Read text
CHECKING THE BATTERY

1. Open the lens cover. Wait a moment and then depress the Shutter Release Button halfway. The batteries are
OK when the Recharge Complete Monitor (green LED) lights. (Fig. 7)

2. With fresh batteries, the green LED lights about six seconds after the Shutter Release Button has been
depressed halfway. This will take longer if the batteries are worn out. In such a case. replace with new batteries.

SETTING THE FILM SPEED

1. Slide the Film Speed Selector to the closest ISO number according to the film speed indicated on the outside
of the film. (Fig. 8)

2. Applicable Films (Fig. 9): ISO 100--ISO 1000 It's recommended you use color negative films. Color slide
films may be improperly exposed under varying lighting conditions.

LOADING THE FILM

1. Push the Back Cover Latch downward. (Fig. 10)

2. Load the film into the Film Chamber, pull out the film leader, press the film container's outlet so that the
surface becomes level with the rail surface, and place the film reader over the Film Leader Mark. (Fig. 11)


1. Film Counter Switch
2. Sprocket
3. Film Guides
View original page 6
Page 7 · Read text
www.butkus.us

3. Line up the film within the Film Guides. Make sure that there is no slack in the film and that the edge of the
film stays over the Film Counter Switch. Then press the Back Cover shut. (Fig. 12)

4. Press the Shutter Release Button once. The film will be automatically advanced until number "1" appears in
the Film Counter Window. If number "1" does not appear, or the film transport motor does not stop, the film
has not advanced correctly. Open the camera back and repeat the loading process. (Fig. 13)

5. The Film Loaded Window confirms whether film is in the camera or not, and shows you what type of film is
being used. (Fig. 14)

HOLDING YOUR CAMERA

1. Always use both hands to steady your camera. (Figs. 15, 16)

* When holding the camera vertically, always position it with the flash at the top.

* Be careful not to place your fingers over the lens, flash or focusing windows. (Fig. 17)

TAKING A PICTURE


1. Be sure your subject is at least 1 m (3 R.) away from the camera. (Fig. 18)

2. Take pictures with sunlight behind you. (Fig. 19)

3. The camera takes beautiful pictures outdoors at any focusing distance greater than 1 m (3 If.) simply pressing
the shutter. For distant subjects, the image will be clearer if the Infinity Switch is held while the shutter is
pressed. The Infinity Switch is the small gray lever on the front of the camera. (Fig. 20)
View original page 7
Page 8 · Read text
FLASH PHOTOGRAPHY

When the Shutter Release Button is pressed halfway and the green LED lights up, when the green LED is lit,
the flash is fully charged and it is possible to take pictures with the Flash.

After you have taken a picture with the Flash, and you want to take one more picture using the Flash, wait until
the green LED lights, after depressing the Shutter Release Button halfway.

* Be careful not to put your finger in front of the flash window.

* If the green LED is not lit, the Shutter will be released but the Flash unit will not fire.

Flash Photography Distance

Shooting Range: 1--about 3.0 m

* If the Shutter Release Button is kept pressed halfway down before the Flash Ready Lamp comes on, the flash
will not fully charge.

* You can also use the Flash Unit as a fill-in light for daytime photography. Momentarily cover the photocell
with your hand and press the Shutter Release Button. Then the Flash Unit will fire.

REWINDING THE FILM

1. After the end of the film has been reached, the film will be automatically rewound.

2. After the film is fully rewound, the motor stops automatically and the "S" is seen in the Film Counter. (Fig.
21)

3. Open the Back Cover to remove the film cassette.

4. If you wish to rewind the film before the end of roll is reached, push the Manual Film Rewind Switch with a
ball point pen, etc. (Fig. 22)

USING THE SELF-TIMER

1. Move the Self-Timer Lever in the direction shown by the arrow. (Fig. 23)

2. Push the Shutter Release Button down completely. The Self-Timer Lever will start to move and the shutter
will be released about 10 seconds after activation.

* The self-timer cannot be cancelled after it has been activated.
View original page 8
Page 9 · Read text
www.butkus.us


Even if the Self-Timer Lever is returned after starting, the shutter will be released when the lever is returned.
Even if the Lens Cover is closed after starting the self-timer, the timer cannot be cancelled and the shutter will
be released about 10 seconds after activation.


(OPTIONAL) DATABACK SETTINGS

Nomenclature of the date imprinting feature (Fig. 24)

1. Display panel
2. Month indication
3. Imprint mark
4. Set button
5. Selector button
6. Mode selector button

Imprinting mode
Examples of date imprinting (Fig. 25)

1. 1992 February
2. 1st 15:59
3.No imprinting
4. February 1st, 1992
5. 1st February, 1992

The date imprinting mode can be divided into 5 types date, time, and no imprinting.

Selecting imprinting mode (For 25)
View original page 9
Page 10 · Read text
Each time the Mode selector button is pressed, the display changes as shown below.

1. Date (Year/month/day)
2. Time (Day/hour/minute)
3. No imprinting
4. Date (Month/day/year)
5. Date (Day/month/year)

Checking imprinting

After shooting, the imprint mark--flickers in the display panel for a few seconds for correct imprinting.

The mark and the letter "M" are not imprinted on the picture.

Resetting the date and time (Fig. 26A--C)

1. Each time the Selector button is pressed, the flashing digits change in the order of year, month, day, hour,
minute and colon (:).

2. When the digits to be reset flash, press the Set button until the desired digits appear. When the Set button is
kept pressed, the digits change rapidly.

Accurately setting seconds (Fig. 27A--C)

1. Press the Mode selector button for Time display mode.

2. Press the Selector button so that the colon (:) flickers.

3 Press the Set button according to the radio or telephone time signal. The time count starts from 0 seconds.

* It is recommended that the second digits be adjusted after adjusting the minute digits.
View original page 10
Page 11 · Read text
www.butkus.us


Battery Replacement ( Fig. 27D)

1. Open the back cover.

2. Remove the screw from the databack battery compartment cover with a small (+) screwdriver

3. Remove the battery compartment cover holding the roller section, and lift up the battery.

4. Load the new battery with the side marked (+) facing upwards. Then, close the battery compartment cover
using the (+) screwdriver (Use lithium battery CR2025. The service life is about 3 years.)

* When the battery is exhausted, the imprinted digits become faint. At that time, replace the battery.

* Do not open the date battery compartment lid except when replacing the battery.

* Keep the battery out of reach of children. If a child swallows the battery, contact your doctor immediately.


Notes on date imprinting feature

* At temperatures below 0°C (32~F), the battery performance deteriorates. The date imprinting feature may not
function correctly and imprinting may become impossible.

* When the battery is replaced, the display panel sometimes shows wrong digits. Reset the digits for correct
indication.

* The date is sometimes illegible ff it is imprinted on the following objects.
View original page 11
Page 12 · Read text
(1) "Warm"-colored objects, such as red, yellow, orange. etc.

(2) Objects with details similar in size to the imprinted date (gravel, leaves, etc.)

(3) Objects of high luminance (sky, white wall, etc )

* Imprinting is not possible in the following modes. (1) Print off mode (2) Reset mode

PROPER CARE OF YOUR CAMERA

* If there is dirt on the lens, do not touch with fingers. Use a blower to blow the dust away, or wipe the surface
gently with a soft cloth. (Fig. 28)

* Camera malfunction can be caused by shock humidity, salt etc. After using the camera at the beach or places
where there are chemicals, wipe it carefully. (Fig. 29)

* Take care not to expose the camera to sudden changes in temperature, as they may cause malfunction. (Fig.
30)

* Do not expose the camera for a long period of time in extremely high temperatures, such as in your car or on
the beach, as this may cause malfunction. (Fig. 31)

* When using a tripod, do not try to force a long screw into the socket. The screw length should be less than 5.7
mm (1/4"). (Fig. 32)

* Do not place the camera near equipment that has strong magnetic fields such as a television or radio. (Fig. 33)

MAJOR SPECIFICATIONS

Lens: 35 mm/F4.5 lens 3 groups, 3 elements

Focusing: Fixed Focus with Infinity Switch
         Distance 1 m--00

Shutter: Mechanical Shutter, 1/125 sec.

Self-timer: Approx. delay 10 sec.

Viewfinder: Reverse Galilean Viewfinder 0.52X

Film speeds: ISO 100, 200, 400, 1000 setting switch, ISO can be seen through the back cover window

Film loading: Ricoh auto-load system

Film advance: Automatic advance

Film rewind: Automatic rewind at the end of roll, Manual rewind is possible

Exposure counter: Additive, automatic resets to "S" when the camera back is opened
View original page 12Page 13 · Read text
www.butkus.us

Built in flash: Automatic sensor flash
     Flash recycling time: Approx. 6 sec.

Flash shooting range: 1 m--approx. 3 m

Power source: 2XAA penlight batteries (Ni-cad battery cannot be used)

Dimensions: 132 (W) X68 (H) X50 (D) mm

Weight: Approx. 2359 (without Battery)

* Specifications are subject to change without notice.
View original page 13Related documents and language editions
From the M. Butkus archive. Original publisher and archive notices are retained.
Check the model and edition against your equipment.
PDF verified 2026-10-10.