Film cameras
Adox Golf User manual
User manual for Adox Golf. 10 pages in English. Read the original PDF, download or print a copy without registration.
10 pagesEnglish2.3 MB PDF

Loading your manual…Open PDF directly
Document details
- Brand
- Adox
- Model / document
- Adox Golf
- Document type
- User manual
- Language
- English
- Pages
- 10
- File size
- 2.3 MB
- Category
- Film cameras
- Document date
- Not specified in catalog
Search available document text
Find a term, then jump to its page in the original PDF. Image-only pages may not be searchable; check the PDF for exact wording and diagrams.
Page 1 · Read text
www.butkus.us
ALL ABOUT
YOUR NEW CAMERA


                 A cumero of distinction

AD0X F0T0WERKE DR. C. SCHTEUSSNTR G[{BH
View original page 1Page 2 · Read text
WELL DONE!
   Congrotulotions on your choice of comero!
  Now you ore one of the ever-growing circle
   of ADOX comero enthusiosts.
   Before you rush out ond stort toking pictures,
  moy we iust run through o few points to
   fomiliorize you with the vorious feotures of
  your comero, so thot you con use it with
   confidence on every occosion. Here, in brief,
    is oll the informotion you need:


Mike Butkus   Digitally                                              DN:ou=butkus.org,Date:cn=Mike2022.05.26signedButkus,email=mike@butkus.org,by11:21:45Mikeo=ButkusButkus-04'00'camera manuals,c=US


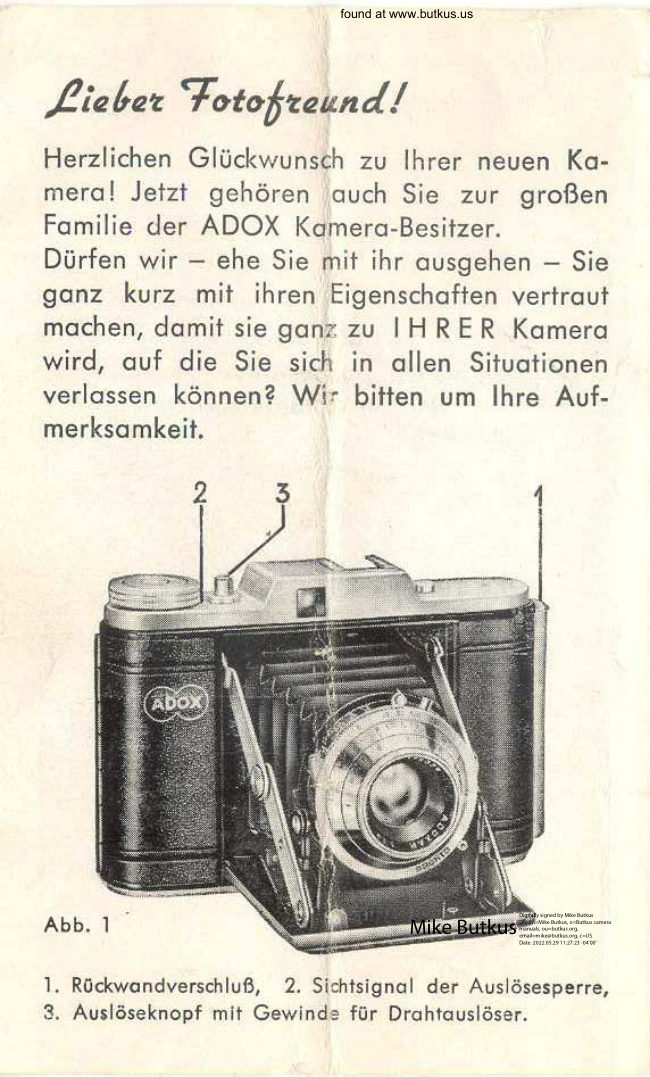
   1. Locking cotch for comero bock 2. Visuol signol of
   double exposure prevention  3. Releose knob with threod
   for coble releose.
View original page 2Page 3 · Read text
www.butkus.us  Your ADOX GOLF 63 (63 S,45 S) is o roll
   film comero ond tokes twelve 21/l' squore                            .|20   pictures (6x6 cm) on      roll film. Whot fi!m
   should you use? Ask for ADOX R 2l in winter,
  ond in summer for ADOX R 17 - then you
   connot go wrong.

  TOADING THE CAMERA
  To open the comero, pull out the locking
   cotch (1). Pull the pivoted spool holder up-
  words (see fig. 2) ond slip the unopened roll
   film into the spool chomber next to the lock-
   ing cotch. The empty spool goes into the


                                        Abb. 2

   other chomber in exoctly the some woy. Moke
  sure thot the key of the film wind knob
  engoges firmly with the slotted end of the
   spool. Then only breok the seol of the film
, ond threod the pointed end of the bocking
  poper into the long slit in the empty spool.
  Now turn the film wind knob in the direction
   of the orrow until the bocking poper becomes
View original page 3Page 4 · Read text
Venmo @mike-butkus-camera  Ph. 2083
PayPal Name  Lynn@butkus.org      www.PayPal.me/lynnbutkus
View original page 4
Page 5 · Read text
tout (see fig. 3). Close the bock ond continue
  winding on the film until the figure t'1"
  oppeors in the red film window. Are you
  reody? Then let's hove o go ot
  "Exposure No.  l "
   Turn the distonce
   setting ring (4)
    until the required
   distonce oppeors
  under the
  diomond mork Q
  The shutter speed
    is set by moving
   the nnilled ring
   until the desired speed oppeors obove the
  diomond mork. Now set the operture with
   lever (5), ond finolly cock the shutter by mov-
  ing lever (6) to the right. Now press the
                                                       (3) . .  .   releose knob, gently, not with o ierk
   click - ond it's in the bog!  ln oll the excitement of toking your first
   picture, do not forget to wind the film on
   until the  f igure "2" oppeors in the  f ilm window.
   But don't worry if you hoven't, nothing con
  go wrong; the double-exposure prevention
                             exposures, thot is,'  lock eliminotes oll double   oll two-on-one picture. lf the visuol signol
  of the double exposure prevention (2) shows
  RED, the film hos been wound on one frome

      l
View original page 5Page 6 · Read text
ond you con moke o  secondwww.butkus.usexposure,
   PROVIDED YOU HAVE TENSIONED THE
    SH UTTE R.


      4. Distonce setting
          ring
      5. Diophrogm setting
          lever
      6. Shutter tensioning
          lever
      7. Flosh contoct
   8 5n -,ile;  : ;.c:J
          setting ring
                                                          fis. 4
   A SNAPSHOT
   When toking o reol condid shot there  is
    never enough time to set the distonce cor-
      rectly. How often the "right moment" is over
    ond gone before we ore reody. But with the
   GOLF 63, 63 S, or 45 S, you cqn set the lens in
    odvonce for condid snopshooting.  lt is quite
    eosy: stop down the lens to  f :l I ond set the
    distonce ring to the red dot between 8 feet
   ond l0 feet (2.5 m ond 3 m). By doing this,
    everything between 6 feet ond 13 feet (2                                 ^    ond 4 m) will come out shorp.
{
View original page 6Page 7 · Read text
lf you use the some stop f:ll  but set the
   distonce to the red dot between 20 feet ond
  30 feet (6 m ond '10 m), everything between
  l3 feef (4 m) ond "infinity" will be shorp.
  Nothing could be simpler! Whot's more,
  every shot will be o winner!

  INDOOR EXPOSURES
  Why not? The GOLF 63 (63 S, 45 S) toke them
   in their stride. The shutter speed setting ring
   (8) shows the exposure times for instontoneous
   shots:
       25 :  1/25 second
       50 :  1i50 second
           ' 20v :   i/200 second
       100 -  l/100 second GOLF 63 S ond                    GOLF 45 S only)
  These exposure times will be too short for
  indoor shots, but why not moke o brief time                             nB"  exposure? The shutter is set to    ond the
  coble releose screwed into the releose knob
   (3). Now, if you press the plunger of the
  coble releose, the shutter will open ond
  remoin open until the pressure is releosed.
. Of course, time exposures should be mode
  from o tripod. Even the most experienced
  omoteur connot hold the comero still for
  fonger thon 1/25 second, so it goes without
View original page 7Page 8 · Read text
www.butkus.us  soying thot indoor time exposures losting
  perhops for severol seconds must be mode
  from o tripod.
  PICTURES BY FTASHTIGHT
  The GOLF 63, 63 S ond 45 S ore iust mode for
  them. The floshgun is slipped into the occes-
  sory shoe ond the leod plugged into the
  flosh contoct (Z). Set the shutter speed setting
  ring to l/25 second ond you ore oll set for
  modern flosh photogrophy. You will find the
  right stop ond distqnce settings on the
  pockoges of Philips copless PF I bulbs or
  G. E. C. No. I bulbs. These flqshbulbs con be
  tirc;orntrly recommended the;, ore both eco-
  nomicol ond relioble. Of course, you con
  olso use your GOLF 63 (63 S ond 45 S) comero
  with on electronic floshgun.
 SHOTS WITH THE SELF.TIMEh
   lf you ore proud owner of o GOLF 63 S, or
 GOLF 45 S, you will noturolly wont to be in
 the picture yourself sometimes. Once you
  hove wound on the film ond set the shutter,
  then cock the little red lever under the shutter.
  Use o tripod, then. When you press the rele-
, ose knob, you will heor o bvzzing sound ond
  the shutter will be releosed ofter obout 10
  seconds, giving you plenty of time to toke up
  your pose.
View original page 8
Page 9 · Read text
f
 I   AFTER THE LAST EXPOSURE  . . .
    l'  wind the film on until the film window
    becomes dork.
   CARE! Before removing the film, seol it with
    the sticker provided to prevent the film from
    unwinding ond becoming fogged. To reduce
   ony risk of fogging, it is better to lood ond
    unfood the comero in the shode.
    There's nothing left to soy except to wish
   you the best of luck with your first film.
  We hope thot we hove been successful in              'the    exploining     most importont feotures of
    your cornb.o. Once you hove used it for o
   whole summer ond winter, you will hove
     irorrr.:d q,.rite o rru,rber of new possib-iiities
   ond techniques; but these only experience
   con teoch you.
    But now we hove soid enough -  let your


{
    toke over.
I


     Printed in Germony.                D]60 e lll/58/10 StI
I
View original page 9Page 10 · Read text
www.butkus.us
ALL ABOUT
YOUR NE\N CAMERA

                         kl*jlqmb    3t.
                                                     'S.ffia.,t     ffid""@: ru


    W


                 A csmero of distinction

AD()X FOTOWERKE DR. C. SCHTEUSSNER GMBH
View original page 10Related documents and language editions
From the M. Butkus archive. Original publisher and archive notices are retained.
Check the model and edition against your equipment.
PDF verified 2026-10-10.