Film cameras
Agfa Recorder I - II User manual
User manual for Agfa Recorder I - II. 20 pages in English. Read the original PDF, download or print a copy without registration.
20 pagesEnglish1.2 MB PDF
Loading your manual…Open PDF directly
Document details
- Brand
- Agfa
- Model / document
- Agfa Recorder I - II
- Document type
- User manual
- Language
- English
- Pages
- 20
- File size
- 1.2 MB
- Category
- Film cameras
- Document date
- Not specified in catalog
Search available document text
Find a term, then jump to its page in the original PDF. Image-only pages may not be searchable; check the PDF for exact wording and diagrams.
Page 2 · Read text
Translated via Google after OCR. This was very
difficult and the translation is not perfect.

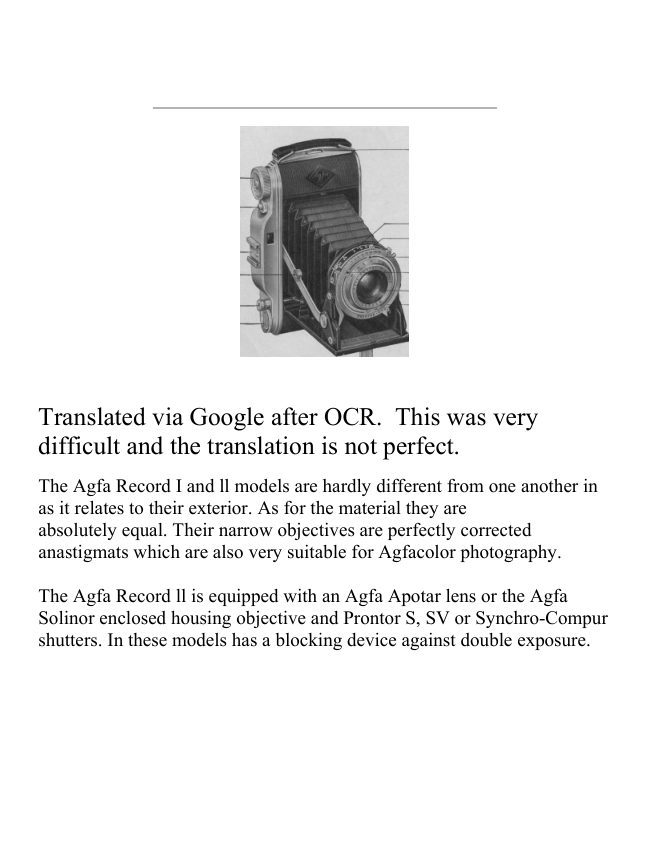
The Agfa Record I and ll models are hardly different from one another in
as it relates to their exterior. As for the material they are
absolutely equal. Their narrow objectives are perfectly corrected
anastigmats which are also very suitable for Agfacolor photography.

The Agfa Record ll is equipped with an Agfa Apotar lens or the Agfa
Solinor enclosed housing objective and Prontor S, SV or Synchro-Compur
shutters. In these models has a blocking device against double exposure.
View original page 2
Page 3 · Read text
1. Film advance button
                                          2. Close button
                                          3. Slide for accessories
                                          4. articulated scissors (to
                                open and close the device)
                                          5. Trigger button and
                                           splitter-signal of blockage
                                      of the film (Record ll)
                                          6. Depth of field ring
                                          7. Camera back lock
                                          8. Diaphragm scale
                                          9. Shutter cocking lever
                                      10. Exposure time
                                         registration mark
                                      11. Distance setting marker
                                      12. Ring or focus of
                                       distances
                                      13. Exposure time ring
                                      14. Support for wide shots
                                      15. Support for overhead
                                      shots


To open the camera back:
Push the lock under the belt in the direction of the
arrow. Open the back of the device.

To load the 6x9 B2 (120) film camera
Never change the device in direct sunlight, but
only in dim daylight.
Tilt the spool holder and pull out the tab of guide.
The empty spool should be in its housing next to
the belt.
View original page 3Page 4 · Read text
When you press the close button (number 2, page
                        2) the lens holder slides forward and engages
                          bootie. It is appropriate, for this maneuver, to
                          incline the back slightly forward. it is sometimes
                        necessary, e.g. when the appliance has been at
                              rest, to help a little with the hand this setting until
                         the fastening clicks.

                    The advantage of the Agfa Record I is that scissor
                       device resides in its setting in the blink of an eye.
                    The careful construction of the scissors ensures a
                          particularly robust stability of the lens holder.


Place the full spool on the fixed trunnion, fold the movable leg and retract the spool
holder.
View original page 4Page 5 · Read text
Not correct


Insert the reel of film in such a way that the
pointed end of the protective paper is directed
towards the empty spool.

Open the sticky tape and remove it carefully,
pull the protective paper and slip the tip of it the
longest slot of the empty spool.


                         Turn film drive
                               bolt to tighten the
                             paper; adjust the
                             paper, pushing it
                              properly, so that
                              the tape rolls up
                              quite exactly - that
                                    is to say without
                                 letting in light -
                         between the two
                           edges of the empty
                              spool.
View original page 5Page 6 · Read text
Press hard, two hands the back of the
                     device until we hear the closing click.


Tilt sideways the prolector volel of the window of film control. Turn the
drive knob until the preliminary signals appears
(points, hands or arrows) and stop when it comes to the number 1. The
film is then ready for the premiere shooting.


Viewfinder.
Closer to the eye the optical viewfinder
in such a way that the field of its anterior lens
is visible up to the corners.

Way to hold the camera for the pictures in
length...
Find a position quite stable. Hold the device
right: don't tilt it in any direction.
Press down on the release button of the box,
regularly and
without haste, with the index finger of the
right hand.


PG 7
View original page 6Page 7 · Read text
. . and for height images
                           Operate by weighing gently with the thumb
                             of
                              the lower right, on the trigger button.
                    Do not weigh in spurts, to avoid pictures
                           <aspen>.
                        Always press the trigger all the way!


.

page 8

                      Method of closing the device:
                       Weigh with two fingers from top to bottom
                        on lens holder scissors;
                             pressure on the closed button of the device
                         and you should hear the click of closing.

                             Attention!
                            Set the distance to infinity and remove the
                           yellow screen and the flexible trigger. Before
                             closing the appliance, re-enter the small
                            support (14 page 2) fixed on the flap, if it has
                          been used.
View original page 7Page 8 · Read text
To unload the camera:
After the last (8th) shooting, continue to turn the button film drive until the
end of the
protective paper from the reel passes in front of the window.
Open the back of the device. Exit completely the training button. Carefully
pull out the full spool - the paper should not unroll - fold the end of the
popier, glue it and wrap the film in such a way that it is protected
against the light.

Place the empty spool in the housing next to the belt, the end to the axis
split rotates on the side of the drive button.


Page 9
Some tips from the manufacturer
A photographic device is a particularly trained in optics and mechanics precision,
which must be properly monitored.
Before taking the first shot, we should be familiarized with how to use it.

The Agfa Record ll is equipped with a blocking device which surely prevents any
double exposure.
Thanks to the red sign of the small window next to the trigger (page 2, number 5),
you can see that the exhibition is already done and that we must move forward the
film. If you only start it just before taking next, there will be no triggering by
inadvertence and an error cannot occur from a careful operator. As for the
instantaneous hunter, who knows his opponent, he will proceed as he has the habit,
because above all he wants to be always ready to (conquer) a scene.
View original page 8
Page 9 · Read text
You should also know what the errors are that we can do. If you weigh once on the
shutter release of the case by opening the device - it need some <address> to do it -
the trigger no longer works.

What fair? First close the device. The trigger is blocked. We could remove this
blockage by advancing the film, but then
you lose that portion of film. In this exceptional case, trigger using the trigger hose
that attaches to thread 10 (page 12) or
polished lever 6 (see pages 12 - 13) emerging from the shutter.
However, you have to do it a little delicately and do not put your fingers in front of
the lens.

With the Agfa Record I it is easy to remedy this by closing the device again and
open it again correctly.

Always observe: Never press the shutter button when opening the camera!

Pg 10
It goes without saying that you must always think, before to close the flap, to
remove the release flexible cable, the filter, etc. Rotate the front lens on infinity.
The shutter is a very fine clockwork mechanism with the finest precision. Do not
arm it on principle just before shooting. He shouldn't ever happen that a camera is
stowed with the shutter cocked.
It is also necessary to adjust the exposure time before cock the shutter; this point is
particularly important for very short exposure times.
By turning the knurled ring, you can feel how much the tension of the spring for a
time of exposure of 1/500 of a second.

Device maintenance
Careful maintenance prolongs the life of the camera.
Protect it from dust and unnecessary exposure prolonged in the sun's rays. Before
there
introduce a new film, make sure the inside of the camera and the lens do not contain
dust or foreign bodies.
An optical instrument of this high quality must be constantly kept very clean. We
will therefore avoid
to touch the lenses and we will immediately remove any fingerprints or smudges.
For cleaning, use only a chamois cloth or a soft linen cloth, which should be
View original page 9
Page 10 · Read text
absolutely dust-free and grease-free
or soap. Take the rag on the tip of a finger or a small piece of wood, but never on a
metallic object. There is no downside to
blow breath on the surface of the lenses to clean more easily. On the other hand,
never disassemble the lens, which should only be done by
a specialist.

Pg 11


                         SHUTTERS

                               Agfa Record I
                                   with shutter Pronto or Vario


Pronto                     Vario
Speed: B, 25, 50, 100, 200
                                           Speed: B, 25, 50, 200
Distances
                                             Distances (meters): 1 - 1.2 - 1.5 - 1.7 - 2 - 2.5 - 3 - 4
(meters): 1 - 1.2 - 1.5 - 1.7 - 2 - 2.5 - 3 - 4 -
                                                          - 6 - 10 - oo
6 - 10 - oo
                                         Diaphragm: 4.5 5.6 (6.3) 8 11 16 22
Diaphragm: 4.5 5.6 (6.3) 8 11 16 22


1. Exposure time setting mark: Turn the knurled outer ring.
2. Shutter cocking lever: Cock before each shot, also for B.
3. Distance adjustment mark: Turn the front lens.
4. Diaphragm lever.
5. Synchronized flash socket 0 3 mm.
6. Automatic trigger (for Pronto only). Delay: about 7 seconds. (Can't be used in
"B".)
 1. Cock the shutter.
 2. Arm the lever (6) of the automatic release.
View original page 10Page 11 · Read text
3. Trigger by pressing the trigger button.
7. Socket for cable release.
Diameters of usable filters: Vario 6.3 = 30mm. Pronto 4.5 = 37mm.
The figures indicated on the knurled ring of the shutter indicating fractions of a
second, e.g. ex. 25 = 1/25 of a second, 50 = 1/50 of a second.

Pg 12


                                  Agfa Recorder II with

                                        Prontor S - Prontor SV
                                       Synchronisio integro
                                     Speed: B, 1, 2, 5, 10, 25, 50, 100, 250


                                  Agfa Recorder II with

                                  Synchro-Compur
                                       Synchronisio integro
                                     Speed: B,1, 2, 5, 10, 25, 50, 100, 250, 500
                                       Distances (meters): 1 - 1.2 - 1.5 - 1.7 - 2 -
                                         2.5 - 3 - 4 - 6 - 10 - oo


Agfa Record ll

1. Shutter cocking lever: Cock the shutter, before each shot, up to the stop (also for
“B”).
2. Self-timer lever (and synchronization for Prontor SV), unusable in position B and
I/500 - delay about 7 seconds.
View original page 11Page 12 · Read text
Continuation of manipulations:
  1° Arm the shutter.
  2° Arm the retarder; for the Compur, after pushing button 2 arms lever 1 again.
  3° Trigger.
3. Exposure time setting mark - turn the outer knurled ring; the mark indicates the
chosen time.
4. Front lens frame.
5. Distance adjustment mark: Turn the desired distance.
6. Shutter release lever.
7. Lever controlling X or M synchronization (for Prontor SV and Synchro-Compur
only).
8. Flash socket; diameter 3mm.
9. Scale and aperture adjustment lever.
10. Socket for flexible trigger.
11. Reference points for X or M synchronization (Prontor SV).
  For indications 2, 7 and 11, see the following pages.

Pg 14

FLASHING TECHNIQUE WITH AGFA CAMERAS - (these are flash bulbs,
no electronic)

The different flash lamps obtained on the market are distinguished: by the lighting
time, by their intensity of light and by the time
which flows between the contact and the ignition of the lamp.
Integrally synchronized shutters are adapted to these different properties.
With fixed focus synchronization (Shutter and Vario, Pronto and Prontor S)
the lighting of the lamp takes place at the moment of maximum opening of the
sectors of the shutter.
But its use is restricted to low speeds, e.g. ex.1/25 sec. This is called X
synchronization use, in addition to this synchronization X, the synchronization M.
Unlike synchronization X, which is fixed, we can, by the synchronization M, delay
the opening of the shutter by a few thousandths of a
second and thus use the flash technique with the highest speeds.

Table 1 gives all the necessary information regarding the position of the synchro
lever for X and M synchronization with or without use of the self-timer.
For shots without flash the position of the synchro lever is indifferent - except for
one exception - if you want to use the self-timer with the Prontor SV shutter, you
View original page 12
Page 13 · Read text
must ensure that the synchro lever 7 is in the red X position, otherwise the
movement for
delay does not work.
For flash photography, the exposure time must be chosen according to the
distance from subject and type of flashlamp used. Refer to the instructions for use
which
found with the flashlight.

Table 2 gives all the necessary indications for the adjustment of the lever and speed,
for X and M synchronization, depending on the types of lamps most
currents.

PG 15


            Lever positions for flash shots In any case, the cable plug must be connected at flash socket 8


Shutter                     X Sync              M Sync


                              No switching
Vario                                                              Not possible
                                           leverage


Pronto without and with time delay        Automatic ignition of the flash      Not possible


Pronto S without and with time delay       Cable connection - see above       Not possible


                                                                      Synchro 7 lever on yellow dot tip.
Prontor SV with self timer               Synchro lever 7 on Red X
                                                       Arm at end of stroke delay lever 2


                          Synchro lever 7 on red X. Arm at end of stroke      With synchronization delay M not
Prontor SV without delay
                            delay lever 2                                        possible


Synchro-Compur without
                          Synchro Lever 7 of X                           Synchro lever 7 on M X
delay


Synchro-Compur with       Synchro lever 7 on X, push back button 2 and       With synchronization delay M not
delay                       continue cocking                                    possible


                                   See shutter illustrations - pages 11-13
View original page 13Page 15 · Read text
Depth of field without any calculation

The depth of field is the extent in depth of the zone of perfect sharpness of the
image since
in front to the bottom of the motif to be photographed.
In front of the point on which the distance is set, the zone of sharpness is less deep
than behind this point.

When focusing on a near object, the area of sharpness is less than when focusing
takes place at a point located at a greater distance.


                         High light intensity, bright but low
                            depth of field.
Large diaphragm p. ex. 4.5
=


                    Low light intensity but great depth
                             of field.
Small diaphragm, e.g. ex.
16 =

By choosing small apertures (higher numbers), you obtain a greater depth of field
(see the table on page 19).
The simplest way is to stick to two-point rule focusing. For snapshots this is almost
always enough.

PG 18
View original page 15Page 16 · Read text
The depth of field ring fixed on the upper
                                  plate of the camera constitutes a very
                                useful supplementary working aid. If, by
                                turning the outer ring, we place p. ex. the
                            diaphragm 8 on the number 4 (meters) of
                                the inner disc, the field limiting the zone
                                of the diaphragm 8 shows us the limits of
                                the depth of sharpness from the most
                            advanced point to the most backward
                                  point, that is to say approximately from 3
                                  to 6 m.


Setting of the                             Depth of field. sharpness
                     Setting distance
diaphragm                                between distances

                 3m. (proximity) 10m.     2.5m.-5m. and 5 m.- 00
Red point between
                        (distant)                 Areas that will be out of
8 and 11
                   missed in red              focus.


Pg 17

What is viewfinder parallax?

Don't be put off by this complicated word - the thing is
very simple.
The axes of the lens and the optical viewfinder are not
at the same height. But they are already set so that, in
most views,
the viewfinder image coincides with the lens image. For
images taken up close,
if you want the edges of the image to correspond exactly
to the sight, you have to hold
account for a slight offset known as parallax of the
viewfinder.
View original page 16Page 17 · Read text
In close-up shots
(at less than 2m.) we see the upper part
of the image
a little less than in the viewfinder.


It is therefore sufficient to slightly turn the device viewfinder direction:
for shots in width: upwards; for height views: sideways towards the viewfinder.

PG 19
Depth of field in meters.


The numbers in this depth-of-field table are calculated to meet the highest demands
of negative sharpness. We can therefore also count on a very satisfactory sharpness
even in an area substantially exceeding the frame indicated in the table above.


PG 20
View original page 17
Page 19 · Read text
In the table, the films of equivalent sensitivity are placed one under the other.
Figures in the "Relative Exposure" heading are comparative figures indicating the
proportional value light required for films of different speeds. For example, a 16/10
DIN film requires twice as much light as a 19/10 DIN film (difference 3/ 10° DIN).
Practically it means that it is necessary to use a larger diaphragm opening or to
double the exposure time.

Pg 22

With the Agfa device -
Agfa filters and lens hoods

Agfa filters are used to render the various colors by the exact values corresponding
in the range from black to white.
We provide quality filters, uniformly colored in the mass, rigorously plan parallel
and of nature, has to satisfy the greatest requirements.
Densities: light yellow, medium yellow, yellow green and red-orange.
The use of filters naturally requires a longer exposure. We use at this effect the pose
extension factors which depend mainly on the
movie awareness. Film manufacturers indicate on the packaging which are the
extension factors to be taken into account for the highest filter densities
currents. When these indications are lacking, the following data will serve as a
standard for the panchromatic films:


                      Exposure factor
Filter
                                filter
light yellow No.1
                          1.5 - 2

medium yellow No.2     1.8 - 2.3

yellow-green No. 7       1.2 - 2.5

red-orange No.7        4


Ask your supplier for the Agfa filters in the transparent threaded case and the Agfa lens hood can also be used
with filters.

For Agfa Record I  f/6.3 dia. 30mm.
For Agfa Record I  f/4.5 dia 37 mm.
For Agfa Record  II      37mm
View original page 19Page 20 · Read text
.

In addition we provide an Agfa lens hood in plastic material, in its frame metal, for
the diameters mentioned above. Screens and lens hood in protective transparent
case.

The lens hood provides effective protection against direct frontal or lateral
incidence of light rays. This is why it lends itself especially to taking backlit shots
or reading shots artificial light or lightning where the light source is closer to the
object than the device photographic.
View original page 20
From the M. Butkus archive. Original publisher and archive notices are retained.
Check the model and edition against your equipment.
PDF verified 2026-10-10.