Film cameras
Alpa Si 2000 / Alpa Si 3000 User manual
User manual for Alpa Si 2000 / Alpa Si 3000. 21 pages in English. Read the original PDF, download or print a copy without registration.
21 pagesEnglish1.1 MB PDF
Loading your manual…Open PDF directly
Document details
- Brand
- Alpa
- Model / document
- Alpa Si 2000 / Alpa Si 3000
- Document type
- User manual
- Language
- English
- Pages
- 21
- File size
- 1.1 MB
- Category
- Film cameras
- Document date
- Not specified in catalog
Search available document text
Find a term, then jump to its page in the original PDF. Image-only pages may not be searchable; check the PDF for exact wording and diagrams.
Page 2 · Read text
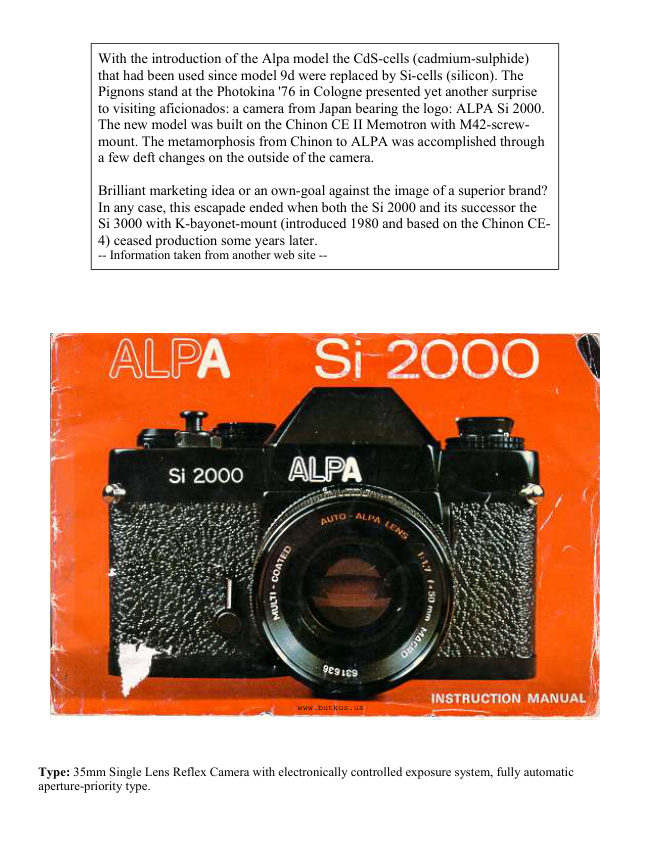
With the introduction of the Alpa model the CdS-cells (cadmium-sulphide)
           that had been used since model 9d were replaced by Si-cells (silicon). The
         Pignons stand at the Photokina '76 in Cologne presented yet another surprise
           to visiting aficionados: a camera from Japan bearing the logo: ALPA Si 2000.
        The new model was built on the Chinon CE II Memotron with M42-screw-
         mount. The metamorphosis from Chinon to ALPA was accomplished through
         a few deft changes on the outside of the camera.

           Brilliant marketing idea or an own-goal against the image of a superior brand?
          In any case, this escapade ended when both the Si 2000 and its successor the
          Si 3000 with K-bayonet-mount (introduced 1980 and based on the Chinon CE-
          4) ceased production some years later.
              -- Information taken from another web site --


                                                   www.butkus.us


Type: 35mm Single Lens Reflex Camera with electronically controlled exposure system, fully automatic
aperture-priority type.
View original page 2Page 3 · Read text
Picture size: 24mm x 36mm.

Film: 35mm cartridge film.

Lens mount: Pentax/Praktica mount.

Viewfinder visibility: 92% of negative size.

Mirror: Quick return system.

Shutter: Metal focal plane, vertical path, electromagnetically controlled.

Shutter speeds: Auto 2 sees - 1/2000 see (stepless). Manual B,1 sec-1/2000 see, and "X".
    Mechanical shutter operation at "X" (1/90 see).

Exposure meter: TTL centre weighted measuring system employing two Silicon blue cells.
    Automatic exposure range of EV 0-19 with ASA 100 (2 sees at f/1.4 to 1/2000 sec at f/16).

ASA range: 25 - 3200.

Film wind: Single stroke in an arc of 134° with 20° play.

Film counter: Automatically indicates number of exposures and resets to zero when the camera back is opened.

Self-timer: 6-10 seconds.

Exposure memory: Push button with lock in conjunction with shutter release button.
                     Indication by a green signal lamp.

Film rewind: Folding crank type.

Accessory shoe: Built in hot shoe.

Synchronization: X (X=1/90 sec)

Multiple exposure: Multiple exposure provision.

Power source: 6V silver oxide battery (Eveready No. 544 or equivalent).

Viewfinder blind: Built in viewfinder blind to prevent extraneous light from affecting
                   the meter reading when the camera is used away from the eye.

Battery test: Indication by a green signal lamp.

Dimensions: (Body only) 145mm (W) x 97mm (H) x 54.5mm (D).

Weight: (Body only) 760 gr.
View original page 3Page 5 · Read text
Digitally signed by Mike Butkus
                               DN: cn=Mike Butkus, o, ou=Butkus.Mike Butkus  org, email=mike@butkus.org, c=US
                                    Date: 2026.04.26 20:19:17 -04'00'
View original page 5Page 6 · Read text
To install battery:


                                          1. Using a coin. unlock the battery chamber cover by turning
                                                         it counterclockwise.

                                          2. Place the 6V silver oxide battery with the minus ( -) side
                    www.butkus.us               facing upwards as indicated by the symbol in the battery
                                chamber (Fig. 1).


                                          3. Replace the battery compartment cover by turning fully
                                   clockwise
                                         (Fig. 2).


Note:
Clean the battery with a dry cloth or paper before inserting and thereafter at regular intervals. Make sure that the
battery is inserted correctly, i.e. check polarity.
The shutter will operate only when a battery is installed except for the'' X ( l/90 sec.) position.
View original page 6Page 7 · Read text
To test battery:

Test the battery when:

A new battery is installed.
The camera is not used for a long period of time.
The camera is being used continuously for many hours.


                                  To test the battery, set the shutter speed dial to the
                                        "Auto" position (Fig. 3). Wind the film advance lever
                                       and press the shutter release button half way. If the
                                               battery is in good condition, the green lamp in the
                                           viewfinder frame will go on. When the green lamp
                                         does not go on, replace the battery (Fig. 4, 5).


                                       Note:
                                     Every time a photograph is taken in the auto mode, the
                                         green lamp should go on, indicating that the battery is
                                                           still in good condition. When the indicator lamp fails to
                                    go on, replace the battery at once.


LOADING THE CAMERA

Use 20 or 36-exposure 35mm film.


                                                 1. Pull out the film rewind knob until the camera back
                                                       is released, (Fig. 6) then swing the camera back fully
                                          open.

                                                 2. Keep the film rewind knob pulled all the way out,
                                                  insert the film cartridge into the film chamber with the
                                            protruding end towards the base of the camera. Push
                                               in the film rewind knob (Fig. 7)
View original page 7Page 9 · Read text
Operate the film advance lever and
                                                               release shutter until figure ''1'' is
                                                           opposite the pointer in the frame
                                                          counter window. The camera is now
                                                        ready for the first exposure (Fig. 10).


                              www.butkus.us


Note: When the shutter release button lock lever is engaged, the shutter cannot be released. Turn the lever to the
left to unlock (Fig. 11).


Important:
Set the shutter speed dial to the "X" position when making two blank exposures to dispose of the first few
inches of film which were exposed during loading. After the film counter indicates you are ready to take the
first exposure, be sure to return the shutter speed dial to the "Auto'' position.

THE FILM SPEED SETTING


                                                The ASA/DIN speed of the film is
                                                             indicated on the film box or in the
                                                                instruction sheet packed with the film.
                                                             Select the desired ASA/DIN speed by
                                                            turning the ASA selection pin until the
                                                            appropriate ASA number appears in
                                                             the ASA dial window,
                                                               (Fig. 12) and then align the ASA/DIN
                                                 number with the white index line on
                                                             the camera top cover by turning the
                                           ASA/DIN dial.
View original page 9Page 12 · Read text
Exposure Meter Needle


                                                                 1. Over exposure:

                                                 Over exposure will be indicated by the
                                                     meter needle moving into the upper
                                                              striped area of the viewfinder scale
                                                              (Fig. 22). Should this occur the lens
                                                           aperture must be reduced until the
                                                        needle enters the shutter speed scale. If
                                                            the needle will still not enter the scale a
                                                             neutral density filter must be used.


 2. Correct exposure:

While the exposure meter needle stays within the scale (arrow marked) correct exposure will result It will be
found when handling the camera that automatic shutter speed selection is a function of the aperture and the
ASA values chosen. As the lens aperture is altered the shutter speed will alter accordingly. Therefore, if the
camera selects a speed that is considered unsuitable for the subject to be photographed, alter the aperture until a
suitable shutter speed is selected.

Should the meter needle move below 1/30 sec. then the use of a tripod is recommended, providing that a larger
aperture cannot be set (Fig. 23).


3. Under exposure:


                                     Under exposure will be indicated by the meter needle
                                    moving into the lower striped area of the viewfinder
                                               shutter speed scale (Fig. 24).
                                 To compensate open up the lens aperture until the
                                          needle moves back onto the scale. Should the needle
                                                             still not re-enter the scale additional lighting or a flash
                                               unit must be used.
View original page 12Page 13 · Read text
UNLOADING THE CAMERA

When the red figure "20" or "36" (20 or 36 exposures) appears against the index mark in the frame counter
window, the end of the film has been reached.

Steps for Unloading the Camera:

1. Press in the rewind release button on the camera bottom (Fig. 25).


                                                                                                           www.butkus.us


2. Lift up the rewind crank on the rowing knob (Fig. 26).

3. Turn the rewind crank in a clockwise direction (Fig. 26). Tension will be felt as the film is being rewound
into the cartridge. Stop rewinding when the tension ceases. Open the camera back by pulling out the rewind
knob all the way and lift out the film cartridge (Fig. 27). The rewind button on the camera bottom will snap
back into position when the film advance lever is next operated. Have the film processed without delay.

CHANGING THE LENS


                                                       The ALPA 2000 is equipped
                                                                with a thread mount which
                                                                    accepts any interchangeable
                                                                       lens with the Pentax/Practica
                                                                    thread mount. To remove the
                                                                             lens, keep turning the lens
                                                                   counter clockwise until it is
                                                                    separated from the camera
                                                         body (Fig 28, 29) .

                                                                Note: Do not remove or
                                                                     replace the lens while the
                                                           camera is functioning.
View original page 13Page 14 · Read text
THE EXPOSURE MEMORY BUTTON

On normal use the ALPA Si 2000 will produce perfectly exposed photographs, due to the automatic exposure
system incorporated in the camera.
However some lighting conditions will occur that could misguide the system. Subjects with very high contrast
or strongly back-lit are examples Such misguidance occurs with electronic shutter cameras since the exposure
system continuously follows the fluctuations of light intensity up until the very instant that the exposure is
made. To overcome these conditions a memory lock has been incorporated.

Steps for using the exposure memory:


                              1. Focus the subject. Make sure that the shutter speed dial is set at the
                                 ''Auto'' position.


                                                                2. Press the shutter release button half
                                           way and measure the light on the main
                                                              part of the subject you want to shoot,
                                                      excluding all unnecessary light from the
                                                           side or background (Fig. 30, 31, 32).

                                               Then press the exposure memory button
                                                 which will instantly memorize the light
                                                       value on the subject (Fig. 33) and twist
                                                           the memory button backward until it is
                                                         locked. When the memory button is
                                                         locked, the green lamp in the viewfinder
                                                              will go on.


 After the exposure return the memory button to its original position. When the memory button is released the
green lamp is turned off. (Fig. 34)


                                                    3. With the exposure memory button locked
                                      compose the subject in the viewfinder as you desire
                                                 (Fig. 35), and press the shutter release button all the
                                  way to take the photograph.
View original page 14Page 15 · Read text
Note: The exposure memory system will be
                                                    erased by releasing the exposure memory
                                                    button before shooting. The memorization
                                                  only functions by simultaneous operation of
                                                       the shutter release button and the exposure
                                        memory button


EXPOSURE COMPENSATION

For special purposes such as multiple exposure, exposure compensation can be accomplished by resetting the
ASA/DIN dial. The following guide will be found useful in determining the correct length of exposure (Fig.
38).

(1 ) white index 2/3 over exposure

(2) white index 1/:4 over exposure (Fig. 36)

(3) red index 1 x correct exposure

(4) white index 1/3 under exposure

(5) white index 2/3 under exposure (Fig. 37)


                                            www.butkus.us
View original page 15Page 17 · Read text
If for special purposes it is necessary to either under or over expose the photograph, proceed by either of the
previous methods. Then rotate the lens aperture ring to bring the meter needle above the shutter speed indicated
in the viewfinder. This will produce over exposure.
Conversely if the needle is brought below the indicated shutter speed then under exposure will result.


The Manual shutter speeds can be used for:

1. A particular shutter speed that is required and beyond the coupling range of the meter, e.g. 1 sec exposure at
3200 ASA.

2. Exposure compensation.

3. " B " ("Time" exposures longer than that possible in the Auto mode).

4. Flash synchronization ("X").


                                 Caution: Get into the habit of immediately returning the
                                        shutter speed dial to the "Auto" position after using the
                                manual mode to avoid possible future incorrect exposures
                                        (Fig. 40).


Mechanical shutter operation:

Since the "X" (1/90 see) position employs a mechanical shutter, it is usable even when the battery is dead.
Setting the shutter speed dial to the''X" position whenever loading the camera with film or operating the shutter
in an unloaded camera will also save unnecessary battery drain.

MULTIPLE EXPOSURE

When desired, the shutter can be wound without transporting the film. This feature enables making double or
multiple exposures on a single frame of film.

Take the first picture in the normal way. Before moving the film advance lever, slide the multiple exposure
switch to the left, as far as it will go (Fig. 41). A red signal appears in the window indicating that the film
advance lever can be wound, but it will only wind the shutter and not transport the film.
View original page 17Page 20 · Read text
To operate, move the self-timer lever counterclockwise
                                          as far as it will go. Advance the film transport lever.
                               Upon pressing the shutter release button the self timer
                                   mechanism will start to operate. (Fig 45, 46).

                                                      If the self-timer is used in the " Auto " mode, turn the
                                        viewfinder blind lever clockwise, closing the viewfinder
                                      system and thereby preventing extraneous light from
                                          influencing the metering system (Fig. 47).


                                                                                          It is advisable to use flash when
                                                                  the exposure meter indicates that
                                                                  the light level is too low, such as
                                                                  indoors, at night time, or in
                                                                  daylight where the subject is too
                                                             dark to provide adequate
                                                            exposure (Fig. 48, 49).


Electronic flash units as well as conventional flash units using flashbulbs may be
utilized. The ALPA Si 2000 has a hot shoe (accessory shoe with built-in flash contact)
together with standard.

(Webmaster: any standard flash will work with this camera. They are found in
department stores for $20 and up. They are "auto" flashes. The higher priced
flashes may have two or more "auto" settings. Just set the flash to the auto setting,
the camera to X and the F-stop to the flash chart depending on the ASA of the film
in the camera. The flash will determine the distance and amount of flash needed.

DO NOT use another flash from another camera with extra pins on the bottom of
the flash shoe. You could damage the flash.)
View original page 20Page 21 · Read text
P.C. outlet for "X" (Fig. 50)
                                       (Webmaster: very few new flashes come with the old
                                               flash cord. This is usually for off the camera flash units
                                               to help eliminate "red eye".)


Electronic and conventional flash units having a foot with built-in contact may be used without a connecting
cord. As the hot shoe has''X" type synchronization, it can be used with electronic flash at''X" (1/90) (Fig. 51) or
at slower shutter speeds, the lens aperture is determined by the calculation table indicated on flash units
(Webmaster: slower shutter speeds can bring in the background lighting but could blur the image due to
camera shake. A tripod is recommended)

USING INFRA-RED FILM

To use infra-red film an extra focusing adjustment must be made. After focusing note the figure that is adjacent
to the red diamond on the distance scale then move that figure over to the red "R'' marked to the right side of the
red diamond. (Fig. 52) This adjustment is only required for black and white infra-red film. When using color
infrared film, focus in the normal way. As of 2020 there is a company making B&W IR film.  If you wish to
really use IR, go digital. There are many cameras that are fixed to allow you to shoot B&W and IR in color.
(Go digital - much easier, they still make B&W IR film - 2022)


Your ALPA Si 2000 Single Lens Reflex Camera is a precision instrument. Used with care, it will provide years
of service.
Protect our camera from dirt, rain, dampness, and excessive heat. Avoid touching the lens. To clean the lens
wipe it gently with a soft, lint less cloth or tissue. Do not use eyeglass tissues as they might damage the lens
coating.
View original page 21Related documents and language editions
From the M. Butkus archive. Original publisher and archive notices are retained.
Check the model and edition against your equipment.
PDF verified 2026-10-10.