Film cameras
Argus Argoflex User manual
User manual for Argus Argoflex. 15 pages in English. Read the original PDF, download or print a copy without registration.
15 pagesEnglish2.6 MB PDF
Loading your manual…Open PDF directly
Document details
- Brand
- Argus
- Model / document
- Argus Argoflex
- Document type
- User manual
- Language
- English
- Pages
- 15
- File size
- 2.6 MB
- Category
- Film cameras
- Document date
- Not specified in catalog
Search available document text
Find a term, then jump to its page in the original PDF. Image-only pages may not be searchable; check the PDF for exact wording and diagrams.
Page 2 · Read text
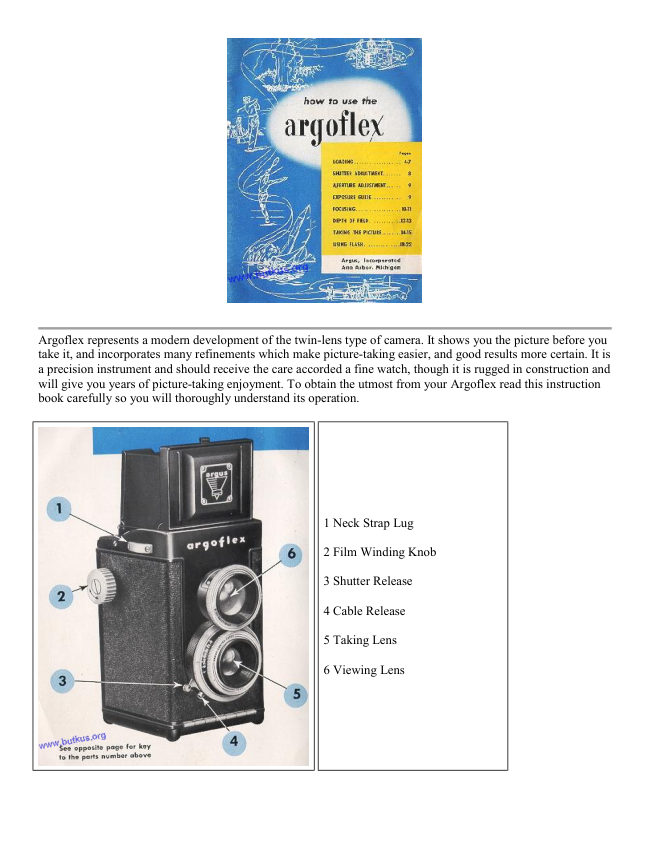
Argoflex represents a modern development of the twin-lens type of camera. It shows you the picture before you
take it, and incorporates many refinements which make picture-taking easier, and good results more certain. It is
a precision instrument and should receive the care accorded a fine watch, though it is rugged in construction and
will give you years of picture-taking enjoyment. To obtain the utmost from your Argoflex read this instruction
book carefully so you will thoroughly understand its operation.


                                             1 Neck Strap Lug

                                             2 Film Winding Knob

                                             3 Shutter Release

                                             4 Cable Release

                                             5 Taking Lens

                                             6 Viewing Lens
View original page 2Page 3 · Read text
7 Locking Catch

                                                  8 Flash Contact

                                                  9 Film Window

                                                  10 Tripod Bushing

                                                  11 Film Window Cover
                                                         Release


USE ONLY 620 SIZE FILM
( you can try using 120 film by cutting the 120 roll edge to fit,
need a 620 take up or make a second 120 fit - check Internet)


                          Open the back of the camera by pressing down on
                                   the locking catch. The back is hinged for
                                 convenience. Hold camera so back does not drop or
                                hinge may be sprung.


                              The empty film spool must be in the upper film
                                  compartment. Pull out the winding knob, giving
                                                         it a quarter turn to secure it in the out position.
                               Swing out film spool cradle and insert the empty
                                       spool.
View original page 3Page 4 · Read text
Drop cradle with empty film spool back into
compartment and turn winding knob to engage it with
the slot in the end of the empty film spool.


Be sure to loan the camera in subdued light; not in
bright sunlight. Swing out lower film spool cradle and
insert new roll of film. Then drop cradle back in
compartment. Be sure film is placed as shown with end
of protective paper in position indicated.


Holding cradle in with the left hand, pull off about 8
inches of paper leader for threading.
View original page 4
Page 5 · Read text
Fold end of paper (about one inch) and insert
        into long slot of the empty film spool.
     To secure end of paper, give the winding knob
       about three turns.


   Close camera back, making sure it is securely closed
   and locked.


Hold lever on back of camera, using left thumb, and
wind until Figure 1 appears in the center of the red
window. Do not wind beyond this point.
View original page 5Page 6 · Read text
To adjust the shutter, turn the milled ring until index
                                       line is opposite speed desired. (See guide on
                                  opposite page.)


There are four steps to taking pictures with Argoflex

Shutter adjustment. according to the type of subject.
Aperture, or lens adjustment, according to the light condition.
Focusing, according to the distance from camera to subject.
Exposure, or taking the picture.
Think of the word SAFE and you will get into the habit of making each step in the correct over. APERTURE ...

Outdoor Exposure Guide
View original page 6Page 7 · Read text
Aperture


                       To adjust the aperture (lens opening) move pointer until
                                              it is opposite correct f number. (See guide above.)


                                          To focus the Argoflex,
                                                open the focusing hood,
                                                     using the right thumb, as
                                                 shown.


                    Hold the camera in the manner illustrated, and focus by turning
                        the knurled lens mount until the ground glass image is sharp.
View original page 7Page 8 · Read text
For critically sharp focusing, use the magnifier. Using the
                          thumb, flip it into position as indicated by the illustration.


In use, the eye must be close to the magnifier. Focus by turning the knurled lens mount until the ground glass
image is sharp. You can also "guess focus" Argoflex by estimating the distance and setting this figure opposite
index line on top of lens mount.


                              This illustration shows how the subject appears
                           on the ground glass with the magnifier in use.


Depth of Field

                                   An important feature of your
                                                Argoflex is the depth indicator
                                            which is a part of the lens mount
                                             and shows automatically the range
                                                    of sharp focus. For example: if
                                               your camera is focused at 20 feet
                                                        (the figure 20 opposite the center
                                                 index line) the range of sharpness
                                                                 is indicated by the lines marked
                                                 with lens markings. Using the
                                            example above, you will see that
                                                     the f/4.5 lines show a range from
                                           15 on one side of the center index
                                                         line to 30 on the other. Thus,
                                                  everything from 15 to 30 feet will
                                              be sharp. At f/16, everything from
                                                 a little less than 10 feet to infinity
                                                    (00) is sharp. This handy device
                                               can be very useful. If you find
                                                          difficulty in understanding its use,
                                                   see your Photo Dealer.
View original page 8Page 9 · Read text
Depth of Field Table


TAKING the PICTURE


                              To take the picture, hold the camera as shown,
                                   and compose the subject on the ground glass
                                        as you want it to appear in the finished picture.
                       A lower or higher position may be desirable to
                                          get just the effect you want. Then, hold your
                                        breath for an instant and press the shutter
                                          release SMOOTHLY with the right thumb.
                                  Take care not to jar the camera or the picture
                             may be blurred due to camera movement.
View original page 9Page 10 · Read text
For use at eye-level, a frame finder is
                                        provided. To use, press the front of the
                                       focusing hood back until it catches. (To restore
                                      use of ground glass, press back slightly on rear
                                  hood panel.)


SPORTSFINDER


                              Hold the camera as indicated in the illustration,
                                  using the right middle or fore-finger to press the
                                      shutter release. This eye-level finder is useful in
                                   taking sport or action pictures where the subject is
                               moving.


WINDINGTHE FILM


                                After each picture is taken, hold lever on back of
                            camera and wind until next figure appears in the center
                                 of the red window.
View original page 10Page 11 · Read text
UNLOADING


                                     After all 12 pictures have been taken, wind about
                               6 turns to take up film and protective paper, but
                               do not use force.


UNLOADING


                           Open the back of the camera by pressing down on
                                    the locking catch.

                                     Pull out film winding knob, giving it a quarter-turn
                                      to secure it in the out position. Swing out film spool
                                    cradle and remove the roll of exposed film.


Seal the end of the film protective paper, using the gummed tape attached to it, and develop or have the film
developed as soon as possible. This will insure better negatives.
Keep the camera loaded with film so you will be ready for any picture opportunity.

ARGOFLEX USES ROLL FILM SIZE 620
(THERE ARE WAYS TO MAKE 120 ROLLS WORK IN 620 CAMERAS)
View original page 11Page 13 · Read text
Hold the camera with
  flash as indicated.
  Push midget bulb in
  as far as it will go and
  give 1/4 turn.

 When using standard
  base bulbs, remove
  adapter. Push bulb in
  as far as it will go.

  Be sure flash gun is
  attached to camera
  when inserting bulb.


To take the picture,
follow the instructions
on page 14. The
carrying case is
designed to permit using
the Flash Unit without
removing the camera.

After the picture is
taken, the bulb may be
ejected automatically.
View original page 13
Page 14 · Read text
The Argus Flash Unit Extension (available as an
                 accessory) permits using the Unit at one side of
                  the camera for better modeling. It also permits
                  the use of two Argus Flash Units for balanced
                   lighting.

            NOTE: When two bulbs are used the lens
                opening should he reduced or a higher shutter
                speed used.


Use of the Argoflex Carrying Case is
recommended at all times. It protects your
camera from hard knocks, from the weather,
and provides a convenient means of carrying.
The camera may be used without removing it
from the case.
View original page 14Page 15 · Read text
Argus Filters, Portrait Lenses,
Copy Lenses and Lens Shade
improve the quality of your
pictures and increase your
camera's versatility. Argoflex
accommodates the 31 mm size
Adapter Ring and 30 mm size
Filters, etc.
View original page 15
From the M. Butkus archive. Original publisher and archive notices are retained.
Check the model and edition against your equipment.
PDF verified 2026-10-10.