Film cameras
Belcar V-PLB 30 / V-PLB 65 / V-PLB 110 User manual
User manual for Belcar V-PLB 30 / V-PLB 65 / V-PLB 110. 2 pages in German, French. Read the original PDF, download or print a copy without registration.
2 pagesGerman, French0.0 MB PDF
Loading your manual…Open PDF directly
Document details
- Brand
- Belcar
- Model / document
- Belcar V-PLB 30 / V-PLB 65 / V-PLB 110
- Document type
- User manual
- Language
- German, French
- Pages
- 2
- File size
- 0.0 MB
- Category
- Film cameras
- Document date
- Not specified in catalog
Search available document text
Find a term, then jump to its page in the original PDF. Image-only pages may not be searchable; check the PDF for exact wording and diagrams.
Page 1 · Read text
®

V-PLB 30   (Réf. : 20815)   MOUNTING INSTRUCTIONS AND NOTICE OF USE
V-PLB 65  (Réf. : 20816)   NOTICE DE MONTAGE ET MODE D’EMPLOI
V-PLB 110 (Réf. : 20817)   MONTAGE-UND GEBRAUCHSANLEITUNG


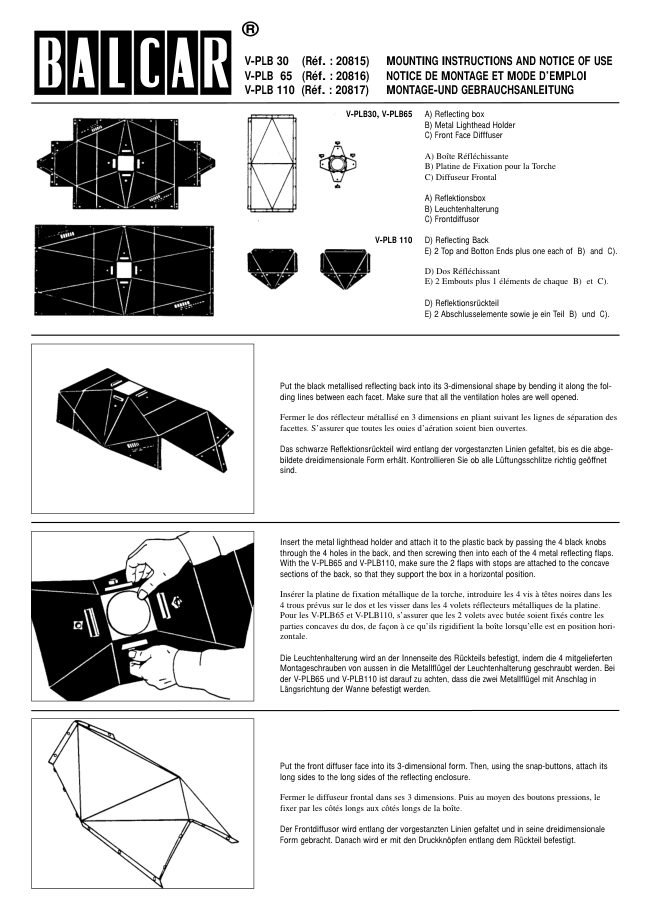
                         V-PLB30, V-PLB65   A) Reflecting box
                                               B) Metal Lighthead Holder
                                               C) Front Face Difffuser

                                        A) Boîte Réfléchissante
                                          B) Platine de Fixation pour la Torche
                                          C) Diffuseur Frontal

                                               A) Reflektionsbox
                                               B) Leuchtenhalterung
                                               C) Frontdiffusor

                               V-PLB 110   D) Reflecting Back
                                                  E) 2 Top and Botton Ends plus one each of B) and C).

                                        D) Dos Réfléchissant
                                            E) 2 Embouts plus 1 éléments de chaque B)  et C).

                                            D) Reflektionsrückteil
                                                  E) 2 Abschlusselemente sowie je ein Teil B) und C).


          Put the black metallised reflecting back into its 3-dimensional shape by bending it along the fol-
          ding lines between each facet. Make sure that all the ventilation holes are well opened.

         Fermer le dos réflecteur métallisé en 3 dimensions en pliant suivant les lignes de séparation des
            facettes. S’assurer que toutes les ouies d’aération soient bien ouvertes.

         Das schwarze Reflektionsrückteil wird entlang der vorgestanzten Linien gefaltet, bis es die abge-
            bildete dreidimensionale Form erhält. Kontrollieren Sie ob alle Lüftungsschlitze richtig geöffnet
           sind.


           Insert the metal lighthead holder and attach it to the plastic back by passing the 4 black knobs
          through the 4 holes in the back, and then screwing then into each of the 4 metal reflecting flaps.
         With the V-PLB65 and V-PLB110, make sure the 2 flaps with stops are attached to the concave
           sections of the back, so that they support the box in a horizontal position.

           Insérer la platine de fixation métallique de la torche, introduire les 4 vis à têtes noires dans les
         4 trous prévus sur le dos et les visser dans les 4 volets réflecteurs métalliques de la platine.
         Pour les V-PLB65 et V-PLB110, s’assurer que les 2 volets avec butée soient fixés contre les
           parties concaves du dos, de façon à ce qu’ils rigidifient la boîte lorsqu’elle est en position hori-
           zontale.

          Die Leuchtenhalterung wird an der Innenseite des Rückteils befestigt, indem die 4 mitgelieferten
         Montageschrauben von aussen in die Metallflügel der Leuchtenhalterung geschraubt werden. Bei
          der V-PLB65 und V-PLB110 ist darauf zu achten, dass die zwei Metallflügel mit Anschlag in
          Längsrichtung der Wanne befestigt werden.


          Put the front diffuser face into its 3-dimensional form. Then, using the snap-buttons, attach its
          long sides to the long sides of the reflecting enclosure.

         Fermer le diffuseur frontal dans ses 3 dimensions. Puis au moyen des boutons pressions, le
           fixer par les côtés longs aux côtés longs de la boîte.

         Der Frontdiffusor wird entlang der vorgestanzten Linien gefaltet und in seine dreidimensionale
        Form gebracht. Danach wird er mit den Druckknöpfen entlang dem Rückteil befestigt.
View original page 1Page 2 · Read text
For a flat front face, connect the short sides of the front face to the ends of the reflecting box. A
                                                                                             flat front face gives a rectangular reflection and about 20% more light than a 3-dimensional front
                                                                            face.

                                                            Pour réaliser une face avant plane, fixer les petits côtés du diffuseur sur les extrémités de la
                                                                            boîte. Une face avant plane assure un reflet rectangulaire et environ 20% de lumière de plus
                                                             qu’une face tri-dimentionnelle.

                                                                                     Ist eine flache Lichtwanne erwünscht, so werden die kurzen Seiten des Frontdiffusors mit den
                                                          Enden des Rückteils wie abgebildet verbunden. Die flache Position ergibt eine rechteckige
                                                                      Leuchtfläche. Zudem ist die Lichtausbeute im Vergleich zur dreidimensionalen Prismenform um
                                                              etwa 20% höher.


                                                                   For a 3-dimensional front face, connect its short sides to the ends of the lightbox. A prismatic
                                                                           front lights up a wider angle (110°) than the flat front face (85°). Thus there is less light fall-off,
                                                           and reflecting panels are easily and efficiently used.

                                                            Pour obtenir une face avant en 3 dimensions, assurer la fixation des petits côtés du diffuseur
                                                           aux extrémités de la boîte. Une face avant prismatique éclaire un angle plus large (110°) qu’une
                                                                    face plane (85°). Il y a ainsi moins de baisse de lumière et on peut utiliser aisément et efficace-
                                                         ment des panneaux réfléchissants.

                                                  Wenn die dreidimensionale Prismenform erwünscht ist, wird der Diffusor wie abgebildet an den
                                                                     Rückteilen befestigt. Mit der Prismen-Position wird ein grösserer Ausleuchtwinkel erreicht (110°)
                                                                             als mit der flachen Position (85°). Die Prismenform eignet sich sehr gut zum Arbeiten mit
                                                                  Aufhellwänden.


                                                             V-PLB30, V-PLB65 and V-PLB110 shown with flat front face.

                                                        V-PLB30, V-PLB65 et V-PLB110 montrées ici avec face avant plane.

                                                             V-PLB30, V-PLB65 und V-PLB110 mit flachem Frontdiffusor.


                                                              V-PLB, V-PLB65 et V-PLB110 shown here in their 3-dimensional front face.

                                                        V-PLB30, V-PLB65 et V-PLB110 montrées ici avec face avant en 3 dimensions.

                                                             V-PLB30, V-PLB65 und V-PLB110 in der dreidimensionalen Prismenform.


ref 97490 trilingue
             ®
                                   Rue des Coutures, Z.I. Sud de Torcy • 77200 Torcy • FRANCE
                                                      tel (33) (0) 1 64 11 63 90 • fax (33) (0) 1 64 11 63 91
                                                           Internet: http://www.balcar.fr
                                                      E-mail: sales@balcar.fr
View original page 2From the M. Butkus archive. Original publisher and archive notices are retained.
Check the model and edition against your equipment.
PDF verified 2026-10-10.