Sewing machines
Bradbury Family & Medium Machines — User manual
User manual for Bradbury Family & Medium Machines. 16 pages in English. Read the original PDF, download or print a copy without registration.
16 pagesEnglish5.5 MB PDF
Loading your manual…Open PDF directly
Document details
- Brand
- Bradbury
- Model / document
- Bradbury Family & Medium Machines
- Document type
- User manual
- Language
- English
- Pages
- 16
- File size
- 5.5 MB
- Category
- Sewing machines
- Document date
- Not specified in catalog
Search available document text
Find a term, then jump to its page in the original PDF. Image-only pages may not be searchable; check the PDF for exact wording and diagrams.
Page 1 · Read text
: DIRECTIONS FOR gente
2 : THE NEW “as : ¢ i
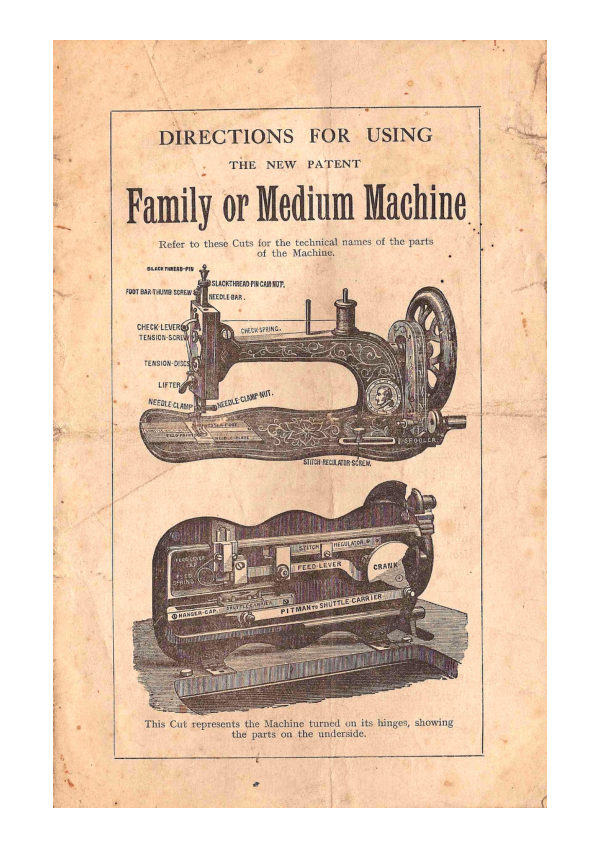
Family or Medium Machine
Refer to these Cuts for the technical names of the parts

of the Machine.

ssuacerimeno-70

This Cut represents the Machine turned on its hinges, showing
the parts on the underside.

t
° e
1
View original page 1
Page 2 · Read text
To Learn the Use of the Machine.

N unpacking the Machine, notice the manner it is threaded

up for future guidance ; having done this, raise the

lifter; then cut the thread above the eye of the needle;
remove the sample, and proceed to learn.

THE TREADLE MOTION.

First lift the presser foot from off the feed by the lift
handle, place the feet upon the treadle, disengage the fly-
wheel, and run the loose wheel toward you, allowing the feet
to move freely with the motion thus given for a time until it
becomes easy ; then put the machine in motion with the fly.
wheel, and again run it a little when all is in motion.

TO ADJUST THE NEEDLE.

Allow the needle-bar to rest at its highest point, and
loosen the needle clamp nut. Take the needle between the
thumb and forefinger of the left hand, having its long groove
towards you, and put the point down through the hole in the
needle plate ; turn the wheel gently towards you while you
guide the needle under the needle clamp; then tighten the
clamp nut; with the left hand insert the point of a fine needle
into the eye, resting it on the needle plate ; loosen the clamp
nut, and pressing the fine needle into the eye in a direct line
from you, turn the wheel gently towards you until the gauge
mark (a line graven in the needle bar, near the top) is level
with the top of the arm ; then tighten the clamp nut, the eye
of the needle being level with the needle plate. When using a
fine needle and mis-stitches appear, raise the needle a little.

TO THREAD THE NEEDLE,

Pass the thread from the reel through the eye at the top of
the arm, downward under and between the tension discs,
upward through the eye of the check lever, then through the
hole in the needle clamp, and through the eye of the needle,
as shown in the first engraving.
View original page 2
Related documents and language editions
From the ISMACS International. Original publisher and archive notices are retained.
Check the model and edition against your equipment.
PDF verified 2026-10-11.