Film cameras
Braun Paxette User manual
User manual for Braun Paxette. 11 pages in English. Read the original PDF, download or print a copy without registration.
11 pagesEnglish2.2 MB PDF
Loading your manual…Open PDF directly
Document details
- Brand
- Braun
- Model / document
- Braun Paxette
- Document type
- User manual
- Language
- English
- Pages
- 11
- File size
- 2.2 MB
- Category
- Film cameras
- Document date
- Not specified in catalog
Search available document text
Find a term, then jump to its page in the original PDF. Image-only pages may not be searchable; check the PDF for exact wording and diagrams.
Page 2 · Read text
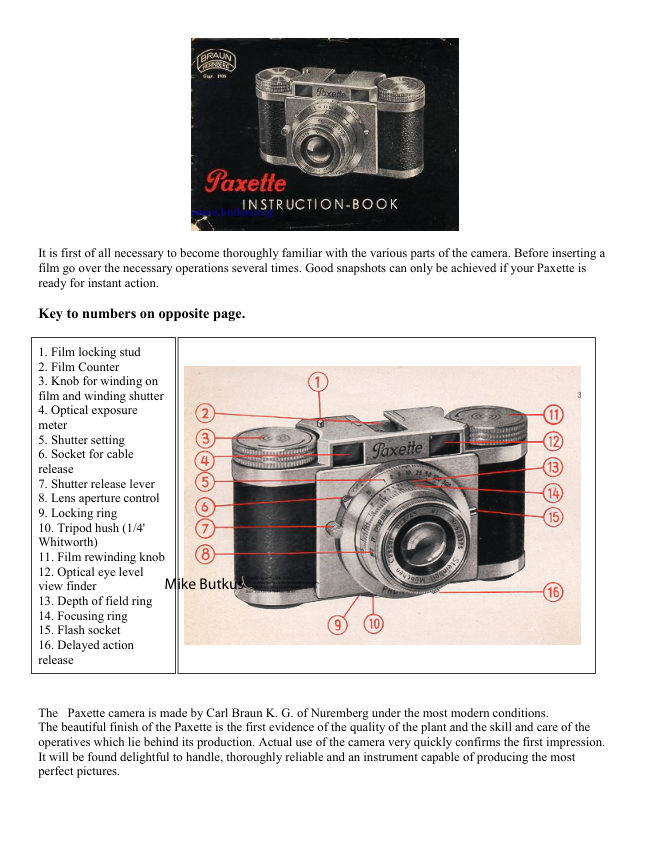
It is first of all necessary to become thoroughly familiar with the various parts of the camera. Before inserting a
film go over the necessary operations several times. Good snapshots can only be achieved if your Paxette is
ready for instant action.

Key to numbers on opposite page.


1. Film locking stud
2. Film Counter
3. Knob for winding on
film and winding shutter
4. Optical exposure
meter
5. Shutter setting
6. Socket for cable
release
7. Shutter release lever
8. Lens aperture control
9. Locking ring
10. Tripod hush (1/4'
Whitworth)
11. Film rewinding knob
12. Optical eye level                                                                         Digitally signed by Mike Butkus
                                                                                                               DN: cn=Mike Butkus, o=Butkus camera manuals,
                                                                                                                           ou=butkus.org, email=mike@butkus.org, c=USview finder         Mike Butkus Date: 2023.03.03 16:41:57 -05'00'
13. Depth of field ring
14. Focusing ring
15. Flash socket
16. Delayed action
release


The  Paxette camera is made by Carl Braun K. G. of Nuremberg under the most modern conditions.
The beautiful finish of the Paxette is the first evidence of the quality of the plant and the skill and care of the
operatives which lie behind its production. Actual use of the camera very quickly confirms the first impression.
It will be found delightful to handle, thoroughly reliable and an instrument capable of producing the most
perfect pictures.
View original page 2Page 3 · Read text
www.butkus.us

Careful study of this booklet is necessary to get the best out of this camera. Once the mechanical details are
mastered every photographic problem can be faced with confidence and the Paxette will become a constant
friend and companion of leisure hours.

How to Open the Camera


                           The milled locking ring on the bottom of the camera
                                           is released by turning anti-clockwise. The back and
                              bottom of the camera can then be slid out.


How to insert the film cassette


                                     The arm which retains the cassette is
                                     swung outwards by about 90° and the
                                                  cassette is engaged in the REWIND dog.
                                     The lever holding the cassette is then
                                     swung back again so that it fits over the
                                              protruding spool knob.
View original page 3Page 4 · Read text
Attention!


                   When film is inserted, it is imperative that the margin of the
                            film is sliding underneath the guide spring at the right side of
                            the cog-wheel.


     www.butkus.us


How to insert the film


                            Pull out the film from the cassette sufficiently far for the
                        trimmed end to be inserted into the slot of the empty spool
                        and then bent back on itself so that it cannot slip. Turn the
                            film winding knob in the direction of the arrow until the
                           sprocket of the film transport engages with the perforations
                           of the film. As the turning of the film winding knob causes
                            the shutter to be wound, the shutter release ]ever should be
                          operated every so often whilst winding is in progress. This
                             will enable the film to be wound on. Once the perforations
                        have engaged the sprocket, the back of the camera should be
                           replaced and locked.


Warning: Direct sunlight should be avoided when loading with film. If there is no shade, the operator's
own shadow in better than direct sunlight.
View original page 4Page 5 · Read text
www.butkus.us

How to close the camera.


                        To close the camera the back should be inserted
                            between the camera housing and front plate and the
                               locking ring tightened.


The film Counter


                         The film counter reads backwards from 36 to 1. It thus
                                 indicates the number of unexposed frames still
                                  available. After the film has been loaded and the camera
                             has been closed, the counter should be set at the red dot
                               near the figure 36, by means of the projecting teeth. The
                                film winding knob is then turned until the reading is 36.
                                           It is necessary to release the shutter to allow the film to
                          wind on.
View original page 5Page 6 · Read text
Film Winding and Film Transport


                    The shutter winding mechanism, film transport and film
                         counter are coupled so that they are operated when the
                       winding knob is wound in the direction of the arrow. After the
                           shutter has been released and until the camera has been re-
                     wound, the safety device which prevents double exposure is in
                          operation.


How to unload the Camera


                                                  The whole length of the film has
                                                       been exposed when the counter
                                                              reads figure 1 and the shutter has
                                                       been released.
                                              To wind back the film, press the
                                                            locking stud; pull out the rewind
                                                    knob as far as it will go and turn it
                                                                  in the direction of the arrow.
                                                    Towards the end of the film a
                                                   somewhat stronger resistance is felt
                                                     which indicates that the film is
                                                          being held by the take up spool.


A few further turns will then wind the film completely into the cassette, and the camera can be opened for
insertion of a new film.

Note: The locking stud must remain depressed throughout the whole rewinding operation. It throws the
sprocket out of gear.


Loading and Unloading Drill


                                                        1. Press down locking stud throughout the
1. Open the camera                            winding operation
2. Insert film cassette                                 2. Raise rewind knob as far as it will go
3. Attach the film to the take-up spool               3. Turn rewind knob in the direction of the
4. Close the camera                            arrow
5. Set the film counter on the red dot near 36        4. Wind the whole of the film into the cassette
6. Wind on until 36 is against the index mark       5. Open the camera
                                                        6. Remove the cassette
View original page 6Page 7 · Read text
www.butkus.us


Checking the film transport


                       To make sure that the film transport is functioning properly and the
                              film really being wound on, lift the rewind knob as far as it will go.
                                       If the film transport is functioning properly the rewind knob will turn
                                 in the opposite direction during winding operations.

                         Checking the Re-winding
                       To check the rewinding, release the locking stud during rewind
                                operations. It will then stand proud and there should be a strong
                                resistance if the mechanism is working correctly.

                         Warning. If force is used against this resistance the perforation
                              of the film will tear. When continuing to rewind, press home the
                            locking stud.


The Lens Diaphragm


                         The lens aperture or diaphragm is set by means of the
                                  front ring on the lens. Bring the red dot into register
                              with the black line at whatever setting is required.
                              Note: The smaller the aperture number the more light is
                                admitted, but the more limited is the depth of field. The
                                  larger the aperture number, the less light passes, but the
                                 greater the depth of field. For example. f/2.8 passes
                          more light than f/16 but the depth of field is much less.


Delayed Action Release for Self Portraitures

The delayed action release is fitted to the bottom of the shutter and is set by moving the lever as far as it will go.
Warning: The delayed action release cannot be used with "B" setting (time).  It would damage the shutter.
View original page 7Page 8 · Read text
The Optical Exposure Meter


                            There are three rows of figures of different density
                                 inside the exposure meter (right hand eye piece). With
                                the eye piece held close to the eye, aim the camera at
                                the subject to be taken. The highest figure which is
                                 discernible after looking through the eye piece for about
                          20 seconds will be the light value and is the basis for
                               reading off the exposure time from the exposure tables
                          on the camera case.


How to Read the Exposure Time from the Exposure Table
Example. Assuming that the figure 10 is the highest discernible figure in the exposure meter, refer to the table
which is attached to the back of the camera case and look for figure 10 in the top horizontal row. The left-hand
vertical row, in front of the thick black line gives the apertures from the 2.8 to 16. It is then possible to read off
the exposure times for each aperture from the vertical row running down from the figure 10. Assuming that
aperture 16 has been chosen (smallest aperture), the reading in the vertical line under the figure 10 for aperture
16 will be 1/10 second. For aperture 11 an exposure time of 1/25 second would be required, for aperture 8, 1/5n
second, for aperture 5.6, 1/100 second and for aperture 4, 1/300 second. No exposure time for aperture 2.8 is
given because for this light value (10) so large an aperture would be unsuitable. The same procedure should be
adopted for all other light values.

Note: The table is compiled for film with a sensitivity of 17/10 DIN. For 21/10 DIN the exposure times should
be halved and for 13/10 DIN they should be doubled.
View original page 8Page 9 · Read text
www.butkus.us


The corresponding values for other sensitivity scales may be taken to be as follows:


       DIN           SCHEINER        WESTON           ASA/BS
        21/10                 31                  64                  12
        17/10                 27                  25                  32
       13/10                  23                  10                  80

How to Focus


                                 After estimating the distance between the camera and
                                  the subject to be taken or after ascertaining it by means
                                 of a range finder (which can be mounted on the
                                camera), the second milled ring situated on the lens is
                                 turned to register with the line which will be found in
                                  the middle of the fixed ring engraved in red. The scale
                                 of the distance setting ranges from 3'/2 ft. to infinity.

                           Exposure Time
                          The shutter is set by bringing the red line on the milled
                                  ring of the shutter into register with the desired speed
                            which is engraved on the collar on top of the shutter
                                housing.


The Depth of Field


                                 The depth of field comprises the area which is sharply
                                        defined by the lens, from the foreground to the
                                      background. This area or depth varies according to the
                                          aperture chosen, that is to say, a large aperture (f/2.8)
                                         gives less depth of field and a small aperture (f/16) gives
                                       a greater depth of field. The depth of field for every
                                          aperture setting can be read off the red scale on the
                                     middle ring of your Paxette.


This repeats on the left and on the right on the centre LINE, the range of lens apertures.

Examples . If the focus is set between 20 and 30 ft., everything will be sharp from down 60 ft. to about 15 ft.
when working with an aperture of f/4. If working at f/8 however, everything will be sharp from infinity down to
12.5ft.
View original page 9Page 10 · Read text
The Palette should be held firmly in both hands so that the rounded
                             bottom edge is resting on the palms of the hands. When the shutter is
                                   released, the left hand will then be keeping the camera steady.
                           The camera and the hand should be pressed against the head and a
                              broad stance adopted to ensure steadiness. Another point to observe is
                                     that the ball of the right hand should exert slight counter pressure
                                  whilst the second finger of the right hand presses the trigger.


                               This should be done gently and without jerking. Move the finger only
                             and not the whole hand. Allow the finger to rest on the release lever
                                      until the release has run off. Remain calm whilst taking a picture
                                  especially when taking snapshots with
                                  the Paxette.
                         Good results amply repay the trouble taken.


If the Paxette should happen to go wrong, the temptation to get a screwdriver and open it up should be resisted.
The correct assembly of, say, the shutter or the relationship of the lens to the focal plane are most delicate
matters, and even a skilled mechanic not accustomed to cameras should hesitate. A faulty camera should not be
touched but should be handed to a good photographic dealer who has a specialist repairer with special tools at
his disposal.


Camera              Format              Lens    Shutter

Paxette              24 x 36 mm              f/2.8    Pronter S 9 - speeds delayed action : flash

Paxian I             6 x 6 cm                 f/7.7    3 - speed (B - 1/25 - 1/100)

Pacian II             6 x 6 cm                 f/3,5    Vario 4 - speed : flash

                     cameras for 2 1/2" x
Inperial Box                               and 2 1/4" x 3 1/4" with and without flash
                    2 1/2"
View original page 10Related documents and language editions

From the M. Butkus archive. Original publisher and archive notices are retained.
Check the model and edition against your equipment.
PDF verified 2026-10-10.