Film cameras
Braun Super Paxette II SCANNED User manual
User manual for Braun Super Paxette II SCANNED. 25 pages in English. Read the original PDF, download or print a copy without registration.
25 pagesEnglish9.0 MB PDF

Loading your manual…Open PDF directly
Document details
- Brand
- Braun
- Model / document
- Braun Super Paxette II SCANNED
- Document type
- User manual
- Language
- English
- Pages
- 25
- File size
- 9.0 MB
- Category
- Film cameras
- Document date
- Not specified in catalog
Search available document text
Find a term, then jump to its page in the original PDF. Image-only pages may not be searchable; check the PDF for exact wording and diagrams.
Page 6 · Read text
www.butkus.us


How to Open the Camera
Release the milled locking ring on
the camera base by turning it  to
the left. The back of the camerd
ean then be slid off.
View original page 6
Page 7 · Read text
Digitally signed by mike butkusmike          DN: cn=mike butkus,
                              o=orphancameras, ou=29,
                               email=mike@butkus.org, c=US
                                  Date: 2018.12.27 18:42:24 -05'00'butkus
View original page 7Page 8 · Read text
www.butkus.us

How to Insert the Film                                      "
                                                       ,
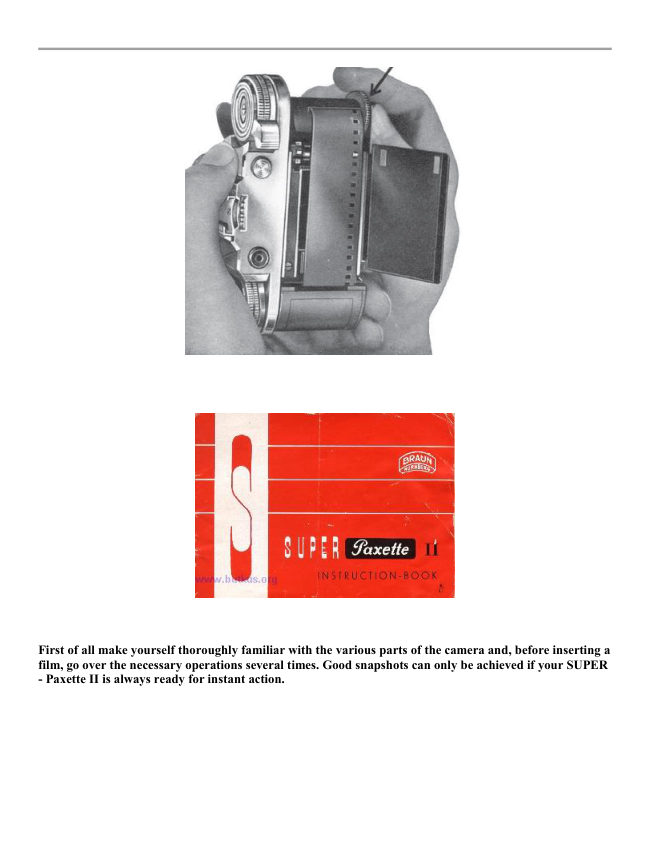
Insert the film cassette into the film chamber so that it engagea in the rewind knob.
Open tho film pressure plate and draw out the trimmed end of the film far enough
to be inserted into the elot of tho take-up spool. At the samo time ensure that the lug
on the take-up spool hooks into the porforation in the film. Now wind the lower wheel of
the empty spool until both sprockets engago in the perforations of the film; it is also
advisable to depress the film rewind push button at the same time. Lastly, swing the film
presrure plate back into the closed position and close the camora.                            ,

Important: Avoid direct sunlight whon loading or unloading the camera. Turn your back
to the light and hold the camera in your own shadow


                                                                                                               )<-)e  )+  -x- )<- )+  )<- )<  -x- -x- )+  )<- )+  )<- )<- )<- )<  -x- )e )a  )<-
View original page 8Page 9 · Read text
How to Close the Camera
To close the camera the back should be inserted between the  camera housing and front
plate and the locking ring tightened.
View original page 9
Page 10 · Read text
www.butkus.us

The Exposuro Counter
The exposure counter reads backwards
from 36 to 1, indicating each time the
number of unoxposed frames still available.
After the film has been inserted and the
camera closed, eet the counter at the red
dot noar tho figure 36 by turning the
toothed wheel which is positioned just
below the maker'g namo. Advanco the
film twice (each time advancing the rapid
wind lever l'1,  times until a  definite
rosistanco is felt), and the film counter
should then read 36.
View original page 10
Page 11 · Read text
IO


     The Rapid Winder
     The shutter winding mechanism, film transport and film counter aro coupled and operated
    by means of the rapid wind lever. Advanco the lever as far as possible, then release it,
      allowing it to spring back; then advance it approximately half way until a noticeable
      resistance is felt. The film is now transported, the shutter cocked, the exposure counter
       corroctly set and your Super-Paxette is ready for the next shot.
View original page 11Page 12 · Read text
www.butkus.us

How to Unload the Camera                                                                     11
When tho exposure counter showe figure I,  this means that the entire length of the film
has been exposed.
To wind back the film, press the rewind push button, then pull out the rewind knob as far as
it will go and turn in the direction of the arrow. Just before the rewinding operation  is
completed, a moro marked resistance will be noticeable indicating that the end of the film
is still held by the take.up spool. A few more turns will wind. the film complotely into
the cassette. The camera can then be opened and the film changed.
Important: The rewind buttou must remain depressed throughout the rewinding operation.
View original page 12
Page 13 · Read text
72   Loading and Unloading Drill

      Loading the                                  Unloading the
         SUPER. ?OXCI\C         SUPER. ?OXCttC                     II
      1. Open the camera                        1. Press down rewind button                            I
     2. Insert film cassette                                                                                                                                      I                                               2. Pull out rewind kuob ae far as it will go
     3. Attach film to take-up spool  '
                                               3. Turn rewind knob in direction of arrow
     4. Close the camera
                                              4. Wind the entire film into cassette     5. Set the exposure counter
                                                                 camera     6. Advance the rapid wind lever twice       5. Open the
     7. The camera is ready for the firet shot     6. Take out caesette                     Y
View original page 13Page 14 · Read text
www.butkus.us

           Checking the Film Transport                                                                       l3
          In order to ensure that the film transport is functioning
             correctly, pull up the rewind knob as far as it will go.
              If the film is moving forward properly, the rewind
         knob will turn in the direction opposite to that indi-
           cated by the arrow when tho rapid winder is advanced.l           Important: This check should be made for a short timo
           only. After checking, push the rewind knob in again.
 !
          Checking the Rewinding
       To check tho rewinding action' release the locking
           stud during the rewinding oporation.  If the mechanism
            is functioning properly a very definite resistance will be
            noticeable. If no resistance is felt, this moans that the
            film has been pulled out of tho cassette and cannot be
        wound back. This fault can only be remodied by
v         opening the camera in a darkroom.
           Important: Do not attempt to force the film or the
            perforation of the film will tear. When continuing to
           rewind, press in the lucking stud again.
I
View original page 14Page 15 · Read text
I4    The Coupled Range Finder
    Tho coupled range find.er of the s u P E R . ?O Xette     does not only give the
      framo of the picture but also the range finder image which is visible as a light circular
      area in the centre of the field. By turning the focussing ring on the lens tho exact
       distance to the subject is measured and automatically set.
       Attention: All interchangeable lenses for the Super-Paxette are coupled to the range finder.
View original page 15Page 17 · Read text
l6                              The Film Speed Rerninder
                                   In order to avoid errors when choosing aperture and
                                            shuttor speed, set the film speed indicator to the speed
                                      of the film used as soon as the latter is insertod into
                                       the camera.


                                    Exposure Time

                            The ehutter is set by bringing the red mark on the
                                         milled ring of the shutter into register with the desired
                                  speed engraved on the collar of the shutter housing.
View original page 17Page 18 · Read text
www.butkus.us

The Lens Diaphragm                                                                              I7
The lens aperture or diaphragm is set by
means of the front ring on tho lens. Bring
the red dot into registor with the black line
at whatever setting is required.
Note: Aperture 2.8 high speed - little depth
of field.
Aperture 16 slow speed - great depth of
field.

The Delayed Action Reloase
The setting lever has to be pushed from
X to greeu V. This can be done only when
the shutter is cocked.
Attention: When setting V is used, the
shutter setting B cannot be used. After the
delayed aetion mechanism has run off' the
setting lever goes back to X automatically.
View original page 18
Page 19 · Read text
t8


                                                                                                                                              {f

      Depth of Field Ring
     The depth- of^field or depth of definition comprises the zone from the foreground. to the
      background of the picture which is sharply defined in the reproduced image. This area or
      $epth varies _according to the aperture chosen, that is to sayo a large           (fZ2.B) gives       less depth of field and a small aperture (f/16) gives a greater depth "purt,rr"ol field.
     With the SUPER  - ?OXette      the depth of field for every photograph can be
        e-asily read off the depth of field ring which is between the focussing iiog on th" lens and
       the                speed setting ring; this repeats on the left and on tlie right of the setting          -shutter     mark the range of apertures.
View original page 19Page 20 · Read text
www.butkus.us

Changing the Lens                                                                               19
The lens should be screwed firmly home into the lens
panel in a clockwise direction. If correctly screwed in,
the central dot on the red engraved depth of field scale
should be just below the engraving ,,SUPER-PAXETTE".
Remove the lens by unscrewing  it in the opposite direction.
When screwing the lenses in and out they should be held
by the knurled fixed ring bearing the depth of field scale.
The Attachable View Finder
Without mask this view finder gives the exact framing
of the picturo when using the wide angle lens of 38 mm
focal length. The mask must be used with long focus
lenses of 85 and 90 mm. For the 135 mm tele-lens an
additional mask is necessary, which is supplied together
with the lens. Furthermore these focal lengths are en'
graved on the bottom edge of the view finder and on
the mask.
For High Demands!
Ask your photodealer for the Universal Prismatic view
finder of Steinheil or for the Polyfocus Universal view
finder which give you the exact images for all focal
Iengths. (See also pago 23)
View original page 20
Page 21 · Read text
20    Taking a Picture

    ThO SUPER. ?OXCttC should be held firmly in both hands with the rounded
      bottom edge resting in the palms  of the hands. When the shutter is released hold the
      camera steadv with the left haud.

      Release the shutter gently and deliberately without jerking it, moving tho middle finger
      only and not the whole hand. Allow the fingor to rest on tho release lever until the
       release action is completed. Remain perfectly still and composed while taking a picture,
        especially when taking snapshots.  If you follow these rules you will be delighted with the
       excellent results achieved.


     )+ +< )< )< )< )e )+ +<- )<- )+  )+ )<- )<- )+  -x- ++' )+ )+ )+  +<-' )e
View original page 21Page 24 · Read text
II
                                      www.butkus.us

                                                                                                         23
        Acceegories for the SUPER- ?qXette
       Interchangeable lenses coupled to the range finder
      Wide angle lens Choro f:3,5/38                   Long focus lens Quinar f:3,5/85
      Wide angle lens Westron f:3,5/35                 Long focus lens Telenar  f :3,8/90
       Long focus lens Tolexon f:5,6/85                  Long focus lens Ennaston f:3'51135
       Prismatic View Finder Made by Steinheil  for focal lengths 38, 85/90 and 135 mm
       with parallax compensation.
      TEWE.PoIyfocus Universal View Finder for focal lengths 35/38, 45/50, 85/90 and
        135 mm with parallax compensation.
         Optical View Finder for 38 mm with mask for 85/90 or 135 mm
      Paximat 35 mm Slide Projector with rapid slide changer. Amazingly simplo to handle.
                                                                                                       con-      Branax 35 mm Enlarger can be used for reproduction and macro photography in
        junction with ground glass adapter, intermediate rings and repro lens.
       Paxitron Home Flash works without dry or wet batteries and takes its onergy directly
       from the mains. Guide number 44 f.or l7/I0 DIN:40 ASA lilms. Light output: appr.
       80-90 W/sec.
      Pico Electrical attachable exposuro  meter masters all exposure problems. Ranging from
        15 sec. - l/1000 sec.
        Eveready and combi-cases  '   filtere and filtorgets -  eunehades

         The righl lor drange ol conglrucfion duc lo improvemenl ir rcserved hcrcwilh                   Prinfed in Germany                                                                                                                157 15.
View original page 24Related documents and language editions
From the M. Butkus archive. Original publisher and archive notices are retained.
Check the model and edition against your equipment.
PDF verified 2026-10-10.