Film cameras
Canon Reflex guide Reference guide
Reference guide for Canon Reflex guide. 88 pages in English. Read the original PDF, download or print a copy without registration.
88 pagesEnglish4.9 MB PDF
Loading your manual…Open PDF directly
Document details
- Brand
- Canon
- Model / document
- Canon Reflex guide
- Document type
- Reference guide
- Language
- English
- Pages
- 88
- File size
- 4.9 MB
- Category
- Film cameras
- Document date
- Not specified in catalog
Search available document text
Find a term, then jump to its page in the original PDF. Image-only pages may not be searchable; check the PDF for exact wording and diagrams.
Page 1 · Read text
www.butkus.us
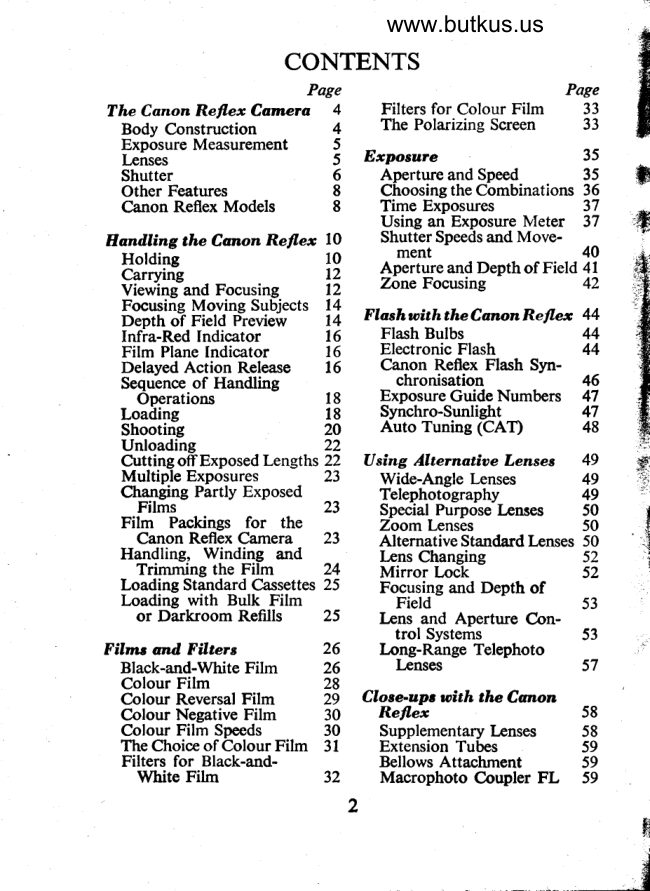
           CONTENTS
                        Page                            Page
The Canon Reflex Camera 4       Filters for Colour Film    33
                                                               33  Body Construction    4    The Polarizing Screen  Exposure Measurement 5                                                               35 Lenses                  5  Exposure Shutter                  6     Aperture and Speed     35  Other Features          8     Choosing the Combinations 36  Canon Reflex Models    8    Time Exposures       37                                 Using an Exposure Meter 37
Hanilling the Canon Refl,ex l0      Shutter Speeds and Move-
                                                           40                      ment                             10 Holding                                     Aperture                                          and Depth of Field                                                                  4l                               12 Carrying                                                               42                               Zone                           Focusing                               12  Viewing         and Focusing
  Focusing Moving Subjects 14
  Depth of Field Preview 14   Flash with the Catron Retle* 44  Infra-Red lndicator      t6     Flash Bulbs            44  Film Plane Indicator    16      Electronic Flash        44
  Delayed Action Release 16    Canon Reflex Flash Syn-  Sequence of Handling           chronisation       46
   Operations           18     Exposure Guide Numbers 47 Loading                 18    Synchro-Sunlight   47 Shooting              20    Auto Tuning (CAT)     48 Unloading             22  Cutting off Exposed Lengths 22   Using Ahernatioe Lenses 49
  Multiple Exposures    23     Wide-Angle Lenses     49  Changing Partly Exposed       Telephotography   49   Films                 23      Special Purpose Leuses 50  Film Packings for the        Zoom lrnses            50   Canon Reflex Camera 23      Alternative Standard Lenses 50
  Handling, Winding and       kns Changing        52    Trimming the Film     24     Mirror Lock             52
  Loading Standard Cassettes 25     Focusing and Depth of
  Loading with Bulk Film         Field                   53    or Darkroom Refills   25    kns and Aperture Con-                                             trol Systems         53Films ond Filters         26     Long-Range Telephoto
  Black-and-white Film    26     I-enses              57  Colour Film              28  Colour Reversal Film     29   Close-upc toith the Canon  Colour Negative Film     30    Refler                   58  Colour Film Speeds    30     Supplementary Irnses    58  The Choice of Colour Film 3l     Extension Tubes        59   Filters for Black-and-             Bellows Attachment   59    White Film            32     Macrophoto Coupler FL  59


                                                                            #
                                                        I.l
View original page 1Page 2 · Read text
Page                            Page
  Lenses for Close-UP Work  60     Motor Drive Unit           63
  MicrophotograPhY                Film Chamber 250          63
    Attachment             60    Motor Drive MF           63
Canon Reflex Aecessories 61   Care of the Camera         64
  Camera Holder          61      Storage                    64  Waist Level Finder       61      Exercise          @  Copying Stand           6l     Running Test After Storage  61
   I-eni Mount Convector 6l     Keeping the Interior Clean   64                                               the Camera with                             62      Treating   I-ens    Hood                                                                    65                                     Care   I-ens Caps,            Rear Irns CaPs                                           with TroPical    and Body        Caps        62     Coping                                        Conditions             Correction  Eye-Piece  -Attachments       62                                65                                  Fsets anil Figures           67  Soft Mat                 62                                                               72  Canon Booster         62  How to . . . Vhat is Vhete?
            The Green Section between pages 16 and l7
TIIE CAIION REFLEX: MODEL BY MODEL           page
Canon EF                                                      2
   Loading4 -Unloading4 - Shooting 4 - Exposure Determina-
   tion 4 --Stopped down metering 5 - Checking and changing
  battery5-Flash6
The Cawn F-I                                                 7
   Loading 7 - Unloadingl -Shogting | - lxposure Deterlnina-   tion g -tttecking Batlery 8- Changing- Battery 8 - Flash l0-   Interchangeable viewfinder system  | 0 - Interchangeable locus-
   ing screen f0
 TIte Canon FTQL, FTL,FThN, TLb, TX md' Pellix QL''''I
   Loading  | | - Unloading  | | - Shootine l? : E1ng.sury Deter-                             Metering            12                  FullAperture   minatio-n                                     14 - Pellix-pVeptece               -                                   Battery               Flash   Shutter 14                                          f4 - Changmg                    14 - Checking             -   Battery 14
 The CanomFX anilEP ...                                                                   '5                                                                        f 5 - Sho-oting-r5 - F'xPosure meter-   Loading 15 - Unloading                                                                                                               f 6 - Flash 20  Gg on FX 16 - Exposuie meter for FP
 The Canon EX EE and. EX ,Auto                             2I
   Loading 2l - Unloading 2l --shooting 2l - Cllnging Lenses
   23 - Chicking Battery 23 - Changing Battery 23
   Some items of equipment or certoin moteriols mentioned in this book
 mav not be freeiV dvaiilobte in every country. Impolt ond morketin.g con'                                              control of photographic deolers.  iiiitit iirV'iii6ty, ond ore outsid; the
                              lsBN 0 240 50659 6
           @ Focal Press., 1976
View original page 2Page 3 · Read text
www.butkus.us
   THE CANON REFLEX CAMERAS
   The Canon 35                1nm. single-lens reflex cameras are of high
 precision, extremely versatile, incorporating a range of aut-o-
 matic features with a viewing system designed foi accurate
 {oqrsing and precise viewing. The description below refers
 in full to the Canon FT, FTb, FTbN, TLb and TX models:
 the other models show some variations which are fully
 described in the green pages.
 _ An extremely wide range of interchangeable  lenses from
 7.5 mm. to 1,000 mm. is made for the Canon reflexes and
many lenses from other manufacturers can be used with
 qdaptors. A range of accessories and attachments permit the
Canon reflex carnera to be used efficiently on almost any
 photographic assignment.
Body Constraction
  The die-cast body is covered with black resilient material
with exposed metal parts black enamel or satin chrome
 finish. The black  i.s hinged on. The camera yields up to 36
images, I x l+ in. (24x36 mm.) on perforated 35 mrir. film.
 It has a permanently  fitted eyeJevel reflex finder with built-in
pentaprism giving a right-way-round view. The centre of the
reflex finder area contains a circular microprism permitting
ultra-fine focusing. and is surrounded by a rectangle givinf
the area from which the CdS meter receives its light. The
remainder of the finder field is a fresnel lens. The image is
brilliant and evenly illuminated. The screen field coveri 92
per         of the actual picture field. The taking lens itself is     -centused to form the finder image. In consequence the flnder
shows exactly the same image as will be-obtained on the
film, without any parallax even when wearing eye-glasses.
The reflex i+ugr remains correct at any distance with any
lrtlg, including close-up supplementary lenses, extensioir
bellows, extension tubes andother attaihments.
  The reflex mirror automatically returns to the precise
fo.cusing-vlewing position the instant the exposure is-made.
Vibration from the mirror's action is practiCally eliminated.
                         4
View original page 3Page 4 · Read text
A mirror locking devioe can hold the mirror in a retracted
position to enable the ultra-wide angl-e 19 mm. lens to be
irsed. An accessory shoe is fitted into the camera top.
Erposure DleasuremenJ
  The pentaprism has a built-in CdS exposure rn!:-ter which
measur^es th; fight passing through the lens (TTL) and is
cross coupled to the-shutter and lens aperture. the exposure
meter needle is visible in the viewfinder. Metering is at the
shooting aperture on the FT and Pellix and at full aperture
on the FTb, FTbN, TLb, TX and Fl.
  The rectangular frame in the centre part of the finder in-
dicates the area from which the CdS photocell receives its
light, so that the photographer can choose the area from
w"nich to take his exposure measurement. This avoids in-
correct exposure of against the light, side-lit or contrasting
strbjects ahd ensures well balanced and correct exposure
reading.
  The-battery-powered circuit is turned. on only while the
light is measured. A battery tester is built in.
Lenses
  The bayonet-mounted standard lenses are interchangeable
and a wide range of telephoto and wide-angle lenses is
available, togeth-er with specialized lenses for macro and
architectural photography as well as zoom types.
  All Canon-FD ana-f'L lenses, including the zooms but
excluding the 7.5 mm. fish-eye and the 35 mm. tilt and slqift,
have ail automatic pre-set diaphragm. An internal link
between the shutter ielease and-the lens mount couples in
such a way that the aperture is stopped do.*q only during
the actual exposure. At all other times it is fully open to
permit viewing with maximum brilliance of the reflex screen
ind minimum depth of field for greatest accuracy. On
Canon lenses even intermediate openings between two
marked apertures can be set without_disturbjlg.lhe  opera-
tion of th6 automatic diaphragm. A depth of field pre-view
control is possible simply by turning the lens to manual
                              )
View original page 4Page 5 · Read text
www.butkus.us
 control or by operating the stop-down lever, as appropriate.
  The lens mount carries a depth of fleld indicator and the
 focusing scale, both in metres and in feet, as well as an
 infra-red mark. Focusing is effected by a helical movement
 which is part of the lens mount.
  The Canon EX EE and EX Auto have their lens fixed
 with convertible type thread mount to accept a special wide-
 angle and telephoto front.
 Shutter
  The Canon reflex camera is equipped with a self-capping
 focal plane shutter travelling horizontally. Focal plane
means that the shutter is located just in front of the film.
Self-capping means that it remains closed while being ten-
sioned, ensuring full light protection. With this type of
 shutter, lenses can be changed while the camera is loaded.
The shutter blinds are made from rubberized cloth and
fitted with a special brake mechanism to reduce mirror shock
and shutter sound. The F-l has very thin titanium blinds.
  The shutter has automatic speeds on a single ring, which
can be set before or after the shutter is wound; in addition,
B setting for time exposures is provided with a locking
facility for long time exposure.
  The speeds have click stops and the speed ring can be
rotated in either direction.
  The automatic shutter speed settings are 1, t, *, t, lll5,1130, 1160,71125,ll250,l/500, 1/1000 sec. The fastest speed
on the TLb is 1/500 sec. On the Fl, it is 1/2000 sec.
  The shutter is flash synchronized for flash bulbs and
electronic flash with conventional 3 mm. co-axial contacts.
 A delayed action is built into the shutter (except on TLb
and TX) and will release the shutter with a maximum delay
of 10 secs.
  The shutter release button is conveniently placed beside
the film transport lever and has a cable release screw-in
thread in its centre.
 A finger guard is placed around the release button and a
release lock is provided to prevent accidental release.
View original page 5
Page 7 · Read text
www.butkus.us
  A full .single- stroke of the film transport lever advances
 film,^.    tensions the shutter and actuates the exposure counter.
 Double or blank exposures are automatically prevented and
 the flash does not fire before the shurter is .iv6und.
 Other Features
                                  self-setting and returns to s . The e,xposure counter is (:  start) when a film is loaded.
  The camera back swings open on its hinge, the film take-
qp spool !s. permanently fixed and a built-In-quick loading device (9rl simplifi.es the.loading procedure (not on TLb[
A tripod gog\e.t is located in the camera base, centred for
 balance. A fold-up rewind crank permits fast iewinaingoi
 the film.
Canon Refl,er Models
oTHE cANoN FT QL is described above and fitted as
standard with the canon FL 50 mq./l.g lens alternativd
with the 50 mm.                                        5g mm.                                                          1.2: '                                                     f                    f,!._a_o1_s! --.,  fonnerlyoTHE cANoN PELLIX QL has the sam-e general ieatures
as canon FT but uses a stationary pellicle, fialf transparent
mirror in place of the normal iirstant-reiurn mirroi, and
metal focal plane shutter.
oTHE CANON FX is the predecessor of the FT and has
the same features except that its coupled cdS exposure
meter does not measure thlough the len-s but has a separate
eye on the front wall of the bamera body. It uses i  split
                      place of the microgrid.ima_g_e_rang_e !l4rJ i"oTHE cANoN FP is similar to the canon FX but without
a b11i!qin exposure meter; a separate meter can be attached.
 THE cANoN Ex EE is a iimplified and varied version
of the canon FT camera. It has a special 50 mm./l.g ienipermanently             ttted with convertible front permittiirg use of
a 35 Tm.f -3.5 wide-ang-le or 95 mm./3.-5 telephoio front
to replace the standard front. The eleitric eye-speedtTL systempermits automatic                                      shutter          pie-set.                  _y9t!ing with
Shutter.speed lalge 1/500 sei. to $ sec., B. Manuar aperturesetting is possible.
View original page 7Page 8 · Read text
THE CANON EX AUTO, introduced 1974, is a EX EE
        with direct flash contact in accessory shoe and automatic
          flash control (CAT).
       THE CANON F-l, introduced 1970, is the more sophisti-
       cated Canon Reflex model for the professional photo-
       grapher and very advanced amateur. Designed from the
        beginning for a motor drive and an enormous range of
         accessories, it uses the newly-created high performance FD
         lens range. The viewfinder is interchangeable and a choice
       of five different finders are available. Automatic flash
       photography is possible. Systems of close up, copying and
       photomicrography have been specifically designed for the
         F-l.
      THE CANON FTb, introduced 1971, is the successor
         of the model FT featuring full aperture metering and direct
         flash contact in accessory shoe.
      THE CANON TLb, introduced 1972, is a somewhat
         simplified version of the model FTb. Its fastest shutter
       speed is 1/500 sec. and it has no delayed action release,
        quick load mechanism or meter switch.
      THE CANON FTbN, introduced 1974, is the model
      FTb with shutter speeds visible in the viewfinder and, less
        important, the transport lever and the multipurpose lever
       on the camera front for stopped down metering etc. are of
       an improved shape, as on model EF.
      THE CANON EF, introduced 1974, has an electronic
        brain, setting the exposure automatically, has extreme
        range of shutter speeds from 30 sec. to 1/1000 sec., of which
         the slow speeds 30 sec. to 1 sec. are electronically controlled,
        the others mechanically. Advanced silicon photocell gives
       improved meter accuracy, quicker response and wider
       metering range. Light emitting diode flashes while the
         shutter is open. Battery check, multiple exposure device.
      THE CANON TX, introduced 1975, is a TLb model
        with hot-shoe flash contact.
,f

\.
View original page 8Page 9 · Read text
www.butkus.us
   IIANIDLING THE CANON REFLEX
Holding
   It is obvious that the camera should be held as steady as
possible; the slightest shake, even if not seen in the negative,
is immediately obvious on an enlargement.
 FOR HORIZONTAL PHOTOGRAPHS hold the
camera in the palm of both hands, the flngers gripping the
front of the body, the thumbs against the back. Use thumb
and middle finger of the left hand to move the lens focusing
mount, and the index flnger of the right hand to operate the
release button. Keep the elbows pressed against the body.
Either the right or the left eye may be used on the finder.
  Always stand with your legs apart.
 FOR VERTICAL PHOTOGRAPHS turn the camera
through 90o so that the left hand presses the camera against
your forehead from above. Use the thumb and the index
finger to move the focusing mount. The right hand holds
the camera from below with the index finger on the release
button. It is of no consequence if the position of the hands
is reversed; you can suit your own convenience.
  To release the shutter, press the release button with the
ball of the finger. Use finger pressure only, and keep the
hand and its grip on the camera steady. The actual pressing
down should be slow and smooth. The slower the exposure
time, the smoother must be the release. A sharp jab at the
release encourages camera shake.
  For slow exposures in the hand, it is advisable to rest the
elbows or at least to lean the body against some support.
In this w&y, even l/8 sec. can be used without excessive
camera movement.
  Such a support is also desirable for faster exposures, as
quite a lot of movement takes place inside the camera after
pressing the release button. A stightly unsteady hold may
thus easily lead to blurred pictures.
  The use of a tripod is necessary when taking time ex-
posures and it is also recommended for speeds slower than
1/30 sec. For upright photographs from the tripod use a
                            10
View original page 9Page 10 · Read text
HOLDING
                           ^'#:&
   For  horizontal                                         IANZl^\.\FZfl   shots (right) hold
   the camera in the
   palms                both            of                                                                                    -a;iiiii:Frr\"r                  fingers    hands, the
    gripping            the                  front                                         L/t^lr                             V      lI   h.-\-l
    of the body, and                                              Press the elbows close to
    the thumbs against                                                   the body'    the back. Focus the
    lens with the mid-
   dle finger of the
     left hand.
                              www.butkus.us

                                                                   always stand with your legs
                                                                           well apart,

                                    For upright shots (left) turn
                                 the camera through 90" so
                                        that the left hand supports
                                                          it from underneath. Alter-
                                      natively, turn  it round in
                                       the other direction, so that
                               the left hand presses the
                                   camera agai nst the forehead
                                 from above. In this case the
                            thumb of the right hand     and hold quite still while
                               presses on  the  release           you release.
                                   button, while the palm of
                                    the right hand supports the
                                   weight of the camera.


Above: With the Canon reflex cameras it is important to keep the camera really steady during the
exDosure and for a fraction of a second after pressing the release button. Whenever possible suPporl
volr body asainst something  solid, such as a tree oi wall or prop uP your hands against your knees
6r a tabld, pirticularly with slow speeds. Use a cable release for time exposures from a tripod.

                                    1l


                                                                  .d
View original page 10Page 11 · Read text
www.butkus.us
ball-and-socket head to allow changing from horizontal to
 vertical position.
Carrying
  To be ready for quick action, it is best to carry the
camera on a short strap round the neck so that it lies on
your chest. Lifting it up to the eye is then a matter of a split
second.
  For convenience and protection, the Canon should
always be carried in its ever-ready case. This case is designed
to hold the camera ready for use. The flap of the case is
removable when the camera is in continuous use to enable
quicker working.
Yiewing and Focusing
   If you look through the eyepiece of the vieufinder of the
Canon camera, you see on the screen the image produced
by the lens and reflected via the mirror. The image is
always visible except during the actual exposure. A fraction
of a second before the shutter is released, the automatic
pre-set iris of the lens closes down to the aperture chosen;
as soon as the shutter closes, the iris opens up to full aper-
ture. The image seen is precisely the same as will be shown
on the film. It is free from any parallax. The screen is a
Fresnel lined flnder field and has in its centre a circular
microprism section.
  The distance is measured by observing the subject through
the microprism centre and turning the lens focusing mount
until the image appears sharply focused, that is, the line
pattern of the microprism practically disappears and the
centre becomes crisp and clear.
  The use of the microprism centre is quite straightforward.
Earlier models have in place of the microprism a split image
rangefinder centre. The two displaced halves of the circle
are moved together by turning the focusing mount until
they are one continuous outline. The best way to arrive
at critical definition is to turn the focusing mount on the
lens slowly to and fro, keeping the subject within the ring.
                            t2
View original page 11Page 12 · Read text
VIEvvING AND FOCUSING


The viewfinder of the Canon reflex cameras shows the image upright and the right way round whether
the camera is held for horizontal (left) or vertical (right) shooting. Wittr the s6ndari  lens, the image
also appears in approximately natural viewing size.


OUT                                                           Meter area
OF FOCUS
                                                                   Microprism
                                                                 lmage area

                                                                Meter needlerNFocusO
                                                                Meter indicator

The Canon FT viewfinder (above) has a bright line indication ofthe image area and a central rectangle
showing the field covered by the meter. The central rangefinder is i microprism type showing a
shimmering image when the lens is not properly focused. The FX and FP modCls (be/ow) have a split-
image rangefinder showing a discontinuous image when the lens is not properly focused.


                                OUT
                              OF FOCUS


                                          IN FOCUS


                                 13
View original page 12Page 13 · Read text
www.butkus.us
As you turn the mount, the image becomes sharper up to a
certain point beyond which it again loses definition. At
this "beyond" stagen turn the mount back, narrowing down
the degree of movement until you arrive at the point of
best definition.
F ocusing Mooing Sub jecls
  The orthodox way of focusing with the microprism may
be adopted for taking photographs of subjects which are
reasonably stationary. When taking subjects in motion, a
different method of focusing is required. Set the distance at
which you expect the subject to be at a given moment, or
focus on some spot which it actually has to pass. Press the
release when the subject reaches the pre-focused point.
With subjects liable to react self-consciously  (e.9. children)
set the lens to a suitable distance, approach the subject
quickly, and expose as soon as the microprism centre
becomes "clear".
  Alternatively, focus on some object which is at the same
distance from the camera to the subject but in a different
direction. When the range is found, swing round to press
the release button as soon as the victim slips into the field
of view of the finder. (See also quick shooting with zone
focusing, page 42).
Depth ol Field Preoieu
  The precise depth of field (see page 4l) can be previewed
by moving the A-M ring of the FL lenses to "M" or by
operating the stop-down lever. On some lenses the serrated
ring with its white indicator dot (which is normally centrally
on top) can be turneci by a few degrees in a clockwise
directi,on when the automatic pre-set aperture lenses close
down to the selected opening. The image in the viewfinder
becomes darker but you can see the extent of sharpness to
the foreground and the background from the subject you
have focused on. On turning the ring back to A, or on
releasing the lever, the diaphragm instantly reopens.
                            l4
View original page 13Page 14 · Read text
LOADING


                                       www.butkus.us


The procedure for toading the Canon reflexes  is (top left to bottorn right): Open camera back and insert
film cassette. Set the film to the red mark on the QL models or atrach film to take-up spool. Close
camera back and take up the slack film by turning the rewind crank gently clockwise. Wind on and
release the shutter twice. Set the speed of the film loaded.
                                  15
View original page 14Page 15 · Read text
www.butkus.us
   The FD lenses do not have an A-M ring; they are stopped
 down by pressing the stop down lever (this is the mutti-
 purpose lever on the front of the camera body, which is
 also used as self-timer lever) in the direction of the lens,
 after having pressed down the button behind the green
 circle on the aperture ring of the lens and turned the green
 circle away from the index line. Now you can set the aper-
 ture manually. After observation turn the green circle
 again to the index line.
    If the FD lenses are to be used manually push the large
 protruding lever on the back of the lens in an anti-clockwise
 direction until it stops and locks into place. On the FD
 50 mm.           1.8 SC lens the lever must be locked by moving             "fthe little black lever from the white dot to the L position.-
  For normal AE operation on the Canon EF the green
 circle has to point to the aperture index line.
Inlra-Red Indicator
  Whe4 working with infra-red film, the distance setting
required is slightly displaced from that of normal films. Foi
this reason a red dot is shown on the distance marking on
the lens barrel with an R below it. Having focused the-iens
in the normal w&y, rotate the lens a little further until the
distance shown against the normal focusing mark comes
opposite to the red dot.
Film Plane Indicwtor                                                                                                 t
  The position of the film plane is represented by a circlecrossed by a line (e) engraved on the camera body. The
precise distance between film plane and subject can be
measured from this position.
Delayed Action Release
 A self-timer, or delayed action release, is built into the
front of the Canon camera body to the left of the lens (it is
the same lever as used in the opposite direction to actuate
the CdS meter). This timer permits self-portraits and is also
useful for hand-held exposures with slow shutter speeds.
       Main text continued on page 17 after green section.
                           l6
View original page 15Page 17 · Read text
www.butkus.us
            TIIE CANON EF
   The canon EF is the gost^advanced version of the canon Reflex  rangp            cqqreraq.                       rt       9f                          differs from the ottrei-mboiti-a.  deririuio Jn  pages      4           8 by these         to                        features:
    rt has an elechonic brain,..offeling-automatic exposure (AE) with
  variable aperture on pres_ele6ting the-shuttiiirieeo, 6Jniilin.'a #itr, u,i extreme                   specds                      from                            30 sec. tg 1il00b         ranse-toof                30iec.                      are                              ereciro"i"iirv'J6it {rgm 1 sec.                                                           rii.jjs9g. ano n. thoseitre,piroJfrom  l/2 sec.. to t/1000 sec. are mechanicaiiv c-"r]ibtitilL ihi"io' metat focat plane shutter runs verticar.ry and ttre md.ctt-iniiar-Jpilas?rlz iJrfl-0CIi  sec.) will work even if the batteries shoutd  i;-it" -iiilir"it!] accuracy is
                                        60"C |:-?6:F- to i 40-T) maintained from temperatures - 206C io-+  -.The silicon photocell metering offers-as compared with the tra- ditional cds meter-improved accuracy,_gre-algr  reiiiuiiitv, quicker resp.onse         and             wider.TgJ:lng                             rangei                                           too                                                                                   ;i                                       u! {sA                               EV -i-(Ig=r;             t8                (:171669 sic.                                                spleo                              ailto).                                   fh" fit,n         lo_ FV il.+l                                             ing. extends from ASA 12 to 32CfJ..
                               near the rewind knob flashes on and  Aligltt emitting diode (!ED) on ounng trme exposures from r to 30 sec. to signar that the struiiii is still opgn; it also acts as battery clreck. A""ilto;iii"
                                       irosition *"  ;t;;;i,1..i'it-"i,""*porur"ty presslngTT,._q a]o.:\.p".'oitsbutton.      locking in
  The meter reading is with emph-asis on the-centre (the microprism
 g1e-a) at full aperture with the'canon Fn 6niis-ri6in'I5 mm. to 300 mm. and sfopped down wiltt ifie ca;;  Ft;;  minirar lenses as well as with            modf accessories suctiis-ueiiows un"ii,'ffi#i* fiG; microscope             adaptor.
                                    automatic,tuning                                            (cAT) system is . Flashpossiblephotograp.hyin coniunc_tionwith withthe canonthe canon                                            Spgidlit"-iliit;h6;"u-rin; the SSC FD Ienies                5.0mm-/r.q                                    ir-jt.s,-'3i;;:                                                                         onty.                                        7;;/3.5 conventional                flash using                                 eith-er horshbe                                         contact or the                                                             flash terminal
 on the camera body is available at 11125 Ga. ild b"6;'i;; electronic flash and t/l5 sec. ind below-ioinaJtrUulbs.
  The viewfinder contains in its ientre a microprism rangefinder sur-
 rounded bv a plain ground gilass ring, wtrite itre-iemiinlG;?i the find-er
 c,onsists of ground glass with fresriel screen strowG on lts base thi
 shutter speed scale and indicator and on itsiighi-ha"o".id"  iire aperture
 scale and needle, o,ver- and under-exposure- marks ano tt e stoppeddown metering mark.
 A delay-ed.action,release with approx. l0sec. delay and a multi-exposure device are built in.
                fitted                   as standard                                                               55 mm.                                 mm. f l.2ssc, FD               (aspheric       SSC                            lens),                                                   50                                                 mm.il.?- -TheNlenses                                arerothesoFDmm.i5 /i.4'sS-C-;.-i-b/1.8 sc.
I  2 CANON REFLEX
View original page 17Page 19 · Read text
www.butkus.us
       For close-up photography, close-up lenses, extension tubes, bellows
      units, macrophoto coupler are available.
       Other accessories include eyecup, angular finder, lens hood, copy
       . stand, camera holder, filters, CAT coupling electronic flash, etc.
   Loading (See page 18.)
     1. Open camera back.
      .., 2. Insert film.
     3. Fix to take-up spool.
     4. Close camera.
     5. Take up film slack.
     6. Make blind exposures.

                                                                                                                                                                                                                                                                                                                    :     7. Wind for first exposure.
  .  . ,8. .Set the film speed.
   Unloading (See pase 22)
 "  ' 1. Push in rewind knob.
   .  2. Rewind film.
     3. Open camera back, remove film.     .
    Shooting (See page 20.)
     1. Turn on the on/off switch on the back of the top plate of the camera
        body.
     2. Wind fiLn transport
     3. Pre-setshutter speed.
    4. Focus and determine the picture area.
     5. The correct aperture sets itself (see below, "Exposure Determina-
         tion"),.      .
    5. Release the shutter gently.
   Erposure Determinarton
       Full aperture metering is possible only with the Fb-lenses which
     have built-in signal pins for this purpo-se. With other lenses, the stopped
    down method (see next page) has to be used.
     1. Set_film spee{ on shutter $ia!, bV lifting up outer rim of rewind ring      and turning it until the ASA speed of the film points to the white
       index mark, and drop ring again.
,    2. Switch on meter.
     3. Set the shutter speed required.
     4. Point camera_to the subiect and the aperture will set itself, the needle
      on the right-hand side of the viewfinder will indicate the aperture  .     set. This reading will be correct for all normal light conditions,
                RFFLEX     I  4.-CANON
View original page 19Page 20 · Read text
particularly as the metering has central emphasis. To cater for extra
   strong contrasty subjects or flat ones, you can point the centre of the
   viewfinder to the particular part you require correctly exposed and
   press the memory lock*the button in the camera top plate between
   the rewind knob and the pentaprism housing. This holds the aper-
   ture measured, while you turn the camera to cover the precise section
  you want to photograph and then release.
    You can also at any time change the shutter speed and aperture
   combination.  If you see, for example, that the given light conditions
   produce a smaller aperture than anticipated, you simply turn the
   shutter speed ring until the indicated combination of shutter speed
  and aperture suits you.
Stoppeddoun Metering
  When using lenses other than the FD series, such as FL or manual
lenses and most accessories such as bellows unit, extension tubes,
microscope adaptor, metering has to be carried out with the lens
stopped down. Stopping down of the FL lenses is effected as described
on page 14 for depth of field preview. While the lens is stopped down,
adjust the aperture ring (or the shutter speed) until the meter needle
in the viewfinder is aligned with the stopped-down index mark near
the base of the aperture scale. Now release the stop-down lever and
take the photograph.
  The stop-down lever can be locked in the stopped-down position by
moving the L-M lock on the base to the red L position and pushing the
stop-down lever toward the lens. To unlock it after use turn the lock
Iever to the white dot position.
 On manual lenses and accessories adjust the apcrture (or shutter
speed) until the needle aligns with the stopped-down index mark in the
finder.
  When using accessories with the FD lenses lock the aperture in the
manual position (see page 16).
Battery Check and, Clwtrye
  To check the batteries simply depress the red battery check button
in the baseplate of the camera and observe at the same time the LED
red light signal in the top plate. If this light blinks on and off in quick
succession, the power of the batteries is adequate;  if it blinks only once
or not at all, the batteries are exhausted and both need replacing.
  To change the batteries, remove the two battery covers in the base of
the camera by unscrewing them with the aid of a coin inserted into the
cover slot. The batteries required are 1.3V PX 625 (or equivalent).
Insert the batteries with the + sign towards the screw covers and replace
covers.
   Notes: Batteries and the camera contacts should be kept clean and
free from fingermarks. If the qlmera is not used for long periods remove
                            CANON REFLEX 5  I
View original page 20Page 21 · Read text
www.butkus.us
 the batteries and keep them in a dry place. In view of the fact that both
 the automatic exposure and the slow shutter speeds depend on efficient
 batteries  it is advisable to carry a spare pair of batteries with the camera
at all times in the battery case supplied with the camera. Check the
 battery performance each time you start taking pictures.
Flash (See page 44.)
  The Canon EF is synchronised for electronic flash at all speeds up to
and includine 11125 sec. The Canon Speedlite 133D fits into-the
cametra's flash hot shoe where it can be used in conjunction with the
Flash Auto Ring A, or Bu attached to the front of the bayonet mount
of the lens with the CAT automatic tuning system (see page 48).
  The camera is also synchronised for flashbulbs at all speeds up to
and including 1/15 sec.
  While the switch on the back of the camera has to be set to the flash
sign (and the shutter to 11t25) when using the CAT system, it may be
set to NORMAL for flashbulbs and the aperture has to be set manually.
For manual setting of the aperture see pagp 14 "Depth of field pre-
view". After using the CAT flash system turn camera off and set CAT
switch to NORMAL otherwise the automatic exposure setting for the
next flash shot will be incorrect.


t  6 GANON nEFLEX
View original page 21
Page 22 · Read text
THE CA}{ON F-l
  The Canon F-l is a system camera designed simultaneously with a
large range of accessories and aew lenses. The eyeJevel pentaprism
viewfinder is removable and can be replaced by various other types.
The meter reads at full aperture.
  TIIE LENSES FIITED as standard are the Canon IiD 55 mm.f 1.2,
FD 50 mm. f 1.4 or ED 50 mm. /1.8.  THE FOCAL PLANE SIIUTIER has very thin titanium blinds and
is speeded from l-1,12000 sec. and B. It is synchronized for electronic
flash and bulbs and has special contacts for the CAT system (see
page48).
 FOR CLOSE-LJP PHOTOGRAPHY, clce-up lenses, extension
tubes and bellows, macro couplers and macro lenses are available.
 OTHER ACCESSORIES range from interchangeable screens to
two different motor drive units, four interchangeable  viewfinders with
three different meter systems, 250-exposure back, electronic remote
control via TV monitor, photomicro equipment, copy stands, etc. The
lens range includes every typefrom fish-eye to extreme long-focus with
special tilt and shift, macro and fluorite types for multi-spectral photo-
graply.
Loading (See page 18 for detailed description.)
1. Open camera bac}.
2. 1asft fftm.
3. Set fftn to rd narlr
4. Close camera.
5. Take up fflm slac.k.
6. I\{ake blind expcmes.
7. Wind for frst exlxxmre.
8. Set the ftlm speerl
IJnloading (See pase 22.)
1. Push in rervind Lnob.
2" Rewind ftlm.
3. Open camera bac.k, remove film.
Shooting (See page 20.)
1. Wind fflm hansport
2. Pre-set the shutter speed.
3. Focus and detemine the picture area.
4. Set cotrect apertme by turning the aperture ring until the meter
   indicator in vieudnder  is centred (see also below "Exposure Deter-
   mination").
5. Release the shutter g€ntly.
                           CANON NEFLEX ?  I
View original page 22Page 23 · Read text
www.butkus.us
E x po tur e D eter rnination
 FulJ aperturemetering is possible only with the FD lenses, which have
 built-in signa! -pins for this purpose. With other lenses, ihe stopped-down method has to be used (see below).
 1. Set-film_speed on shutter dial by lifting up outer rim of shutter speed
    dial and turn it until the speed of the film in ASA or DIN appeals in
   the cut out window. Now drop rim.
 2. Switch meter on.
 3. Set the shutter speed required.
4. Point the camera to the subject to be photographed, placing the main
   part to be exposed correctly into the rectangle around the circular
   microprism while turning the aperture ring of the lens until the
   needle bisects the circular pointer. The aperture does not need to
   point to a specific y'number; between settings can be used. If the
   needle cannot be centred, there is either too much or too little
    light and a slower or faster shutter speed will have to be chosen.
    The procedure can be reversed by pre-setting the aperture re-
   quired and turning the shutter speed dial until the needle and
   pointer are aligned. Intermediate positions on the shutter dial scale
   can NOT be used. Only the engraved speed from 1 sec. to 1/2000sec.
   can be used with the meter. There are occasions when, during the
    me_tering, the needle-movement is slack. This is caused by changes
   in light intensity and is characteristic of the CdS meter.
    To extend the available light reading ability of the CdS meter the
  Canon Booster T Finder (see page 62) can be employed.
S to p p e d- down  []I etering
- When using.other than FD lenses, such as the FL types, meteringhas to be carried out with the lens stopped down b f f.8 6r smallei.Stopping down is effected by pushing the self-timer lever toward the
lens. It can be held there aga_ins! spriqs pressure or locked by setting
the small lever at its base to L. To unlock the lever after use turn thE
lock to the white dot position. Now proceed as above Nos. I to 4.
Batterlr Chech anil Clunge
  To check the power of the battery:
1. Set film specd to 100 ASA and shutter speed to 1/20ffi sec.
2. Set meter switch on back of camera to C. If the needle in the view-
   8!4"r swings to the _meter index, the battery's power is sufficient;
   ft thq needle stays below the index the battery needs replacing.  The battery used is a mercury No. 625 or equivalent.  Its-iife if
frequently used is about one year. To change the battery, remove the
battery cover in the base of the camera by turning it to the left. Insert
the-battery with the -l side facing outward (to the screw cover) and
replace thecover. ff the camera is not used forlong periods remove the
battery and keep it in a dry place. The battery anii its contacts should
be kept clean and free from fingernoarLs.
 I  8 CANON REFLEX
View original page 23From the M. Butkus archive. Original publisher and archive notices are retained.
Check the model and edition against your equipment.
PDF verified 2026-10-10.