Film cameras
Century Graphic 23 User manual
User manual for Century Graphic 23. 7 pages in English. Read the original PDF, download or print a copy without registration.
7 pagesEnglish1.2 MB PDF
Loading your manual…Open PDF directly
Document details
- Brand
- Century
- Model / document
- Century Graphic 23
- Document type
- User manual
- Language
- English
- Pages
- 7
- File size
- 1.2 MB
- Category
- Film cameras
- Document date
- Not specified in catalog
Search available document text
Find a term, then jump to its page in the original PDF. Image-only pages may not be searchable; check the PDF for exact wording and diagrams.
Page 2 · Read text
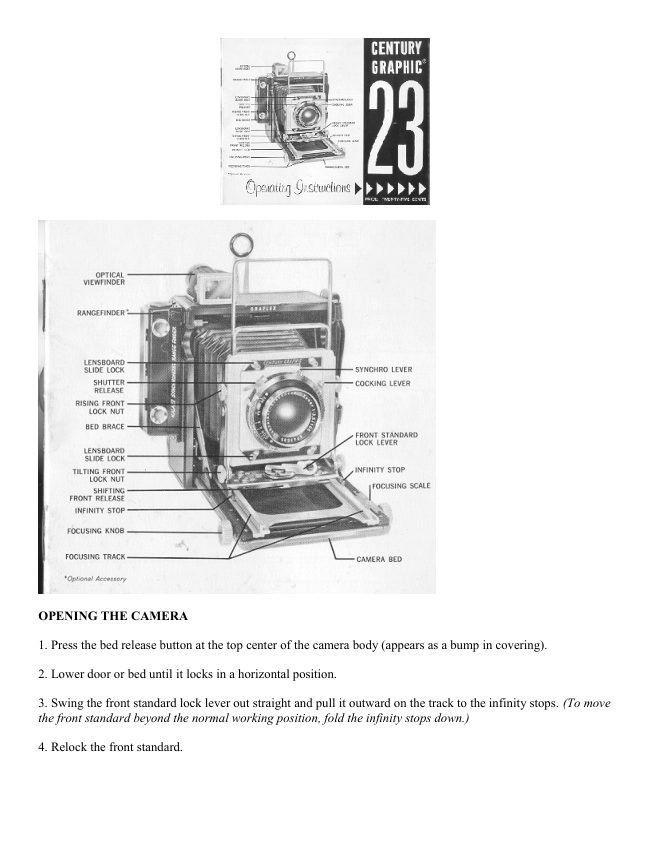
OPENING THE CAMERA

1. Press the bed release button at the top center of the camera body (appears as a bump in covering).

2. Lower door or bed until it locks in a horizontal position.

3. Swing the front standard lock lever out straight and pull it outward on the track to the infinity stops. (To move
the front standard beyond the normal working position, fold the infinity stops down.)

4. Relock the front standard.
View original page 2
Page 3 · Read text
CLOSING THE CAMERA

1. Close the sports viewfinder frame and swing down the sports viewfinder eyepiece.

2. If the front standard movements have been used, return them to normal as follows:

a. Drop the lensboard to the lowest position and lock it.
b. Tilt the lensboard back to its normal, vertical position and lock it.
c. Bring the shift of the front standard to neutral.

3. Rack the track back to the limit of its movement.

4. Unlock the front standard and push it back into the camera body. Lock it.

5. Press down on the bed braces to release and close the bed. It will lock closed with a click.


SCALE FOCUSING


                    A focusing scale and index scale for each
                                    lens to be used on the Century Graphic
                                should be installed on the bed and track
                                along with a properly identified pair of
                                       infinity stops for each lens to be used on
                                   the camera. Be sure to use the proper set
                                     of infinity stops.


The focusing scales on the Century Graphic 23 Camera are of the modified vernier type with one part carried on
the camera bed and the other on the sliding track. The distances indicated are from film position to the subject.
Each focusing scale is calibrated especially for the lens supplied with it. If this scale is used with any other lens,
even of the same make, speed and focal length, out of focus pictures may result since lenses vary somewhat
from their indicated focal length.

Focus on greater distances by matching the figures for the measured subject distance indicated on each scale.
For shorter distances use the pointer at the front of the short index scale set opposite the figure representing the
subject subject distance.
View original page 3Page 4 · Read text
GROUND GLASS FOCUSING

Ground glass focusing is recommended for all critical photography. It must be used when the front is tilted.
shifted or otherwise moved from the normal position


                                             1. To open the focusing hood, press down on the
                                              latch. To close the hood, first press in on the side
                                    wings and up on the bottom panel, then pull the top
                                downward until it latches.

                                             2. To remove the focusing hood (allowing the use of
                                      a magnifying glass over the entire ground glass
                                             area): lift up on the release latch while pressing
                                      sideward on either of the two catches holding the
                                       focusing hood onto the focusing panel. Lift the
                                       focusing hood up. To reattach: position over the
                                    ground glass and press in until it snaps into place.


NOTE:The focusing panel for your Century Graphic 23 Camera may he converted to include Ektalite at a
Graflex Service Department.

FOCUSING PANEL
1. To remove: Press down on the knurled edges of both focusing panel release arms. Slide across camera about
1/4" and lift off.

2. To attach: Release the slide locks place the focusing panel approximately in the normal position and slide it
1/4" to engage the release arms; it will snap into place.


SLIDE LOCKS
Release by sliding to the left. By sliding firmly to the right, any attachment (e.g. Roll Holder, Grafmatic,
Graflarger, etc.) can be held firmly in position.


KALART RANGEFINDER FOCUSING


                        TO USE:
                                             1. Open camera and move the front standard
                                          against the infinity stops.
                                             2. Look into the rangefinder eyepiece and rack
                                          the track forward until the image of your
                                          subject as seen in the central, moving field
                                         exactly coincides with the larger stationary
                                      image.
View original page 4Page 5 · Read text
EXTRA LENSES
Additional lenses must be focused by ground glass or focusing scale.
The Kalart Rangefinder may be focused on the subject and the distance read from the focusing scale matching
the lens for which the rangefinder is adjusted and this reading transferred to the focusing scale for the lens being
used.

LIGHT BEAM FOCUSING FOR NIGHT PHOTOGRAPHY
When it is too dark to see the image clearly by looking through the rangefinder, the accessory: Kalart Focuspot
may be attached to the top of the rangefinder. Electrical energy is obtained by plugging into the battery outlet of
the Graflite Battery Case. When the Focuspot is "On," two beams of light are projected through the rangefinder.

Focusing will cause one beam of light to move with respect to the other. When they coincide on the subject, the
lens is automatically in focus on that particular subject.


VIEWFINDERS
The Century Graphic is equipped with both a sports viewfinder and an optical viewfinder. Both are used to best
advantage when the eye is held as close as possible to the rear element.

SPORTS VIEWFINDER
The sports viewfinder frame may be lifted by grasping the grips of the extendable frame and pulling upward as
far as possible. Swing the eyepiece to an upright position.

OPTICAL VIEWFINDER
The optical viewfinder is often preferred since it may be fitted with masks of different sizes to correspond with
the field coverages of different focal length lenses (see chart below).

Parallax Adjustment · Rotate the eyepiece dial until the number which most closely corresponds to the
distance from the subject is opposite the line along the top center of the finder.

STANDARD MASKS AND LENSES FOR VARIOUS FILM SIZES
View original page 5
Page 6 · Read text
FRONT STANDARD ADJUSTMENTS
The Century Graphic 23 has three important adjustments to shift, rise, and tilt the lens and shutter. Each
movement may be used independently, or with the others.


                              RISING FRONT

                                                1. Loosen both rising front lock nuts-- lift the
                                             lens board frame. Retighten lock nuts before
                                    making the picture.

                               SIDE SHIFTING FRONT

                                                1. Release the front standard lock.

                                                2. Press down on the lateral shift, re lease and
                                                slide the front standard left or right as desired
                                     and retighten the front standard lock.


TILTING FRONT
1. Loosen the tilting front lock nuts.
2. Tilt the lens board as desired. Retighten the lock nuts.


                  DROP BED
                                 1. Provides downward or forward tilt of the lens.
                                 2. Allows lowering the lens board--the opposite effect of
                                 "rising front."
                                 3. Eliminates cut-off when wide angle lenses are used.

                 TO LOWER THE BED:
                                 1. Rack the track all the way back.
                                 2. Press downward on both bed braces and snap the bed into
                               the lowered position.


TO RAISE THE BED:
1. Rack the track back.
2. Press down on the bed braces to unlock, and allow the bed to rise.

INTERCHANGEABLE LENSES

The long bellows extension of teh Century Graphic 23 permits a choice of lenses ranging from wide angle
(short focal length) to telephoto (long focal length). A set of matching focusing scales and infinity stops should
be installed for each lens; a rangefinder fitted to the camera should be adjusted for the lens normally used.
View original page 6Page 7 · Read text
CHANGING LENSES

1. To remove the lens and it's board: Slide both lensboard locks laterally to the full out position. Lift teh lens
and shutter assembly out.

2. To install a lens: Insert the lens on its board onto the camera. Press the lensboard firmly into the front frame
and slide both lensboard slide locks to the full in position

FLASH PHOTOGRAPHY GRAFLITE

The GrafliteBattery Case can be attached to the handle lugs on the left side of the camera, or to an extra
pair of lugs, (Cat. No. 2756), fitted to the right side of the camera. Holes are already in the camera to
accept the extra lugs. If the accessory Kalart Rangefinder is on the camera, attach mounting plate,
Cat. No. 2754, to it.

(See the complete Graflite manual for full details concerning use and operation.)

SHEET FILM HOLDERS


                                      Sheet film holders (Cat. No. 1212) hold two sheets of
                                            film, one on each side. To fit to the cameras, slide it
                                     under the focusing panel as far as possible.

                                      Sheet film, which is available in the greatest variety
                                         of emulsions, comes packaged in a box with each
                                        piece of film interleaved with a sheet of black paper.
                                                         It must be loaded and unloaded in total darkness, but
                                      has the advantage of: allowing the processing of one
                                         or more exposed negatives as desired.


While the following instructions will help you, we urge you to practice m the light with a piece of exposed film.

To load the holder: Withdraw the slide and open the end flap. Handle the film by the edges only, keeping the
film code notch in the upper right corner as shown. Slide the film all the way into the channels formed by the
metal flanges or lips on all three sides of the film septum in the holder. If the bottom flap does not seat
smoothly, the film has not been pushed under the upper end of the septum. Insert the dark slide with the raised
dots on the bright side of the handle facing outward, indicating that the film is ready to be exposed. Turn the
catch or hook to prevent unintentional withdrawal.

After exposing film, reinsert the side with the black side of the handle facing outward - to indicate exposed film.

ACCESSORY INSTALLATION
Consult separate instructions packed with each accessory for full operating details.
ROLL HOLDERS: Remove focusing panel and secure with slide locks.
GRAFMATIC HOLDER: Slide under focusing panel and secure with slide locks.
FILM PACK ADAPTER: Slide under focusing panel - secure with slide locks if desired.
GRAFLARGER: Remove focusing panel and secure with slide locks.
View original page 7From the M. Butkus archive. Original publisher and archive notices are retained.
Check the model and edition against your equipment.
PDF verified 2026-10-10.