Film cameras
Chinon Bellami User manual
User manual for Chinon Bellami. 13 pages in English. Read the original PDF, download or print a copy without registration.
13 pagesEnglish0.9 MB PDF
Loading your manual…Open PDF directly
Document details
- Brand
- Chinon
- Model / document
- Chinon Bellami
- Document type
- User manual
- Language
- English
- Pages
- 13
- File size
- 0.9 MB
- Category
- Film cameras
- Document date
- Not specified in catalog
Search available document text
Find a term, then jump to its page in the original PDF. Image-only pages may not be searchable; check the PDF for exact wording and diagrams.
Page 2 · Read text
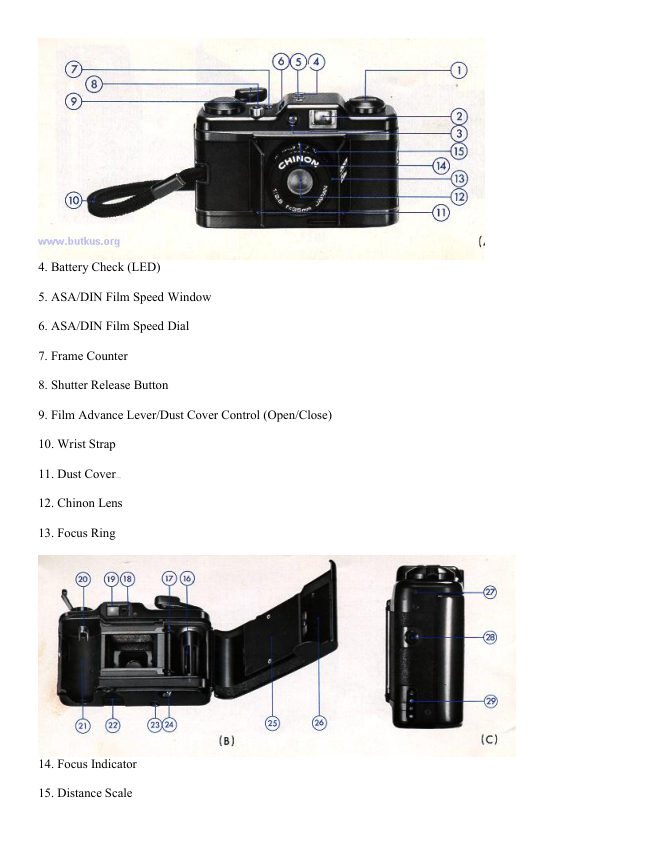
4. Battery Check (LED)

5. ASA/DIN Film Speed Window

6. ASA/DIN Film Speed Dial

7. Frame Counter

8. Shutter Release Button

9. Film Advance Lever/Dust Cover Control (Open/Close)

10. Wrist Strap

11. Dust Cover4.butkus.org

12. Chinon Lens

13. Focus Ring


14. Focus Indicator

15. Distance Scale
View original page 2
Page 3 · Read text
16. Take-up Spool

17. Sprocket

18. Slow Shutter Speed Warning/Flash Ready Light (LED)

19. Viewfinder Eyepiece

20. Rewind Spindle

21. Film Chamber

22. Battery Compartment Cover

23. Tripod Socket

24. Film Rewind Button

25. Film Pressure Plate

26. Back Cover

27. Flash Sensor Pin Socket

28. Flash Retaining Socket

29. Electrical Contacts for S-120 Flash

NOMENCLATURE (S-120 FLASH)

(Please refer to Figures D and E in accompanying Illustrated Guide)

30. Flash Ready Light


31. Flash Mode Selector

32. Flash Window

33. Auto Flash Sensor
View original page 3
Page 4 · Read text
34. Flash Locking Dial

35. Flash Distance Guide

36. Flash Sensor Pin

37. Flash Retaining Screw

38. Electrical Contacts for Bellami

39. Battery Compartment

40. Battery Compartment Cover


SPECIFICATIONS OF CHINON BELLAMI CAMERA

Type: 35 mm EE Compact Camera with Retractable Lens System

Negative Size: 24 X 36 mm

Film: 35 mm Film Lens: F/2.8 35 mm, 4-elements in 3-groups

Viewfinder: Bright Frame, Viewfinder Magnification (0.5X)

Shutter: SEIKO Program EE Shutter, Shutter Speed from 1/8 to 1/1000 sec.

Exposure Meter: Cds EE Exposure System, EV6 - 17(ASA 100), ASA25-400 (DIN 15 - 27)

Minimum Focusing Distance: 1 m (3.3 ft.)

Film Wind: Single stroke

Film Counter: Automatically indicates number of exposures and resets to "0" position when the camera back is
opened.

Film Rewind: Folding Crank type

Flash: Chinon Dedicated Auto Flash provision, built-in flash ready lamp (red LED)

Synchronization: "X" Flash Sync.

Dust Cover: Dust cover can be opened and closed easily by the film advance lever. Meter switch is activated
while the dust cover is fully opened.

Battery Check: Built-in Green  LED4.butkus.org

Slow Shutter Speed Warning: Built-in Red LED

Accessory: Chinon Dedicated Auto Flash S-120
View original page 4
Page 5 · Read text
Power Source: Two 1.5V Alkaline batteries (LR 44, A 76) or Two 1.5V Silver Oxide batteries (SR44, G 13,
S76)      4www.butkus.org

Dimensions: 105 (L) X 63 (H) X 33 (W) mm (4.13" X 2.48" X 1.29")-When dust cover is closed

Weight: 220 grams (8.8 oz.)


SPECIFICATIONS OF CHINON AUTO S-120

Type: Automatic Electronic Flash dedicated for Chinon Bellami Camera

Guide Number: 12 (ASA 100, Meters), or 39 (ASA 100,Feet)

Applicable ASA Film Speeds: ASA 100 and 400. Film speed is automatically set when the ASA film speed
dial is set to these positions.

Flash Mode Selector: Switch for Auto Flash Daylight Sync. and Off positions.

F Stop for Auto Flash: F/4 (ASA 100, 400). F stop is automatically set to F/4 by the auto flash.

Auto Operation: 1-3 m (3.28 - 9.84 ft.)—ASA 100 1.7 - 6 m (5.58-19.68 ft.)—ASA 400

Illumination Angle: Picture area of 35 mm focal length lens

Number of Flashes: Approximately 120 with AA size Alkaline battery

Recycling Time: Approximately 10 seconds with AA size Alkaline battery

Power Source: One 1.5V AA size Alkaline battery     4w ww.butkus.org

Dimension: 60 (H) X 44 (W) X 33 (D) mm (2.36" X 1.73" X 1.30")

Weight: 60 grams (2.1 oz.) without battery

.

INTRODUCTION

Welcome to the world of Chinon Photography!! Your Chinon Bellami is one of the most advanced ultra
compact 35 mm cameras with attractive features available today. Some outstanding features include, mini size,
lightweight, retractable lens system, electromagnetic programmed EE shutter, Cds automatic exposure system, a
sharp 35 mm F/2.8 all glass 4 element lens, dedicated auto flash provision and many more.
The Chinon Bellami employs the latest state of-the-art electronics which will ensure carefree operation every
time.

In order to take full advantage of the features of your Chinon Bellami, please read the instruction manuals
carefully so as to totally familiarize yourself with the camera before actually starting to take pictures.

We thank you for choosing Chinon quality products and we wish you years of satisfaction and enjoyment.
View original page 5
Page 6 · Read text
RETRACTABLE LENS SYSTEM (Figures are at end of page)

The lens of your Bellami camera is retractable. In order to extend the lens to take a picture, turn the film
advance lever completely until it stops. The dust cover will open and the lens will be set to the picture taking
position (Fig. I ). To close the dust cover and return the lens to the protected position, push the film advance
lever to the original position (Fig. 2).

Opening the dust cover fully switches the camera power ON and all camera functions are operational. Closing
the dust cover switches the power OFF and all camera functions are deactivated.


NOTE: *Make sure that the dust cover is fully opened when you take a picture.

     **When your camera is not used or carried with you, close the dust cover to protect the lens from dust
       or foreign objects, and to avoid accidental shutter release.
View original page 6Page 7 · Read text
INSTALLING THE BATTERIES
        1. Slide the battery compartment cover along the arrow mark designation with your finger to open the
        battery compartment cover (Fig. 3).

        2. Place two 1.5V alkaline batteries or silver oxide batteries (Fig. 4).

        3. Replace the battery compartment cover until a click sound can be heard (Fig. 5).

     NOTE: *Clean the batteries with a dry cloth or paper tissue before inserting.
      ** Be sure that batteries are inserted correctly, i.e. check polarity.

      *** The shutter will operate only when batteries are correctly inserted and not exhausted.

      *** Use the following 1.5V alkaline batteries: LR44, A-76 or equivalent.
         Use the following silver oxide batteries: G-13, SR44, EXP-76, MS-76 or equivalent.


BATTERY TESTING

Test the batteries when:

  — new batteries are installed

   — the camera has not been used for a long period of time

   — the camera is being used continuously for many hours

To test the batteries, press the shutter release button slightly while the dust cover is fully opened and the lens is
in the ready position. If the batteries are in good condition, the green LED located at the top of the camera will
illuminate (Fig. 6).

If the LED fails to illuminate, the batteries are too weak and need to be replaced, or they are incorrectly
inserted.

         NOTE: The batteries will last about one year and must be replaced with two 1.5V alkaline
             or silver oxide batteries.
View original page 7Page 8 · Read text
FILM LOADING

Your Chinon Bellami camera can be used with the most popular 35 mm films available today.

        1. Pull up the film rewind knob until the camera back pops open (Fig. 7).

        2. Then, insert a film cartridge into the film chamber with the protruding end facing the bottom of the
      camera (Fig. 8).

        3. Push in the film rewind knob and slightly turn the knob in either direction until it catches the film
        cartridge spool.

         4. Insert the trimmed end of the film into a slot of the multi-slotted take-up spool.

        5. Rotate the take up spool with your thumb to advance the film until the sprockets engage with the
       upper and lower perforations of the film (Fig. 9).

        6. Close the camera back firmly until it locks with a click (Fig. 10).

        7. Turn the film rewind knob gently until the film slack is taken up and the rewind knob stops turning
        freely. Do not force or further rewind the film.

        8. Advance the film and release the shutter three times (Fig. 11 ). The rewind knob should rotate
       counterclockwise when the film is advanced, and the " I " marking should appear in the frame counter
      window. (Fig. 12).


ASA/DIN SETTING

Make sure the correct ASA/DIN film speed is set in the camera to correspond with the ASA/ DIN film speed
indicated on the film box. Turn the ASA/DIN film speed dial to select the appropriate ASA/DIN Speed in the
ASA/DIN Speed window on the top of the camera (Fig.13)

      * In the event you are using a film with an ASA/DIN speed not indexed in the film speed window, you
       should select the appropriate ASA setting according to the following table: 4.butkus.org

      * For proper exposure, the ASA/DIN dial must be set on an indicated ASA setting (25, 50, 100, 200 or
       400) and not in between.
View original page 8Page 9 · Read text
CAMERAS        25           50            100             200              400
    ASA        20 25 32     40 50 64     80 100 125      160 200 250      320 400 500
     DIN        14 15 16     17 18 19      20 21 22         23 24 25         26 27 28


AUTOMATIC EXPOSURE SYSTEM

Your Chinon Bellami is equipped with a Cds automatic exposure system which will control the exposure level
automatically for any picture taking situation.

         NOTE: Do not obstruct the Cds Automatic Electric Eye so as to always ensure correct
             exposure (Fig. 14).
FOCUSING At first, estimate or measure the camera-to subject distance and rotate the focusing ring to the
appropriate distance (Fig. 15). The following table shows the camera-to-subject distance that the focusing ring
represents:


      METER             1          1.5      2      3       5                  (infinity)
        FEET                3.5        5       7     10      20                 (infinity)
      * Safety Focusing: Under sufficient lighting conditions, i.e., when you are taking pictures outdoors, the
      need for focusing is virtually eliminated. All you have to do is set the focusing ring to the "3M" green
      marking
* Depth of Field:

             METER                    1      1.5     2     3     5           (infinity)
               FEET                         3.5     5     7    10    20          (infinity)

            Sunny day, seaside                         *  *  *  *     *
           Sunny day, scenery or
portrait                          *  *  *
View original page 9Page 10 · Read text
SHUTTER RELEASE

Your Bellami is equipped with a SEIKO programmed electronic shutter which automatically determines the
best combinations of the shutter speed and aperture value for a given lighting situation. First be sure to hold the
camera steady and press the shutter release button halfway. If the slow shutter speed warning LED located on
the viewfinder frame illuminates (Fig. 17), hold the camera as steadily as possible to prevent camera movement
and blurred picture. Keep the shutter release button depressed until the warning LED turns off. Use of a tripod
or flash is highly recommended. If the warning LED does not illuminate, press the shutter release button
completely since the shutter speed is faster than 1/60 sec.

NOTE: Be sure not to block the lens, electric eye, flash window or auto-flash sensor when releasing the
shutter.


UNLOADING EXPOSED FILM

When the film in the camera is fully exposed, the film advance lever will stop. Do not attempt to force the lever
any further. Rewind the film and replace it with a new film.

        1. Close the dust cover and push in the rewind button at the bottom of the camera (Fig. 18).

        2. Unfold the rewind crank of the rewind knob and turn the rewind crank clockwise (Fig. 19). You will
        feel friction as the film is rewound. Suddenly, when the film is rewound completely, the friction
       decreases and the rewind crank will turn with ease.

        3. Pull up the rewind knob to open the camera back (Fig. 20). When the camera back is opened, the
      frame counter will automatically reset to the "S" position. The rewind button on the bottom of the
      camera will pop out upon the next advancement of the film advance lever.


          NOTE: Do not take the film out of your camera in bright sunlight. Your exposed film should be
              processed without delay.
View original page 10Page 11 · Read text
CHINON DEDICATED FLASH SYSTEM

A specially designed and developed automatic flash unit Chinon S-120 is available for your Chinon Bellami
camera as an optional accessory. This highly advanced dedicated flash system permits carefree flash
photography.

        1. Install one AA size alkaline battery according to the polarity indicated in the battery compartment
        (Fig. 21).

        2. Connect the flash unit to the camera (Fig. 22-A). Insert the retaining screw into the flash retaining
       socket on the side of the camera. Turn the flash locking dial until the unit is secured. (Fig. 22-B).

        3. Set the ASA/DIN film speed in the camera to ASA 100 or 400 (Fig. 23). The flash unit will be
       automatically set by the camera.

Set the flash mode selector to the "ON" position (Fig. 24). If used in daylight, set the flash to the "DAYLIGHT
SYNC" position.

Make sure that the flash ready light on the flash unit is illuminated (Fig. 25). The flash ready light on the
viewfinder frame will also flash when the shutter release button is partially depressed signaling the flash is fully
recycled and ready to take a picture (Fig. 26). The flash ready light usually illuminates a few seconds after the
flash is switched to the "ON" position and when the battery is fresh. 4.butkus.org

Adjust the focus to the desired distance and depress the shutter release button (Fig. 27). 7. Return the flash
mode selector to the "OFF" position (Fig. 28).

NOTE: Be sure that your finger does not cover the flash or light meters.
View original page 11Page 12 · Read text
A. Automatic ASA/DIN Setting

When the ASA/DIN film speed is set to ASA 100 (DIN 21) or ASA 400 (DIN 27), the flash unit is
automatically synchronized. If the ASA/DIN film speed of the film to be used, is close to ASA 100 or ASA
400, use the nearest setting, referring to the following table:


  SETTING         100             400
   ASA       80 100 125      320 400 500
    DIN        20 21 22        26 27 28

B. Adjustable Flash Range ("ON" position)

The flash system is compatible with major ASA/DIN film speeds available. The flash System will automatically
compensate to the indexed film speed. If you want to take a picture of the subject which is more than 3M (10
ft.) from your camera, use a high speed ASA/DIN film. The following table shows the effective range of the
flash system.


    ASA            100            400
   METER          1 - 3            1.7 - 6
       Feet             3.3 - 10          5.6 - 20

C. Daylight Flash Photography

("DAYLIGHT SYNC" Position)

If the main subject has less light falling on it than the surrounding area and background, such as backlight
situations or when the subject is beside a sunny window in an interior, under exposure of the main subject will
result. In such situations, it is recommended to use the auto flash for the photograph even in daylight situations
(Fig. 29 & 30). For best results, with outdoor "Fill-in flash", the flash unit should be employed within the
following range:

1M - 3M (3.3 - 10 ft.) . . . Outdoors on sunny days (ASA 1 00)

1M - 5M (3.3 - 16 ft.) . Outdoors on cloudy days or indoors besides a sunny window (ASA 100)


D. Flash Ready Light

The flash ready light of the flash unit will illuminate when it is ready to fire. Plus, the flash ready light (LED)
on the viewfinder frame of the camera will also flash when the shutter release button is partially depressed
signaling the flash is ready. 4.butkus.org

             Note: The flash ready light on the camera will not flash signaling when the flash is set to
              the "DAYLIGHT SYNC" position and it is under exposure.
View original page 12Page 13 · Read text
CARE OF THE CAMERA
You Chinon Bellami camera is a precision instrument. When used with care, it will provide you years of
trouble-free service. Protect your camera from dirt, rain, dampness or excessive heat. Avoid touching the
lens. To clean the lens wipe it gently with a soft lintless cloth or tissue. Do not use eyeglass tissue as it may
damage the lens coating.  If service should be necessary, contact your Chinon dealer or an authorized Chinon
Service station.

* When you are finished taking photographs, it is recommended to close the dust cover of your camera
completely so as to prevent battery drain.
View original page 13
From the M. Butkus archive. Original publisher and archive notices are retained.
Check the model and edition against your equipment.
PDF verified 2026-10-10.