Film cameras
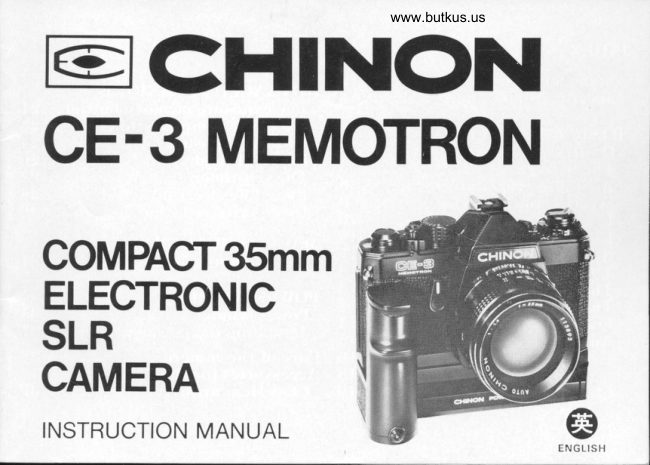
Chinon CE-3 MEMOTRONDIRECT User manual
User manual for Chinon CE-3 MEMOTRONDIRECT. 40 pages in English. Read the original PDF, download or print a copy without registration.
40 pagesEnglish4.0 MB PDF
Loading your manual…Open PDF directly
Document details
- Brand
- Chinon
- Model / document
- Chinon CE-3 MEMOTRONDIRECT
- Document type
- User manual
- Language
- English
- Pages
- 40
- File size
- 4.0 MB
- Category
- Film cameras
- Document date
- Not specified in catalog
Search available document text
Find a term, then jump to its page in the original PDF. Image-only pages may not be searchable; check the PDF for exact wording and diagrams.
Page 1 · Read text
www.butkus.us
ECHINON
CE.3 MEMOTRON

COMPAGI 35mm
ELECTRONIC
SLR
CAMERA
INSTRUCTION MANUAL
View original page 1
Page 3 · Read text
Venmo @mike-butkus-camera  Ph. 2083
PayPal Name  Lynn@butkus.org      www.PayPal.me/lynnbutkus
View original page 3
Page 4 · Read text
www.butkus.us


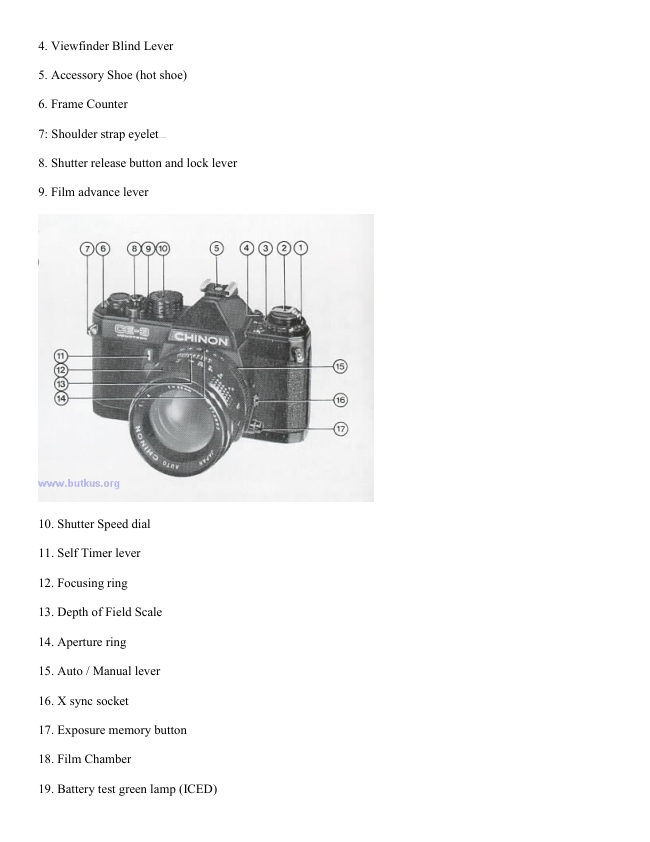
 18. Film Chamber
 19. Battery test green lamp (LED)
30. Viewfinde r eyepiece
31. Sprocket teeth
82. Take up spool
33. Film pressure plate
24. Camera back
35. Rewind button
36. Film rail
37. Film guide rail
38. Seiko Electronic stepless shutter
39. Tripod socket
30. Battery chamber cover
31. Power Winder Electronic contacts
33. Power Winder Coupling cover
33. Power Winder guide pin recery   tacle                                                  ,
                              g
View original page 4Page 5 · Read text
SPECIFICATIONS

* Type : An automatic SLR (Single lens re-      * Film Counter :   Automatically indicates
  flex) compact camera with aperture priority      number of exposures and resets to zero when
  exposure system (AE) and Seiko metal elec-       the camera is opened.
  tromagnetic shutter                                 x Self Timer : 7 -12 seconds
* Picture Size : 24 x 36 mm                         * Film Rewind : Folding crank type
* Film : 35 mm cartridge film                          * Accessory Shoe : Built-in hot shoe
* Lens Mount : Pentax/Praktica M-42 Mount       * Synchronization : "X' terminal
* Viewfinder Visibility  : 95% of negative size                        (X = 1/100 sec.)
* Mirror : Quick return, shockless system        *Power Source : Two silver oxide G-l3 type
*Shutter :  Seiko MIrC-ES (electromagnetic        batteries (Eveready S-76 or equivalent)
  metal shutter, vertical path)                    *Viewfinder Blind : Built-in viervfinder blind
* Shutter Speeds : Auto  : 4 sec.                                                              extraneous light from affecting                                 - 1/100 sec.      to prevent                      (stepless)                     the meter reading when the camera is used
                Manual :  "B'. *X'. 4 sec.      away from the eye.
                   1/1000 sec.                     * Battery Test :  Indication by green signal                   -                 Mechanical :  Shutter op-      lamp (LED) in viewfinder frame
                   eration at                         *X" (1/100 sec.)      * Accessory : Chinon Power Winder, Chinon
* Exposure Meter :  TTL, centre weighted       Interchangeable lenses, various accessories
  measuring system employing two silicon blue     *Dimensions  : (Body only) 140.50 mm (u,) x
  cells, Automatic exposure range of EV-l       88 mm (h) x 50 mm (d) (5.53" x 3.46" x                                            - +18 at ASA 100 F/1.4                                                     1.96")
* ASA Range : 25-3200 (DIN 15 -36)           *Weight : (Body only) 620 g (21.86 oz.)
* Film Wind : Single stroke in an arc of 135o
 with 20o stand off
4
View original page 5Page 9 · Read text
THE BATTERIES
Installing the Batteries
  1. Using a coirr, unlock the battery
   chamber c()\'er tr]' tunring  it
      c(  ) tur  t crc loc krvi se.
 2. I'lace thc trvo 1.5\r silver oxirle
   G-13 type batteries (Eveready S-76
    or equivalent) with the ntinus (-)                                    NO'|E' CLEAN THE tsA'ffERIES    side facing upwarcls (Fig.l ).                                                        \\'I'III A DRY CLOTII OR I'APER 3. Rclllace the trattcrv charnber                           IIIIFORE INSERTING ANI)    c()\'cr            llv ttrrning ftrllv cl<lckrvise    'flIllREAF"|ER                                                  A'f REGULAR    (Fie.            2).                                   IN'IERVALS. MAKE SURE TIIA'I                                       'IIIE  I]A'MERIES ARE IN-
                                  SItRl'llD  CORRIiC'| LY,    i.e.                                    CIIIICK POLARI'IY. 'IIIE SIIUT-
                     TER \\'ILL OPI]RA'IE ONLY
                                                                        \\'l IIIN llA'ffERIIlS ARE IN-
                            STALLED, EXCEPT FOR TI IE
                                 "X" (1 / 100 sec.) AND "Il" POSI-                                                                                 'f toN.
View original page 9Page 10 · Read text
www.butkus.us
    TESTING THE BATTERIES                      @E-@
     Testing the Batteries
     Test the batteries when:
     New batteries are installed.
      The camera has not been used for
       a long period of time.
     The camera is being used contin-
       uously for many hours.
                                  NOTE: EVERY TIME A PHOTO-
                              GRAPII IS TAKEN IN THE   To test the batteries, set the shutter  AUTO MODE, THE GREEN    speed dial to the "Auto" position   LAMP SHOULD GO ON, INDI-
     (Fig. 3), and press the shutter release   CATING THAT THE BAT'IERIES
     button half way. If the batteries are in   ARE STILL IN GOOD CONDI-
    good condition, the green lamp in the   TION. WHEN THE INDICATOR
     viewfinder frame will go on. When the   LAMP FAILS TO GO ON, RE-
     green lamp does not go on, replace the   PLACE THE BAT'IERIES AT      batteries (Fig. a).                                    ONCE.
L                                                                                              I
View original page 10Page 11 · Read text
LOADTNG THE CAMER A  MEMO HOLDER                                      /
LOADIIIG THE CAMERA:             that the upper ancl lower film perfor-
                                     ations have engaged the transportUse 80 or 36 exposure 35mm film.                                          sprclckets, close the camera back
  1. Pull out the film rervind knob    firmlv (Fig. 7).
     trntil the camera back is released
     (Fig. 5), then swing the camera
   back fully open.
  3. Keep the-filin rewind knob pulled
    all the wav out, insert the film                                  USII{G THE MEMOHOLDER:    cartrirlge into the film chamber
    rvith the protruding end towards   Your Chinon CE-3 Memotron com-
   the base of the camera. Push in    perct SLR has a built-in mernoholder
    the filrn rervind knob(Fig. 6).        feature. To trtilize the rncmoholder
It may be f<lund necessarv to ttrrn    featurc simply cut off the top of the
the knotr slightly so that the rervincl     filrn box and insert it into the memo-
shaft engages the film cartriclge sgxtl.    holder located on tlrc back cover of
Insert the trimme<l end of the film    v()ur carnerar so thtrt vou can qrricklv
into the slot of the take-up sltool.    anrl easily identifv the type of film
Ilolrling the film lightly down orr to   and ASA speed used in the carnera.
the translxlrt spr<lckets, operate the   Your calling card can also be inser[ed
film advance lever. Ilan'ing checked     int<l the memoholrler.

10
View original page 11Page 12 · Read text
t  ADVANCING THE FILM                  www.butkus.us     fFr-   /^I                                                   ,*-iEo€,J
     ADVAIVCING TIIE FILM:
    To make sure the film has been
      loaded properly, operate the film ad-
     vance lever through a full stroke
        (Fig. 8). Now turn the rewind knob
      clockwise until resistance is felt. Do
      not force it. Keep observing the film
     rewind knob; it should turn counter-
     clockwise every time the film is
      advanced.
     Operate the film advance lever and                                     ('1"     shutter release until figure       is
     opposite the pointer in the frame
     counter window. The camera is now   NOTE: WHEN TIIE SHUTTER RD
     ready for the first exposure (Fig. 9)   .   LEASE LOCK LEVER IS EI\I.
                                 GAGED, (Fig. 10) TrrE STTUTTER
                                        CAI{]\OT BE RELEASED. TURN
                            THE LEVER TO THE LEF'T TO
                                  UNILOCK (Fig. 11).


                                                                         11
View original page 12Page 13 · Read text
ADVANCING THE FILM (Continued)

IIIPORTAIIT NO f E: SET 'tHE   THE FILM COLNTER TI{DI-
SHI-"['TER SPEED DIAL TO     (]A'TES YOU ARE READY TO.THE                          ,TAKE'THE    "X'OR "MANUAL" SPEEI)                FIRS'T EXPOSURE,
POSTTION \\'HEN MAKING    tsE STIRE 'TO RE'TTIRN THE
T\\'O BLANK EXPOS['RES   SHUTTER SPEED 'TO THE
TO DISPOSE OF THE FIRS'I     ..AUTO'' POSITION.
FE\\' II{CHES OF FILM WHIC]H
\\'ERE EXPOSED DT'RING
LOADIIIG, HOWEVER, DO
I{OT SET THE SHUTTER             'TOSPEED DIAL   THE AUTO
POSI'TION, IF YOU SHOULD
DEPRESS THE SHUTTER RE.
LEASE BUTTON{ IIg THE ATI'TO
POSITION THE SHUTTER
WILL REMAIN OPEI{ FOR A
LOIJG PERIOD OF TIME (TIME
EXPOSURE) AIID THE FIL}T
WILL ISO'T ADVANCE. WHEI{
View original page 13Page 14 · Read text
www.butkus.us
ll   FILM SPEED / SHUTTER SPEED          @E-@
     FIL}I SPEED SETTIING:              rotate thc shtrtter speed dial until
     'fhe                                    the "Auto" lnalrk is <tltlxrsite the inrlex      ASA / DIN speed of the film is   line or1 the canlcra brldv (Fig 13).     inrlicated on the film b<lx or in the    'fo set it  frrr ntantral exlx)srlre c()11-    instruction shect ltacked rvith the    trol, ttrnr the shutter sl)ce(l di.rl until      filrn. Select thc rlcsire<l ASA / Utf    the rlcsirerl shtrttcr speed is linecl trll     spcctl lrv trrrnirlg the ASA selection                                               rvith thc inclcx rnark on the camera    Jrin until  thc  apltropriate ASA    bodv.    nurnber appears in thc ASA dial rvin-
    rlou' (Fig. 1Z) and then align the
   ASA / DIN ntrnrbcr rvith the rvhite
    inrlex line on the carnera t<lp c()\'er
   bv tunring the ASA / DIN dial.
  THE SHI]T'TER SPEED SET'TING:
   Your Chinon C+3 Memotrr)n camera
    is equipped u'ith an electromagneti-
    callv controlled Seiko stepless metal
    shtrtter frtr eithcr automatic rtr manrral
   exposure control. T<l set the camera
     frrr automatic shutter speecl selectirtn,
View original page 14Page 15 · Read text
npeRruRe serrlruc r rocuslr,rc  le:l
  THE APERTURE SETTING:         upper and lorver split images in the
                                    microprism are coincedent in  the  The aperture is set in the usual man-                                           center of the vien{inder (Fig. 17, 1^8).  ner by rotating the lens diaphragm                             The focus can also be adjusted by   ring until the required F-stop is set                                       the microprism rvhich surrounds the   against the red diam<tnd index rnark                                  microprism disk by turning the  on the lens barrel (Fig. 14, 15). With                                             ftrcusing ring on ths lens back ancl  the shutter speed dial set at "Auto",                                              f<rrth until the image is perfectly  the electronic rnetering svstem will                                         sharp. This procedure ensures with-   set the correslx)nding shutter speed                                      out a doubt that the irnage is at its   to enstrre correct exlx)sure of the film.                                          sharpest setting.
  FOCUSII[G:
  Your Chinon CE-3 llemotron has
  three methods of  f<rcusing: split   Scale Focuslng:
  image, microprism, and scarle focus-   You may erlso focus by utilizing the
   ing. Set the auto / manual control    engraved disttrnce scale on the lens.
  on the lens t<t the "Aut()" pclsiti<tn    Estimate or rneasure the camera t<>
  (Fig. 16). Observing the subject    subject distance in feet ()r meters'  through the viewfinder turn  the   then set the focusing ring to the
  focusing ring on the lens until the    appropriate setting (Fig. 19).
                                                                                                www.butkus.us
  t4
View original page 15Page 16 · Read text
www.butkus.us
   AUTOMATIC EXPOSURE                      @E-@
   AUTOMATIC EXPOSURE:
   The meter on I off srvitch is incor-    porated in the winding mechanism.
     It is therefore necessary to advance
   the fllm advance ievei before pro-
    ceeding. Set the shutter speed dial to
   "Auto" (Fig. 30) and select the aper-
   ture according to your purpose for
    shooting the picture. Focus the sub-
    ject. Depress the shutter release but-
   ton slowly and smoothly. When the
    shutter release button is half way
    ciepressed, the exlx)sure meter needle
     u'ill indicate the correct shutter speed
    figure according to the light value
   rvhich corresponds to the chosen
   aperture vaiue (Fig. 21). Further de-
    pression of the shutter release button
     rvill reiease the shutter at the shutter
   speed indicated in the viewfinder.I
                                                                      l5
View original page 16Page 17 · Read text
EXPOSURE METER NEEDLE
DXPOSURE METER NEEDLE:       As the lens aperture is altered
                                    the shutter speed will alter ac-  1. Over Exposure: Over exposure                                             cordingly. Therefore, if the cam-   will be indicated by the meter                                      era selects a speed that is con-   needle moving into the upper                                           sidered unsuitable for the subject   striped area of the viewfinder                                     to be photographed, change the    scale (Fig. 22). Should this occur                                         aperture until a suitable shutter    the lens aperture must be reduced                                  speed is selected. Should the    until the needle enters the shut-                                    meter needle move below 1 / aO    ter speed scale. If the needle will   not enter the scale a neutral       sec. then the use of a trtpod ts                                    recommended., provldtng that   density filter must be useC.       a larger aperture cannot be
                                           set (Frg. 33).
 3. Correct Exposure: The expo,sure
   meter needle stays ll'ithin the
   scale (arrow marked) correct
   exposure will result. It will be
   found when handling the camera
   that automatic shutter speed
    selection is a function of the aper-
   ture and the ASA values chosen.
View original page 17Page 18 · Read text
www.butkus.us
EXPOSURE METER NEEDLE (Continued)                     @E-@
 3. Under Exposure: Under expo-
   sure rvill be indicated by the
   meter needle moving into the
   lower striped area of the view-
   finder  shutter speed scale
   (Fig. 24). To compensate open
  up the lens aperture until the
   needle moves back onto the scale.
   Should the needle still not re-
   enter the scale additional lighting
   or an electronic flash unit must
   be used.


                                                                 L7
View original page 18Page 19 · Read text
UNLOADING THE CAMERA
U1VLOADI1VG TIIE CAMERA:          the way and lift out the film
                                     ((36"       cartridge (Fig. 27).The rewindWhen the red figure '(2O'') or                                          button on the camera bottom will(30 or 36 exposures) appears against                                        snap back into position when thethe index mark in the frame counter                                          film advance lever is next oper-window, the end of the film has been                                        ated. Have the film processedreached.                                         without delay.
Steps for Unloading the Camera:
  1. Press in the rewind release button
   on the camera bottom (Flg. 25).
 2. Lift up the rewind crank on the
   rewind knob (fig. 26).
  3. Turn the rewind crank in a clock-
   wise direction (Fig. 86). Tension
    will be felt as the film is being
   rewound into the cartridge. Stop
   rewinding when the tension
    ceases. Open the camera back by
   pulling out the rewind knob all

18
View original page 19Page 20 · Read text
www.butkus.us
CHANGING THE LENS                     @E=@
CHANGII\G THE LEIVS:
Your Chinon CE-3 Memotron is
equipped with a screw mount which
accepts any interchangeable lens with
the Pentax f Practictr screw mount.
To remove the lens, turn the lens
counterclockwise until it is separated
from the camera body (Fig. 28, 89).


 NOTE: DO NOT REMOVE OR
 REPLACE TFIE LENS WHILE
 THE CAMERA IS FUNCTION.
  INIG.


                                                                 19
View original page 20Page 22 · Read text
www.butkus.us
THE EXPOSURE MEMORY BUTTON                     @E-@
In normal use the Chinon CE-3     2. Press the shutter release lrtrtton
X{ernotron rvill produce perfectly       half rvav and meastrre the light
expose<l pliotographs, drre to  the     on the main part of the sr.rbiect
automatic expxtstrre svst.ent incrlrlx)r-     you want t<l shrxtt excluding all
ated in the camera. Iforvever, some       rrrlnecessary light from the side
lighting conditions rvill occur thatt      or background (Figs. 30, 31, 32).
could rnisguide the svstern. Subjects     Then press the exltr)sltre memory
rvith a. \'ery high contrast or strclngly       button which will instantiy rnem-
back-lit are examples. Such rnisguid-        orize the light value on the sub-
ance ()ccrlrs rvith electronic shutter        ject. locking it in place (Fig. 33,
calncras since thc exIX)srrre system       34). When the memory btrtton is
contintuluslv f<lll<lrvs the fltrctuations       locked the green lamp in the view-
of light intensit\' nl) until the very       flnder frante will stay on. Wren
instant that the cxposrtre is made.      the exposure ntemory button is'fo  ()\'erc()rnc the se conditions a      returned to the original position
tnem()rv lock has iteen inc<lrporated.       or the exposLlre has been made,
Steps frrr rrsing the lixlx)srlre Memory:       the green lanrp will go off.
   1. F<rcus thc srrbject. Mal<e sure that    3. With the exp<)sllre mem()rv but-
    the shutter sltced <lial is set at     ton locked c()rnpose the subject
    the "Attto" lxlsitiort.                  in the vies.fincler as vou clesire
View original page 22Page 23 · Read text
THE EXPOSURE MEMORY BUTTON (Continued)
     (Fig. 35). Then press the shutter
    release button all the way to take
    the photograph.


33
View original page 23Page 24 · Read text
www.butkus.us
  EXPOSURE COMPENSATION                      @E-@
  EXPOSURE COMPENSATION:       4. 1 X index Correct Exposure.
                               5.     US EV (Ug F-stop)   The Chinon CDB Memotron camera                                                      over exposure.
I    incorporates an exposure compensa-   6.        213 EV (213 F-stop)    tion dial which can be utilized for                                                      over exposure (Fig. 37).    special purposes such as bracketing                                                   7 .2 X index 1 EV (1 F-stop) over    exposures, compensation for back-lit                                                  exr)osure.    or spot-lit situations. By rotating the
  ASA / DIN dial as shown in the fol-   NOTE: AFTER THE EXPOSURE
   lowing chart you can change your   HAS BEEN MADE, THE ASA
   exposure by plus or minus one full   NUMBER MUST BE RETURNED   F-stop (in LIS F-stop increments)   TO THE 1 X INDEX MARK FOR
    (Fig. 38).                     NORMAL EXPOSURE (#4).
      L. UZ X index L EV (1 F-stop) under
       exposure.
      2.          213 EY (2/3 F-stop)
                under exposure.
      3.          1/3 EV (1/3 F-stop)
               under exposure (Fig. 36).


                                                              33
View original page 24Page 25 · Read text
meruual exposuneIel
MAI{UAL EXPOSURE:                  shutter speed dial. If for special
                                        purposes it is necessary to eitherBy moving the shutter speed dial off                                      under or over expose the photo-the "Auto" setting manual shutter                                       graph, proceed by either of thespeeds can be set. There are two                                      previous methods. Then rotatemethods of selecting the correctexposure.                            the lens aperture ring to bring
                                        the meter needle above the shut-  1. Set the required shutter speed on                                            ter speed indicated in the view-   the dial. While depressing the                                           finder. Thls will produce over   shutter release button half way,                                            exposure. Conversely  if the needle   observe the meter in the view-                                            is brought below the indicated    finder. Rotate the lens aperture                                         shutter speed then under expo-    ring until the needle aligns with                                          sure will result.   the corresponding shutter speed
    figure on the scale in the view-
    finder (Fig. 39).               The Manual Shutter speeds can be
  8. Set the required aperture on the   used for:
    lens. Slightly depress the release      1. A particular shutter speed that is
   button and observe which shutter       required and beyond the coupling
   speed is indicated in the view-       rarrge of the meter e.g. 4 sec.   finder. Set this speed on the       exposure at 3200 ASA

24
View original page 25Related documents and language editions
From the M. Butkus archive. Original publisher and archive notices are retained.
Check the model and edition against your equipment.
PDF verified 2026-10-10.