Film cameras
Chinon CP-5s User manual
User manual for Chinon CP-5s. 29 pages in English. Read the original PDF, download or print a copy without registration.
29 pagesEnglish2.2 MB PDF
Loading your manual…Open PDF directly
Document details
- Brand
- Chinon
- Model / document
- Chinon CP-5s
- Document type
- User manual
- Language
- English
- Pages
- 29
- File size
- 2.2 MB
- Category
- Film cameras
- Document date
- Not specified in catalog
Search available document text
Find a term, then jump to its page in the original PDF. Image-only pages may not be searchable; check the PDF for exact wording and diagrams.
Page 2 · Read text
will permit automatic AF operation when used with the optional Chinon 35-70mm AF lens. Total
unmanned automatic operation is also possible when further used with the optional Chinon power
winders and wireless remote control unit.

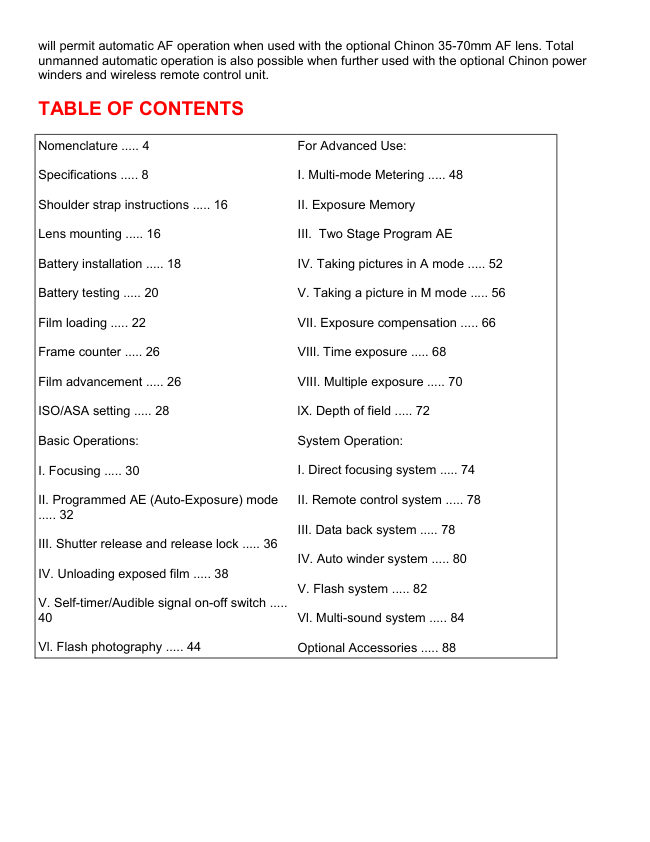
TABLE OF CONTENTS

Nomenclature ..... 4                       For Advanced Use:

Specifications ..... 8                                          I. Multi-mode Metering ..... 48

Shoulder strap instructions ..... 16                    II. Exposure Memory

Lens mounting ..... 16                                       III. Two Stage Program AE

Battery installation ..... 18                      IV. Taking pictures in A mode ..... 52

Battery testing ..... 20                       V. Taking a picture in M mode ..... 56

Film loading ..... 22                                VII. Exposure compensation ..... 66

Frame counter ..... 26                               VIIl. Time exposure ..... 68

Film advancement ..... 26                          VIII. Multiple exposure ..... 70

ISO/ASA setting ..... 28                          lX. Depth of field ..... 72

Basic Operations:                      System Operation:

I. Focusing ..... 30                                             I. Direct focusing system ..... 74

II. Programmed AE (Auto-Exposure) mode      II. Remote control system ..... 78
..... 32
                                                                         III. Data back system ..... 78
III. Shutter release and release lock ..... 36
                                                  IV. Auto winder system ..... 80
IV. Unloading exposed film ..... 38
                                           V. Flash system ..... 82
V. Self-timer/Audible signal on-off switch .....
40                                                  Vl. Multi-sound system ..... 84

Vl. Flash photography ..... 44                Optional Accessories ..... 88
View original page 2Page 3 · Read text
NOMENCLATURE

1. Manual shutter speed select button
                                                 8. Self timer LED
/Exposure memory button

                                                 9. Shoulder strap eyelet
2. Metering mode select lever

                                            10. AF electronic contacts
3. Shutter release button

                                            11. Self timer / Audible signal on-off switch
4. Exposure mode select dial

                                            12. Power grip attachment screw
5. Film advance lever 4.butkus.org

                                            13. Lens lock release lever
6. Film counter window

                                            14. Power grip (battery compartment)
7. Multi exposure lever


15. Accessory shoe (hot shoe)               19. Aperture ring

16. Film rewind knob and back opening knob 20. Depth of field scale

17. Film speed dial (ISO/ASA)               21. X-sync socket

18. F-stop window                          22. Focusing ring
View original page 3Page 4 · Read text
23. Viewfinder eyepiece
                                            31. Sprocket teeth
24. Metal focal plane shutter
                                            32. Multi-slotted needle
25. Film chamber
                                            33. Camera back
26. Film rail
                                            34. Film pressure plate
27. Film guide rail
                                            35. Power winder coupler
28. Power source contact
                                            36. Auto Date electronic contacts
29. Power winder electronic contacts
                                            37. Rewind button
30. Tripod socket


SPECIFICATIONS

SPECIFICATIONS:

Type: 35mm automatic compact SLR camera with TTL full aperture selectable multi-mode metering (Center
Weighted AVERAGE Metering, SPOT Metering and SPOT-AVERAGE metering), twin program AE (instant
stop-down re-metering), Aperture priority AE, and manual exposure system. 4.butkus.org

Picture format: 24 x 36mm

Lens Mount: CHINON universal bayonet mount (K, KA, RK mount compatible) with built-in CHINON AF
lens contacts.
View original page 4Page 5 · Read text
Mirror: Quick return mirror with sub mirror.

Shutter: Electromagnetically controlled focal plane shutter, stepless speeds from 8 sec to 1/1000 sec on
automatic maximum operation time at AE (A, P1 or P2 mode) is 30 seconds, 14 speeds from 8 to 1/1000 sec on
manual exposure. Electronically controlled automatic and manual exposure.

Shutter Release: Electromagnetic type shutter release with safety lock and provision for cable release.

Viewfinder: Fixed eyelevel pentaprism (silver-coated) central split image with micro prism collar, 18 digital
LED's indicate shutter speeds (green), over/under exposure (red), and program AE (green), Aperture visible in
viewfinder (optical type).

Viewfinder magnification: 0.87X at infinity with standard 50mm lens.

Viewfinder visibility: 92%

Auto Focus Type: Built-in AF contacts for CHINON AF lens, activated by shutter release.

In-Focus Trigger: shutter will not be released unless the optional AF lens is in focus.

Exposure Meter: TTL full aperture AVERAGE metering and SPOT metering plus capability of measuring
light in accordance with the averaged reading of SPOT and center weighted AVERAGE metering (SPOT-
AVERAGE) employing two silicon blue cells.

Exposure Range: at F1.4 50mm, ISO 100.

Center weighted average metering - EV + 1 (F1.4, 1 sec.) to EV + 19 (F22, 1/1000 sec.)

Spot metering - EV + 3(F1.4, 1/4 sec.) to EV + 19 (F22, 1/1000 sec.)

Exposure Compensation: Built-in exposure memory lock system with audible signal activated by halfway
depression on shutter release button at SPOT, and by "M' button at AVERAGE metering (Aperture priority AE
mode only)

ISO Range: ISO 25-3200 with 1/3EV segment (for DX coded film)

Exposure Compensation: +2EV to -2EV

Programmed AE mode: Two stages available.

P1: The programmed AE designed for fast moving object. Lens aperture stays open up to the shutter speed of
1/60 sec. Between 1/60 -1/1000 sec., the aperture varies in accordance with the programmed shutter speed.

P2: The Programmed AE designed for slow moving objects depth-of-field well considered AE character. Lens
aperture stays full open up to the shutter speed of 1/8 sec. At faster than 1/8 sec., the aperture varies in
accordance with the programmed shutter speed.

Programmed AE signal: Built-in with flashing "P" LED when the aperture is set within 4 stops from full
aperture opening. Beyond 4 stops from full aperture opening, "P" LED will remain "ON" at program AE mode.
View original page 5
Page 6 · Read text
Manual Shutter Speed selector: One-touch activation type by pressing the shutter release button halfway.
Also serves as Exposure Memory button at A mode. Depressing the "M" button, shutter speed starts from 1/125
sec. and goes up with LED indication. Depressing both "M" button and shutter release button, shutter speed
goes down from 1/125 sec. A with LED indication in viewfinder.
S.C.S. (Shutter speed Change Signal): Built-in with audible buzzer signal along with manual shutter speed
change.

M.E.S.: (Manual Exposure Signal): Built-in with audible buzzer signal when the proper exposure is achieved
by turning aperture ring.

Camera Shake, over/under warning: shutter speed slower than 1/30 sec., under/over warning with double
audible signal.

Film Advance: Single stroke in an arc of 130° with 25° stand off. Motorized film advance with optional power
winder.

Film Loading: Multi-slotted needle type

Film Rewind: By depressing the rewind button and cranking the rewind lever.

Film Counter: Automatically indicates number of exposure and resets to "S" when the camera back is opened.

Multiple Exposure: Built-in switch which disengages film advance and film counter.

Self timer: Electronically controlled at 10 sec. with flashing red LED and audible buzzer signal.

"B" (Bulb) Timer Signal: Built-in with variable audible buzzer signals.

Accessory Shoe: Hot shoe type with "X" sync and a contact for CHINON dedicated flash.

"X" Synchronization: "X" flash sync at 1/100  sec.4.butkus.org

Slow Synchronization: 1/60 see or slower at manual

Special Contacts for CHINON AF lens: Built-in

Special Contact for CHINON Auto Date: Built-in

Power Source: 3 x 1 .5V "AAA" (AM-4)       4www.butkus.org

Power Hold System: 30 sec. at manual exposure mode

Battery Check: Built-in with digital LED indicator

Accessories: Chinon power winders, Dedicated flashes, Info Back-2 data imprinting unit, Auto Date data
imprinting unit, Super multi-coated lenses, AF lenses, Deluxe carrying cases and many more.

Dimensions: 136 (W) x 88 (H) x 51 (D) mm. (5.35" x 3.46" x 2.01") Weight: 520g (18.34 oz)
View original page 6
Page 7 · Read text
SHOULDER STRAP INSTRUCTIONS


                                               Place the end of the shoulder strap
                                                 through the retaining ring connected
                                                         to the camera body lug. Fold the
                                                  shoulder strap over the retaining ring.
                                               Place the ends of the strap through
                                                   the plastic retainer. Pull tight to
                                                   secure. Follow the same procedure
                                                             for the other side of the camera (Fig.
                                                         1, 2).


LENS MOUNTING


                                             Your CHINON CP-5 program is
                                              equipped with a CHINON "K"
                                               bayonet mount which accepts all
                                                  interchangeable lenses with the "K"
                                               bayonet mount. To attach the lens,
                                            match the red dot on the camera
                                            body with the red dot on the lens
                                                            (Fig. 3).


Then insert the lens into the camera body and turn it clockwise until the lens locks with a click. To
remove the lens from the camera body, depress the lens lock release lever, turn the lens
counterclockwise as far as it will Do, and lift it up from the body (Fig. 4)


BATTERY INSTALLATION

                                                         1. Turn counterclockwise the screw
                                           on the side of the power grip to
                                           remove the power grip from the
                                           camera body (Fig. 5).

                                                         2. Place three 1.5V "AAA" alkaline
                                                  bakeries (LR-03, AM-4) in the power
                                                         grip (Fig. 6).

                                                         3. Attach the power grip to the
                                           camera body by turning the screw
                                                  clockwise to secure it.
View original page 7Page 8 · Read text
NOTE:

       1. Make sure that the batteries are inserted correctly, i.e., check polarity. The shutter will
      operate only when batteries are correctly installed and not exhausted. When replacing
       batteries, replace all three bakeries at the same time.

       2. If you do not use your camera for a long period of time, remove the bakeries, and store in a
      dry location. This will prevent the possibility of battery leakage and damage to your camera. 4.butkus.org

BATTERY TESTING
                                                        1. Set the "exposure mode select dial"
                                                        to the "P" position (Fig. 7).

                                                        2. Look through the viewfinder and
                                              depress the shutter release button
                                                halfway down to confirm at least one
                                                        of LED indicators in the viewfinder
                                                      illuminates (Fig. 8).

                                                        3. When nothing illuminates, replace
                                                  the batteries with a fresh set or check
                                                        to ensure the batteries are correctly
                                                           installed.
NOTE: Battery testing cannot be accomplished with the exposure mode select dial set at the "L" or
"B".


FILM LOADING

                                                         Pull up on the film rewind knob until
                                                   the camera back pops open (Fig. 9).
                                          Then insert a film cartridge into the
                                                            film chamber with the protruding end
                                                         of the cartridge positioned to the
                                              bottom of the camera. Push down the
                                                            film rewind knob and slightly turn the
                                            knob in either direction until it "seats"
                                                    properly into the film cartridge spool
                                                           (Fig. 10).
View original page 8Page 9 · Read text
Insert the trimmed end of the film into
                                           a slot of the multi-slot needle (Fig.
                                                       11). Turn the exposure mode select
                                                             dial to "M" or "X" setting and advance
                                                   the film while holding the film lightly
                                        down on to the transport sprockets.


Release the shutter if necessary and advance the film until the sprockets engage with the upper and
lower perforations of the film (Fig. 12). Then close the camera back firmly until it locks with a click.
Now turn the film rewind knob gently until all the slack is taken up and the rewind knob stops.


                                     Do not force or further rewind the film
                                                           (Fig. 13) Advance the film and
                                                  release the shutter three times (Fig.
                                                       14). The rewind knob should rotate
                                                  counterclockwise as the film is
                                            advanced and the "1 " marking
                                                should appear in the frame counter
                                           window (Fig. 15).


                                              Turn the exposure mode select dial to
                                                   the desired position. A convenient
                                  memo holder is provided on the back
                                                         of your camera. Whenever you load
                                       new film, just cut off the top of the film
                                            box and put it in the memo holder as
                                           a reminder (Fig. 16).
View original page 9Page 10 · Read text
FRAME COUNTER
                        Your CHINON ,CP-6 program is equipped with a frame
                          counter which displays the number of exposures made and
                            resets automatically upon opening the camera back. At the
                           very beginning, the counter shows "S" indicating the start of
                           the picture taking process. When a film is loaded according to
                           the procedure previously described the counter displays "1"
                              indicating that the camera is ready for the first exposure. Every
                           time the film advance lever is turned, the counter will proceed
                       one stop forward. The number 24 and 36 are colored in orange
                              to warn the end of commonly used films (Fig. 17) 4.butkus.org

FILM ADVANCEMENT

When the film end is reached, the film advance lever may stop before the lever is fully turned. Do not
force the lever. Stop winding at once and rewind the film. Refer to "UNLOADING EXPOSED FILM."

ISO/ASA SETTING

                      The film speed dial located on top of the camera is coupled
                                directly to the internal exposure control circuitry and the
                             correct exposure factor for the film is automatically set by
                              aligning the ISO/ASA number of the film you are using with the
                          index mark on the camera body (Fig. 18). The ISO/ASA
                      number of the film is printed on the film box or in the
                               instruction sheet packed with the film. Pull out the film speed
                                 dial and turn the dial to align the appropriate ISO/ASA number
                             with the green index mark. Be sure to check the ISO/ASA
                      number whenever you put new film into the camera.

BASIC OPERATIONS

I. Focusing


                         At the center of the viewfinder is the split image with microprism
                                collar which is then surrounded by ground glass. When the camera is
                                in focus, the image on these focusing aids becomes sharpest. While
                            observing the subject through the viewfinder, turn the lens focus ring
                                  until the upper and lower split images match up to form a uniform
                         image (Fig. 19).

                            This split image focusing is particularly helpful when the subject is
                          dominated by vertical lines. The microprism is also very helpful;
                       when out of focus; the image on the microprism will be composed of
                            a collection of asterisks (Fig. 20). These sparkling asterisks will
                             disappear when the focus is properly set. You can double check the
                             focus seeing by the image on the ground glass.
View original page 10Page 11 · Read text
You can also focus indirectly. Actually measure or estimate
                             the distance to the subject and set the lens focus ring to the
                             appropriate setting (Fig. 21).


II. Programmed Auto-Exposure

                                                    (AE) mode ("P" mode)

                                                   Your CHINON CP-5s program
                                                camera automatically selects
                                                          the most suitable combination
                                                                 of shutter speed and aperture
                                                                     for the optimum exposure.
                                               The programmed AE mode is
                                                               ideal for general picture taking
                                                   by shooting very quickly and
                                                                   easily, eliminating
                                                      troublesome exposure setting
                                                        according to light conditions.


                     The CHINON CP-6 program camera is also equipped with the
                         World's First "Two-Stage" Program AE mode.  It is
                     recommended to use, in most cases the "P1 " mode, which
                           selects fastest practical shutter speed.
                             1. Set the Exposure Mode Select dial to the "P1" position (Fig.
                            22).
                             2. Set the lens at it's minimum aperture.
                             3. While looking at the shutter speed indicator scale in the
                            viewfinder, slightly depress the shutter release button.
View original page 11Page 12 · Read text
The "P" LED and program selected shutter speed LED indicators light up (Fig. 24). Further pressure
on the shutter button will release the shutter.

* Programmed AE mode warning: The "P" LED indicator (green) in the viewfinder will "flicker"
when the lens aperture is set within four stops of the lens full aperture opening. Beyond four stops of full
aperture opening, the "P" LED indicator will remain illuminated at the programmed AE mode. Thus, set
the lens aperture, so as not to cause the "Programmed AE mode warning" LED to "flicker."

For more detailed usage of programmed AE, please refer to the section "Two-Stage programmed AE"
for advanced use.

III. Shutter release and release lock


                        Your CHINON CP-5s program camera features a two stage
                           electromagnetic shutter release with safety lock. When the
                             shutter release button is depressed halfway, the electronic
                                 circuitry starts functioning. When the button is fully depressed,
                                                   it will trigger the shutter. Always hold the camera steady and
                             gently depress the shutter release button to make an
                          exposure. The position marked "L" on the exposure mode
                             select dial is the shutter release safety lock position.


When this is aligned with the index mark, the batteries are disconnected from the circuitry and
an exposure cannot be made (Fig. 25). This position is also used when the camera is not to be
used for a long time.

IV. Unloading exposed film

                                        When the film in the camera is
                                                                          fully exposed, the film advance
                                                             lever will stop. Do not attempt
                                                               to force the lever any further,
                                                         but rewind the film and replace
                                                            with a new one. Push in the
                                                      rewind lock release button at
                                                         the bottom of the camera (Fig.
                                                             26). Unfold the rewind crank of
                                                         the rewind knob. Turn the
                                                      rewind crank clockwise (Fig.
                                                             27).

You will feel friction as the film is rewound from the camera, back into the film cartridge. Suddenly,
when the film is rewound completely, the friction decreases and the rewind crank will turn with ease.
View original page 12Page 13 · Read text
Then pull up on the rewind knob to open the camera back
                                (Fig. 28). When the camera back is opened the frame counter
                                     will automatically reset to "S". The rewind lock release button
                       on the bottom of the camera will pop out to the normal position
                     when the film advance lever is advanced again. Your exposed
                                 film should be processed without delay.


V. Self-timer/Audible signal on-off switch


                                           Your CHINON CP-5s program
                                         camera is equipped with an
                                                     electronic self-timer with a red
                                   LED indicator, together with a
                                               piezo ceramic buzzer (audible
                                                        signal).


Thin self-timer switch also functions as an audible signal on-off switch. The built-in self-timer
electronically delays the shutter release for ten seconds. The camera should be mounted on a firm
support during self-timer operation. To activate the self-timer, place the self-timer switch to the upper
position and depress the shutter release button (Fig. 29, 30). You will notice the red self-timer LED
blinking with the piezo ceramic buzzer (audible signal) and two seconds before the shutter release
the flashing frequency will increase giving you or your audience time to smile. The self-timer may also
be utilized for releasing the shutter at low shutter speeds when a cable release is not available. If you
decided not to use the self-timer, you can cancel it even after it has started to operate. Just return the
self-timer switch to the normal position for cancellation.

NOTE: When utilizing the self-timer with the exposure mode select dial set at "P" or "A", it is
recommended to block the viewfinder with an eyepiece cover or similar item to prevent extraneous
light from interfering with the automatic exposure system of the camera (Fig. 31 ).
View original page 13Page 15 · Read text
2. A few seconds after your CHINON flash is turned to the "ON"
position, the flash ready light will illuminate. When the flash has
reached adequate power, the camera's shutter speed is
automatically set to the 1/100 sec., and 1/125 sec. shutter speed
indicator (green) will blink, signaling the camera flash is ready to
operate (Fig. 35).

3. With the exposure mode select dial set at "A", after the picture
has been taken and before the flash has recycled, the camera will
automatically switch to the automatic exposure mode until the flash
has once again recycled.


                                   Other electronic flash units can be
                                          utilized with your CHINON CP-5s
                                 program camera. However, if the
                                        unit does not incorporate a built-in
                                     hot shoe, a P.C. cord must be
                                   connected to the "X"
                                     synchronization terminal on your
                                CP-5s program camera for proper
                                        flash synchronization. Also the
                                   exposure mode select dial must be
                                           set to the "X" position (Fig.
                                        36). NOTE: It is advisable to use
                                   only CHINON dedicated flash units
                                      or units designed specially for use
                               on CHINON cameras.

                                  (Webmaster): Any auto (non-
                                     dedicated flash) will work with this
                                   camera. They can be expensive
                                        units to $30 units. By placing the
                                        flash in AUTO mode, look at your
                                      film ASA and distance to your
                                         subject. Set your camera to manual,
                                            at 1/60 sec. or "X" and to the F-stop
                                        stated on the flash. Some flash units
                                        will have multiple colors (flash
                                 power) and have more than one F-
                                         stop. These determine the max.
                                      distance to the subject.
View original page 15Page 16 · Read text
NOTE: When "FP" or "M" type flash bulbs are used, the shutter speed must be set to 1/15 sec. or slower. Use
of a tripod is always recommended. For details on "Slow Synchronization", refer to "SYSTEM OPERATION".

FOR ADVANCED USE:

I. Multi-mode metering system


                                         By simply switching the metering select lever,
                                       SPOT metering and center weighted AVERAGE
                                                      metering plus capability of measuring light in
                                                      accordance with the averaged reading of SPOT and
                                                            center weighted AVERAGE metering (SPOT
                                      AVERAGE) can be obtained regardless of the AE
                                            mode chosen.


1. AVERAGE: center weighted average metering method
This metering system is considered as the conventional way to measure light. The light value of the subjects
placed in the viewfinder is measured evenly with the stress on the light value in the center of the composition.
Simply set the Metering Mode Select Lever to the AVG position to employ this metering mode (Fig. 38).

2. SPOT: spot metering method


                                                      This method to measure a light value of
                                                           the subject placed in the center of the
                                                          viewfinder, which covers about 2% of
                                                           the total picture area. The spot metering
                                                    system measures the area covered by the
                                                           split-image and microprism part of the
                                                        focusing screen.


 This method is extremely useful when there is a big gap between light and dark areas of the subject, e.g. when
taking pictures of a subject with direct sunlight toward the camera (backlit conditions), or of a subject spot-lit
with a dark background. 1.) Set the Metering Mode Select Lever to the SPOT position (Fig. 39).  2.) The
shutter release button depressed halfway, the SPOT digital LED in the viewfinder (red) and the selected shutter
speed at this SPOT metering mode will light up (Fig. 40).
NOTE: When using a PL filter in the SPOT mode, be sure to use a circular Polarized Light (PL) filter for best
results.
View original page 16Page 17 · Read text
3. SPOT-AVERAGE: averaged reading of SPOT and center weighted AVERAGE metering ("A" mode)

                            This unique SPOT-AVERAGE metering method is to measure light
                                in accordance with averaged reading of "spot" and "center weighted
                            average" metering.  This method of light measuring is useful in such
                             cases when taking pictures of a scene in extremely backlit condition,
                              or when there is a big gap between brightness of a main subject and
                           background-under these conditions, AVERAGE metering will be
                      much affected by the background brightness while SPOT metering
                                will only measure the light in the center. 1.) Set the Exposure Mode
                              Select Dial to the "A" position, the Metering Mode Select lever to the
                     "AVG" position (Fig. 41). 2.) Look through the viewfinder compose
                              the picture and focus.

3.) Depress the shutter release button halfway and at the same time depress the Manual Shutter Speed Select
Button once which will instantly memorize the center weighted averaged metering data (Fig. 42).  4.) Continue
to depress the shutter release button halfway and center the main part of the subject in the spot metering zone,
then set the Metering Mode Select lever to the "SPOT' position (Fig. 43). Instantaneously the camera will
compute the averaged reading of the center weighted average metering and spot metering, giving an audible
signal.
NOTE: In the viewfinder, the shutter speed digital LED at SPOT AVERAGE metering blinks, and the spot-
metered shutter speed digital LED lights up.
5.) While keeping the shutter release button halfway depressed, compose the picture and release the shutter.
NOTE: The SPOT-AVERAGE metering cannot be used in program modes (P1 or P2). Please use "A" mode for
SPOT-AVERAGE metering.

II. Exposure Memory
Under normal circumstances your CHINON CP-5s will produce perfectly exposed photographs, due to the
integrated automatic exposure circuitry. However, some lighting conditions might occur that could misguide the
system, such as subjects with a very high contrast or strongly backlit scenes. In such cases the exposure memory
should be used.

                                 1. Exposure memory at SPOT metering mode. Exposure memory
                            lock is executed by depressing the shutter release button halfway at
                              the "A" mode. Center the main part of the subject in the spot metering
                          zone with the Metering Mode Select Lever set in the "SPOT" position
                         and depress the shutter release button halfway to memorize the
                            exposure, giving an audible signal (Fig. 44).
                         While keeping the shutter release button halfway depressed,
                         recompose the picture as you desire and release the shutter. The spot-
                           metered shutter speed indicator in the viewfinder will flicker, and the
                           metered shutter speed at the time of recomposing will stay lit:
View original page 17Page 18 · Read text
2. Exposure memory at AVERAGE metering mode


                                1. ) Make sure that the exposure mode select dial is set to the "A"
                               position. 2.) Look through the viewfinder and center your subject in
                              the split micro prism center spot, and depress the shutter release
                            button halfway. 3.) Then press the manual shutter speed select button
                          once which will instantly memorize the light value of the subject
                              (indicated by an audible signal). Once the manual shutter speed button
                                    is depressed, there is no need to hold it further, as long as the shutter
                               release button is halfway depressed (Fig. 45).


4.) Focus and compose the subject in the viewfinder as you desire then press the shutter release button all the
way to take the photograph.
NOTE: When the exposure mode select dial is set to the program mode (P1 or P2), exposure will not be
memorized.


                                                 I. Two-stage programmed AE


                          The CP-5s camera is designed with a two-stage program, which
                                 gives you greater photographic versatility: select either program
                              based on your photographic needs via the one touch lever (Fig.
                                   37).
View original page 18Page 20 · Read text
3. Programmed AE mode warning and aperture setting.

                                                (Table C) Unlike other program cameras,
                                CHINON CP-5s camera accepts any existing "K"
                                        mount lenses even in the program mode.
                                                 Generally, you should set the aperture at its
                                     minimum setting. Although you can take a
                                                    perfectly exposed picture at any aperture setting,
                                                   the applicable programmed range is limited in
                                                         this connection, thus the program AE mode
                                            warning LED is useful to check the lens aperture
                                                      setting for program mode. The programmed AE
                                     mode warning "P" LED will "flicker" when the
                                                   lens aperture is within four stops of the full
                                             opening aperture. Set the aperture within the
                                               range so that the warning LED will not "flicker".
                                            Follow your own photographic needs; however,
                                                     in such a case for instance, using 50mm f1.4 lens
                                               with its f/stop set at 5.6, the camera is controlled
                                         by the program characteristics of f/1.4 through
                                                           f/5.6, beyond f/5.6, camera is controlled by the
                                                  aperture priority automatic exposure mode (See
                                                     table C).


IV. Taking pictures in A mode

                                                       After you have set the exposure mode
                                                      select dial (to "A") and desired
                                                     aperture, the camera will
                                                    automatically select the stepless
                                                      shutter speed from 8 sec. to a fast
                                              1/1000 sec. "A" mode is convenient
                                                             for taking picture at specific aperture
                                                       settings based on your individual
                                               needs.

                                                         1. Set the exposure mode select dial
                                                        to the "A" position. Set the desired
                                                   aperture by rotating lens aperture ring
                                                           (Fig. 38).
View original page 20Page 21 · Read text
2. When the shutter release button is depressed halfway, the exposure control circuit is
energized and will be in the monitoring stage (Fig. 39). You can see the computerized shutter
speed displayed in the viewfinder by green and yellow LED's (Fig. 40).


                                                            * If the lens F stop or the aperture size
                                                                 is too large for the lighting condition,
                                                   the red over exposure indicator (third
                                               from the top of the scale) will glow,
                                                      giving double audible buzzer signals
                                                           (Fig. 41). When this happens, stop
                                       down the lens diaphragm by turning
                                                   the lens F stop ring or use a film with
                                          a lower ASA number. Another
                                                        alternative is to use a ND (neutral
                                                     density) filter in front of the lens.

* If the displayed speed is 1/30 or slower (yellow LED's with audible signal), use of a tripod is
recommended, or you can increase the shutter speed by opening the lens diaphragm. Use of a
flash unit is also suggested.

* If the computed shutter speed is even longer than 8 sec. (semi darkness condition) the under
exposure indicator (red LED with double audible signal) at the bottom of the scale will light up
(Fig. 42). Open the lens diaphragm by turning aperture ring, use a film with a higher ASA
number or use a flash.


V. Taking a picture in M mode


                                        You can manually control the CHINON
                                               CP-5s when the camera is set to the "M"
                                               mode. Just one push of the manual shutter
                                                   speed select button selects the desired
                                                           shutter speed and the audible signal will be
                                                    heard when correct exposure is obtained.
                                                     Furthermore, CHINON CP-5s program
                                                camera is equipped with convenient
                                                   "power-hold circuitry".


* Manual shutter speed select button
1. Set the exposure mode select dial to the "M" mode position (Fig. 43).

2. When the shutter release button is depressed halfway the 1/125 shutter speed LED will blink and the
metered shutter speed will be displayed (Fig. 44).
View original page 21Page 22 · Read text
3. Select the desired shutter speed by depressing the shutter speed select button. The shutter speed LED
indicator increases step by step as you press the button.

4. When you press both shutter release button and manual shutter speed select button, the shutter speed
LED indicator decreases step by step.


* There are two methods of selecting the correct exposure (M mode)

1. In the Shutter Speed Preferred Selection: set the required shutter speed.


                                                Rotate the lens aperture ring until the
                                                   selected shutter speed and the metered
                                             speed are matched up on the scale in
                                                  the viewfinder (Fig. 45).


2. In the Aperture priority AE: Set the required aperture on the lens. Change shutter speed until both
LED's are coincident (Fig. 53).


        * Other features at M mode

       1. Power-hold circuitry: One push of the shutter release button holds the camera
       circuitry for 30 seconds.

       2. S.C.S. (Shutter speed Change Signal): An audible signal will be heard when the
     manual shutter speed changes. When the correct exposure (shutter speed) is obtained,
     a longer audible signal is heard.

       3. M.E.S. (Manual Exposure Signal): For the shutter speed preference (#1 above), an
      audible signal is heard when the correct exposure aperture is obtained.

NOTE: At "M" mode, the camera shake and over/under warning audible signals are not
operative.
View original page 22Page 23 · Read text
VI. Exposure Compensation (at "P" or "A" mode)


                      Your CHINON CP-5s program camera incorporates an exposure
                       compensation dial which can be utilized for special purposes
                      such as bracketing exposure, compensation for back-lit or spot-
                                                 lit situations. If you would prefer darker or brighter pictures than
                        those obtained by the automatic exposure system, this feature is
                         very helpful.


You can change the exposure factor up to one full stop either plus or minus in 1/3 EV
increments.
Pull out and turn the film speed dial to the desired position (Fig. 51).

  NOTE: After exposures have been made, be sure to return the dial to the normal exposure
                                            position.

IV. Exposure Memory

Under normal circumstances your CHINON CP-5s program camera will produce perfectly
exposed photographs, due to the integrated automatic exposure circuitry. However some
lighting conditions might occur that could misguide the system such as subjects with a very
high contrast or strongly back-lit scenes. In such cases the exposure memory feature should
be used.


                             1. Make sure that the exposure mode select dial is set to the
                          "A" position (Fig. 47).

                             2. Depress the shutter release button half way and measure the
                                 light on the main part of the subject you want to shoot excluding
                                    all unnecessary light from the side or background (Fig. 48).
                     Then press the manual shutter speed select button once which
                                   will instantly memorize the light value of the subject giving an
                          audible signal (Fig. 49). Once the button is depressed, there is
                      no need to hold the manual shutter speed select button further
                       as long as the shutter release button is depressed halfway.
View original page 23From the M. Butkus archive. Original publisher and archive notices are retained.
Check the model and edition against your equipment.
PDF verified 2026-10-10.