Film cameras
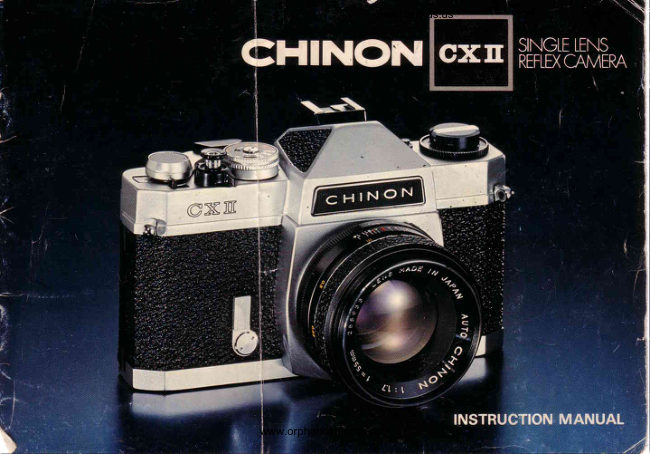
Chinon CX II User manual
User manual for Chinon CX II. 15 pages in English. Read the original PDF, download or print a copy without registration.
15 pagesEnglish2.5 MB PDF
Loading your manual…Open PDF directly
Document details
- Brand
- Chinon
- Model / document
- Chinon CX II
- Document type
- User manual
- Language
- English
- Pages
- 15
- File size
- 2.5 MB
- Category
- Film cameras
- Document date
- Not specified in catalog
Search available document text
Find a term, then jump to its page in the original PDF. Image-only pages may not be searchable; check the PDF for exact wording and diagrams.
Page 4 · Read text
Venmo @mike-butkus-camera  Ph. 2083
PayPal Name  Lynn@butkus.org      www.PayPal.me/lynnbutkus
View original page 4
Page 6 · Read text
www.butkus.us


                                                       triq  q                                                       Fig.1O

LOADINGTHE CAMERA
Use 35 mm  f ilm availablein 20 or 36 exposure       w?y, turn  it until  it does.
cartridges.lt is recommendedto load and unload                                                       (3) Insert end of film into slot in take-upspool
the camera in subdued light, e.g. the shadow                                             and engage perforationsof the film with
of your own body and not in direct sunlight.                                                     the sprockets.Placethumb lightly over film
(1) Pull up film rewindknob until camera-back       on bottom sprocket wheel and operate film
   pops open. Swing open camera-back(Fig.        advance lever until upper sprocket wheel
   e).                                       engages film perforations. When advance
(2) While rewind knob is still upraised insert          lever stops, free  it by depressing shutter
    film cartridgeinto chamberwith protruding         releaseon top of camera. Make sure that
   end.towardbottom of camera. Pressin film           film lies flat between guide rails (Fig. 1O).
   rewind knob.   lf it'does not go in all the         Close camera back firmly.
                                                                                                                                                                .          5
                                   www.orphancameras.com
View original page 6Page 7 · Read text
F i g . 1 1                                                  Fie. 12

(4) Operate film advance lever, depressing                                                    "                                                         't                                                               !                                appears   SETTINGFILM SPEED(ASA.'DIN)    shutter release until  f igure
     in the exposure counter window.  ln this     The ASA (or DIN speed of the film is specified
    position the camera is ready for the  first     on the film box or  in the instructionsheet
   exposureto be made (Fig. 11).             packedwith the fiim.
   To be certain that the film transportscor-                                                    Pull up and rotate the outer rim of the shutter
    rectly,take up any f ilm slack in the cartridge                                                      diai until desiredASA DIN numberof the film
    by turning the rewind crank clockwisetill                                            appearsin the window on the top of the shutter
    resistanceis felt. When advancingthe film                                         speed dial (Fig, 12 .
    the rewind knob should turn counterclock'
    wise.  This is evidence that the film  is     Also rotate film type reminderdial so that the
    loadedcorrectly.  lf it does not, reload the      film type insertedis alignedwith the indexmark
    the film correctly.                              Fie. 13). This will remind you of the type of
View original page 7Page 9 · Read text
d) 1/60 sec. outdoorsin deep shade.                 ;Fig. 15) indicating correct exposure, a nd
          e) 1/30 sec. for dimly lit scenes such as at        then app,iyadditionalpressureto the Shutter                                                   ReleaseButton to trip the shutter.          dusk or indoors.
       NOTE :  A tripod should be used for shutter      NOTE :    lf the needle ca n not be perfectly
        speedslowerthan 1/30 sec.(1/15^"1 sec, B.)'        centered (Fig. 15 , even after completely                                                               rotating the Aperture Ring counterclockwise,
        2. Set the Aperture Ring to a n intermediate        a lower shutter speed must be set by rotating
          positionsuch as 5.6.                                                           tne Shutter Speed DiaI clockwise.
        3. While looking through the viewfinder focus      5.  lf the indicator needlerisesto the plus posi-
          the lens, and then gently depressthe Shutter         tion (Fig. 16 indicating overexposure,rotate
        ReteaseButton. The diaphragm blades will         the Aperture Ring clockwise until   it   is
         automatically close a nd the viewfinder will        centeredbetweenthe p!us and minus signs
        appearslightly darkened. Slightly increase         r'Fig.15). Then take the pictureby increasing
         pressureon the Shutter ReleaseButton a nd        pressureon the Shutter.ReleaseButton.
         metering system will turn on; most likely
         resulting in a movement of the indicator      NOTE:   lf the indicatorneedleremains in
        needle visiblewith in the viewfinder.                the plus position , Fig. 16 , eVen after f ully                                                             rotating the ApertureRingclockwise,a higher        4.  lf the indicator needleremains stationary at                                                       shutter speed m ust be set by rotating the          the minus position (Fig. I7), rotate the Aper-                                                Shutter Speed D ia I coilnterclockwise'          'ture             Ring counterclockwiseuntil the needle
             is centered betweenthe plus and minus signs      NOTE:  Correct exposure is determined by


                         F i g . 1 5                     F i g . 1 6                     F i g , 1 7                     F i g . 1 8


\i
* . ! ,
View original page 9Page 10 · Read text
www.butkus.us
   centering the indicator needle between the       Speed DiaI ca n be  f reety rotated  in the
   plus and minus signs (Fig. 15). correct ex-        TlLooo- 1 sec. range ; however,as a protec-
   posureca n be set either before or after ad-         tion against incorrect exposure, the Shutter
   va ncing the f ilm.                           SpeedDial cannot be set to  'r B " when .the
                                                    Shutter Refease Button is depressed. 2. APERTURE PRIORITY METHOD
occasionallyphotographerswish to center the                              COUPLINGRANGEOF THE BUILT.INindicator needle not by rotating the Aperture                             METERRing, but by rotating the Shutter Speed Dial.
This method is used to control depth-of-field and    The built-inmeterof yourchinoncx ll has a
is easily accomplished by  f olrowing the  pro.     very broad range capabfe of offering correct
cedureoutlined below.                         exposurein almost all photographicsituations.
1. Set the desired F-stop on the Aperture Ring     However,if the user tries to set a shutter speed
   and focus the lens.                          which is beyondthe coupfing range of the built-
                                                            in meter, a red warning ff ag will appear between
2. Gently depress the shutter Release Button,     the plus and minus signs (Fig. 1g), indicating   without            tripping the'                      sh utter,                                a                              nd  lock                                                                          it                                                  correct exposure                                                            cannot                                                                 be                                                                         obta ined                                                                                                  at that    in the depressed                     position                           by                            moving                                         the                                                    shutter                                                      speed. To                                                                   obta in                                                                               correct                                                                           exposure                                                                                          a   sh      utter          Release                  Button                       Lock Lever                                           to                                         the                                                higher                                                        shutter                                                      must                                                            be set by rotating                                                                                     the                                                                                         shut-   right,         with              the middle                          finger                                    of your                                            right                                                          ter                                           Speed                                                        DiaI                                                            counterclockwise                                                                                               untif                                                                                       the                                                                                         red   h a n d .                                           warn ing  f Iag disappears. For your reference,
3. with the shutter ReleaseButton locked in      the chart below indicates the towest shutter
   the depressed position, merely rotate the     speed that can be used at different film speeds
  shutter speed Dial until the indicator needle     (ASA's). when setting a shutter speed lower
    is centered (Fig. 15).  After the correct ex-     than that indicatedon the chart, the red warn-
  posure h as been determined, the sh utter      ing flag will appear.
  ReleaseButton may be unlocked by moving
   the Lock Lever to the left
  NorE:  when the shutter ReleaseButton is
   locked in the depressedposition,the shutter
                                     www.orphancameras.com
View original page 10Page 12 · Read text
www.butkus.us

                UNLOADINGTHE CAMERA
                                                                     "                                                              ,,36,,*ffi           When the red figure                                             20" or                                                     appears in
                          the exposurecounter window arigned with the
                          the index mark, the end of the firm has been
                         reached.ffiffi
                      Take the followingsteps for rewinding the film
                              into the cartridge.
                              (1) Unfold cra nk on rewind knob (F ie. 2I).
       Fig. 2I                (2) Press in a ll the way the rewind release
                              button on camera bottom (Fjg. 22)
                            (3) Turn rewind crank lever clockwise. Tension
                                       is felt as the film is rewound from the take-
                           up spool into the ca'ssette. Stop rewind-
                               ing when tension is released.Open cam era-
                          back (by pulling out rewind knob all the
                          way) and remove the f ilm.
                        Have f ilm processedwithout delay.


        Fig. 22


             www.orphancameras.com                                1 1
View original page 12Page 14 · Read text
www.butkus.us


                                             Fig. 24                                                       Fig. 25

SELF TIMER                       FLASH PICTURES
The self-timer permits the photographer to get     Most types of flash bulbs and a.lso electronic
into the picture.  Place camera on tripod or      flash can be used for flash pictures.
other f irm support ltripod socket is on bottom    When using flash bulb No. 5, 58, 25,25B., MS,
of camera). Get camera ready for exposure as     M5B, M2, M2B, AG1, 6, 68, 8, connect the flash
usual. Push down self-timerlever (Fig.2g.                                               "    ".                                                cord to flash socket  M   When using ele-
Depressshutter releaseto start self-timer. Ex.      ctronic f lash or SM flash bulbs,connectthe f lash
                                                                                                        "posure will be made approximatelyB seconds     cord to f lash socket  X." (Fig. 25).
after the releasehas been pressed.            When using Nos. 5, 58, M5 and M5B flash bulbs
                                              as well as electronicflash, Nos. 6, 68, B flash
                                                bulbs shutter speeds from 1/30 to 1/125 sec.
                                                 are recommended.
                                    When using Nos. M2, M2B, AG1, AGlB, SM flash
                                                bulbs shutter speeds from 1/30 to  1/60 sec.
                                    www.orphancameras.com                                1 3
View original page 14Page 15 · Read text
are recommened.Cordlessf lash units are slipped    remove the lens, grip the lens with one hand
into the accessoryshoe on the top of the eam'     and the camera with the other, turning the lens
era. The accessory shoe may also be utilized     counterclockwiseuntil  it is removed.
for a flash unit having a synchro cord.            To rep!acethe lens,turn clockwiseuntil secured
                                                            in position.
MIULTIPLEEXPOSURE
                                    IMPORTANT NOTETo superimpose two or more exposureson one                                    When installingor removing the 55 mm F/1'2
,negative,makd the first exposurein the normal                                           Chinon lens the shutter rOieasebutton must notw?y, then, withg-utmoving film transport lever,                                             be r  l,rck G) position or the focus ring must beslide the multi6le-'exposurelever (Fie. 26) as                                               turned to a distancesetting of less than O'9 M
far as  it will €p to the  left.                         (3 feet) to avoid damage to the rear lens ele'A red signal appears in the cutout window in'                                             ment.dicating that the film transport lever can be
wound, but vgill only set the shutter and not
transport the'filrn. . On releasing,a second ex'
posure is made on the same film frame'  This
procedure can be r:epeatedto obtain any num'
ber  of exposures on one negative.    lf  the
multiple exposure lever has been set but is in
fact not required, you. can manually push  it                      'itsback to cancel     effect.

CHANGINGTHE LENS
A 55 mm lens is the proper focal length for
general purpose picture taking.  Any Chinon                 www.butkus.us
telephoto and wide angle lens can be used. To                                        Fis. 26
 L,4
View original page 15From the M. Butkus archive. Original publisher and archive notices are retained.
Check the model and edition against your equipment.
PDF verified 2026-10-10.