Camera accessories
Chinon Data Back 3 User manual
User manual for Chinon Data Back 3. 28 pages in English. Read the original PDF, download or print a copy without registration.
28 pagesEnglish1.9 MB PDF
Loading your manual…Open PDF directly
Document details
- Brand
- Chinon
- Model / document
- Chinon Data Back 3
- Document type
- User manual
- Language
- English
- Pages
- 28
- File size
- 1.9 MB
- Category
- Camera accessories
- Document date
- Not specified in catalog
Search available document text
Find a term, then jump to its page in the original PDF. Image-only pages may not be searchable; check the PDF for exact wording and diagrams.
Page 2 · Read text
TABLE OF CONTENTS

                                      Changing the order ofNOMENCLATURE
                                         year/month/day
SPECIFICATIONS
                               INPUTTING AND CORRECTING
                            DATAINSTALLING THE BATTERIES

                              DELETING DATA
ATTACHING TO THE CAMERA
                            DATA IMPRINTING
FILM SPEED SETTING
                              INTERVAL TIMER SETTING
DATA IMPRINT POSITION IN THE
                              INTERVAL PHOTOGRAPHYPICTURE

SETTING THE DATE AND TIME


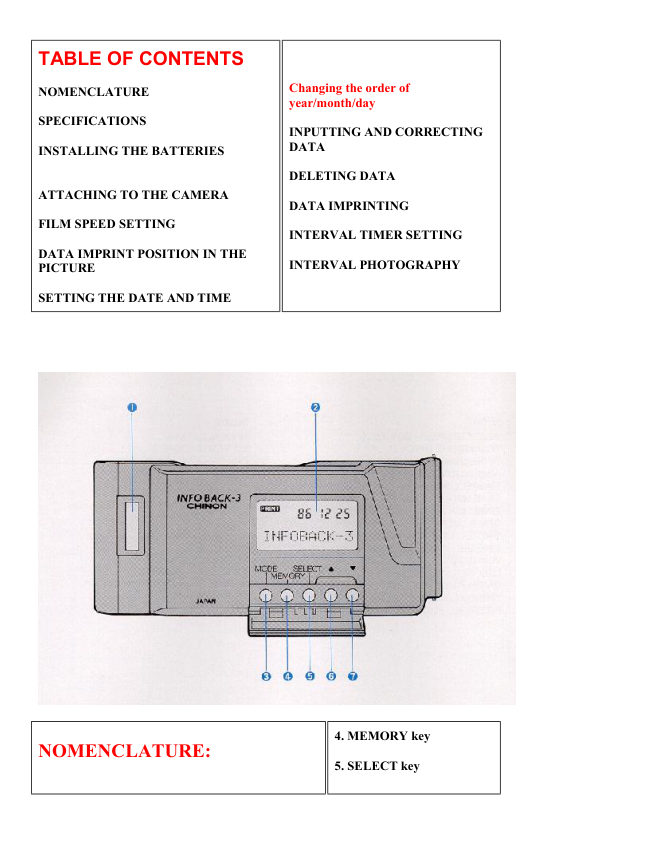
                                                              4. MEMORY key
NOMENCLATURE:
                                                              5. SELECT key
View original page 2Page 3 · Read text
1. Film type window                                       6. UP key

2. LCD window                                            7. DOWN key

3. MODE key


8 Camera back hinge release

9. Battery cover

10. Signal contacts

11. Film pressure plate

12. Imprint slot
View original page 3
Page 4 · Read text
SPECIFICATIONS:

TYPE: Digital data imprinting unit with LCD (Liquid Crystal display) for CHINON CP-7m SLR cameras,
interchangeable with CP-7m back cover. DATA IMPRINTING: Data will be imprinted simultaneously with the
shutter release of the CP-7m. Data is imprinted from the back side of the camera.

FILM SPEED SETTING: Film speed is automatically adjusted according to the ISO setting in the CP-7m
body. Two-step switch over at ISO 100 - 320 and ISO 400-1600.

NUMBER OF IMPRINTING CHARACTERS: Up to 10 alpha/numeric characters
  including (Heart), & : < + - *  /   '  .  ! ?

IMPRINTING MODES: 1. date and data
2. time and data
3. data
4. date and time
5. no data
6. interval operation control


FIVE FUNCTION KEYS: MODE, MEMORY, SELECT, UP and DOWN keys.

LCD DISPLAY PANEL: Built-in for data readout.

INTERVAL TIMER MODES:
1. Shutter release for a specific date and time can be set.

2. Shutter release for interval time sequences can be set from 1 second up to 99 hours 59 minutes 59 seconds.

3. Shutter opening in Bulb time mode can be set from 1 second up to 99 hours 59 minutes 59 seconds.

4. Sequence settings can be set for up to 99 exposures.


DATA MEMORY: Can memorize 5 different data with up to 10 characters with each MEMO.

BATTERY CHECK: Weak batteries will be indicated via flashing LCD readout.

CHECK TIME ERROR: Within +30 seconds monthly.

POWER SOURCE: 2 pcs lithium batteries (CR-1/3N).

BATTERY LIFE: Approximately three years.

SIZE: 134.3(W) x 58.9(H) x 14.6(D) mm (5.29" x 2.32 x 0.57")

WEIGHT: 83 9 (2.9 oz) without battery.
View original page 4
Page 5 · Read text
INSTALLING THE BATTERIES

        1. Pull out the insulation sheet in the direction of
       the arrow to switch on power from the already
       placed batteries.

        2. "86-1-1" will appear in the LCD window.
View original page 5Page 6 · Read text
NOTE:
        1. Even though some broken
       characters might appear instead of
      "86 - 1 - 1", it is in the normal
       operation as well.

        2. When the LCD panel blinks
       continuously, the batteries should be
       replaced immediately as they are too
        weak to operate the INFO BACK-
      3 properly.
View original page 6Page 9 · Read text
FILM SPEED SETTING
                                                       1. When using DX-coded film, the
                                                 film speed is automatically set by
                                                  the camera body and
                                                     the appropriate imprinting
                                                  brightness is adjusted
                                                 automatically as well.

                                                       2. When using non-DX film faster
                                                than ISO 400, it is suggested that
                                              only the "no data" mode be
                                                         utilized.


NOTE:
     1. When using specialized film such as infrared, it is also suggested to use the "no data" mode.

     2. When using film with other than ISO 100-1600, the imprinted data may be faint or blurry.
          It is also suggested to use the "no data" mode.
View original page 9Page 11 · Read text
SETTING THE DATE AND
TIME

 1. Press the MODE key to select the imprinting
mode of date and time.

        2. Press the MEMORY key and, a
       character position will begin to blink.

        3. By pressing the SELECT key, the
       correctable number changes from
       "minute" to "hour",
         then "year", "month" and "day", in
        order.

        4. Set the desired number by pressing
       the (up arrow) or (down arrow) key.
       When the 'minute' is set, it starts
       counting from 00 seconds of the selected
       minute.
View original page 11Page 12 · Read text
5. By pressing the MEMORY key, blinking will
stop and PRINT will be indicated.
  The INFO BACK-3 is now ready to imprint date
and time data.
View original page 12
Page 13 · Read text
Changing the order of
year/month/day


        1. Press the MODE key to select the
       imprinting mode of date and data.

        2. Press the (up arrow) key for two
       seconds. Positioning of the year/month/day
        will change
          to day/month/year and month/ day/year,
        in order.
View original page 13Page 14 · Read text
NOTE:

Changing the order is not possible when in
the date-and-time mode.


Changing to and from the 12 and 24 hour
timing modes

       1. Press the MODE key to select the
      imprinting mode of time and data.

       2. Press the ~ key for two seconds.
     Time will be indicated b, the 12 hour
      system.
View original page 14Page 15 · Read text
NOTE:

This operation is not possible when in the date-
and-time mode.

INPUTTING AND
CORRECTING DATA

        1. Press the MODE key to select the
       imprinting mode of date/ data, time/data or
       data to input data.
            If data is already stored, it will appear on
       the LCD panel. If no data is in memory, no
       read out will appear.

        2. Five data memories of up to 10
       characters including space can be input into
      memory.
         Press the SELECT key and choose from
    MEMO 1 to MEMO 5.
        The stored data if any will appear right
        after the MEMO number is shown.

        3. Press the MEMORY key and "_" will
        blink, indicating data can be put where the
       "_" blinks.
            If there is already data stored, "_" will
       blink over the position where the new
       character can be inserted.
View original page 15Page 16 · Read text
4. Press the (up arrow) or (down arrow) key to select the
desired character.
You can choose from A to Z. (heart) to ?, 0-9 and vice
versa.
Characters available for input (in order):


A B C D E F G H l J K L M N O P Q R S T U V W
X Y Z
(Heart), & : < > + - *  /  '  .  ! ?
0 1 2 3 4 5 6 7 8 9 Blank (no data)

5. Press the SELECT key, the data input indication "_"
(blinking) will move forward by one space
  each time SELECT the key is pressed.
  Select desired data by the (up arrow) or (down arrow)
key.
View original page 16
Page 17 · Read text
6. Repeat procedure #5 above. Up to 10 characters
can be input.

7. By pressing the MEMORY key, the blinking
will stop and "I" will be displayed.


The INFO BACK-3 is now ready to imprint data.
View original page 17
Page 18 · Read text
DELETING DATA


                       When you want to delete the data stored in the
                                    specific MEMO number, follow these steps:

                                               1. Press the MODE key to recall the data
                                            indication mode.


                                        2. Press the SELECT key to choose the specific
                   MEMO number that you wish to delete.
                               The stored data will appear right after the
                   MEMO number is shown.

                                        3. Press the MEMORY key.

                                         4. Then press both (up arrow) and (down arrow)
                                 keys at the same time to delete the data.
View original page 18Page 19 · Read text
DATA IMPRINTING


                                         1. Press the MODE key to select the desired
                                    imprinting mode. " date and data" - " time and
                                     data" -  "data and date" and "time - no data"

                                         2. Depress the camera's shutter release button to
                                     take a photograph.
                               The selected data will be automatically
                                     imprinted, PRINT will blink on the LCD panel for
                               2 seconds
                                          to confirm the imprinting. NOTE: 1. If the
                                    imprinting area is yellow or white in coloration,
                                      the data imprint may not appear clearly.

                                         3. If you do not intend to imprint any data on the
                                        film, press the MODE key to display "no data".
View original page 19Page 20 · Read text
INTERVAL TIMER SETTING


                      When using the interval timer mode, the starting
                                  date, starting time, interval time, the number of
                                 pictures to be taken and long release time can be
                                        set.
                                       1. Press the MODE key to recall any mode.

                                      2. Press again the MODE key for 2 seconds or more
                                    to display "INTERVAL". Setting the Start Date

                                      3. Press the SELECT key to display "START
                          DATE".

                                      4. Press the MEMORY key and the number input
                                  area will blink.
                                    Press the SELECT key to select date and month.
                                 Press the (up arrow) or (down arrow) key to
                                         set the starting date for the interval timer
                                   operation.

                                      5. Press the MEMORY key again. The blinking will
                                  stop and the starting date will be in the memory.

                        NOTE: This operation is limited to the life of the
                                 camera's battery system. The starting date must be
                                      set within a month's duration when using a fresh set
                                  of either "M" batteries or a 2CR5 type lithium
                                   battery in the camera body.
View original page 20Page 21 · Read text
Setting the Start Time


                                        6. Press the SELECT key to display "START
                             TIME".

                                        7. Press the MEMORY key and then press the
                         SELECT key to select the hour and minute.
                                      Press the (up arrow) or (down arrow) key to set
                                     the starting time for interval timer operation.

                                        8. Press the MEMORY key to place the starting
                                  time into the memory.
View original page 21Page 22 · Read text
Setting the Interval Time


        9. Press the SELECT key to display "INT TIME".

       10. Press the MEMORY key and then press the SELECT key to select the correct hour, minute or
      second between exposure. Press the (up arrow) or (down arrow) key to select the desired interval time.

       11. Press the MEMORY key to place the selected interval time into the memory.

NOTE: The shutter release for interval time sequences can be set from 1 second up
  to 99 hours 59 minutes 59 seconds between exposures.
View original page 22Page 24 · Read text
Set the camera's exposure mode to the "B" (bulb)
position.

       15. Press the SELECT key to display "RE
      TIME".

       16. Press the MEMORY key and then
       press the SELECT key to set the desired
        shutter
          duration: hours, minutes and seconds.
         Press the (up arrow) or (down arrow)
      key to select the desired exposure time.

       17. Press the MEMORY key to place the
       exposure time into memory.


NOTE:   1. The shutter opening in the bulb mode
can be set from 1 second up to 99 hours 59
minutes and 59 seconds.
        2. The bulb setting duration is limited to
       the condition of the camera's power source.

        3. When using the interval time operation
        in camera modes other than "B" (bulb)
        mode, the "RE TIME" must be set to
       "0:00 00".

        4. The exposure time in "RE TIME" mode
      must be shorter in duration than the
        interval time
           setting or the operation will not start.
View original page 24Page 26 · Read text
NOTE:

       1) When setting the INFO BACK 3 for the long-exposure mode ("RE TIME"), set the camera's
     mode to the "B" (bulb) position.

       2) When the self-timer or long exposure time is set by using the controls on the camera's body,
          the INFO BACK-3's interval time functions will not operate.

        4. Compose and focus the subject. A tripod or other steadying device is recommended.

        5. Press both the (up arrow) and (down arrow) keys simultaneously to start the interval timer
          operation INT will be displayed.
       When data is imprinted, PRINT will blink on the LCD panel for 2 seconds.


NOTE:

       1) To cancel the interval timer sequence, press both the ~ and ~ keys at the same time.

       2) Do not set "RE TIME" in modes other than the Bulb mode.

       3) Do not set "RE TIME" (long exposure time) longer than the "INT TIME" (interval time).
View original page 26From the M. Butkus archive. Original publisher and archive notices are retained.
Check the model and edition against your equipment.
PDF verified 2026-10-10.