Film cameras
Chinon Infoback 2 User manual
User manual for Chinon Infoback 2. 8 pages in English. Read the original PDF, download or print a copy without registration.
8 pagesEnglish0.8 MB PDF
Loading your manual…Open PDF directly
Document details
- Brand
- Chinon
- Model / document
- Chinon Infoback 2
- Document type
- User manual
- Language
- English
- Pages
- 8
- File size
- 0.8 MB
- Category
- Film cameras
- Document date
- Not specified in catalog
Search available document text
Find a term, then jump to its page in the original PDF. Image-only pages may not be searchable; check the PDF for exact wording and diagrams.
Page 3 · Read text
Imprinting Selection:


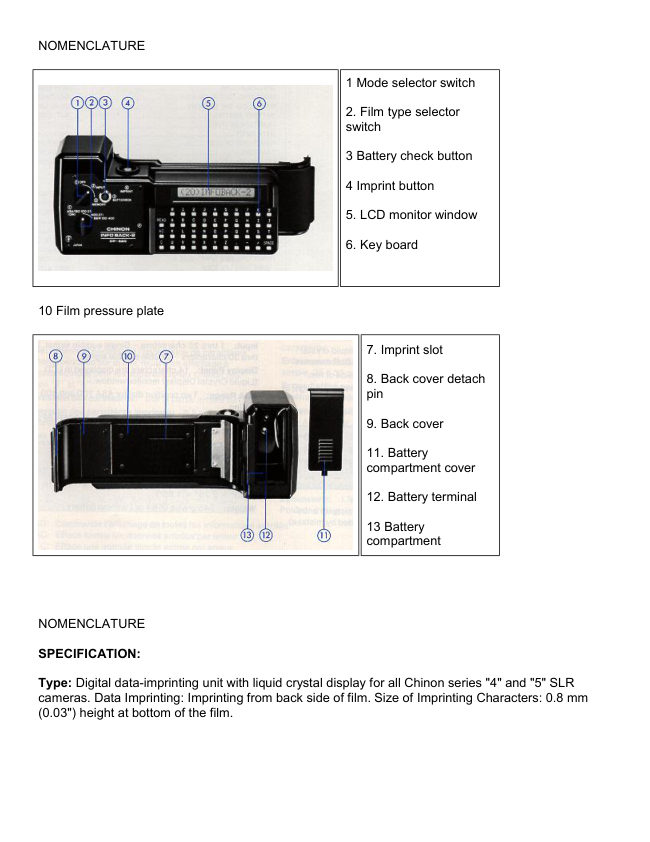
READ: Displays all inputted information

     AC: Clears entire data (inputted by mistake) entry
       C: Clears a single data entry (inputted by mistake)

Number of Imprinting Characters: Up to 30 characters.

Input: 1 thru 25 characters - Single audible signal, 26 thru 30 characters - Double audible signal.

Display Panel: 14 characters are displayed in LCD (Liquid Crystal Display) monitor window.

ASA Range: Two position dial for ASA 100 and 400 setting.

Power Source: One 9 V battery-Type S-006P,6F22,, Mn1604 or equivalent.

Battery Check: Built-in, "BATTERY OK!" indication on display panel with audible signal.

Imprint LED: Yellow LED (7 dots).

Dimensions: 176(L) x 70(H) x 42(W) mm (6.93a x 2.75" x 1.65")

Weigh: 245 grams (8.64 oz.) without battery

MOUNTING TO THE CAMERA:

Pull out the Film Rewind Knob until the camera back pops open (Fig. 1). Push down on the retaining
pin with your finger nail until the top of the back cover shaft is disengaged from the hinge (Fig. 2). Pull
outward at the top of the hinge until the back cover is fully removed from the camera body. To mount
the Info Back-2 to the camera, reverse procedure is required.
View original page 3Page 4 · Read text
INSTALLING THE BATTERY:


Slide out the Battery Compartment Cover (Fig. 3) from the front of the Info Back-2. Pull out the
Battery Terminal (with the 2 leads attached) from the Battery Compartment (Fig. 4). Plug in a 9 V
transistor battery (S-006P, 6F22, Mn1604 type or equivalent). The correct positioning of the positive
(+) or negative (-) end of the battery is shown on the battery. Insert the battery into the Battery
Compartment with the battery terminal upward (Fig. 5) and replace the battery compartment cover.
NOTE: The mode Selector Switch should be set to the "OFF" position when the unit is not in use.
Failure to do so will result in completely drained battery in approximately four days. The Info Back-
2  will make approximately 800 imprints with a fresh battery.


BATTERY TESTING

Turn the Mode Selector Switch (Fig. 6) to INPUT position and depress the Battery Check Button (Fig.
7). When the battery is in good condition (battery potential is high enough), an audible signal will beep
and the word "BATTERY OK!" will appear in the monitor window. When battery voltage is too weak to
operate, no audible signal will be heard. When replacing the battery the Mode Selector Switch should
be set in the OFF position. NOTE: Battery testing can be executed with the Mode Selector Switch in
the INPUT or MEMORY position.
View original page 4
Page 5 · Read text
FILM TYPE SETTING

Set the Film Type Selector Switch (Fig. 8) to the desired film speed (ASA/ISO 100 or ASA/ISO 400).


    INFO BACK-2
                      FILM TYPE
  ASA/ISO SETTING
                    COLOR FILM
          100              ASA/ISO 100
                             (DIN 21)
                     COLOR FILM
          400              ASA/ISO 400
                             (DIN 27)
                   BLACK & WHITE
          400            ASA/ISO 100-400
                            (DIN 21-27)


NOTE: When using a film rated other than the above mentioned, trial imprinting is recommended.


DATA INPUT:

1. Set the Film Type Selector Switch to the desired film speed (ASA/ISO 100 or ASA/ISO 400).

2. Set the Mode Selector Switch (Fig. 9) to the INPUT position, the Number "30" will appear in the
LCD monitor window.
View original page 5Page 6 · Read text
3. Check the battery, then input the data.


4. After each input of data, the remaining number of possible inputs of information will appear. Up to
30 characters can now be keypunched into the unit by depressing the appropriate character keys.
This unit is equipped with dual stage audible signal.
Stage one: a single audible signal which indicates that the unit is properly recording the first 25
characters of information.
Stage two: a dual audible signal that warns you when the last five (26th30th) characters of
information is being recorded by the unit and the unit is approaching maximum input level.

NOTE: Do not depress the keys with any sharp objects such as a ball point pens or a knife.

5. Set the Mode Selector Switch in MEMORY position (Fig. 10) from INPUT position. The word
"MEMORY" will appear in the LCD monitor window and remain visible for a few seconds.


6. Depress the shutter of the camera and take the picture in the normal manner. NOTE: Information
will not be clearly imprinted on the bottom of the film
frame when the bottom of subject is white or yellow.

7. Now you are ready to imprint the data onto the film. Simply depress the IMPRINT Button (Fig. 1 1).
An audible signal will then be heard indicating imprinting has begun. When all information has been
transferred to the film, a triple audible signal will be heard. The word "IMPRINTED" will appear in the
LCD monitor window. As long as the Mode Selector Switch is set in MEMORY position, the
information will be stored indefinitely and can be repeatedly imprinted on the film frame, picture after
picture.

NOTE: Do not advance the film unless the word "IMPRINTED" appears in the LCD monitor window.
When the film is advanced during the imprinting process, the information on the film will be garbled.
View original page 6
Page 7 · Read text
8. The data being stored in memory can be cleared by switching the Mode Selector Switch to the
INPUT or OFF position. NOTE: The battery will last for approximately 4 days if the Mode Selector
Switch is left in the MEMORY position. (These times are for the old type batteries, not current year
2000 brands.  Still, you must turn it off)
View original page 7
Page 8 · Read text
CAUTIONS:
1 Do not depress the keys with any sharp objects such as a ball point pen or a knife

2 Do not use cleaning solution such as lacquer, thinner or MEK, it will dissolve plastic components

3. To clean the unit, use a soft cloth without any solution.

4. Rough handling may result in damage to the unit.

5. Do not print twice on the same film frame otherwise the data will be garbled.

6. When using with a power winder, release the shutter after data are imprinted. Data can not be
imprinted with the power winder in continuous use.

1. At high temperatures (60°C or over), LCD (Liquid Crystal Display) may turn black Do not leave the
unit in any place under the direct rays of the sun for a long time

2. At low temperatures (0 degrees or under), performance of the LCD may decline.

Because we continually strive to improve our products, we may change specifications without prior
notice.
View original page 8
From the M. Butkus archive. Original publisher and archive notices are retained.
Check the model and edition against your equipment.
PDF verified 2026-10-10.