Film cameras
Chinon CM-3 camera User manual
User manual for Chinon CM-3 camera. 9 pages in English. Read the original PDF, download or print a copy without registration.
9 pagesEnglish0.9 MB PDF
Loading your manual…Open PDF directly
Document details
- Brand
- Chinon
- Model / document
- Chinon CM-3 camera
- Document type
- User manual
- Language
- English
- Pages
- 9
- File size
- 0.9 MB
- Category
- Film cameras
- Document date
- Not specified in catalog
Search available document text
Find a term, then jump to its page in the original PDF. Image-only pages may not be searchable; check the PDF for exact wording and diagrams.
Page 2 · Read text
www.orphancameras.com


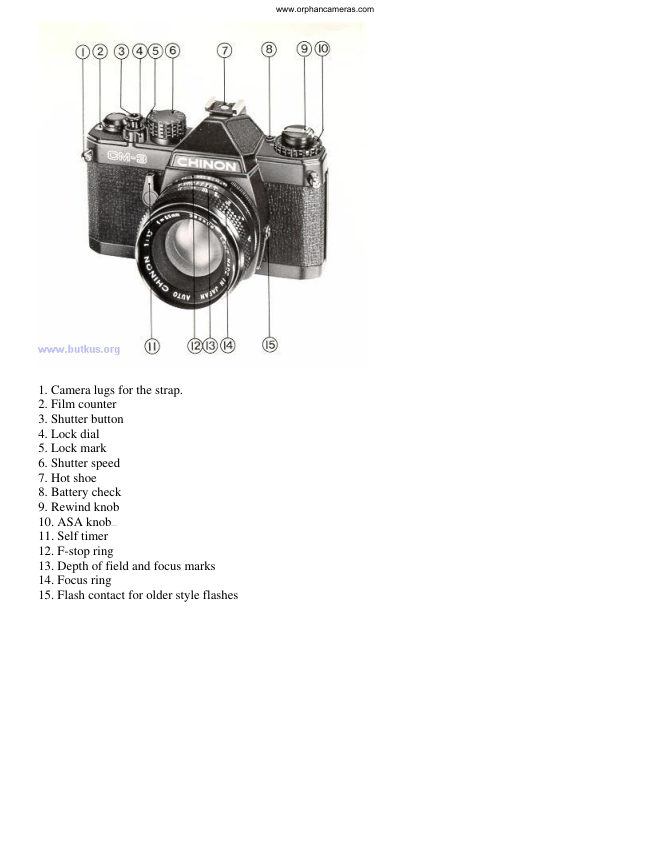
1. Camera lugs for the strap.
2. Film counter
3. Shutter button
4. Lock dial
5. Lock mark
6. Shutter speed
7. Hot shoe
8. Battery check
9. Rewind knob
10. ASA  knob4.butkus.org
11. Self timer
12. F-stop ring
13. Depth of field and focus marks
14. Focus ring
15. Flash contact for older style flashes
View original page 2
Page 3 · Read text
www.orphancameras.com


16. Rewind knob notch (must fit in film canister by adjusting knob slightly when pressing down after inserting
film)
17. Green (good exposure) LED
18. Viewfinder
19. Red (over and under exposed LED's)
20. Advance sprockets (make sure film is in these sprockets)
21. Film leader sprocket (insert cut film leader into on of the slots to lock the film on this roller)
22. Rear film plate (presses against film to make sure it lies flat)
23. Read door (rewind knob is pulled up to release door, NEVER open door unless film is completely rewound)
24. Battery door (unscrew counter clockwise with quarter, use erase on battery contact areas to clean)
25. Power winder contacts (use eraser when mounting winder)
26. Bottom edge of film guide (film should be above and below these guides)
27. Film guides (film will slide along this area to keep it flat)
28. Tripod screw hole.
29. Shutter curtain (never touch, clean or do anything to this delicate part)
30. Rewind button (Used at end of roll or if you must rewind mid roll. Should you rewind mid roll you must
cover the lens and fire one or two extra shots past the number previously exposed pictures. Tell your processor
you did this as most processing is automated and the printing machine expects the frame spacing to be even)
31. Cap for motor drive connection  area.4.butkus.org
32. Two holes for holding the winder in correct position.
View original page 3
Page 4 · Read text
www.orphancameras.com


Use a quarter to unscrew the battery holder.  It takes 2 MS76 or SR44 batteries. Note both the battery "bumps"
go towards the cap.


Turn the ASA dial and match the film inserted to the numbers on the ASA dial. Use the suggested starting
position of the shutter speed of 1/125 (125) and the F-stop of 5.6 to start adjusting the light  meter.4.butkus.org


Focus on the subject, press the shutter halfway, the LED's just outside the will operate. ONE will light up
showing the batteries are functional. If one of the light does NOT glow, try new batteries.


Illustration of changing the battery. Note the direction the batteries go in, the small bump of the battery goes
towards the cap.
View original page 4
Page 5 · Read text
www.orphancameras.com


The button by the ASA dial is a battery check, pressing it should turn on the Green (center) viewfinder LED.


Make sure the film sprockets are in the right location. Use the end of the film pack to insert into the back
holder.
Wind the film.


You must wind the lever and fire two "blank" shots to get the exposed film past the shutter. There is a shutter
lock, move it off the "L" to allow the camera to fire. The lock does not prevent you from winding the camera.
A camera should not be left in a wound mode for extended periods of  time.4.butkus.org
View original page 5
Page 6 · Read text
www.orphancameras.com


Set the ASA to match the film in the camera, try a setting, when outdoors, of 1/125 and F-5.6 to start adjusting
the setting to get a correct exposure. Press the shutter button slightly.


Adjust the F-stop to get the green (center LED) to light. You may need to adjust the shutter speeds if the lens
aperture is all the way closed and the top (overexposed LED) is still lit or the aperture is open all the way and
the bottom (underexposed LED) is lit. Certain lens have an "A"uto (aperture of lens is always open unless the
shutter is firing) and "M"anual (aperture size varies in accordance to F-stop set. This setting is sometimes
useful when checking actual depth of field in viewfinder), you should have the lens set to A unless doing some
specialty photography. The split image viewfinder becomes clear on the subject when in correct focus. The
exact center top and bottom half also will match when in focus.


Use the aperture and shutter speeds to obtain correct exposures for you pictures. When you are finished with
the roll the film will not advance fully. Do not try to advance any more, just press the rewind button.
View original page 6
Page 7 · Read text
www.orphancameras.com


Flip the rewind bar and turn the rewind knob to wind the film back in the container. Pull up on the rewind knob
to release the back door when the rewinding becomes easy (you may feel a greater strain as the film comes out
of the advance slot)


Image 25 shows how to unscrew the lens, counter clockwise. Image 26 and 27 show the differences in depth of
field by lens aperture. Image 26 shows a small depth of field (notice the bricks) and 27 a great depth of field.


Image 28 shows the depth of field scale on the lens. At 10 feet at F8 will provide an in focus image from 8 feet
to13 feet, at F16 from 6.5 feet to F18 feet. Remember you can always use the scale to extend you depth of field
by finding the distance of the item you want in focus and then moving the distance setting to the closest or
furthest on the scale. For example a picture taken at F16, you set the 10 foot camera setting at the far right F16
depth of field mark. You will then have everything in focus from 5 to 10 feet but directly behind the 10 foot
mark will be out of focus. You can do the opposite and have everything from 10 feet to 30 feet in focus but
everything in front of 10 feet is out of focus.
Image 29 shows the self timer lever. Press the lever all the way down to delay the shutter 10 seconds or so.
After pressing the lever down you must depress the shutter to let the self timer activate.
View original page 7
Page 8 · Read text
www.orphancameras.com


To use a flash, set the shutter speed to X. The hot shoe will accept any standard flash. Do not use dedicated
flash units with extra pins. The metal shoe will short the pins and could damage the flash.  If you have an
ancient flash with a flash cord or a powerful hand held unit with grip, use the flash contact on the side of the
lens.
Image 33 shows the Infrared Film mark. With Black and White IR film you first focus, then move the distance
found on the lens to the RED IR mark. Usually a Red or IR filter is used to cover the lens. Exposure film
according to the IR package. Color IR film does not need to be refocused.


The power winder shown mounted to the camera, the integrated chip that controls the functions and the
available remote relay for the power winder.


The winder with the interval timer, image 37 shows the continuous mark when firing more than one frame or
using the interval times. Image 38 shows the dial for the number of frames you wish to fire up to 24 frames and
image 39 show the length of time between those number shots up to 30 seconds. There is a winder with just an
single advance.
View original page 8
Page 9 · Read text
www.orphancameras.com


Fig 40 shows the cap needed to be removed to add the Chinon Power Winder, I believe there is a place to screw
the cap on the bottom of the winder body to keep it from getting lost.
View original page 9
Related documents and language editions
From the M. Butkus archive. Original publisher and archive notices are retained.
Check the model and edition against your equipment.
PDF verified 2026-10-10.