Film cameras
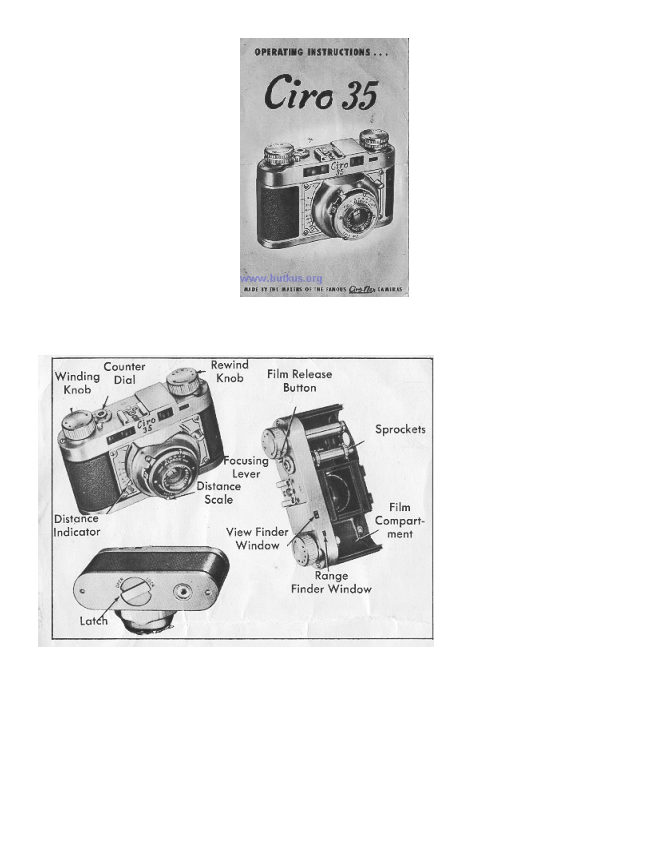
Ciro 35 User manual
User manual for Ciro 35. 12 pages in English. Read the original PDF, download or print a copy without registration.
12 pagesEnglish1.8 MB PDF
Loading your manual…Open PDF directly
Document details
- Brand
- Graflex
- Model / document
- Ciro 35
- Document type
- User manual
- Language
- English
- Pages
- 12
- File size
- 1.8 MB
- Category
- Film cameras
- Document date
- Not specified in catalog
Search available document text
Find a term, then jump to its page in the original PDF. Image-only pages may not be searchable; check the PDF for exact wording and diagrams.
Page 3 · Read text
1. OPEN THE CAMERA


                               On the bottom of the camera you will find a latch
                                     marked "Open" and "Lock."

                                      Turn the latch counter clockwise to "Open" position.


2. REMOVE CAMERA BACK


                                     Hold camera in left hand, as shown.

                                     With the fingers and thumb of the right hand gripping
                                              the bottom edge, slide out the camera back.


3. INSERT FILM


                                                 Insert film cassette in the film compartment. Make
                                             sure fork on end of winding shaft engages cross
                                  member in spool.

                               When film is drawn out the film perforations should
                                        engage sprockets.
View original page 3Page 4 · Read text
4. THREAD FILM


                                        Thread the end of the film into slot in the take-up
                                              spool.

                                      Push sufficient film. through so that it will lock
                                             securely in position when the spool is turned.


5. START FILM


                                       Push down film release button and turn "Wind" knob
                                                    until both sprockets engage the film as shown.

                                                          If necessary, push button dawn the second time, and
                                               turn until film is secure on take-up spool.
View original page 4Page 5 · Read text
6. REPLACE CAMERA BACK


                                            Place the camera back in position as shown. Make
                                             sure edges are in the run ways and that the spring on
                                               inside of back clears the film.

                                       Push the back into position and lock.


7. ADVANCE FILM


                                  To bring film into position for the first picture:

                                                  1. Turn "Wind" knob until it stops.

                                                  2. Push down film release button and turn "Wind"
                                     knob until it stops again.

                                                  3. Push down release and "Wind" once more.


8. SET EXPOSURE COUNTER


                                            Set exposure counter dial by rotating it until the first
                                          notch following "0" is opposite the index mark.

                                             Thereafter the counter will, automatically turn with
                                              the "wind" knob, to show the number of the next
                                                 picture.
View original page 5Page 6 · Read text
9. SET LENS APERTURE


                               On the bottom edge of the shutter is on indicator
                                      which controls the size of the lens opening.

                                        Study the exposure guide on page 8, and set indicator
                                                for the desired speed.


10. SET SHUTTER SPEEDS


                               On the top edge of the shutter there's an indicator and
                                      numbers which straw the various shutter speeds ("T"
                                             stands for Time, "B" for Bulb exposure).

                                        Study Exposure Guide on page 8, and set indicator for
                                           proper shutter speed.
View original page 6Page 7 · Read text
11. FOCUS THE CAMERA


                                        Holding the camera about 2 or 3 inches from the eye,
                                                sight the subject through the small window.

                                Move the focusing lever up or down until the split-
                                      image merges.


12. FOCUS CAMERA


                                When the image you see through the small window is
                                                       split as shown above the lens is out of focus.

                                           Adjust the focusing lever until the two sections of the
                                       image form on unbroken outline.


13. FOR HORIZONTAL PICTURES


                                     Use Range Finder as in Steps 11 and 12.

                                      Hold camera horizontally as shown.
View original page 7Page 8 · Read text
14. FOR VERTICAL PICTURES


                                     Use Range Finder as in Steps 11 and 12.

                                      Hold camera vertically as shown.

                                      Models R and S are equipped with Alphux self-
                                        winding shutters and you have only to flip the shutter
                                                release to take a picture.

                                     Model T is equipped with Rapax set-and-release
                                            type shutter and there is a Set lever which must be
                                        pushed up before snapping the release lever.


15. REWIND FILM


                                                  After all exposures are made rewind the | film
                                                      into the original cartridge. First lift the "Wind"
                                          knob and turn slightly until it stays up.

                                           Turn the "Rewind" knob in the direction of the
                                                 arrow. Film is all rewound when the counter
                                                        dial stops turning.
View original page 8Page 10 · Read text
18. USE CABLE RELEASE


                                          The cable release screws into the shutter and is
                                          recommended for use when camera is on a
                                                         tripod.

                                          Use the regular shutter trip when the camera is
                                            hand held.


Ciro Cameras use 'Wollensak Lenses exclusively. These lenses are of the highest quality and are coated for
maximum efficiency..
It is important that they be kept free from dust and dirt. Clean gently with lens tissue; avoid touching the glass
with your fingers.

19. ATTACH THE FLASH


                                                                     The accessory
                                                                                                clip on the top
                                                                                      of the camera
                                                                         accommodates
                                                                                        the flash gun.

                                                                                        Slip it on or
                                                                                      take it off in a
                                                                                                        jiffy as shown.


20. TAKE FLASH PICTURES
Goad flash pictures are easy. With the loaded gun in position on camera, snap just as you would for regular
pictures.

FOR SUPER-ACCURATE FOCUSING

On all photographic work requiring extreme accuracy, it is advisable to follow the attached chart closely. Under
ordinary circumstances simply use the indicator on camera.
View original page 10Page 11 · Read text
DEPTH OF FIELD TABLE FOR 2" FOCUS LENSES (50.8 mm.)
MINIATURE CAMERAS CIRCLE OF CONFUSION 1/500 INCH.
View original page 11
Page 12 · Read text
Illustration below shows one of the five famous Ciroflex models, made by the makers of
Ciro 35.
View original page 12
From the M. Butkus archive. Original publisher and archive notices are retained.
Check the model and edition against your equipment.
PDF verified 2026-10-10.