Film cameras
Ciro-Flex camera User manual
User manual for Ciro-Flex camera. 8 pages in English. Read the original PDF, download or print a copy without registration.
8 pagesEnglish1.2 MB PDF
Loading your manual…Open PDF directly
Document details
- Brand
- Graflex
- Model / document
- Ciro-Flex camera
- Document type
- User manual
- Language
- English
- Pages
- 8
- File size
- 1.2 MB
- Category
- Film cameras
- Document date
- Not specified in catalog
Search available document text
Find a term, then jump to its page in the original PDF. Image-only pages may not be searchable; check the PDF for exact wording and diagrams.
Page 3 · Read text
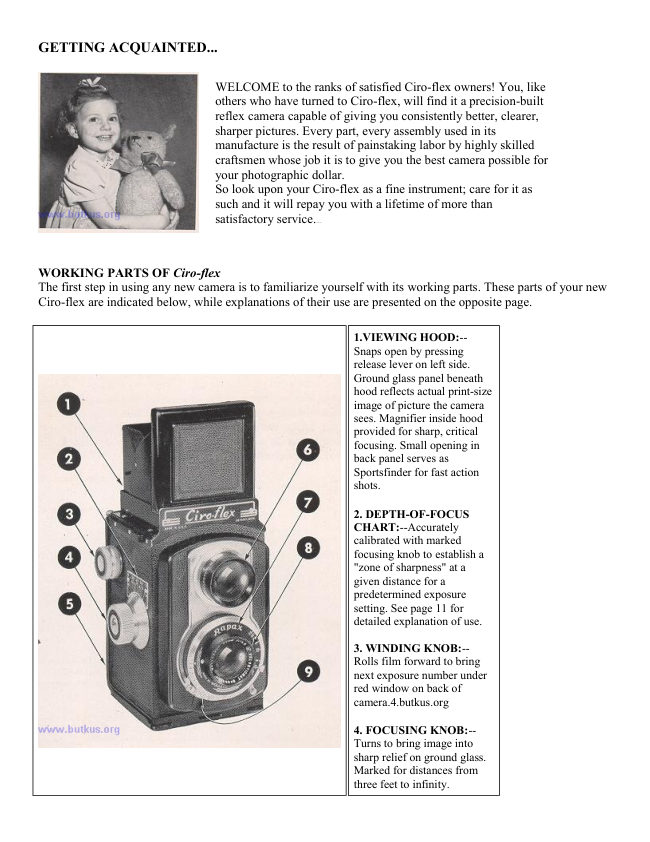
5. BACK COVER:--Opens for loading film by
pressing down on built-in button at top.               8. TAKING LENS:--f3.5
                                             Wollensak Velostigmat lens, coated
6. VIEWING LENS:--Fine coated f3.2           and corrected for excellent color
Wollensak Anastigmat lens synchronized with      work. Perfectly synchronized with
Taking Lens below to permit sharp focusing and    Viewing Lens above. Automatic
excellent composition arrangements on the ground   corrective parallax devise controls
glass before each exposure.                       both lenses.

7. SHUTTERS:--Your Ciro-flex is equipped with   9. CABLE RELEASE
either the Automatic Alphax Shutter or the         FITTING:--Built in for either
Wollensak Set-andRelease Shutter. Both are         cable release or flash attachment
famous for their accurate, dependable               extension. Threaded fittings on
performance. Alphax: speeds range from 1/10th to   right side and bottom of camera
1/200th of a second. Rapax: speeds from 1 to       provided for flash attachment and
1/400th of a second. Both provide for bulb and                tripod.4.butkus.org
time exposures.


FILMS THAT FIT Ciro-flex


                Your Ciro-flex takes either Eastman 120 or Agfa B-2 for black-and-white prints
                   while Eastman Kodacolor C-120 may be used for fine color work.
                 Eastman 120 and Agfa B-2 are available in five different types or grades each
                    of which, properly exposed, will record the full range of tone values.

                   Since some types of film are more sensitive to light than others, the specific
                   "speed" of the film being used plus the intensity of light illuminating the subject
                   should be considered in determining proper exposure setlines.

                The use of a good exposure meter is an excellent short-cut through the
                   complications of correct exposure and it provides you with a selection of lens
                     apertures and shutter speeds that will result in satisfactory negatives.

                  For your information as well as for a basis of film comparison, the published
                    film speed ratings of each of the films that fit your Ciro-flex are reprinted
                   below:
View original page 3Page 5 · Read text
FOCUSING YOUR Ciro-flex


                Your Ciro-flex was designed to bring you two separate systems of focusing,
                   both of which serve a definite purpose . . . the Ground Glass System for sharp,
                        critical focusing and general purpose use, and the Depth of Focus Scale System
                     for sports events and fast moving objects. 4.butkus.org

                 While both systems are fully explained on the following pages, let's first
                     establish a basis of understanding with regard to certain terms used in any
                    discussion of this subject.


TERMINOLOGY

Diaphragm or Lens Stop
The diaphragm or lens stop is an adjustable iris located in the shutter between the lens elements. It controls the
amount of light passed through the fine "wocoated" Wollensak taking lens used by Ciro-flex. It also serves as
the devise that controls the depth of focus in your Ciro-flex.

                        The picture you see Is the picture you take

Depth-of-Focus . . .

                                         When the lens is focused on a point or
                                                                 object, those subjects somewhat nearer
                                                    and farther away from the lens are
                                                                 relatively sharp also. This effect is
                                                              called "depth-of-focus". As the
                                                    diaphragm is made smaller . . . i.e., as
                                                             the lens is stepped down, you will note
                                                                  that this field of relatively sharp focus
                                                                          is extended to subjects even nearer and
                                                                 farther away from the object upon
                                                   which the lens is focused as illustrated
                                                        above.


Correct Exposure Setting . . .
The correct exposure setting for a given picture depends upon the intensity of the light with which the subject is
illuminated and the speed of the film being used. When these quantities are known, the shutter may be adjusted
to the proper diaphragm opening and set for the right length of time to result in sharp, clear negatives of a
density which will permit making good prints. 4.butkus.org

With knowledge of film speed values, the use of a good exposure meter is recommended as an excellent short-
cut to correct exposure settings.
View original page 5Page 6 · Read text
FOCUSING . . . Ground Glass System

                       The Ciro-flex Ground Glass System of focusing gives you a print-size
                          preview of every picture you take before you expose the film. It is used
                               in most general cases where time permits and is particularly
                       recommended for taking portraits and other pictures where sharp,
                                 clear, crispness of detail is desired.

                     To focus on the ground glass, open the viewing hood by pressing down
                        on release lever on left side of camera. Now, by holding the camera in
                          your left hand up close to your chest, you can look down onto the
                         ground glass and see an actual print-size image of the picture the
                         camera actually sees projected in full negative size (2 1/4 x 2 1/4 ).

                         Next step is to frame the image you see to obtain an interesting
                          arrangement for picture composition. You mav find it necessary to take
                           a few steps forward or backward . . . or to raise or lower the camera to
                           achieve a special angle effect.

After you have framed the picture you want, turn the focusing knob until the principal object in your picture
image stands out in bright, sharp relief.
Whenever extra sharp, critical focusing is desired, the magnifying glass attached to top panel of viewing hood
may be flipped into position over the ground glass image.


FOCUSING . . . Ground Glass
Knowing the speed of the film you're using and estimating (or checking with a light meter) the intensity of the
light on your subject, you then adjust the shutter to the correct exposure setting and cock the shutter. Check
your ground glass once more to make sure of distance and composition, press up on the shutter release trigger
and the picture is yours forever.

THE CIRO-FLEX SPORTSFINDER

               The Ciro-flex Sportsfinder is a small opening in the back panel of the viewing
                hood to serve your need for fast-action sports shots. For sharper, clearer action
                      prints, pre-focus on the ground glass as described above usingsome object where
                    the action is to occur as your focal point.

                Then press the front panel of the viewing hood down to the small catch lock on
                    the back panel. Now, instead of looking through the ground glass, you merely
                     raise the camera and "catch" the action through the Sportsfinder.  If time does
                   not permit pre-focusing on the ground glass, the Sportsfinder may be used with
                    the Ciro -flex Depth -of-Focus Scale System described on page 11.
View original page 6Page 7 · Read text
FOCUSING . . . Depth-of Focus System


                             The Ciro-flex Depth-of-Focus Scale is located on the camera-
                             body just above the focusing knob. To use this scale, focus the
                               camera as already explained or simply judge the distance
                               between the camera lens and your subject.

                                   After determining the correct exposure setting, read the footage
                                    distance on the focusing knob that falls between your
                               diaphragm opening figures appearing on both sides of the zero
                                       line on the depth-of-focus scale.

                                 This distance represents a "zone of sharpness" extending in
                                      front of and behind the focal point of your picture. Any objects
                                   within those limits will be relatively sharp on the negative.


For example, in the picture at right, the focus is set at 18 feet. If the diaphragm is set at f/l6, the depth of focus--
or "zone of sharpness"-- extends 10 feet in front and 100 feet behind the focal point of your picture. Or, using
f.4 diaphragm opening with focus set at 18 feet, the depth of focus extends from 15 feet to 22 feet.

THE Ciro-flex SNAPSHOT RULE -


When taking ordinary snapshots, it is not always necessary to focus on the ground glass. By merely using the
depth-of-focus scale, you can readily "set" your camera for a "zone of sharpness" and follow this famous Ciro-
flex snapshot rule:

This rule is presented as a helpful guide to increase the usefulness of your Ciro-flex. In practice this rule permits
you to carry your camera set at a "zone of sharpness" ready for instant use should a good subject appear
unexpectedly. You need only set the shutter speed according to the brightness of the light and the kind of film
used to insure Rood.
View original page 7Page 8 · Read text
RECOMMENDED ACCESSORIES

Ciro-flex Camera Case--


                   Made of genuine cowhide attractively lined with dubonnet velvet.
                       Designed to permit unrestricted use of the protected camera. Just drop
                           the front cover as shown and you're ready for action.


Cable Release--Cable releases are available for use with your Ciro-flex. They are a valuable accessory for time
or bulb exposures where a slight movement of the camera may ruin an excellent picture.

Flash Gun--Any flash attachment of standard make which will fit the Alphax or Rapax Shutters may be used
with the Ciro-flex.

Tripod--Any tripod having a 1/4" - 20 thread attachment will fit the Ciro-flex.

Filters--Any well-known make of filters in the 32mm. mount size will fit your Ciro-flex camera. For all
practical purposes the medium yellow is recommended.

Portrait Lenses--Your dealer carries a selection of special lenses for fine portrait photography which will bring
the image up closer than three feet. These supplementary lenses can be obtained in various focal lengths and
should be mounted to fit the 32mm. diameter lens mount.
View original page 8From the M. Butkus archive. Original publisher and archive notices are retained.
Check the model and edition against your equipment.
PDF verified 2026-10-10.