Film cameras
CLIX "120" camera User manual
User manual for CLIX "120" camera. 8 pages in English. Read the original PDF, download or print a copy without registration.
8 pagesEnglish1.6 MB PDF
Loading your manual…Open PDF directly
Document details
- Brand
- Clix
- Model / document
- CLIX "120" camera
- Document type
- User manual
- Language
- English
- Pages
- 8
- File size
- 1.6 MB
- Category
- Film cameras
- Document date
- Not specified in catalog
Search available document text
Find a term, then jump to its page in the original PDF. Image-only pages may not be searchable; check the PDF for exact wording and diagrams.
Page 1 · Read text
www.butkus.us
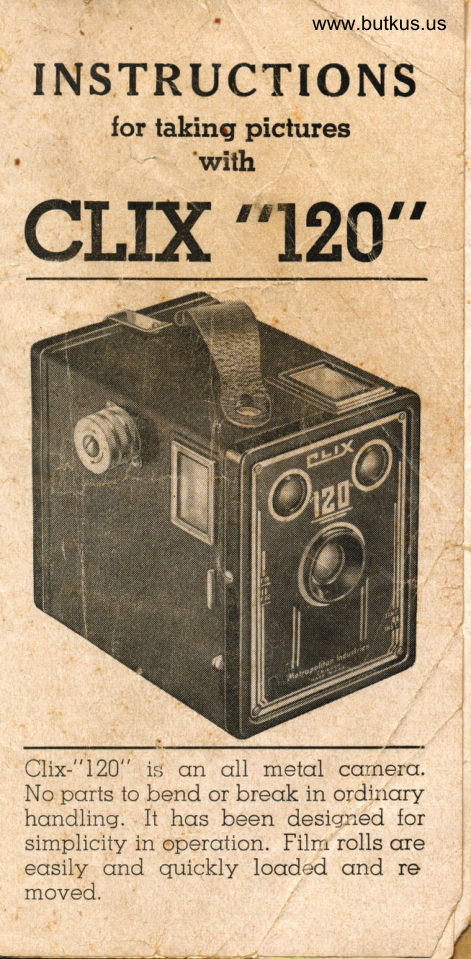
INSTRUCTIONS
       for taking pictures
              'with
       "I2A''CLIX


Clix-" I20" is; qn o11 metol cqmerq.
No ports to bend or breok in ordinory
hondlinq. It hcs been desiqned for
simplicity in operotion. Filni rolls qre
eosily cnd quickly looded crnd re
moved.

                                                                 /G
View original page 1Page 3 · Read text
.:   www.butkus.us|lr

                                               Illustrction
                                   T".                                                   '


        Removing Film Ccnrier
     How to Load Film
Avoid briqht sunliqht when loadinq.
Alwoys seek q shoded ploce, thus
preventing sunliqht from accidentcrlly
spoilins the film.
Remove bock of comero by liftinq up
the spring cotch ond pull cover out-
wqrds. Pull out the film winding
knob, CIs for os it will 90, using cr
riqht-hond turning nrotion. Then with-
drow the Film Reel Holder (see illus-
trotion obove).
Ploce the empty spool in the top re-
cess with the cross siot next to round
hole in the side of film cqrrier.
Ploce spool of new film in the recess
of bottom of film ccrrrier. ffhe bottom
is the end which hqs no hole crt the


                                                                                                                                                                                                                                                    '1side.)
Breok the seol and poss the protected
pCIper over the four rollers ond crcross          'i
the openins in the back. Be sure thct
the colored side of the pqper is on
the outside.
View original page 3Page 5 · Read text
I


                                                                                                                                                                   ,A

I                                                                                                              II
                                                                                                                                         .t'{
 ;,I                Illustrqtion No. 3                      -1.iI
 \Mith the film winder knob pulled out
 os for qs it will go, repiqce film ccrr-
  rier, moking sure thot the round hole
  crt top of film corrier is next to winder
 knob. When replocing film corrier,
 be sure thot the side with the oblonq
 opening goes in first ond thot the
 smoll cut-out of the bottom siides
 olong the trock inside the comero at
 the bottom.


 Thread paper
  through longest
  slit in  emply
  spool qs lqr as
   it will go.
View original page 5Page 6 · Read text
l        www.butkus.us
     After firmlyt re.plocinq film cqrrier, push the     film windei knob intc comero qs for cls it will    go qnd turn knob to right until it engcges the
     spool. Repioce bock of cqmero by fitting the
    bottem of cover over the notches of bottom of
     ccse. Push top of cover into position crnd press
      slrring cotch to snop into plcrce over the but-    ton qt the top. BE SURE THE BACK IS COM-
    PLETELY CLOSED BEFORE STARTING TO TAKE
    PICTURES.
    The two bronze springs ottached to the bock
     qre plcrced there for the purpose of keeping film
     rolling smoothly and to prevent the film from
     buckling inside the cqmero. Turn the winding
    knob to the right until the figure "1" crppecrs
     in the reC window of the bock cover. You crre
    now reody to tcke your first picture.
           How to Tcke Sncrpshots
     Set your exposure selector by moving it down
    to the "Instcnt" mark. Keep the selector in     thot position'until ycu want to chonge  it  to     toke q time exposure.
    There ore two view finders (see illustrotion No.
     1). One is for horizontcl ond the other for     verticql pictures. Look into the view finder
',r'   from directly over the center of it to see whot     will cppeor in the picture. Do not stond closer
    thon B feet from subject nor further cwoy thon
     necessory to get everything into the picture.
    Trip the shutter release once only for eqch
     shot, either up or down. After toking picture
    No. 1, turn knob until figure "2" e.ppeo-rs ond
     repeat until you hcrve made eight shots. Cou-
     tion: Be sure to wind knob immediotely after
     tcking eqch shot to qvoid double exposures.
                  Unlocrding the Film
     After the eighth shot is mode, wind the film     until  it is oll on one spool. To mcke sure it
      is ccmpletely wound, keep winding for severol
     iurns olter it feels slack.
    Pull out film winder knob, remove cqmercr
    bock qnd pull out film ccrrier. Remove spool
     of film ccrefully. Seol end of roll crnd put it in   q dork ploce immediotely, prefercrbly in the     originol film contoiner.
        How to Mcrke Time Exposures
    Time exposures ore mqde ryhen tight is not     bright enough for g sncpshot or when tcking
     indoor pictures without flood lomps.
    REMEMBER, IT TAKES TWO MOVEMENTS OF
    SHUTTER RELEASE TO MAKE A TIME EX.
    POSLIRE, ONE TO OPEN AND ONE TO CLOSE
     SHUT'IER.
   Move ihe exposure selector to "Time."  Set     cctmerc on some fixed flot object. The length
      of exposure will depend on the omount of liqht,
     the subject ond speed of film useC. A fiftli td    o holf second is usucrlly enough for dull days
     a
View original page 6Page 7 · Read text
outdoors. Niqht pictules outdoors mcy require
up to 5 minutes. Indr>or pictures in the doy-
time require severqi seconds. Indoor shots
by ordinory electlic liEht from 6 seconds to 2
minutes. Be sure to ptrsh shutter releqse up or
down when shot is finished.
              Aperture StoP
The operture stop, or selector, is used to
chcrnge the size of the opening, thereby in-
crecsing or decreosiirg the cmount      ltghtpcrssinqf through the lens to the fiim. The-ot  Clix-r'I20't     Ccmero hos two stops-F.I6 onC F.22.
In bright sunlight, pull stop out (F.22). In ordi-
nory [ght, ond for tirne ond indoor shots, push
stop in-(f.tO). Set stop qtF.22 only when light
is exceptionirtly briqht. Otherwise use the F.16
stop.         '  Whct Film to Select
CI!x:'L2j" is designed for cny stondcrrd 120,
82 or G20 film, block and white or color. But
if you vrish to toke pi.ctures in dull liqht or oncloudy doys, use q "fcrst" film. Your film
deoler cqn suggest whot type of film to use.
                  Contcrct Prints
Film used in the CIix:'I20" produces 2rA"x3V4"
contcrct prints. But :nlorged prints moy be
hod from the scme film. We suggest thot you
consult your deoler on cll detoils concerning
the developing of your films, moking contqct
prints or enlcrgemenis.
          Composing the Picture
Decide what is the moin center of interest ofeqch shot, ond finC q view finder thot empho-
sizes thot point, while eliminotinq cril bock-
ground that wouid detroct from the center of
interest.
For instqnce, don't photogroph o person cgairtst
a sign-boord bockground unless the sign hos
some meoning in the picture. Simple, cleon,open bockgrounds qre best.
If you ore shooting <r light colored object, try
for o dork bcckground. Likewise, cr dork ob-
ject will shcw best cqoinst o light bockground.
Thct is known os phctographic "controst."
Also, try for o pleosing plocement of the shot
in your view finder, thus "froming" the pic-
ture. Use the view finder thct gives you the
most pleosinf bcrlance, ond thot best mqtches
the proportion of your picture.
             Judging the Light
Beqr in mind thct qfternoon sunlight is stronger
for photogrophy thon morning sun, qnd sum-
mer sunlight is much stronger thqn winter
light, even though you think they crre of the
sqme brightness.
Shots tcrken cgcinst sqnd or snow bcckgrounds
need less overheod light thcn normolly,  crs
scnd crnd snow crre-l powerful liqht reflectors.
View original page 7Page 8 · Read text
www.butkus.u

 Fleipful Hints to Get Best
      Results Wirh the
  CLIX "I2O" CAMERA
  o Hqve cqmerq in shqr l when looding.
  o Hold cqmercr steody when sncrpping
     the picture.
  a Advcrnce film to next number immedi-
     otely ofter eoch picture to qvoid mcrk-
     ing 2 exposures or the sqme film.
  o Study condition of liqht ond set oper-
     ture stop.
  a Alwoys loccte your subject in center
     of view finder.
  a Do not foce directly ,nto the sun.
  o Keep the lens free of dust or finger
      prints.
  o Be sure the bock cover is on tight.
   .  Check oil points qbove ond you will
    be deliqhted with results.


           GUARANTJiE
  This cqmerq is unconditionclly  guqrqn-
  teed cgoinst defective w,trkmqnship ond
  motericls for o period of one yeor.  If,
  for ony reoson, your cqrr.erq needs serv-
  icing, return it to the fcrctcr'y with this
  guorontee ond 50c to cover complete
 new pr'bcision pre-focusing ond lcbora-
  tory rechecking, pius pcstoge ond hcn-
  dling costs. . . . A service chorge will
o'.b."r,, be cdded for pqrts  if the ccr:nerq hos
       obused, d-ropped,  ',,r broken.
View original page 8From the M. Butkus archive. Original publisher and archive notices are retained.
Check the model and edition against your equipment.
PDF verified 2026-10-10.