Film cameras
Comet 20 User manual
User manual for Comet 20. 13 pages in English. Read the original PDF, download or print a copy without registration.
13 pagesEnglish1.7 MB PDF
Loading your manual…Open PDF directly
Document details
- Brand
- Comet
- Model / document
- Comet 20
- Document type
- User manual
- Language
- English
- Pages
- 13
- File size
- 1.7 MB
- Category
- Film cameras
- Document date
- Not specified in catalog
Search available document text
Find a term, then jump to its page in the original PDF. Image-only pages may not be searchable; check the PDF for exact wording and diagrams.
Page 2 · Read text
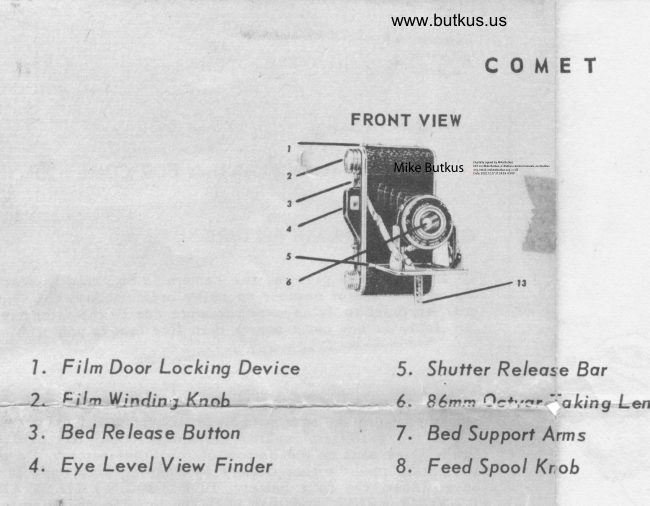
BACK VIEW


   9. T ime ond  I /fr  Setting
   10. Film CounterWindow
    ll.  Flosh Unit Mount
   12. Tripod Socker
   13. Supporf L"9
View original page 2Page 3 · Read text
www.butkus.us
              GETTING READY


                    TO OPEN CAIERA
                         Press the. Bed Release Button
                        $) as shown in illustradon at                                 left, and the camera will snap
                        open automatically. The cam-
                            era is now in the correct posi-
                               tion to.take pictures.


TO CLOSE CATERA
Press down on both bed sup-
poft arms (7) a.s shown in illus-
srration at  ri g h t,  with your
thumbs. Vhen the bed lifts,
ptess the under side of the
bed with both thumbs, and push
up  until  the bed locks shut.
View original page 3Page 5 · Read text
LOADING THE CATTERA
Your camera has been dcsigned to enable
loading of film with the utmos-r ease even in
che dark. Always remember that film should
be loaded in darkness or dim licht. NEVER
in btight light.  Care in loadiig will avoid
lost or fogged film.
 1. Pull out the film door locking device (l)    in direction of arrow. Open-the back'of
    tte carrcra by pulling out afr down (See fig.)
2. Pull out the feed spool knob (g). Place the
    fullspoolof filmin the lower film recess.
3. Break the seal on the film, prll the paper
  from the full  spool to the empty spool.
  Place the tapered end of the paper in the
   larger slot of the empty spool with the
  black side of  the paper facing down.
4. Turo the  film  winding'knob (2). Make
   sure the paper is unwinding straight and
  securely fastened to the empty spool.
  Then close back of camera.
5. Turn the film wiading koob until the num-
   ber "one" shows in the red window (10)   io the back of the camera.
6. You are now ready to take your first
   picture.
View original page 5Page 6 · Read text
www.butkus.us                                                                   ililt
                r}fr

            SHUTTER SETTINGS
The shutter setting lever (9) regulates the length of time
the film is exposed to light passing through the fens which
leaves the image on the film.  For outdoor pictures on bright
days or with flash bulb attachment the shutter setting lever
should be set at  l/ |,0. For pictures taken indoors with flood
lightsr or ourdoors on cloudy days, lever should be set on
TIME.
View original page 6Page 8 · Read text
www.butkus.us
ffi


 REMOYING FILM


7. After the last picture has been taken turn the film winding knob(2)        th_. paper all passes the red window and is completely      "ltil                                                  -Usingwound around the take-up spool. Pull out rhe winding knob.
thethe samesame cautionscautions asas youyou wouldwould inin loadingloading thethe film,film, oDenopen thethe bac-kbac-k
ofof thethe cameracamera andand removeremove thethe loadedloaded spool.spool. PlacePlace thethe empryempry spoolspool
in the uppgr recess. Push in the windingknob. You are nbw riady
toto reloadreload thethe camera.camera.
View original page 8
Page 10 · Read text
www.butkus.usIn subdued light, such as inside the house, night street
scenes, cloudy days,  etc., without the Comet syncro
flash,       -a time erposure should be made. Time exposureis made by moving the shutter speed lever to thi posi-
tion marked TIME.  Place the camera on a firm suppore
A tripod is preferred. The COMET has a tripod soCket
in thi bed in which any sraodard tripod can be attached.
If a tripod is not available the camlra should be resred
on a table or other solid object. To use the camera on
a table pull out the support marked COMET.
The shutter release bar is pressed in and held for the
desired length of exposure aid released. Usually most
exposures can be made from I to 15 seconds. Best re-sults are obtained from    light merer reading or usingthe table supplied with the^ film.
View original page 10
Page 11 · Read text
Insrluciions for Flcsh Unir FOR COMET 20

   #I TAKING A FLASH PICTURE

                            rhe                             camera                                               is operated                                                           in exacrly      y!._    Tr^the      mannerI asfla$forpicture,outdoor                            shors                              by ordinaiy                                               daylight.                                                   How-    ever,- in order to avoid over exposure due ro thi i""t.""iay    the lisht, do not come nearet ihan five feei ;t;;-";tl"i:     "r

  The Comet Flash Unit uses rwo Penlire rype barteries.#teries                   iq the unit, remove rhe meral cover
   plate by lifting one side with finger, cover snaps off and on.
   Insert the batteries, making certain that the top of each
    battery' lies. next to the bottom of the other batteiy. Do not
   attempt ro insert either battery by pushing both ends in at   once. Inserr the first battery, BOTTOM eUn f'tRST AND
  TO YOUR RIGHT', and then push the top end of the battery
    a.ll the way down.-Next, ins-ert the secbnd battery top .od    first, and ro your right, and then push the bortom jna of the
   battery all the way in. Make sure ihat both batteries are held
   firmly in place by $" conract springs ar ends, then replace   the cover plate by hooking one side-and snapping othe^r end
   down.
View original page 11Page 12 · Read text
www.butkus.us
trIake sure that the contact springs in the batterycaseaswell
as the tops and bottoms of the batteries are ciean. Before
loading the camera with film, operate rhe shurter a few rimes
to insure clean co-ntact                             !,oints in-_the shutter. Vhenever youhave reason to belicve ihat the flash unit will remain oui of
use for a period of a month or more, remove the batteries to
_prevent possible corrosion.  If the battery is old or if it hashad prolonged use it may not have sufficiint powerpower toto sctsct offoff
                 ,  Batteries will run down even wheo not in use.    ls       practice toto testtest youryour batteriesbatteries saqhsaqh timetime beforebefore
you pli_n to iake-a series                              pictures. The-best practical way                                      -ofto test the batteries is with a regular Penlite ryie flash lighi.


P. ATTACHING THE FLASH UNIT
To attach the flash unit, slide the metal foot at t5e bottomof the unit into the metal shoe on the top of the camera,
and push the unit forward as far as it will go.-
CAUTION: Make sure that you do nor have an unused flash
bulb in the unit while the unit is being attached to, or re-
moved from the camer-a, as the flash bulb may go off whilethe unit is being attached.
View original page 12Page 13 · Read text
I.{
 A INSERTING THE FLA5H-BULB                                                                                                                                                                                                              3i                                                                               .:t- t@                placiag base of bulb in opcn hole  battery case cap. Be surC prongs on bulb ari placed in
  Srooves, making sure flash unir  ii  seared properl-y for best           1  contact.
 IMPORTANT: Use # or press )g bayonet base ftash bulbs.

 U REMOYING THE FLASH.BULB
 Remove the used bulb by lifting the end of the large spring
  ejector with thumb-bulb &ops out without being touched.
                                    made in U.S.A.
View original page 13From the M. Butkus archive. Original publisher and archive notices are retained.
Check the model and edition against your equipment.
PDF verified 2026-10-10.