Film cameras
COMPASS CAMERA User manual
User manual for COMPASS CAMERA. 44 pages in English. Read the original PDF, download or print a copy without registration.
44 pagesEnglish1.6 MB PDF
Loading your manual…Open PDF directly
Document details
- Brand
- Compass
- Model / document
- COMPASS CAMERA
- Document type
- User manual
- Language
- English
- Pages
- 44
- File size
- 1.6 MB
- Category
- Film cameras
- Document date
- Not specified in catalog
Search available document text
Find a term, then jump to its page in the original PDF. Image-only pages may not be searchable; check the PDF for exact wording and diagrams.
Page 3 · Read text
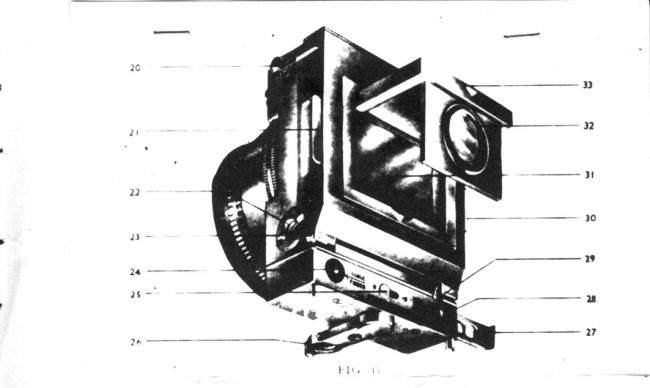
.10  Carrrera llach  Release (ilrp.                !:    h-xpo.rr rt' \teter  Slrtle.
..:I   l'ressure  I'l.rte  l(r'le;rse Lug         .15  \'ierv- Finder.
22       l lerrro v a t r l e 'f r i p o t l     l t u s l r             .2 ' r  .\n ;le  Vre u -l:in tle r Crtntr ol .
13   l(t'lease Pin  for  llinxed   lrlcL       J0   l'ressure  I'l;rte Release Lug.
24  Ra n g e -I iin r l e r                           J I   lfrrcussing Screen.
25  S ulrplenrentarv  l'-xposure          32   l;ucussing  I\lagnifier.
                                                      \\'t dge       3J   Screen  (-'over.
-r,  Tripod  llush.


                      www.orphancameras.com
View original page 3Page 5 · Read text
.qF           %

   I   Sprrit [.er el                                                ll    Frlte r  In d rca tio n   \\' rrrdow.
 2  I)r.'tance I ndrcator                  1 2     I j r l t e r C o n r r , r l .
 J  Shutter Speetl l(rng LocL             l3   In sta n ta n e o u s S e ttin g  r \r r ,,w.
  ,l  lnstantaneousIlelease                       l{   Trnre Release
 5  Lens Stop Control       h            l5    l,e n s Co ve r.
 1, Stop tndrcatron Win.l.*.)'             l6   Depth  of liocus Scale.
 7  StereoscoprcIleatl.    p            1 7  S h u r r e r 1 \ ' r n d .
 E  Angle View-Finder.                           \$"              lE  Sh u tte r Sp e e d Rrn g
 9  Camere Foot.                            l9    \lrlle d  Fo cu ssrn g l(rn g .                      d
l0  Lens Horxl


                      www.orphancameras.com
View original page 5Page 6 · Read text
a\.+
        tsir
                                                        '
   For  clarity   this  instruction  book  is, thercforc,  tlivided  into  four  sections  :
Srctior                                  Subjoct                                  Prgcr
  1   Detailed  description   of the Compass Camera and  the  handling
          of  its  various  adjustments                                          .1to 23
  2  The use of the Compass Unit  Svstem   ...                   34 to 3(t
  3  Supplementary  instructions and additional  technical notes        3l to 37
  +  An  Index   will  be. found on page                                                       3t'i
   Indcicd  diagrems  of the C,amera are bound  into each end of the book and can
bc unfolded   lor easy reference.
   All key numbcrs  quoted  in the  text  refer to the numbers on these diagratns.
Ottrer references (as:  Fig.   f ) relab  to the  illustrations   in the  text.
  Whetuau   lcft  -   ight,-or   cluhuise  or a;ti-clochuise   moucment  ts  menlioncd
is  this booh, ii  is assimed that thc camcla  is being vicwed frotn  the FRONT'.
  Distance  measurements  are  given  in   " feet  "  and  in   " metres  "  to  covt'r
alternative  calibrations  engraved on the camera.  The *'ord  " feet  " or  " metres
will be found engraved on the focussing ring and depth  of focus scale indicating
the method  of calitrration  of the particular  model'
View original page 6Page 8 · Read text
SECTION T
 DESCRIPTION OF THE COMPASS CAMERA AND THE
    HANDLTNG OF rTS VARIOUS ADJUSTMENTS
OPENING  AND  CLOSING  THE  CAMEN.A
  To open out the camera  for use, slide out the  front  extension by shaking  tlre
camera forward,  tlen  pull out both extensions to the  full and lock in position by
turning   firmlv   to  the  left  (anti-clockwrse).   To  close camera,  turn  the  front
tirmlt'  to  the right  (clocku'ise), u'hen tu'o quick successive clicks.will  be heard,
tndicating  tlre unlocking  of  the  tu.o  extensions:  the  extt'nsions can then be
pushecl back  into  the camera.
LENS COVER  AND  HOOD
  To clear the lens,  lift  ttre hinged Cover  (15).  r*hen  tJris Cover  is closed  it not
only  protects   t{re  lens,  but  also  protects  the  shutter  release and  prevents
inadvertent  exposures.
  Under  the cover  is a telescopic Lens Hood  (10) extended by gripping  its outer
rim, and  pulling    it  forward.    fhis Hood shields the lens from  extraneous  light
and should always be used, as  it has no  effect other than this 3ha(ling and doc
not complicate  the use of the c:rmera
View original page 8Page 9 · Read text
SHUTTER.  CONTR.OLS
   There are three operations  in the usc' of the shutter   :
                    (c)  To  st't to  the  retluired  speerl.
                   (b)  To  u'inrl.
                     (c)  To  release.
   (rr)The Shutter Speeclsare engraved on a band or Ring  (ltt) encircling the front
.extension.  Thev are indicated as fractions of a second 1in red) and as Compass
 Units  (in black)  ; these latter are explained in Section 2.  Once set to any' spe+d,
 the Shutter  u'ill continue to repeat that spee<lautomaticallv  u'ith every u'inding
 the Speed Setting  Ring  is onlv  reset lvhen   it  is desire<l to  alter  the s1x'ed.
   Thd Speed Setting Ring  is freed by pushing  its l.ocking Catch  (3) to the right
 (clo,ckwise), when a red edge  u'ill be revealed.  The Ring  is nor'r' free to revolve
 and the desired exlx)sure can be brought  into  line  rvith the  black:rrrou'(13)
 alongside t.lle locking catch.   This black arro\f  is the indtcator  for all automatic
 speeds.  rvllhen the  Setting Ring has been correctly  placed, the lot'king catch  is
 pushed-         to the  left and the Ring  is then locked against movement.
    (b) To wind the Shutter, rotate  lr'ith the finger-tip the milled r'r'heel(17), u'hich
 is set in the top edge of the camera front,  to the left lantr-cltx'ku'ise)  unttl  it stops.
 \4'ith  the Shufter  set to a  s]rort exposure  onlv a short  rvind  is reguired   ;   \ rith
 longer exposures a longer wind   u'ill  be founrl  necessar\'.  The  Shutter  cannot
 be overwound.
                    www.orphancameras.com
View original page 9Page 12 · Read text
LIGHT   FILTER.S
    .\ set of three t'ohruretl Liglrt  l;ilters  is lruilt into the Compass C-a,mera. They
:rr(. c()ntrolle<l bv the  rnilletl rvheel engrave<l "  l;lL'fF:Il.S   "  (12) on  ttre right  of
the camera  front.   \\'hether a Filter  is in place, and  if  rc which,  is indicatord in
the circular  rvindou'  (l I ) ;ust belou' the u'heel.  There are four positions of the
 l;ilter  Control,  the respective indications  in the rvindoru being  :-
             o.    I.ens open, no liilter in place
               J.     \\'ratten   Kl   Filter  (for Orttrochromatic  pletes or films).
                 l'.J.  \\'rattt'n  (]    l;ilter  (for I'anchromatic plates or films)..
                        | '. {   \\'ratten  X I  l;ilter  (for   I 'anchronratic  plates or films) .   'l'he        contlitrr)n{ rn u'hich these Filters shoul(l bc used are briefly desriH     in  tlrc
Irrrtes on pages J(r antl 37.  The numbers are ('ompars  t'nits  (se  Srrction 2, pge
 29t rrhile the lettt.r l'indicates  that the  l;rlter ln place ts suitable only for use rvitl
I'anchromatrc crnulsions, not  s'ith Orthex hromatic plates or lilms.
FOCUSSING     grr*i.v5'J1
  The camera is focus:itrl for subjects at various distances by revolving tbe milled
l;ocussing  Ring  (19)  rr-hich rs betu'rcn  the body  of  the camera and the bck
extension.  Three methuls  of setting to the correct focus are Provided:-
         l. The  Fot'ussing Scale.    l. The Range-Finder.    3. The Focussing Screen.
                                       7
View original page 12Page 13 · Read text
FOCUSSING SCALE   'the       front of the nrillt'rlljocussinsRing is etrgravedrvith a St'aleof distancesin
 ft.et  or  alternativelt'    nretres.      lft'  estrnratirtg   ()r  measurirtg    tht'  distance   front
camera  to  subjecb  an<l  s'etting  thts  Seale  u'ith  the  c()rre('t nunrber   of   "  feet  "
or   " metres   "  in  line  u'ith  the  arr()\i'engravecl     "  l)ist:rn('('      '  (l)  tltt'camer;t    rvill
be  correctlv    focussed.
   .\utomatic  and more accurate  results  u'ill be obtaint'rl  bv using the range-fin<ler.

THE N.ANGE.FINDER.
    lf the camera is pointed tor,uarrla subjet't u'hit'h is then vicrrt't:tlthrough tlre
circular lens marked  " Itange-l;inder  "  (24\ at the bottom  of the canlera back,
tr,r'o images of the subjt'ct  u'ill be seen.  Tht're  is:r  blue imaqc  all over the  tiekl
of view, an(l super-imposed on this, a small t'irt'ular vt'll<ls unage.  This yello*'
circle must be in ttre centre of the blue  fielrl, as  it  s'rll  lx'if  the eve is directlr'
behind  tlte vieu'ing lens.
  Comparing  tlre central  vellow image  rvith  the section of the blue image upon
which   it  is super-imposed   it  will  be seen that  the same objects appear  in both.
but  that  they may be slightly  displaced verticallv   (re  Fig  41.   By  rotating
tlre milled Focussing Ring  (19) the'relative   position  of the  trro images of an1'
selected part  of the subject can be adjusted, and from being one above tte  otJrer
thev can b€ made  to  overlat' one another and  t'oincide  exactlv   (re  FiS.  4).
                    www.orphancameras.com
View original page 13Page 14 · Read text
F tG. 3.-How    to hold  the Camerl  when  operating  the Ren*c-Finder
                       9
View original page 14Page 16 · Read text
\\'hen  such portions  of the  range-tinder  irnages coincide,  the  part  of the subject
they represent  is in sharpest focus.  A  little  practice rnay be neccssarv to achieve
this  <;uicklv and  accurately,  but  care expended  in mastering  the  verv  simple
operation   involverl    rrill   tr  more  than  repaid  by  t}re strarpners  of  the  resultant
prctures.
  The  easiest  \,r'ay is to hold   tfie camera  sideways  between  the  first  finger and
thumb  of the left-hand and turn milled For:ussinfi lting (19) with  first finfer and
thumtr  of the right  hanrl, in which case imaqes u'hen out of focus *-ill be displeced
rerttcallv (.ee F'ig. 3).

GR.OUND  GLASS  FOCUSSING   SCREEN.    (l"itted  only  on Envelope  Bachs)
   'l'he
       ljocussingScretn  (31;rsburlt  into the pressure plate in the hinged back of
the camera.     lt  is revealed bv  yrullinf  bat'k the lower edge of the hinged scnaen
c:over (33).    lf the Shutter  is opened at  " TJ\Il.l  "  (with Stop 0 and no Filter  in
place) the image that  will be received on the pkrte or film can b  seen and-with
the :rid of the llagnifying   (ilass (-12) built  into the hinged col'er (33)-focussed
on the groun<l glass.
    .\ sntall Cross is seen on the centtt  of the Ground (ilassScreen.  Ihe purpa    o{
tltis  (lross  is to enable each Compass user to arcertain  the exact fmussing  point
of the \Iaenifying  Glass accor<ling to  hrs ou'n  individual  eyesight.    !\'ith  the
Shuttt'r ollenerl an<l the canlera lnintecl  to the light  this Cross must be carefully
                                                                                              l l
View original page 16Page 18 · Read text
TO  II)AD   THE  COMPASS   CAMEN.A   VTTH   PLATES
             (For loading  roll films, see pages 15 to  20.)
         The                         ('amera  l-rack htted  u'ith  the ground  glass focussing screen is                .              lompags
       denCred  to take the Compass plate Enr-elopes.
         Each  F-nr-elope consists  of  tu'o  parts,  one  sliding  within  the  other.  when              -
        the Innerenvelope ispushedhomethetwomakeacompletelylight-proof   container
          for the nensitive plate.   \\-hen  tfie Inner envelope is withdrawn  the sensitive plate
          is revealed through theframe  cut  in the Outerbnvelope,so   it  is essential Urai tfre
        Inner envelop   .hall  only be r,r'ith<lraurr rrhen the u'hole isloa{e{   intot}re camera
        an<l the camera back  close<!.
             Ttt               aroid                     occtdcntal partiol  u'ithdrcu,al, F)nt'elopest{?"u,  be                                                                                                     bt, thc si&s,                                                                     .hdndled           bv)        s<tt               the tof>.a                                                       U;   *,t ,rt   z.o,t..
         To  load the  cattrera, the hinged  back  is released by  pressing the  studs  (20)
          otr either  side of the camera at the top.  The Envelope  is ptaceci (cut-out  frame
         torvartls the lens) into the  little red sliett at the bottom  of'the  hinge<l back anrl
        the baek rs then closed.  (See illustration  on lnge  14, t.'ig.5.)
I        To uncover the-plate insirle the camera ready for exposure, press inwards  tlre tr,r'o
        prelsure  pliete release lugs 121 and  30) on the  trdei  of thg hinge{  back.   This
        relieves all pressure from  the Envelope and the lnner  enveloJre can be rr-ithdrarvn
                                                                                                  l 3
View original page 18Page 19 · Read text
FlG.  5.-lnscrt   Envelope   in  ( arrrera ltack  trchind     F I G
                 Red Led*e.
                     www.orphancameras.com
View original page 19Page 20 · Read text
, }
by  pulling  out  the  part  which  protnrdes   tlrouglr   tho  "  letter  box  "  stot  in  thc
gaTqfa top until a definite stop is-reachecl (see Fij.6).   Wben the Inner envelopc
is fullv  u'ithrlrar*'n  the pressure lugs are releared ahd the  pidturr  can bc trhen.
   .{fter  taking,  press the  pressure  plate  release lugs inwards,  while  tlrc  Inner
envelope  is pushcrl  dor,r'n through  the  slot  to  its  original   " cloced "  poeition.
IJe slr.rett is pushed right honte.   If an linuelope has bccnbent ot damagcd by canlass
handling.or.curr.t'ing. tt  ttill sometimes ln fouidthat   th. Innu  esaelopi uili  nol push
completclv hom_e:  tJ thts occuls  tl can usually be conccled by partijlly   uitMnriq
lhe Inner  t'nt,elttftt again, and gently "tr'orhing "  it dou,tr int6  iis futlyitoscd   posilii
u'hilc the prt'ssurc-ltlole releasc lugs atc  ltresicd ixu,ards os/or  as thcy wilt'go.
    .\fter  closing  the  I',nvelogx., relear  the  lugs, open hinged  back, end nemoee_
               \\'hen  tht' Flnvelope has been used, tear  off  Jpecirrl Papcr IndicetorFnt'elop.
Tab  lixed on  tlrt' back, as a slgn of exposure.   This  uill  |revent  accidentel  n-
cmplovment   of a usetl F-nvelope aod conse<luent double exposurie. .      r ,          .   /,
To L.AD THE coMpAlrscAMEnAvrrH  loLL  ,,rf,r   \"lKfit    !)
  (To load  u'ith Compass Enr.elopes, see patcs  13 to  15.)
    It  u'ill  facilitate  a spt't'<lv understanding  of the working  of the Roll  Film  Iteck
if these instructions  art'  tirst read straighfthrough,   and are then followecl clo*lv
in <letail as tht' tilm  is loaded.
                                                                                   l 5
View original page 20Page 23 · Read text
TO ATTACH   R.OLL FILM  BACK  TO CAMERA
      lf  the hinged back,  u'hich accommo<lates the plate envelopes'Ttrisfor single expo-
 sures,.ts in place on the camera  it must  first be removed.          is efficted'bv
 releasing  it  from  the top  cJips (20) and then  withdrarring   the spring  li"g.    p--r"
 (23)' enabling-the  track to be lifted  ofl the fixed hinge pin on  thl  opinsit!   si'de
  To attach  the  roll film_Back,  lay the camera face tlou"n and place'the  roll  film
 Baclr-in position                9n  i!  The two.tprrng  hinge pins 134 and  3+i),  seedtagram on
Pogc 17, should then be pulled  outu'ar<l+-o'treir   ttre'tlack   s.ill  clrop into jnsition
and tan be rccured bv releasing thc 1lns.
        top.clips.,(20) on the camera back grip the  roll  filrn Back tirmly and hold  it ^,3:cl<xF<l agatnst  tlre camera.   Tht'  clip Cover  (47) which  folds down  oi'er the clips
Prevents accidental release.  A  finger-nail'groove   is pror.irlert in the cenrre bf
tle  clip Cover.
TO LOAD  THE  NOLL  FILM  BACK
  With  the  roll  film Back                              -hin-ged to the camera  but  not  held  clortl   by  the  topclip_s (20) the Back  is ready  for  loading  u.ith  film.
   Fust,          turn              the \\'inding                                   (37)                                              in  ttie                                                 direction  indicatcd  by the arrow,  until                            5"y              ta, bluk         appears                                                          (3tt).                      in the indicator                              window
   Tlu  Winding  Ke.v' must olways b  tutned'clockwtse,  i.c.,  it   tlu ditcclim  indicaled.
P! tltc arlou  engrarcd along.sidc it.    " One turrt  "  is intendcd to indicale one coml>bb
                      www.orphancameras.comls
View original page 23Page 24 · Read text
:

rcuolulton  of the handle, sturting and fnishilg    utith the red spol engraaed os  tlu
haadle resting in thc red semi-circle engtaacd on tlv  side.
   T*'o  bobbins  or  tilm Spools are required, one reatlv loaded with  film and  tlc,
other empty  to sen'e as a  " take-up  " spool on to u'hich  tJ:e film  is wound  after
exposure.           Th9  necessary  gmpJ)'  spool  (together   u'ith  a spare,  in case of  loss)                   .is supplied urth  each roll  lilm  back.
   Xoltcc thot the tu,o cnds of the Spools arc dissimilar.   At one eod ttre llole  is tlre
full diameter  of  tte  spindle, and  the cap or end of  tlre spool  is smooth,  at the
otlrer end the Hole  is smaller and  is surrounded  by a ring  of Shallow  Tocth.
     f nsrertthe empt)' take-up Sp<xrlinto the lower tilm chamber (41), scc diqran  on
poge 16, wrth  rts foothed   tind  to*'ards  the  \\'inding  Key  side of the baik,  and
with the Slot in its spindle (35) uppermost.    If the Spool is pleced in this position
uith   its Toothed  F-nd close against the corresponding  teeth surrounding  the  ltn
(4tt) in the tilm chamber,   it can be snapped into place by pressure on theopposite
end-  rrhere  it should be firmly  engaged by the spring stud  ({lA)
_-The  full Spool should now be removed from  its outer carton aud  tinfoil  wr.ppiry.
The papr   *al  parttal/y  broken  by  pulling  Tab  (a3) and  the spool  then  lcidei
into  the upper  lilm  chamber   (39).   This  is done by  insertrng  the end  wittr  the
larger  Hole on to the  fixed  stud  (,10) on the Windint   Key  side of the Back. end
pressing dg*l                   opposite end until   it clicks into place and  is held firmly  by the                -thespring stud (421.
                                  t9
View original page 24Page 25 · Read text
'l'ab
   Now draw tihe      (43) of  the I'aper Slxxrl l,earl tor,r'ards tlre t.nrpty  sptxrt, .7rsl
 lat  csoyg-hly:t    tp be comforbbly  fitlcd  inio the Srot (35) tn tlw spind'te'ot iht  citf>tr
  sfool.  The Tab drould be entered into the rvide;nrtion   of the Slot anrl  slirl irlong
  the narow   portion  as far as  it  will  go.
 ,  The  action  of drawing  the Tab  (,13) towards  the  take-up  spool breaks com-
 PFtely  the Ilrper Seal with  u'hich the loadetl spocil is protecteil.  bive  tht  \\'inding
 Kcy onc complete  turn, making  sure that  thi  I'apei  l-ead is u'ell centred on  thri
 Pressure Plate (45),and remove the broken Papertieal  rvhich  u'ill have <letache<l
  itdf   from  the  spool.
   The  roll  film Beck fuould  nou' be closed against the canrera, making  sure that
          clips-on                       ttre                   camera                            back                                               fully engagl                                                             in                                                      the                                                                slbts provided                                                                                           anrl                                                                                               foi                                                                 them  !tt:J"p                I hold       the          bach sccure.                      The                                  Clip Cover                                                 then                                                             folde<i                                                            dorvn on                                                                                          clips                                                                                                to                                                                           the                                        1+Z1is' prevent          accidental                      release.

 TO USB TH8 N.OLL FILM NAdX
    Ttre Winding  Key (37)   -                                      illo*   tgrned  to bring the film into pxrsition for exlxrsurt.
  After  several turns a red Dot   r'r'ill be seen in-the  indicator'u-indorr-   (-ltt),'thrs  rs
  folloyed  by another  rcd Dot and then a rcd  [,   a r,rarning  that  the next  turn
  rrill  bring z rcd  I  into  the window  and the  nrst ntm  into  position  for exposure
  in  t}re camera.
                       www.orphancameras.com2o
View original page 25Page 26 · Read text
.\fter  this  tilnt lurs lx'('n. ('Ipoii('d, thc \\'intling   lir.r'  rrfust'lx' wound a  furtfier
complete turn u'hen a red 2 u'ill shou', and the film  u'itt be in place for the second
('\l)osure, an<l so on until  the sixth exposure has been rturrltj.
  .J/u'nusu,ind on the filu tnintediatll)'a.[ternuhtng en cr'ltttsrtr?.

TO UNLOAD   THE  R.OLL FTLM BACK
   After  the srxth exposure has been m:rclt', u'irrrl on the film  untrl  tu'o selnrate
blach Dot:  follorved bv a, hlach Iappear    in the rntlicator u'in<lorv.  The  blach I
indicates th:rt  tltt'  tilm  is cornpletelv u'ound  otl on to the t:rke-u1l Spool and  is
readv for unkxrrlrng.
   'fhe
          roll  film  llack can now be opened by unfolding Clip Cover (47), rt'leasrng
tht'top  Clips 1J01an<l lettirtg the llack  fall open on its hinges. \\'hen the ll:rck is
olxnt'tl the filnt  r'r'ith its prott'ctive paper learl and trailer  u'ill  lx' found u'ound on
to the take-up Sp<xrl. lt shorrld be v'rle<l lrl'ore remot'al lronr lht' cdtncre rvith the
gtrmme<l Slip provided,  as  if  it  is taken out careltsslv  lrlorr  sealing, the pap'r
mav sl)rrng partiully  ol)cn, allou'ing  lixht  to fog thc e<lges of the  film.
    lf, u'hen tlte camera is openi:d, the loose end of the gumme<l Slrpattacherl to the
spool papr   is on the  lou'er side of the S1nol, and therefore canhot  be reached,
the \\'inding- Kel'- can bt' slorvlv turned  just as far as may be. necessary to  lrring
the lcnse end of the gummerl Slip into a position convenient  filr sealing.
                                 21
View original page 26Page 27 · Read text
\OTl'-.-     lf  this  is done  it must be remeruberctl that after the Sp<rcIisextracted
the     \\'inding                      liel'u'ill                     bave  to be                                         turnerl                                                   to complete                                                                               its  revolltion,   i.e., until the blach                   . shon's                        in the-r+'rndow                                             (3tt),                                        before                                                      reloi<ling.
   Tf"  sealt'<lsPool and the nou'empty  spool on s'hrch'the  lilm uas l<u4e6 into                 i   .
the back can l>e remort.d.bv  pressing-thi. Release lJutton  (44) u.hich u.ithdrarrs
the spring stu<ls anrl rnatrles- the  tp,r,,l.  t<l spring out.   ILeplace'ready emptv  sl1ro.rtin              I
 lor'l'er slrool chambtr   according  to  loir<ling' insiructions,              t""   i"f.'i"g  up
the next spool of hlm.
  The Release llutt-on  (44) is litted  u'ith an automatic  safety catch which pre\.ents
it being operatetl u'hen a lilm  is in position and rvhen the  ioll  film Back is closed
against the canrera, but when lhe-Rach  ts open  rt  ts tntporlant  thatlhis Heleasc
Button should ntil be p1es.se{ercrltt u,hen it  ts desircd to renlouc a  lullt, expoiid und
duly seuledflnt  Spool front the' co,tt(/a.
VTEW.FINDER,                                                                                                  I   -ff".ry.Uift                                                                         h
                   is-r'ic'utd  :tntl arranged bv  sighting   it through  the circular  lens
nrarke<l "  \'ir.*'-liin<ler "  {Jrr) on the  rigtit of the'camera at'the  bottom.   'l.his
lrinder shon's hou'muclt  of the subject sitl be included, but  in this respect it  is
completell' accurdte onlv shen the-camera  is hetdu'ith the l'rcw-Ftntler'lens closc
Itt thc et'e.
   \\'hen  it  is desired to fqus  the subject by range-finder right up to the moment
of exposure, the range-finder can itself be used is a sightin-"SVi6w-F'in<jei--That
                       www.orphancameras.com                                 22
View original page 27Page 28 · Read text
is to_say, though  the Range-Finder  imege  will not cover the  full  ficld of view givcn
.by the camera lens,  it doer show accuratelv  the direction  in which  the cemJra  is
 pointed and u'hat  uill  appear  in the centre  of the picture  taken.
ANGLE  VIEW.FINDAI
 .  lo  9rcrate  the Angle View-Finder   pull out the catch  (29) mnl   in  ttre camers
 back  just  alor_e  tJre view-finder.     Tire  subject  can  then   ir  soen ttrnoogb  the
 rvinrlou' marked   " Angle  Vierr'-Finder  "  (lt) ih the side of the camera.    .Ls this
ena[les snap-shots  tc be taken  at  right-angles   to  the  direction   in  which   ttc
photographer   is looking,   it  is of  spccirel value  in obtaining  natural  pictures  of
camera -conrious   subjccts.
HOLDING   THE  CAMERA
-  9-*iog  to the exceptionally   roatl  size of the camera  care must be taken  when
loldrng    it  to  avoid.?ny   part  of  tlc  hend  obscuring  any  part  of the  Lcns c  the
Range-Fin&r    or  View-Finder.     (Figr.  2 and  3  liluitritc     efiective  mctbodr.)
     If  tlte  catrr:a   is hcld  presd    firmly  rgrinst   ttre forehead, es its design intendc.
grcat steadine$  results and-comparatively    long expocures  can be  gir.en,
      not  ift-tQcrmera      ufign  pressing  tf,e  suiittei   Relear.     It  sho;ld   u,i prcna   !9
gently   and-firmly    against   eittrer  the-forehead   or  the  pressure  of a thu'mb  on
thc  back  of  the  cam€ra.   This  givoe  r  rteady  clmera  and sharp  nogative*
                                 2t
View original page 28Page 29 · Read text
SECTION  2
       TO USE THE COMPASS UNIT SYSTEM
   Tbc. Compor   .                     -Unit  Sy;tem-  ensures  thc  sclentific  accuracy   of  the  exposur(.
F\rcD  to every  plirte  or  flm,  horrever  difficult  the  conditioni  and complix   the
hctors  involved.
 .  Urd   in conjuncti<xt with  the Compass Range-Finder, which gives similarfacilitv
e  gbt"i"+g    stta_rP focus,  this  System  remol'es  all  necessity  fcr  guessrvork  in
photognphy  and enables even the inexpenencerl  to achieve iechnically  satisfac-
tory  nnlts   with oomplete  certainty.
  Thc-kcystooe  of tbi  Unit  System- is tte  Exposure  lfetcr,  or Syrcd  lteter,  built .into  thc Cemera.
EXPiOSURE METET
   At  thc back  of the bar   of the c3mera  is an arrow engraved  " sp€cd  lleter,',
pointtng  to a Slidc  (27) thich  can be pulled  out from  the side of thc camera.
  T-o g-T. the Exposure  Mctcr  under normal  lighting  conditions,  set the  sliding.
Lnob  (25) in the centre of the back of the camira  to-"  0 " and look through  the
View-Finder-(2tt)   at- the subject  y_hich is to be photographed    ;   s'hile  so'doing
gndurlly    pull  out the Exposure  Meter  Slidc  (27j.
                      www.orphancameras.com2+
View original page 29Related documents and language editions
From the M. Butkus archive. Original publisher and archive notices are retained.
Check the model and edition against your equipment.
PDF verified 2026-10-10.