Film cameras
Coronet 3D User manual
User manual for Coronet 3D. 6 pages in English. Read the original PDF, download or print a copy without registration.
6 pagesEnglish1.0 MB PDF
Loading your manual…Open PDF directly
Document details
- Brand
- Coronet
- Model / document
- Coronet 3D
- Document type
- User manual
- Language
- English
- Pages
- 6
- File size
- 1.0 MB
- Category
- Film cameras
- Document date
- Not specified in catalog
Search available document text
Find a term, then jump to its page in the original PDF. Image-only pages may not be searchable; check the PDF for exact wording and diagrams.
Page 2 · Read text
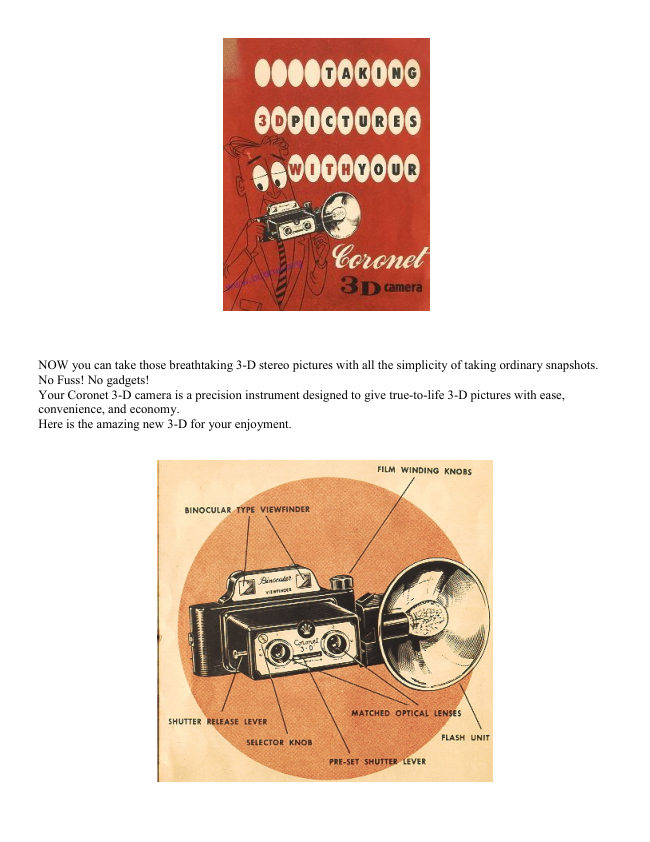
NOW you can take those breathtaking 3-D stereo pictures with all the simplicity of taking ordinary snapshots.
No Fuss! No gadgets!
Your Coronet 3-D camera is a precision instrument designed to give true-to-life 3-D pictures with ease,
convenience, and economy.
Here is the amazing new 3-D for your enjoyment.
View original page 2
Page 3 · Read text
READ THESE INSTRUCTIONS CAREFULLY
The few minutes required to read this instruction booklet will insure better 3-D pictures for you with easy
handling and more enjoyment of your camera.

USE #127 FILM
Eastman Kodak Verichrome, Ansco Plenachrome All Weather or Selochrome film is recommended for use both
indoors and outdoors. Under normal conditions, they will give clear, sharp pictures. You may use a faster film,
such as # 127 Eastman Super XX, Ansco Pan Press or Ilford HP3 for outdoor pictures on dull days, or with
flash.

HOW TO LOAD CAMERA


                            Remove back by releasing both snap locks on the camera
                                    back. The back can then be lifted and removed. The empty
                                    spool is always fitted to the winding knob key. The spool will
                               go in easily if you first engage the slot at either end of the
                                    spool to the winding knob key. Turn the knob to make sure
                                         that the empty spool turns freely and until the slot in. the
                               empty spool is showing Place a roll of #127 film in the lower
                                  compartment. Break the seal and draw the paper over the two
                                       large openings and over to the empty spool. Make sure to
                                 have the black side of the paper facing into the camera and
                                      the colored side facing you. Insert the end of the paper into
                                      the empty spool. Be careful to center it on the spool so that it
                                        will wind evenly. Turn the winding knob enough to secure the
                                   paper to the spool and see that the paper is feeding straight.
                              Then replace the back and secure it by fastening both snap
                                       locks. Now turn the winding knob in the direction shown until
                               # l appears in the red window in the camera back. You are
                           now ready to take your first 3-D picture.


-IMPORTANT!
3-D Stereo pictures must be made in pairs. Your Coronet 3-D camera does this for you automatically. You get 4
pairs of 3-D photographs on a #127 film. Therefore, take your 3-D pictures ONLY on the odd numbers-1, 3, 5,
7. Always be sure that both lenses are open when shooting 3-D pictures.

• FOR LIFE-LIKE 3-D PICTURES OUTDOORS


                                        Set the shutter by moving the preset lever on the face of
                                          the camera. Hold the camera up to your eyes. Your
                                     Coronet 3-D camera has a binocular-type viewfinder
                                       allowing the use of both eyes for maximum comfort and
                                         accurate 3-D composition. Hold the camera at level with
                                          subject and steady.
View original page 3Page 4 · Read text
This is important for good 3-D pictures. Frame the subject in your viewfinder and, holding the camera steady,
gently push in the shutter release lever to take your 3-D picture. After the first picture has been taken, turn the
winding knob to #3. Repeat this operation using only the odd numbers - 1, 3, 5, 7. Remember to re-set the
shutter each time.

• REMOVING THE FILM
After you have taken the last of your 4 pairs (on #7 in the red window), turn the winding knob until the end of
the paper has passed the red window. Remove the back as shown before. The exposed roll can now be removed.
Avoid direct sunlight and take care not to let the roll of film loosen on the spool. Fasten the end with the glued
paper found on the roll of film. You may find it easier to fold under about half an inch of the paper before
sealing.
IMPORTANT-If you have the film developed locally, emphasize that it is a 3-D stereo film and that you want
the negatives printed in pairs. (see Page 8)

GOOD INDOOR PICTURES WITH FLASH
Use the same procedure as above except that you add the flash unit to the camera as follows:
Remove the metal cover from back of the flash unit. (Fig. 1) Insert 2 penlight batteries with the tops in opposite
directions as illustrated on the metal cover. Snap the metal cover back into place by pressing lightly with thumb.

(CAUTION! Remove batteries when camera is not in use!)
Insert the flash unit by pushing flash gun pins into its receptacle in the side of the camera. Flash bulbs are
inserted by slipping into the socket and pushing down gently until you hear it click into place.


Use Amplex #5 G.E. #5 or Sylvania #25 flash bulbs or equivalent. After taking the picture, eject bulb by pulling
straight back on the lever on the side of flash unit housing. This releases the bulb which can then be removed.
Flash bulbs remain "hot" for a moment after use.
When taking flash pictures, use steady continuous motion on shutter release lever to insure proper
synchronization of flash bulb and shutter.
View original page 4
Page 5 · Read text
NOTE: Your Coronet 3-D camera may also be used to take ordinary snapshots. In the upper left corner of this
camera face plate is a small round knob.  This is the selector knob. To take 8 ordinary snapshots, turn this knob
counter clockwise. This closes #1 lens. You can then use every number (1 - 8) in the red window to get 8
ordinary snapshots.
CHECK THESE RULES FOR BETTER PICTURES
1. Hold the camera steady and push the shutter release lever smoothly to avoid blurred pictures. Hold the
camera level with subject.
Load your camera out of direct sunlight.

2. Remember that you get 4 pairs of 3-D pictures. Use only odd numbers 1,3,5 and 7. Wind film immediately
after taking each picture to avoid double exposures.

3. Keep the sun over your shoulder. Your subject should ©  be in bright sunlight or in open shade under a clear
sky.

4. Your shutter must be pre-set each time before you can take a picture.

5. The main subject should be no more than 4 to 10 feet from camera. Your background will automatically be in
focus. If you get closer, your picture may not be sharp.

6. Have each roll of exposed film developed as soon as possible after it is exposed.

7. When using flash attachment, remember to insert a new bulb for each picture. Keep your batteries fresh for
peak performance.

8. Clean your lenses carefully only with a dry, soft cloth or lens tissue or lens brush. Never use your fingers on
your camera lenses.

9. Remember for true 3-D pictures keep subjects separated from background . . . this will give depth to your
pictures.

TO VIEW 3.D PICTURES.


                                                                If you have the film developed locally,
                                            emphasize that it is a 3-D stereo film and that
                                          you want the negatives printed in pairs. The
                                                       prints must be trimmed to proper size 1 3/4" to
                                                                      fit viewer and they must be transposed before
                                          you can get the full 3-D stereoscopic effect.
                                              That is, the pair of pictures must be cut down
                                                   the center and the right hand picture put into the
                                                               left hand side of the viewer and vice versa. The
                                                     pictures should be taped across the backs to
                                            keep this position permanently.
View original page 5Page 6 · Read text
EXTRA VIEWERS $1.98 each

NOTE - FINISHERS ARE NOT YET EQUIPPED FOR THIS NEW DEVELOPMENT IN
PHOTOGRAPHY, WE CANNOT GUARANTEE THAT THEY WILL DELIVER PRINTS
TO THE ABOVE EXACT SPECIFICATIONS. UNTIL LOCAL FINISHER IS READY -
TO INSURE PERFECT 3-D PICTURES WE HAVE MADE SPECIAL ARRANGEMENTS
FOR LABORATORY FACILITIES TO

Fine Grain Develop and Print Your Pictures on Heavy Weight Glossy Paper ... Already
Reversed . . . and Ready For Viewing (same as sample print with viewer).
Use handy mailing bag enclosed with your kit. Be sure to print name and address clearly.
Enclose cash, check, money order or express draft.
Single Roll  $ .60
2 Rolls  1.00
Additional 3-D Prints From Your Negatives 4 for 50¢ (minimum order 50¢)

IMPORTANT -- NEVER CUT ANY PAIR OF NEGATIVES APART
Within 48 hours after receipt, your 3-D pictures will be on the way back to you with your
negatives (plus another mailing bag).

Mail Film To Photo Lab Nearest You

3-D PHOTO LABS, INC. P. 0. Box 109 • Madison Sq. Sta., New York 10, N. Y.
3-D PHOTO LABS P. 0. Box No-8652 • Hollywood 46, Calif.
3-D PHOTO PRINTS Box 579, Adelaide St. P. 0. a Toronto 1, Ont.

3D camera corporation 50 WEST 24th STREET, NEW YORK 10, N. Y
View original page 6
From the M. Butkus archive. Original publisher and archive notices are retained.
Check the model and edition against your equipment.
PDF verified 2026-10-10.