Camera accessories
Cosina Auto Winder CX-W User manual
User manual for Cosina Auto Winder CX-W. 6 pages in English. Read the original PDF, download or print a copy without registration.
6 pagesEnglish1.1 MB PDF
Loading your manual…Open PDF directly
Document details
- Brand
- Cosina
- Model / document
- Cosina Auto Winder CX-W
- Document type
- User manual
- Language
- English
- Pages
- 6
- File size
- 1.1 MB
- Category
- Camera accessories
- Document date
- Not specified in catalog
Search available document text
Find a term, then jump to its page in the original PDF. Image-only pages may not be searchable; check the PDF for exact wording and diagrams.
Page 1 · Read text
www.butkus.us
    G@S[NqA
   AUTO WINDER GX=\AI


Mike Butkus             Digitally                                                       DN:email=mike@butkus.org,Date:cn=Mike2022.04.08signedButkus,by00:56:16Mikeo=ButkusButkusc=US-04'00'camera manuals, ou=butkus.org,


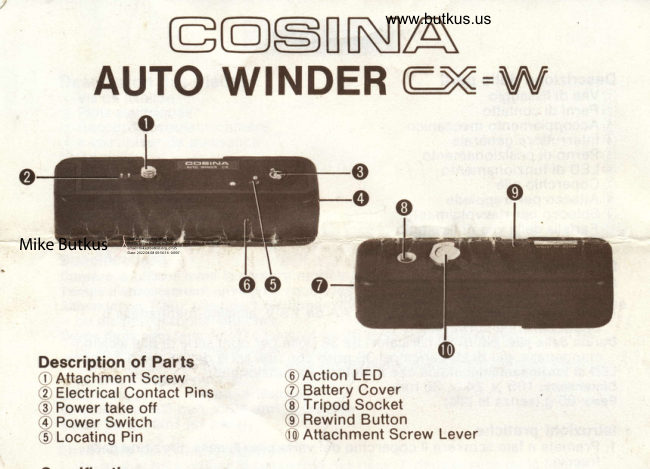
   Description of Parts
     Attachment Screw           @Action LED
      Electrical Contact Pins          CD Battery Cover
     Power take off         @ Tripod Socket
     Power Switch          @ Rewind Button
     Locating Pin           @ Attachment Screw Lever
View original page 1Page 2 · Read text
Specifications
Camera: Tor use wtth CX-2 nrodei carnera.
Winding Time: Approximately 1 second.
power Supply: fwb t.5V "AA" size penlighth batteries. Either alkaline manganese
  or sealed carbon zinc.
Battery Duration: Over 30, 36-exposure cassettes of film with a fresh set of
  alkaline manganese batteries.
   Over 20, 36-exposure cassettes of film with a fresh set of sealed carbon
  zinc batteries.
Action LED: Indicates when the motor is running.
Dimentions:  1 05mm X24mmX 36mm
Weight 95g (without batteries)
General Operation
1. Push and slide off the Battery Cover C in the direction of the_arrow mark.2. Install a pair of AA size 1 .5V-batteries according to the mark E    indicated
  respectively on the inside of the battery compartments.
3. Reillace th'e Battery Cover @ as befor-e and turn off the Power Switch @.
4. Couple the winder to the bottom of the camera body. E_ngage the winder to
  the Power take off @ make sure that the Locating Pin @ is aligned.
  Tighten the Attachment Screw @ into the camera tripod socket.
5. Se1 the Power Switch @ to "ON". The winder advances the film after each
  exposure automatically.
6. The Action LED @ will light when the motor is running.7. When you have fihished exposing the last frame in your film cassette, turn
   off the power switch. Then push the Rewind Button @ and rewind the film
  as discribed in the instruction sheet of the CX-z camera. You don't need to
  remove the winder from camera body when removing film. Note: Set the
  Power Switch @ at "OFF" position when the winder is not in use.
View original page 2
Page 4 · Read text
Bitte spenden Sie 2,50 Euro, um diese Website über E-Bay zu unterstützen ... www.PayPal.me/butkusView original page 4
Page 6 · Read text
www.butkus.us
                DEUTSCH

Einzelbeschreibung:
@ Befestigungsgewinde                     F u n ktionsanzeige (LE D)
@ Kontaktstifte                            Batteriefachdeckel
@ Mitnehmerkupplung                   Stativgewinde
6) Ein/Aus Schalter                    Ruckspulsperrknopf
(D Justierstift                                Befestig u ngsschraube

Technische Daten:
Verwendung: fur Kleinbildkamera COSINA CX-z
Transportdauer: ca. 1 Sek /BildStromquelle: Zwei 1 .5 V Batterien (AA-Type)    ' '--'"
  Mit Alkali-Mangan Batterien k6nnen pro Batteriesatz mehr als 30
  Kleinbildfilme mit 36 Aufnahmen transportiert werden.
  Bei Kohle -Zink Batterien verringert sich die Leistung auf etwas mehr als 20
  Film mit 36 Aufnahmen.
Funktionsanzeige: Eine rote Leuchtdiode (LED) an der Ruckseite zeigt die
  einwandfreie Transportfunktion an
Abmessungen: 105 X 24 X 36 mm
Gewicht: 95 g (ohne Batterien)
Bedien u n g sha ndg ritfe:
1. Den Batteriefachdeckel @ in Pfeilrichtung schieben und abnehmen.
2. Zwei Batterien 1 .5 V (Typ AA) einsetzen
                                                         beachten.                                         angegeben,   Achtung:                        wie im Batteriefach          +/ -  Position,                                                                  er einrastet.                                                  schieben,tis                              der Pfeilrichtung3.   Batteriefachdeckel          @ entgegen
4. Den Winder an derUnter-sei-te der Kamera so ansetzen, daB der Ausschnitt
  an der Voi'derseite unterhalb der Objektivabdeckung ist. Leicht hin- und
  herschieben bis der Justierstift @ in das Justierloch am Kameraboden
   einrastet.
   Befestigungsschraube @ anziehen.
5. EIN/AUS --schalter @ iuf "ON" - Position stellen
  Der Film wird sofort motorisch transportiert, falls dies nicht vorher schon
   manuell vorgenommen wurde.
6. Drucken Sie ganz auf den Ausldseknopf, um den VerschluB zu l6sen.
  Sobald Sie den Finger vom Ausldseknopf nehmen, begilnt der Winder
   sofort mit dem Filmlransport. Die Funktionsanzeige (LED) leuchtet auf,
  solange der Film weitertransportiert wird.
7. Druclien Sie, wenn lhr Film zu Ende ist, also nach der letzten Aufnahme, den
   Filmruckspulknopf und spulen Sie den Film in die Patrone zuruck, gemdB
  Bedienungsanleitung fur die CX-2 Kamera. Beim Entfernen der Filmpatrone
  braucht der Winderhicht extra von der Kamera-Unterseite abgeschraubt
  werden.
   Wichtig: EIN/AUS:Schalter auf "AUS"-Position  .stellen, wenn Sie den Winder
   nicht mehr benotigen
View original page 6From the M. Butkus archive. Original publisher and archive notices are retained.
Check the model and edition against your equipment.
PDF verified 2026-10-10.