Film cameras
COSINA CSM IN User manual
User manual for COSINA CSM IN. 63 pages in French, Spanish, Italian. Read the original PDF, download or print a copy without registration.
63 pagesFrench, Spanish, Italian6.0 MB PDF
Loading your manual…Open PDF directly
Document details
- Brand
- Cosina
- Model / document
- COSINA CSM IN
- Document type
- User manual
- Language
- French, Spanish, Italian
- Pages
- 63
- File size
- 6.0 MB
- Category
- Film cameras
- Document date
- Not specified in catalog
Search available document text
Find a term, then jump to its page in the original PDF. Image-only pages may not be searchable; check the PDF for exact wording and diagrams.
Page 1 · Read text
www.butkus.us
lOcosrru,*
    CSM


             rNSTRUc r.roN sboxl er
               MODE D'EMPLOI
             cEBRAUCT+sft{w ErsuNG
              t.IBRb.TTO D'ISTRUZIONI
       FOI-LETO DE INSTRUCCIONES
View original page 1Page 2 · Read text
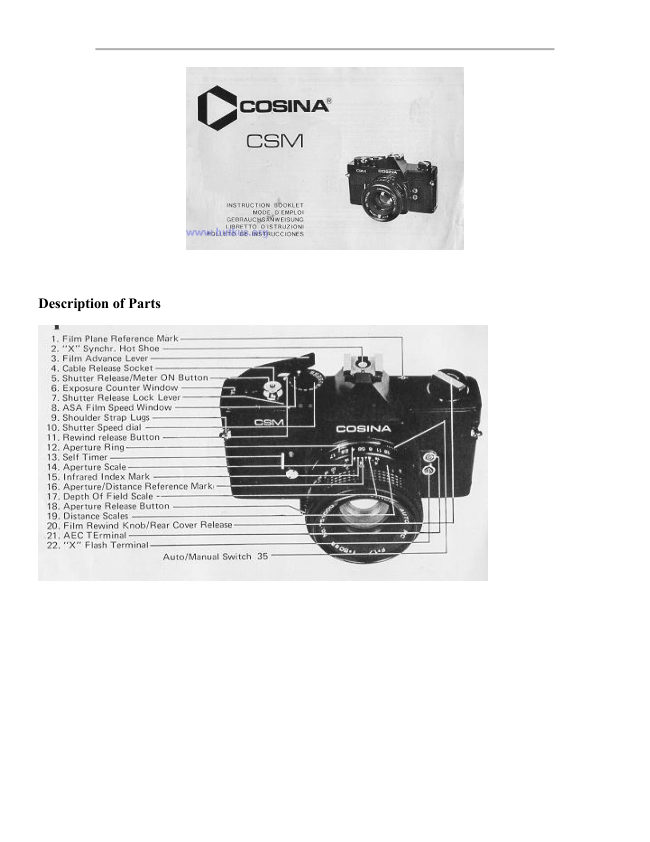
@ Description of Parts    @ Description      @ Bezeichnungen

    1Et       1. Film Plane Reference Mark
       2. "X" Synchr. Hot Shoe
      3. Film Advance Lever
      4. Cable Release Socket
       5. Shutter Release/Meter ON Button
      6. Exposure Counter Window
       7. Shutter Release Lock Lever
      8. ASA Film Speed Window
      9. Shoulder Strap Lugs
      10. Shutter Speed dial -
       1 1. Rewind release Button
      12. Aperture Ring
      13. Self Timer
      14. Aperture Scale
     15. Infrared Index Mark
         1 6. Aperture/Distance Reference Markr
     17. Depth Of Field Scale -
     18. Aperture Release Button
     19. Distance Scales
     20. Film Rewind Knob/Rear Cover Release
     21. AEC TErminal
     22. "X" Flash Terminal
                            Auto/Manual Switch 35


                                                                                     Frg 1
                                                                              rl    l
View original page 2Page 5 · Read text
,-                         3
@ rruseRTrNG BATTERY                    €) LoADTNG THE FtLM
O urse EN PLAcE DE LA PtLE                €) MrsE EN PLAcE DU FtLM
@ Einlegen der Batterien           @ Einlegen des Filmes in die Camera
O Inserimento delle batterie                              ([) Caricamento della pellicola
                                        DE LA PELtcULAI  rrurngDuqstoN DE LAs PtLAs       € cnncr          (D-'16)
2 batteries 5-76 Silver 1.5V each are needed to       Your camera is designed to accept black &
function the electrical shutter and the LED        white or color film in standard exposure cas-
system. Both batteries to be placed in the           settes.
battery compartment (+) side face up.              To load the camera:
Battery test by LED's of metering built-in the        1. Fold out the Rewind Crank (23) and pull up
viewf inder with half pressure of the release          on it sharply until the Rear Cover (32) snaps
llu tton.                                               open. The Exposure Counter (6) wilt auto-
                                                             matically reset to "S" (Start).
                                              2. Place the cassette in the Film Chamber l24l
                                                with its protruding end facing the camera
                                                                   base.
                                              3. Push down on the Rewing Knob (20) and
                                                       turn it in either direction until  it drops into
                                                                                     its normal position.
                                                                    4. Draw the  f ilm leader across the camera back
                                             and insert it into one of the slots in the
                                                  Take-up Spool (30). NOTE: To bring the
                                                                slot into a more convenient position, rotate
                                                                                              it in the direction of the arrow with your
                                                                                                                                          f  i nger.
                                      Frg 3                         5.  Advance the  f ilm making sure both sides are
                                                                                                                                          f ully engaged on the Sprockets (29).
                                                                 i3r
View original page 5Page 6 · Read text
www.butkus.us

6.  Close the Rear Cover and press  f irmly until
      it snaps shut.
7.  Rotate the Rewind Crank (23) carefully in
   the direction of the arrow to take up any
   slack in the  f ilm. Alternate advancing the
        f ilm and  f iring the Shutter Release Button           Frg4
   (5) until the number "1"  is opposite the
   index mark in the Exposure Counter Win-
  dow (6). As you advance the   f ilm the
   Rewing Knob should rotate counterclock-
   wise indicating the  f ilm is moving smoothly
   through the transport.  lf the Knob does not
    rotate. open the Rear Cover and re-load the
   camera. NOTE: lf the Shutter Release But-
   ton does not operate. make sure the Lock           Frg5
   Lever (7) is set at "A" (Advance).


                                                                14,
View original page 6Page 7 · Read text
rEr 1
    SETTING THE FILM SPEED
    REGLAGE DE LA SENSIBILITE DU FILM   ee       Einstellen der Filmempfindlichkeit
      Selezione della sensibilita della pellicola
    AJUSTE DE LA SENSIBILIDAD DE LA PELICULA    @oI
                                                                         set                                                                             speed:                                                                 the                                                                                                                                                                     f ilm   Each                              or black                        &              of         type                  film -  color                                      white -        To'1                                                    up                                                 sensitivity                                                                                        .                                                                            Lift                                  This                                                   on   has                                                                     the outer collar of the Shutter        own                  sensitivity                          to light.          its
     is assigned a numerical value describerJ as an           Speed Dial (10) and rotate  it until the ASA
  ASA rating (U.S.A. Standard) or a DIN rating          number or  representative index mark  is
   (Europe and most other countrres). ln most             opposite the green index line.
    cases, both ASA and DIN ratings are imprinted         2. Release the collar to lock the  f ilm speed
   on the  f ilm package, as well as the clata sheet              setting in the camera.
   packed with the film and the frlm cassette        The  f ilm speed range is f rom ASA 25-3200.
      itself.
   The higher the film speed rating, the more
    sensitive the film is to light that is, less light  is
    required   f or a proper exposure. The  f ilm speed,
    therefore, is an important element in ensuring
    that the through-the-lens  metering systems of
   your camera determine the correct shutter
    speed/ft-stop combinations for a given lighting
     situation.
   Each time a  f ilm with a new  f ilm speed rating  is
    loaderJ in the camera, the  f ilm speecl MUST be
    set in the Film Speed Window (8) to assure
    accu rately exposed photographs.                                                      www.butkus.us

                                                                                Frg6
                                                                                                 (6.t
View original page 7Page 8 · Read text
6                                      www.butkus.us                     iEl
 €)SETT|NG THE SHUTTER spEED
 €) REGLAGE DE LA vtrEssE DE L'oBTURATEUR
@ Einstellen der Verschlusszeit
Q Regolazione detla velocitd dell'otturatore
   AJUSTE DE LA VELOCTDAD DE OBTURACTON0
 The shutter controls the length of time light  is         determination of a shutter speed setting should allowed to strike the  f ilm. The speed at which         be made based on the action-stopping needs for the shutter opens and closes is measured  in        your picture, i.e. the more action, the faster the fractions of a second that correspond to the          shutter speed required.
 numbers on the Shutter Speed Dial (10). For
 example 10OO is 1/1000 second. 125 is 11125
 second, 2 is 112 second, and so on. The number
 "1" on the Dial represents one full second ofexposure. When set to "8" (Bulb) the shutter
 remains open as long as the Shutter Release
Button is depressed. This setting is for use in
pictures of night scenes and where available
 light exposures are beyond the exposure read-
 ing capabilities of your camera.
To set the shutter speed, rotate the Dial until
the number representing the speed you desire is
opposite the index mark. Generally speaking,
when outdoors in bright or hazy sunlighi,
11125 second is suitable for most photographs.
When indoors in a well-lit room, 1/60 second
should be sufficient to record your subject,
depending upon the  f ilm you are using. Final                          FtgT

                                                               r6)
View original page 8Page 9 · Read text
E  6                                                    I
    FOCUSING THE LENS                     €) SETTING THE EXPOSURE
    MISE AU POINT                e REGLAGE DE L',EXPOSITION  ee
      Scharfeinstellung des Obiektives       @ Bel ichtungseinstellung
     Messa a fuoco dell'obiettivo                        ([) Regolazione dell'esposizione
   ENFOOUE DEL OBJETIVO                €) AJUSTE DE LA EXPOSICION   @o0
      -f o  assu re ttre sharllest pc;ssil;le pl'totoclraplls,        Your Cosina CSM has a built-in LED system,
  your COSINA CSN4 has ;r horizorrtal :;plit'rrtrage,        which measures tne light corninq through the
   surrouncled with a rricro-prrisrn, frlcustrrg sfiot In           lens and enables you to set the proper exposure
   ther vierrvfincter r,nrhich cxit!tqeratcs in-flcus ancl           for a given lighting condition.
   out-lclcus iryraqes.                                     Trnvo sensitive cadmir,rm Sulfide (CdS) cells.
   fi5 !rf u lool< throuqh the vrernlf in(.iel, turrt ihe           installed freside the eyepiece, read the light in
   L.EI{S f'OCUSIIJG ti ING (3ij) rrrrt;l tlie split-of  f        the overall picture area and particularly the
  image lrecoftles as <ltre cornplete int;t1;e in lhe        center weighted. This is very irnportant  in
   vie'rvfindr:r. Wherr this occurs, the trn.tgle has           olrtaining accurate exposure reasings irr scenes
   been brouilhl into foctis.                           where there is an over-aboundance of sky in the
                                                       irackground or where backlighting or sideli.clht'
                                                               ing is present.
                                             To take an exposure reacling:
                                                        1. Winding of the Film Advance lever (3).
                                                        2. Switch the meter on by gently pressing the
                                                            shutter speed button half-way down. The
                                                                      lens will stop down to the F-stop pre-set on
                                                                the aperture R ing.
                                                        3. When one of the LEDs located at upper side
                                                            of the vielnrfinder lights, the meter circuit  is
                                                      powered by batteries.
                     FrgB
                                                                     ri:
View original page 9Page 10 · Read text
www.butkus.us                     8El                               (+)4.  Wl'ren             red         the                 warning light                                        lights                                                           it                                APERTURE                                          RELEASE BUTTON                                                                                  is    €)   meaning               Over-exposure.                                      case                              In                                        this                                             the           of   cliaphragm ring of the taking lens should be    €) PoussorR DE REoUVERTURE
    turneci to the direction of the arrow or the                 DU DIAPHRAGME
   shutter speed dial shoulcl be turned to a                  @ Blendeniiffnungstaste   higher           speecl until the green optium lamp                    Q Pulsante di piena apertura del diaframma     lights.
5. When the red warning larnp (-) lights, it  is    €) BOTON LTBERADOR DEL DTAFRAGMA
   meaning of Under-exposure.  In this case the                                        When the Shutter Release Button (5) is pressed   diaphragm ring of the taking lens should be                                                  half-way down, the LC0 metering system  is   turned to the direction that the arrow                                                       activated and the lens stops down to the f-stcp
    indicates or the shutter speed dial should be         pre-set on the lens Aperture Ring (112). lf you   turned                  opposite                            direction until the         to the                                              wish to re-con'lfJose your photograph or check   green               lamp                             lights.         optiunr                                                  the focus prior to taking the picture, press the        proper6. The                                      obtained              exposure                                       is                      of film                                                Aperture Release Button (18). This opens the   whenever                            lamp                                               lights.             the                green optium                                    The                                                   lens to its nraximunt f-stop allowing you to   range that the green optium light lights is                                         view your suLrject through a bright, clear   0.3 EV.                                                              viewf inder.                         Fis 9


                                                                             Fisl 0
                                          €)
View original page 10Page 11 · Read text
iEl    I    DEPTH OF FIELD                             focus properly, as in fast action photography.                                                     Shallow depth of   f ield can be used to throw    PROFONDEUR DE CHAMPS                     distracting foregrounds and backgrounds out of   ee
      Schdrfentiefe                                    focus to add separation between a subject and
      Profonditd di campo                                            its surroundings.
    CAMPO DE PROFUNDIDAD    @oI
   When you  f ocus on a specif ic subject, an area in
    front of and behind that subject will appear
    acceptably sharp rn your picture. This area, or
   zone, of acceptable sharpness is DEPTH OF
   FIELD.
   Depth of  f ield is determined by the  f -stop you
    select and the distance from the subject rn
   focus to the  f ilm plane. As you get closer to
   your subject, or as you open your lens (e.9.             www.butkus.us
   from  f i6 to f2.8), the depth of field becomes
    shallower. By stopping your lens down (e.9.                            Frg11
   from f2.B to  f16),  this depth or zone of          f 2 8                                r6
    acceptable sharpness can be increased.
   Another factor in depth of   f ield is the focal
    length of the lens being used. As a rule, the
    longer the focal length of a lens the shallower
   the zone of acceptable sharpness becomes; the
    shorter the focal length, the greater the depth
    of  f ield. Knowing the depth of  f ielcl limitations
    of your lens can enhance the creativity of your
    pictures. A deep zone of acceptable sharpness
   provided by shorter focal length lenses is ideal           Fp|2                 Fis13    for "snapshooting" when there isn't time to
View original page 11Page 12 · Read text
iej  lo                              IIwww.butkus.us€) TAKTNG THE PTCTURE                  USING THE SELF-TIMER
   PRTSE DE VUE                                 R ETAR DATEU Re
@ Die Aufnahme                                        Selbstausliiser
Q Come scattare la fotografia                       Autoscatto
€) TOME DE LA FOTOGRAFTA              EMPLEO DEL AUTODISPARADOR
Once you have got the green dot lighted on,       Your CICSINA CSM has a built-in self-tinrer
check the composition of your picture and       which delays the shutter release approx. 10
 press the Shutter Release Button all way down         seconds. -[his enables yor] to irrclude yourself in
giving a slow, steady pressure on  it to take        the prcture and is also of benifit in close-ufrs
photograph.                                and rnacro photography w,here the camera
Advance the  f ilm for your next shot.                         rrlrivemLlnt must be reduced tcl a mininrurn.
                                              To activate the self-tirner.
                                                      1. Move the self-tirner lever in the tlirectiorr of
                                                             the arrow until  it sloDS.
                                                      2. Press ttre shutter release l)utton to start the
                                                                    self timer nrovin.r;.
                                   A red liqht trlinks to In'.licate the self .timer
                                                         wor king.


                                                                                   Fis14
                                            (o
View original page 12Page 13 · Read text
Erz
   TAKTNG FLASH PICTURES. e        DE vuE AU FLASH ELEcrRoNlouE e pRrsE
 @ Blitzaufnahmen
 Q Fotografie con il flash
        DE ForocRAFIAS coN FLASH  I  rorua
   Cordless Electronic Flash
     lf you will be using an electronic  f lash unit with
   built-in hot shoe contact, the flash can be
   attached directly to the Hot Shoe (1) atop the
  camera pentaprism. The camera and flash will
  then be fully synchronized through the con-
   tacts in the shoe with any shutter speed up to
  and including 1/60 second. NOTE: The Shutter
  Speed Dial lndex for 1/60th second is marked
   in red as a reminder for  electronic  flash
   synchronization and is color-coded to the "X"
   marking on the Hot Shoe itself   .


                                                                    trin1ArrYrv


                                            (}
View original page 13Page 14 · Read text
www.butkus.us                                                              E  l3
@ cHnrucrNG LENSES
@ cHnrucEM ENT D'oBJEcrt F
@ Wechseln der Objektive
Q Cambio dell'obiettivo
  cnMero DE o&JETrvosI
The universal thread lens mount of your Cosina
Camera affords you the opportunity of select-
ing  f rom the hundreds of universal thread
mount lenses and optical accessories available.
To attach your lens:
1. Hold the camera securely in the palm of
   your left hand.
2. Grasp the lens  f irmly around the lens barrel
   and align the lens threads with the camera.
3. Turn the lens clockwise until it is firmly
   seated. lf the lens is diff icult to screw in,
   remove  it and inspect the threads for dirt or
   other foreign matter.
To remove your lens:
1. Hold the camera as above.
2. Grasp the lens  f irmly around the lens barrel
   and turn it counter-clockwise about three
        f ull turns and lift  it caref ully away  f rom the
   camera body.
IMPORTANT: Do not touch the reflex mirror
in the camera body when attaching or removing
a lens. Dust particles can be removed with a
blower or sof t camel-hair brush.
                                                      t?
View original page 14Page 15 · Read text
iet   l4
                  SWTTCH  e AUTO-MANUAL
   €) POUSSO   r R MANUE L-AUTOMATT OU E
 @ Automati k/Manuel l-Schalter
 Q Interruttore automatico/manuale
   €) coNMUTADOR AUTOMATTCO/MANUA L
   When using nonautomatic accessories (bellows,
     etc.), it  is sometimes required that you disen-
    gage the automatic diaphragm feature of your
    lens. Most standard lenses for your Cosina
   Camera as well as most universal thread mount
    lenses provide an Auto/Manual Switch (35) for
     this purpose.
   To disengage the automatic feature, move the
    Switch to "M"  (Manual). To engage the auto-
    matic diaphragm, return the Switch to the "A"
    (Automatic) position.


                                                                                               Frg'l 6


                                              (9
View original page 15Page 16 · Read text
www.butkus.us                                                                                           .E] Td  REWINDING THE FILM
  REEMBOBINAGE DU FILM
   Riickspulen des Films
   Riavvolgimento  della pellicola
  REBOBINADO DE LA PALICULA
When you have finisheh taking all your pic-
tures, rewind the film back into its cassette as
follows:
1. Press the Rewind Release Butron (11) be-
    side the speed dial.
2.  Lift up the Film Rewind Crank (23) and
   turn it in the direction of the arrow until
  you feel the film tension lessen. This indi-
   cates the  f ilm has been cornpletely rewound
    into the cassette.                                                 Ftg17
  Open the camera back by pulling up sharply
  on the Rewind Crank and remove the
   exposed cassette.
  NOTE: AVOID DIRECT SUNLTGHT
 WHEN LOADING OR UNLOADING
  YOUR CAMERA.


                                          (E
View original page 16Page 17 · Read text
irl 16
      TNTRODUCTTON OF COSTNA AEC ADAPTERI   e
]   E PRESENTATION DE L'ADAPTATEUR AEC
I     G) BESCHRETBUNG DESCOSTNA-COMPUTER-ZErT-ADAPTERSil   o tNSERtMENTO DEL DtSpOStTtVO COSTNA AEC   g coLocActoN DEL ADAeTADoR cosrNA AEc
l,     A. Specif icat ions:                            Aperture-prefered  Automatic Exposure Control adapter.llll     Si,rt.rn'                          Toshiba 4G 13 type 6V silver oxide battery.111   tir,ttery :'       C)peratlng range:  EV.4 (F1.4 1/B) - EVlB (F161/1Ot)O) with ASA1O0.      EE oPerat'nn t''unto?'r.o
                             Ev 4 -* 11
                   F5.6     EV B -- 15
                                                                   case  f ilm speecl is ASA 100)                F16      EV 11                                                 - 18         (in
      B. Procedure of use:
                    '1            .  lrrsert the battery to the battery compartment (+ side face up).
     2  l'trrn the speed dral of AEC adapter until the engraving of 1000 comes to the white indication.
       3. Sel the speed dial o{ camerir at 1000.
       4.  Pull up the cock which lies r-rn the top face of the adapter.
       5.  lrrsert the aclapter to the accessory stroe of canlera.
       6. Lay clornrn the cock as previously positioned.
       1. Engage the pin of speed dial of camera with the slot of speed dial of adapter.
       8. Fir the: ai--lap1",'  f-ly turning the lock-dial clockwise.
       9.  lirsert the plug to the socket.
      C. Operarion:
       1. l\dvance: the  f ilm.
       2. Set lhe carnera tr-r 16" object which you want to take picture of, and press the release button half
           wil/ (l()wrr.
                                                                                                                                                      ,l i
View original page 17Page 18 · Read text
www.butkus.us        E
3. Then, immediately, the meter circuit is powered and one of the LEDs in the viewfinder will light.
   At the same time, the motor of adapter starts running. lt runs just until the center positionecl
   green LED lights and srops.
4. When the green LED lights, it means that the exposure condition  is correct. Now, you can press
    the shutter release button all way down.
5. When either i{  'or ..!-) red LED light and the motor keeps running, you should rotate the
_ diaphragm ring 5nd ch'oose another F-stop until green LED lights.6' When red LEDi,tionts,  it means overexposure, so you should rotate the diaphragm ring to -->    (right), in other wbrds, to smaller aperture.
7         red LED.,:_]lights, it means underexposure, so you should rotate the diaphragm ring to <-    Wh.9l.     (lett), in other words, to bigger aperture.
B. lf the green LED does not light though you have already set to maximum aperture, it is out of  EE range. lt is the same mean, if the both red LEDs light at the same time.
   1?34


       Frg18                    Fig'1 9                     Fig20                      Fig21
View original page 18Page 19 · Read text
E]
   SPECIFICATIONS
     Lens Mount:       M=429 P='1.0 screw mount, Flange back  f ocus distance 45.45mm
    Shutter:             Magnetically controlled Cloth Curtain Focal Plane shutter with the speed
                          from 4 sec. to 1/1000 sec. plus B and Mechanical 1/50 sec.
                            Flash synchronization at X (1/60 sec.)
                                Electrically controlled Selftimer of 10 sec. with winking Warning Signal lamp
    Viewfinder:        Fixed Pentaprism type, Magnif ication 1x (with f=55mm lens), Dioptry 0.9,
                                 field of view 93% for both vertical and horizontal, Focusing to be made by
                         horizontal split image and surrounding Micro-prism, Indications of
                       Optimum, Over and Under exposures.
     Metering System:    Matching system by stop-down metering
     Film Speed Range: ASA 25   3200                                      -                                              1B (F161/1000 sec.)     Auto-exposure range: EV 3 (F1.4 114sec.l - EV     Film advance:      1BO^ rotation with Stand-off angle 30"
     Shutter Release:   Equipped with built-in Lock dial and Stop-down release button. Half
                            pressure stops down the lens shooting aperture and Full pressure activates
                             the shutter
    Exposure Counter:   Progressive type from S (start) and automatically resets to S
      Electrical Source:    5-76 Silver battery 1.5V x 2
                            Battery test by LEDs of metering built-in the viewfinder with half pressure
                             of rhe release button
     Size (Body):        136.5 x 83.2 x 51 (mm)
   Weight:           54ogm


                      @
View original page 19Page 20 · Read text
www.butkus.us
   Page 1-2(Fig 1-2)I
DESCR IPTION                                     28. Rideau de l'Obturateur
  1. Repdre du plan film                               29. Roue A picots
  2. Synchronisation "X". Contact sabot                30. Bobine rticeptrice
    indirect                                           31. Presseur du film
 3. Levier d'armement                                 32. Dos de l'appareil
 4. Adaptateur pour ddclahcheur souple                33. Prise de tr6pied
 5. D6clancheur et mise en circuit de la cellule          34. Couvercle du compartiment pile
 6. Fendtre du compteur de vue                        35. Conrmutateur Auto/Manuel
  7. Blocage du d6clancheur                            36. Bague de mise au point
 8. Fen€tre de la sensibilit6 du film (ASA)
 9. Anneau pour courroie de cou
10. Cadran des vitesses
1 1 . D6brayage pour le r6embobinage                  Z  Pase3(Fig3)
12. Bague des diaphragmes                    MISE EN PLACE DE LA PILE13. Levier du retardateur
14. Echelle des diaphragmes                   Deux piles de 1,5 volts (5-76 silver) sont
15. Repdre pour film infrarouge                        n6cessaires pour faire fonctionner le systdme
16. Repdre de la profondeur du champ                  6lectrique de l'obturation et le systdme LED.
17. Echelle de la profondeur du champ                Les deux piles se placent dans le compartiment
18. Poussoir de r6ouverture du diaphragme                pile le p6le + vers le haut.
19. Echelle des distances                        Le contr6le des piles se fait dans le viseur en
20. Manivelle de r6ouverture, tirette d'ouver-          appuyant l6gdrement sur le ddclancheur.
    ture du dos
21. Prise du branchement de l'AEC
22. Prise pour cordon de  f lash 6lectronique
23. Manivelle de r6embobinage
24. Compartiment de la cassette du film
25. Glissidres pour griffes  i accessoires
26. Viseur
27. Guide film               @
View original page 20Page 21 · Read text
Pases(Fig6)1tr1"'3  Page3-4(Fig4-5)             t+
   MISE EN PLACE DU FILM               REGLAGE DE LA SENSIBILITE DU
    Votre appareil a 6td concu pour recevoir  les       FILM
    cassettes standard en noir et blanc ou  en                                           Tous les films quels qu'ils soient, ont une    couleur. Pour mettre en olace le film:                                                                    sensibilit6 diff6rente d la lumidre. Cette sensi-
    1. ouvrir le dos de I'appareil (32) en tirant sur               bi lite est inscrite sur I'emballage en ASA       la manivelle de r6embobinage Q3l .  Le          (standard US) ou en DIN (standard europ6en).               de vue      compteur                          (6) se remet automatique-                                                                                                                                  est                                                                          plus                                                                  est grand,                                                  Plus le chiffre                                                                                    le                                                                                       film                        (d6part).      ment sur "S"                                                                                                                neces-                                                                  sensible,                                                           ce qui veut                                                                                                   est                                                                                   dire qu'il                                                                                                   alors
    2. placer la cassette du film dans le comparti-           saire de moins de lumidre pour faire une bonne
      ment (24)                                          photograph ie.
    3. repousser la manivelle de r6embobinage (20)         La sensibilit6 du film est un 6ldment important,
    4. engager le morceau de film apparent dans         d aff icher sur votre appareil af in que la mesure      une des fentes de la bobine r6ceptrice (30)                                              de la lumidre a travers l'optique, soit correcte.
   NOTE                                         Chaque fois que vous mettrez un film diff6rent
   Pour amener un des fentes dans une position          sur votre appareil,  il est indispensable d'afficher
    pratique,  il  est possible de faire tourner la            la sensibilit6 du  f ilm sur l'appareil (8):
    bobine r6ceptrice avec le doigt dans le sens de la         1. tirer sur la couronne du c6t6 des photos
         fl dche.                                                   (10) et tourner jusqu'd ce que le chiffre en
    5. assurez-vous que les perforations du film        ASA que vous voulez afficher corresponde
        soient bien engag6es sur la roue d picots (29)            au repdre vert.
    6. fermer le dos de l'appareil                       2. lib6rer cette couronne.  ll  est possible
    7. tourner la manivelle de r6embobinage  (23)              d'afficher les sensibilit6s de 25 avec 32OO
      dans le sens de la fleche pour tendre le film           ASA.
      dans la cassette. Alternativement actionner
       le levier d'armement du film, declancher
       jusqu'd ce que le chiff re 1 apparaisse en face
     du repere dans la fenetre du compteur de
      vue (6).
                                            [9
View original page 21Page 22 · Read text
www.butkus.us                                                                                       lF
                                        PaseT(Fis8)   5  Pase6(Fig7)          6     REGLAGE DE LA VITESSE DE            MISE AU POINT
      L'OBTU RATE U R                            Le COSINA CSMest 6quip6 dans le viseur d'un
r        L'obturateur contr6le le laps de temps pendant       d6poli dont la  pastil le centrale est divis6e
        lequel le film doit 6tre expos6 d la lumidre. La        horizontalement en deux, ainsi qu'une plage ii
        vitesse d laquelle il s'ouvre et se ferme est        microprisme.
       indiqude sur le cadran de vitesse (10). Par      En agissant sur la bague de mise au point (36),
        exemple:                                                    les deux images dans la pastille centrale doivent

 I      1000 = 1 /1000 de secondes                           se trouver dans le prolongement l'un de l'autre      "125 = 11125 de secondes                       et absolument nettes sur la zone de micro-                                                                 prisme.1.    2    -112seconde
       Le chiffre 1 correspond ir une seconde sur B.       La nettet6 de l'image observ6e sur le d6poli est
        L'obturateur restera ouver tout le temps que         trds importante car elle se reportera sur le plan       vous appuierez sur le d6clancheur et se refer-        film et donnera des r6sultats plus ou moins
       mera lorsque vous libdrerez le d6clancheur.                nets.
       Tourner la couronne de vitesse jusqu'd ce que la
         vitesse que vous d6sirez soit en face du repdre.
     En ext6rieur, par temps clair, le 125e de
       seconde est la vitesse recommand6e. En in-
         t6rieur bien 6clai16, le 60e de seconde devrait
         etre suffisant.
        Naturellement  ces deux vitesses ddpendent de la
          sensibilit6 du  f ilm que vous uti lisez. La d6cision
         finale quant d la vitesse de l'obturateur devrait
        etre bas6e sur la vitesse de d6placement ou
          sujet.


                        @
View original page 22Related documents and language editions
From the M. Butkus archive. Original publisher and archive notices are retained.
Check the model and edition against your equipment.
PDF verified 2026-10-10.