Film cameras
Ernemann Focal Plane User manual
User manual for Ernemann Focal Plane. 7 pages in English. Read the original PDF, download or print a copy without registration.
7 pagesEnglish1.5 MB PDF
Loading your manual…Open PDF directly
Document details
- Brand
- Ernemann
- Model / document
- Ernemann Focal Plane
- Document type
- User manual
- Language
- English
- Pages
- 7
- File size
- 1.5 MB
- Category
- Film cameras
- Document date
- Not specified in catalog
Search available document text
Find a term, then jump to its page in the original PDF. Image-only pages may not be searchable; check the PDF for exact wording and diagrams.
Page 2 · Read text
www.orphancameras.com

Nr. 909
2AM

Directions for use
of the

Ernemann Focal Plane Camera
with safety blind focal plane shutter

65 ~9 cm (31, ~ 2") 912 em (41/5 31/4”)
1015 cm (51s 3'o”) 1318 cm (61, 49/4”)

2c

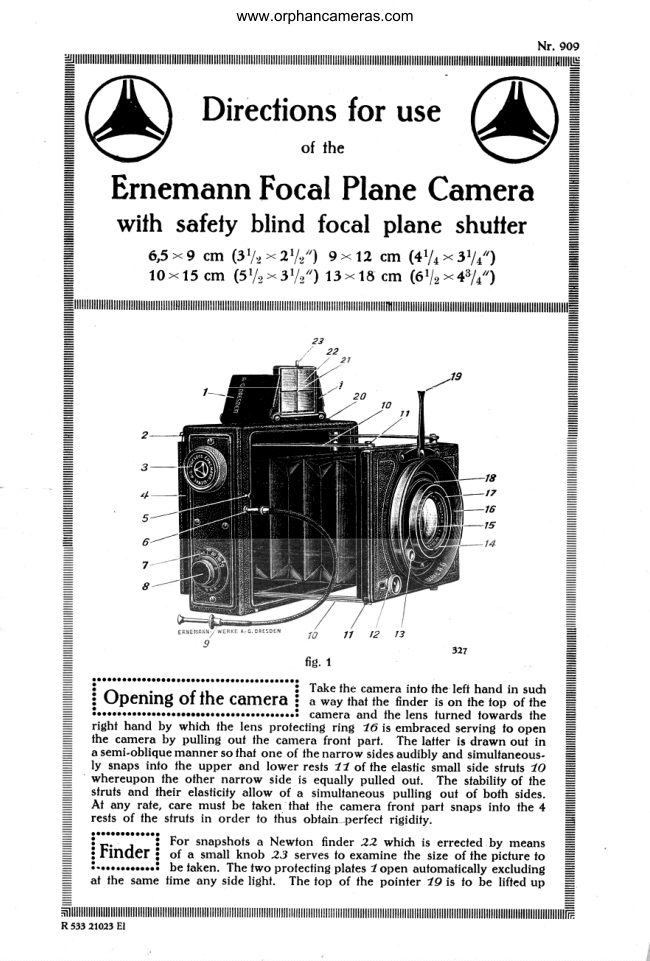
fig. 1

" Take the camera into the left hand in such
Opening of the camera { a way that the finder is on the fop of the

a see camera and the lens furned towards the
right hand by which the lens protecting ring 16 is embraced serving 10 open
the camera by pulling out the camera front part. The later {s drawn out in
‘ semi-oblique manner so that one of the narrow sides audibly and simultaneous.
ly snaps info the upper and lower rests 17 of the elastic small side struts 70
whereupon the other narrow side is equally pulled out. The stability of the
struts and their elasticity allow of @ simultaneous pulling out of both sides.
AL any rate, care must be faken that the camera front part snaps into the 4
rests of the’ struts in order fo thus oblain perfect rigidity.

For snapshots a Newion finder 22 which is errected by means
of a small knob 23 serves to examine the size of the picture to
be taken. The two protecting plates 7 open automatically excluding
af the same fime any side light. The top of the pointer 19 is fo be lifted up

SA
535 21023 Bt

in
View original page 2Page 3 · Read text
www.orphancameras.com

2

until it stands in a right angle. By looking at about 2 inch. distance between
the eye and the finder lens through the finder over the centre of the cross
lines 24, of the finder glass 22, and the top of the pointer 79 one will be
able to view correcily the picture to be taken,

" vee ‘The lens 75 is mounted in focussing mount.
Lens and Diaphragm in its original position it is focussed at @

(Infinity) where all distant objects are sharply
defined. For sharp focussing of the lens at shorier distances the lever 23
has been provided. On the right hand side of the lens mount opposite the
lever 13, 18 the distance scale 18 and on the disc above is the focussing
mark 24 acting asindicator, The scale indicates the distance in metres between
the object to be photographed and the lens. By turning the rifled ring 17
the Iris diaphragm is adjusted. On the inner side of the ring is the mark 74
indicating the openings of the diaphragm as per dise 25,

Pa
fig. 2 oy
re The focal plane shutter which can be set at
} Focal-Plane Shutter {-any opening permits three ways of taking
i
bas pictures viz:

1, Instantaneous exposures up to '/iom th of a second: one pres:
sure upon the release, regulation of exposure by changing width of slit
and spring.

2, Bulb Exposures “2”: One pressure upon the release, exposure ceases
when pressure upon release stops.

3, Time Exposures “O”: Double pressure upon release, exposure equal
to Interval between first and second pressure,

‘The regulation of the fime of exposure for snapshots is partly effected by
the spring fensions (see next paragraph) and partly by varying the widih of
2 the slit according fo the narrower or broader slit openings required which are
4B obiained by lifting end turning the knob 6. The numbered scale surrounding
2 © this knob & indicates in millimetres the slit openings required. Furthermore,
the shutter must be adjusted fo “2” for time exposures and fo “O” for Bulb
exposures. On the botiom of the finder casing underneath the finder 22 a
speed fable is arranged which, by means of a combined working of the width
of slit and spring fension, sfaies the time of exposure. Time and Bulb ex-
posures “2” and “O” must only be made with the largest possible width of sit.

CO
View original page 3From the M. Butkus archive. Original publisher and archive notices are retained.
Check the model and edition against your equipment.
PDF verified 2026-10-10.