Film cameras
Exakta VX 1000 User manual
User manual for Exakta VX 1000. 26 pages in English. Read the original PDF, download or print a copy without registration.
26 pagesEnglish2.1 MB PDF
Loading your manual…Open PDF directly
Document details
- Brand
- Exakta
- Model / document
- Exakta VX 1000
- Document type
- User manual
- Language
- English
- Pages
- 26
- File size
- 2.1 MB
- Category
- Film cameras
- Document date
- Not specified in catalog
Search available document text
Find a term, then jump to its page in the original PDF. Image-only pages may not be searchable; check the PDF for exact wording and diagrams.
Page 2 · Read text
the possibility of operating it incorrectly, and possibly damaging the mechanism. The EXAKTA is a high-
quality precision instrument which can naturally only be expected to answer all your requirements when it is
always handled correctly.


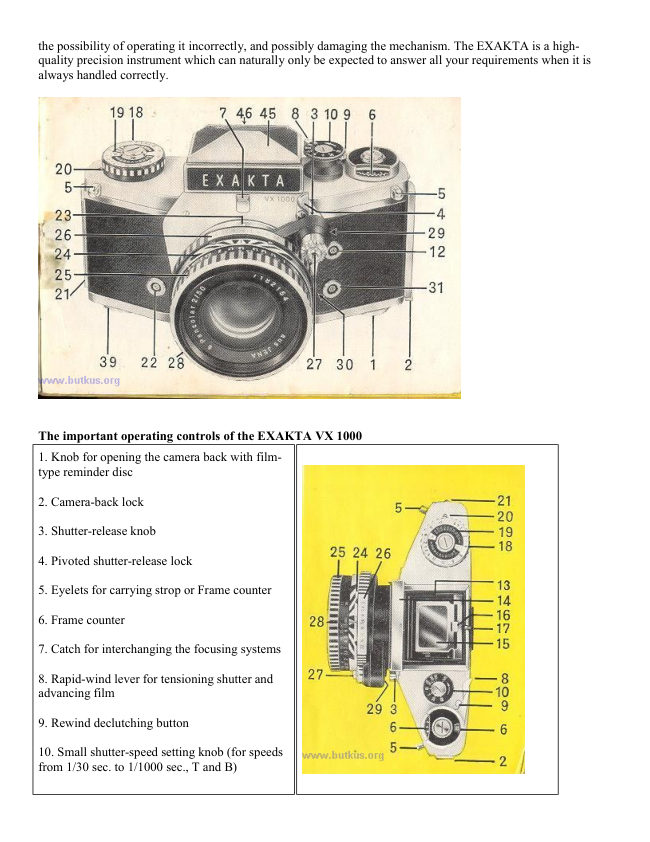
The important operating controls of the EXAKTA VX 1000

1. Knob for opening the camera back with film-
type reminder disc

2. Camera-back lock

3. Shutter-release knob

4. Pivoted shutter-release lock

5. Eyelets for carrying strop or Frame counter

6. Frame counter

7. Catch for interchanging the focusing systems

8. Rapid-wind lever for tensioning shutter and
advancing film

9. Rewind declutching button

10. Small shutter-speed setting knob (for speeds
from 1/30 sec. to 1/1000 sec., T and B)
View original page 2
Page 3 · Read text
11. Friction dog of rapid-wind lever

12. Flash contact "X" (primarily for electronic
flash units)

13. Finder Hood

14. Front of Finder Hood


REAR VIEW
View original page 3
Page 4 · Read text
22. Flash contact "FP" (for flashbulbs)
15. Swing-up focusing magnifier
                                                  23. Red aligning dot on camera (for changing
16. Handle for swinging the focusing magnifier    lenses)

17. Lever for opening the Finder Hood             24. Depth-of-field scale or automatic depth of-
                                                         field indicator
18. Large shutter-speed setting knob (for speeds
from 1/8 sec. to 12 seconds and also for delayed   25. Distance-setting (focusing) ring
action at 1/4 sec. to 6 seconds)
                                                  26. Aperture-setting ring
19. Film-sensitivity reminder disc
                                                  27. Release mechanism for lenses with fully
20. Indicator disc for checking film advance       automatic aperture (release knob or release
                                                  rocker)
21. Camera-back hinge
                                                  28. Lens


29. Red aligning dot on lens

30. Lens locking lever

31. Flash contact "F" (for flashbulbs)

32. Take-up spool with blue pin

33. Chamber for take-up spool or cassette

34. Film-wind sprocket

35. Film-guide runners

36. Film gate with blind of focal-plane shutter

37. Film-cutting knife

38. Knob of film-cutting knife                        42. Non-detachable hinged camera back

39. Rewind crank                                    43. Exchangeable film-pressure plate

40. Dog of rewind crank                              44. Tripod bush

 41. Chamber for cassette containing unexposed film   45. Penta Prism

                                                     46. Eyepiece of Penta Prism
View original page 4Page 5 · Read text
Preparations for use

                               The Finder Hood (13) is opened by pressing on the lever
                                          (17). To close the hood, press the front (14) backwards until
                                                         it locks. The focusing magnifier (15) can be swung into
                                          either the working or rest position by means of handle (16).
                                   For further information on the use of the Finder Hood see
                                  page 34.

                               Swing the shutter-release lock (h) out of the way, then
                                        release the shutter either by pressing directly on the shutter-
                                        release knob (3) or indirectly by depressing the release knob
                                      or rocker arm (27) on the lens. When you have finished
                                      taking pictures, swing the shutter-release lock (4) so that it
                                     covers the shutter-release knob (3), making shutter release
                                      impossible, thus avoiding unintentional exposures.


Film loading

Loading and changing the film must not take
place in direct sunlight! The EXAKTA VX
1000 uses standard 35 mm miniature film, in
cassettes of 20 or 36 exposures, to make
negatives 24mm x 36 mm. Perfect film transport
requires faultless film cassettes. Daylight
loading spools should only be inserted in
cassettes made by the same manufacturers.

1. Depress camera-back lock (2) downwards.
Open hinged camera back.
View original page 5Page 6 · Read text
2. Pull out the rewind crank (39) by means of its
                                             knob.


                                                      3. Insert the cassette containing the unexposed
                                                film in the feed chamber (41). Push the knob of
                                                  the rewind crank back into the camera body.
                                                  twisting the knob gently in either direction to
                                           engage the dog (40) with the bar in the cassette
                                                    core.


4. Remove the take-up spool (32) from the
chamber (33). Push the beginning of the film
under the clamping spring of the take-up spool
and wrap one half turn round the core of the
spool.


5. Replace the take-up spool (32) in the film
chamber (33) and turn it slightly in the wind-on
direction so that the friction dog (11) of the
rapid wind lever couples with the bar inside the
spool core and allows the spool to be pushed
right home into the chamber (33).
View original page 6Page 7 · Read text
6. Swing the rapid-wind lever (8) right up to its stop (if
                                    necessary first releasing the shutter). These two processes
                           may have to be repeated until the teeth of the film-wind
                                    sprocket (34) engage with the perforation holes on both sides
                                     of the film.


                                         7. the correctly inserted film runs from the full cassette as
                                         tightly as possible over the film-guide runners (35) into the
                              somewhat deeper lying film track and over the film-wind
                                    sprocket (34) on to the take-up spool (32).


8. Closing the camera: This should be done by pressing the
back lightly home until an audible click is heard.


9. Expose two blank frames to wind on the fogged leader-
length at the beginning of the film: release and swing the
rapid-wind lever (8) as far as it will go. Once again: release
and swing the rapid-wind lever (8) as far as it will go.
View original page 7Page 8 · Read text
10. Setting frame counter (6). Turn the disc of the frame
                                   counter (6) with the index finger to the left (anti-clockwise),
                                           until, when using a film with 36 exposures the figure "36", or
                            when using a film with 20 exposures the figure "20" appears in
                                     the center of the window. The EXAKTA VX 1000 is now
                                  ready for action, and the frame counter will indicate after each
                                 exposure the number of unexposed frames still left on the film
                                       in the camera. To check the film transport observe indicator
                                     disc (20): the disc with its black-white mark orates, when the
                                   spool of the film-feeding cassette is revolving.


11. When film is loaded, immediately set the film-type
reminder disc in the back-opening knob (1) and the film-
sensitivity reminder disc (19) as a reminder of the type of film
that is in the camera. Both discs may be turned in either
direction, until the appropriate reference is opposite the red
dot, or, in the case of the film-sensitivity disc, opposite the
black triangle. The film-type symbols have the following
meaning:
View original page 8Page 9 · Read text
Using a take-up cassette


                                      In place of the take-up spool (32), an empty standard-type
                                     film cassette may be placed in the take-up chamber (33). Take
                                     care to check the condition of this take-up cassette
                                    thoroughly: the core should move easily within the shell of
                                      the cassette and must not jam (if necessary the friction point
                                     of the cassette core may be lubricated by rubbing them with
                                       paraffin wax). When using a take-up cassette proceed as
                                      follows: attach the leader tongue of the film to the core of the
                                        cassette spool, ensuring that the bar in the core of the spool is
                               on the right as the spool is turned away from the body, and
                                          insert the cassette so that the friction dog (11) of the rapid-
                               wind lever (8) engages with the bar in the core of the spool.
                              Then check that the film is pulled taut between the two
                                         cassettes, and is lying correctly between the guides, against
                                      the register rails in the deeper channel.


                                                       It is not necessary to trim the beginning of the film
                                            specially. Any shape of leader can be used with the take-up
                                      spool of the EXAKTA VX 1000, either the narrow tongue
                                     provided on standard commercial cassettes, or, even better,
                                     a straight cut-across end as obtained when cutting lengths
                                        of film from bulk rolls. When employing a take-up cassette
                                         the film must be trimmed to suit the core of the cassette
                                         spool.

                                    For changing film, refer to page 41.
View original page 9Page 10 · Read text
Operating the shutter

                                           1. The shutter is tensioned and the film wound on by
                                      operating the rapid-wind lever (8). This lever should always
                                  be swung right up to its stop, and will then spring back of its
                            own accord. (The fast returning lever should be restrained
                                      gently with the thumb.) The tensioning of the shutter and the
                                        transportation of the film ore coupled (avoiding
                                       unintentional double exposures and blank frames). It is
                                     impossible to release the shutter before it has been fully
                                     tensioned and the film wound on. Never force the rapid-
                                wind lever back from any intermediate point in its travel.

                                  Should the lever not spring back automatically when the
                                 camera is empty, the back (42) should be opened and the
                                    film-wind sprocket(34) turned a little towards the exposed-
                                      film chamber (33). The rapid-wind lever (8) should be
                                      gently nudged during this operation.


2. The reflex image in the viewfinder (Finder Hood, Penta
Prism or Lens Magnifier) will be visible even after the
shutter has been released. (Instant return mirror.) The red
warning signal in the reflex image indicates that the camera
is not yet ready for action, and that the rapid-wind lever (8)
must be wound before the shutter is ready for release (see
illustration: reflex image seen through Penta Prism).


3. Shutter speeds from 1/1000 sec. to 1/30 sec. can safely be
employed without the use of a tripod. For exposure times of
1/8 sec. and longer, including delayed action exposures, the
camera should be firmly supported (on a table, against a
wall) or on a tripod. The tripod socket (44) is situated
underneath the EXAKTA VX 1000.
View original page 10Page 11 · Read text
For all exposure times of 1/8 sec. or longer, or exposures
                                    using the delayed action, lenses having automatic diaphragms
                                   should be set to manual in order to avoid premature opening
                                     of the aperture. When using the Domiplan 2.8/50 lens, a cable
                                       release with a long plunger and time-exposure lock, or the
                                       special locking knob (available as an accessory) should be
                                employed for the release rocker. For more information
                                    regarding this, see the detailed description of lenses on pages
                                    28-31.


                                 Cable releases (with long plunger) may be screwed into the
                                        shutter release knob (3) on the camera or into the release
                               mechanism on the lens (27). This is particularly important
                             when using shutter speeds of 1/8 second and slower, and
                                         virtually indispensable when employing the B setting. See
                                 page 21.


Selection of exposure times from 1/1000 sec. to/3o sec.
(without delayed action)
Lift the small shutter-speed setting knob (10), turn it in the
direction of the arrow until the desired speed value is
opposite the setting dot on the central disc and then allow the
knob (10) to spring back. This operation may be performed
either before or after tensioning the shutter.


The figures represent fractions of seconds: for example 30 =
1/30 sec, 125 = 1/125 sec. Intermediate speeds cannot be set.
View original page 11Page 12 · Read text
Shutter speeds from 1/8 sec. to 12 sec. (without delayed action)


                              Read also the instructions of page 18! Tension the shutter. Set
                                      the small shutter-speed setting knob (10) to T or B. Turn the
                                       large shutter-speed setting knob (18) in a clockwise direction
                                          until it stops; this tensions the speed-regulating mechanism.
                              Then lift the outer ring of the shutter-speed setting knob (18)
                                       turn it until the yellow mark is opposite the desired black
                                  speed value and then let the outer ring spring back. The small
                                       figures 8, 4 and 2 signify fractions of seconds, e. g. 1/8 1/4 and
                                    1/2 sec. The larger figures from I to 12 represent whole
                                  seconds (3 seconds Is represented by a dot). After a fairly
                                         brief exposure (e. g. '/s sec.) has been used, the speed-
                                      regulating mechanism will be only slightly run down; despite
                                              this, it should always be wound right up by turning the knob
                                     as far as it will go.


Time exposures of any desired length (without delayed
action)

Read also the instructions on page 18! Select T or B on the
small shutter speed knob (10) by lifting the knob and
rotating it in the direction of the arrow until the required
setting (B or T) is opposite the red dot on the center disc.
Then allow the knob (10) to spring back.


B: the shutter will remain open so long as pressure is
maintained upon the shutter-release knob (3) or on the
release mechanism of the lens. T: the shutter will open when
the release knob (3) or the release mechanism on the lens is
operated and will close again upon a second pressure. The B
and T settings are very important for taking night and indoor
exposures.
View original page 12Page 13 · Read text
Setting of shutter speeds from 1/1000 sec. to 1/30 sec.
                                   (using the delayed action)
                                  Refer to the instructions on page 18! Tension the shutter.
                                     Select the desired shutter speed on the small shutter-speed
                              knob (10), e. g. 1/125 sec.

                                   Rotate the large shutter-speed knob (18) clockwise as far as it
                                       will go, and set it to any of the red figures as described on
                                page 20.


                            Red figures represent delayed-action exposures with which the
                                       shutter opens approximately 12 seconds after pressing the
                                        release.


Selection of shutter speeds from 1/4 to 6 seconds, using the
delayed action
Refer to the instructions on page18. Tension the shutter. Set
the small shutter- speed setting knob (10) to T or B. Turn the
large shutter-speed setting knob (18) as far as it will go in a
clockwise direction, as described on page 20, and select the
desired red exposure time, e. g. 1/2 sec.

The smaller figures 4 and 2 represent fractions of seconds,
i.e. 1/4 sec. and 1/2 sec., large figures from 1 to 6 represent
whole seconds. (The dot 3 seconds.)


Red figures represent delayed-action exposures with which the
shutter opens approximately 12 seconds after pressing the
release.
View original page 13Page 14 · Read text
Intentional double exposures

                               With the EXAKTA VX 1000, it is not possible for
                                      unintentional double exposures to occur. It is, however,
                                      possible to take double exposures on purpose (e. g. for trick
                                    photography). After the first exposure, the shutter can be re-
                                    tensioned without winding on the film as follows: turn the
                                    small shutter-speed setting knob (10) as far as it will travel in
                                      the direction of the arrow, without lifting it; the knob should
                                 be held to prevent it from springing back.


Operating the lens

1. The aperture value (f/No) is selected by means of the
aperture-setting ring (26). Turn this ring until the desired
f/No on the aperture scale is opposite the mark. For
instructions on operating the diaphragm mechanism, see
the sections dealing with the various lenses on page 28
onwards. The smaller aperture numbers e. g. f 2, 2.8, 4,
indicate relatively large diaphragm openings: permit brief
exposures, but give only shallow depth of field. The larger
aperture numbers. e.g. 16, 22, indicate relatively small
diaphragm openings requiring longer exposure but giving
great depth of field. Further information on the depth of
field will be found on page 27
View original page 14Page 15 · Read text
2. The lens is focused by turning the distance-setting ring
                                     (25) and observing the definition of the reflex image in the
                                     viewfinder. The lower values on the distance scale indicate
                                     meters, whilst the larger values above them represent feet. All
                                      distances are measured from the back of the camera to the
                                        subject. When the image of the subject in the reflex
                                    viewfinder attains us sharpest definition, then the correct
                                    camera-subject distance in feet or meters will be in line with
                                      the red setting mark. For further information on using the
                                     Fresnel lens (with micro-prism field) see page 38.

                          When focusing the reflex image use the maximum aperture of
                                      the lens (i. e. smallest f/No) to obtain the most brilliant
                                   image, and then stop down just before the exposure. It is not
                                    necessary to take the camera from your eye, since all the
                                      lenses are equipped with fully-automatic spring or pressure
                                   diaphragms. For more detailed information see the
                                       descriptions of the lenses on page 28 onwards.


Reading off the depth of field

When the depth of field is great, objects at widely varying
distances from the camera will form a sharp image. The
precise extent of this sharp zone will be indicated (after
focusing) by the depth-of-field scale (24) on the lens: on
either side of the red distance-setting mark you can read off
from the distance scale where the depth of-field zone begins
and ends for any specific aperture setting. If the relevant
f/No. on one side of the central distance-setting mark is in
line with the infinity symbol (--) or even beyond it, then the
depth of field will extend right up to infinity. On the right
are two examples and a photograph demonstrating large
depth of field.

Above: Distance setting 2 meters (6 1/2 ft), aperture f 5.6 =
depth of field extends from 1.7 m (5 1/2 ft) to 2.5 m (8/2 ft)

Below: Distance setting 4 meters (13 ft), aperture f 16 =
depth of field extends from 2 meters (6/2 ft) to infinity (00)

The Pancolar 2/50 mm lens from Jena has an automatic
depth-of-field indicator; see page 31.
View original page 15Page 16 · Read text
Fully-automatic pressure diaphragm on
Focusing for infra-red pictures (Use a digital       Domiplan 2.8/50 lens: Always open the
camera)                                         diaphragm fully for focusing. Pre-select the
                                                       required smaller aperture (larger f/No) by
When using infra-red film, first focus the reflex image   turning the aperture setting ring (26);
normally, then note the distance indicated by the red    intermediate settings between the marked f/
setting mark (either in feet or meters, or the infinity    numbers can also be selected. By
symbol), and turn the focusing ring to set this distance  depressing the release rocker (27), the lens
against the red dot (infra-red setting mark) which is      will stop down automatically; when the
either to the right or the left of the normal setting        pressure on the rocker is relaxed, the
mark. By doing this the image produced by the        diaphragm re-opens automatically. The
invisible infra-red rays, which lies at greater distance    release rocker should therefore be held
from the lens than the image formed by visible light,   down until the shutter has closed. To check
will be brought into sharp focus in the film plane of     the depth of field when focusing, the
the camera and consequently will appear sharp in the    release rocker (27) may be depressed part
negative.                                  way so that the diaphragm closes down
                                                    without releasing the shutter.


In order to avoid premature opening to the aperture,
for longer exposures, both when using the large
shutter-speed setting knob (18) and when employing
the B and T settings on the small speed-setting knob
(10), and also for all delayed-action exposures, either
of the following procedures should be adopted: Screw
a cable release with a long plunger and time-exposure
lock into the release rocker. In this way pressure can
be maintained on the release rocker or body-shutter
release for any desired period without having to keep
ones finger constantly on the release (also eliminating
camera shake).

Alternatively, a special locking knob (available as an
accessory) can be screwed into the release rocker; by
propping up the lower part of the rocker the automatic
diaphragm mechanism will be disengaged. The lens is
then stopped-down (i. e. a numerically-larger aperture
value is selected) by turning the aperture-setting ring.
The lens opening will remain stopped down according
to the extent to which the ring is rotated.
View original page 16Page 17 · Read text
Fully automatic spring diaphragm on T 2.8/50 from Jena and Pancolar 2/50 lenses from Jena


                                  Engage the automatic diaphragm mechanism by pushing
                                          the release knob (27) on the lens towards the camera
                                          together with it5 mount and turn it to the right (viewed
                                    from the front of the camera). To disengage the automatic
                                      diaphragm, press the release knob (27) together with its
                                  mount towards the camera and turn it to the left (again
                                       looking from the front). When the automatic mechanism
                                                    is disengaged (= manual diaphragm setting), the
                                    diaphragm will remain stopped down to the selected f/No
                                                (this is Important when using slow shutter speeds and
                                         delayed-action exposures). When the automatic
                                  mechanism is engaged, the diaphragm should be fully
                                    opened for focusing. Select the required smaller aperture
                                             (larger f/number) by turning the aperture-setting ring
                                             (26), which can also be set to intermediate stops. By
                                        depressing the lens-release knob (27) the diaphragm is
                                       stopped down automatically; by letting go of the release
                                  knob (27) the diaphragm re-opens automatically.


Pressure on the release knob (27) should not be relaxed until
the shutter has closed. To check the depth of field whilst
focusing, depress the lens-release knob (27) just far enough
to stop down the lens as required without releasing the
shutter, In order to ensure that the shutter-release knob (3)
on the camera body is always depressed far enough to
trigger the shutter, the setscrew on the release mechanism of
the lens should be adjusted to the required length with a
screwdriver. A cable release with a long plunger can be
screwed into the lens-release knob (27).

Automatic depth-of-field indicator on the Pancolar 2/50
lens: After setting the aperture and distance, follow the
appropriate black/white bands from the two movable black
markers to the distance scale, upon which the depth-of-field
range can be read off. Example: aperture setting f 8, distance
5 meters (17ft) = depth of field from barely 3 meters (10 ft)
to over 15 meters (actually 23 meters or 76 feet).
View original page 17Page 18 · Read text
3. Changing the lens (28) (select automatic on all lenses
from Jena): depress the locking lever (30) towards the lens,
then turn the lens to the left until the two red dots (23 and
29) are in line, and lift the lens out towards the front. To
insert a lens proceed in the reverse sequence: line up the red
dots, and turn the lens to the right until it locks. All special-
purpose lenses can be used, with focal lengths ranging from
the shortest to the longest.
View original page 18
Page 19 · Read text
Using the Finder Hood

The reflex image in the Finder Hood (11) of the
EXAKTA VX 1000 may be used both for
selecting or framing the subject, and also for
focusing and checking the depth of field, by
provisionally stopping down the lens. Generally,
a large enough image for normal view finding
purposes will be obtained when using the
standard ground-glass screen or the Fresnel
screen; for critical focusing, however, we
recommend the additional use of the Focusing
Magnifier. The pivoted Focusing Magnifier (15)
will spring into its working position when the      the camera must be held close to the eye. When
Finder Hood is opened, but can be folded back     taking vertical pictures with the Finder Hood it
out of the way by operating the handle (16); see     is possible to shoot at right angles. This is
also page 6. Refer to page 38 for instructions on    particularly useful for working inconspicuously
the use of the Fresnel screen. Normally, the        since the photographer can remain in
EXAKTA VX1000 is held at chest or shoulder     concealment.
level. When the pivoted supplementary
Focusing Magnifier (15) is also used.
View original page 19
Page 20 · Read text
(The Penta Prism makes it possible to take vertical pictures with a direct line of vision and also
provides a laterally-correct and upright viewfinder image.) The image on the ground-glass screen of
the Finder Hood (13) can also be observed from below when the camera is held above the head. This
will prove very useful when taking pictures over walls or over the heads of crowds. Users who
normally wear spectacles should use their close-up (reading) glasses for focusing with the Finder
Hood. For interchanging the Finder Hood. see page 39.


Using the Penta Prism

The Penta Prism serves the same purpose as the
Finder Hood, with the exception, that the reflex
image on the ground-glass screen will invariably
be upright and laterally-correct no matter
whether the camera is held horizontally or
vertically; this is particularly useful when taking
pictures of moving subjects, since the image in
the viewfinder will move in the same direction     For normal upright and horizontal exposures the
as the subject itself. With very rapidly-moving   EXAKTA VX 1000 should be held with the
subjects the camera can thus be "panned" by        right hand and focused with the thumb and
swinging it gently in the direction of motion of     index finger. The left hand should give
the subject (as for example, with racing cars).       additional support, the left index finger being
When employing the Penta Prism (45) the         used for releasing the shutter. The reverse
camera should always be held at eye level.         handling is possible for horizontal exposures: to
Viewing the reflex image through the eyepiece     prevent camera shake when using the EXAKTA
(46) may be effected with either eye.        VX 1000, press the back of the camera against
                                                   the forehead. Photographers who normally wear
                                                    spectacles
View original page 20Page 21 · Read text
should use their distance glasses for focusing with the Penta Prism. Refer to page 38 for instructions
on the use of the Fresnel screen. -- For fitting and removing the Penta Prism see page 39. An
invaluable accessory for use with the Penta Prism is the flexible eyepiece cup: this is fitted on to the
eyepiece (46) of the Penta Prism and shields it from distracting stray light. It is also helpful for
spectacle-wearers since vision-correction lenses made by ones optician can be inserted into the
revolving mount, making it possible to focus without wearing glasses.


                              Focusing with the Fresnel screen

                            The EXAKTA VX 1000 may optionally be supplied with a
                                  Fresnel screen. With this screen, focusing is mainly performed
                                  using the centrally placed matt ring without the fresnel line
                                       structure. To increase the accuracy of focusing, a microprism is
                                  centered in this ring. The extra brilliant image visible in this
                                   patterned field serves for focusing in the same way as the image
                             on the ground-glass screen, except that with the microprism,
                                     incorrect focusing will result in an image which is blurred to a
                                     greater degree. The lens will be correctly focused when the
                              image in the microprism is at its sharpest. It is, however,
                                   absolutely essential to focus with a large aperture, as with
                                    apertures off 5.6 and smaller, the image in the microprism field
                                     will appear relatively sharp, even with the lens incorrectly
                                   focused. This, of course, will lead to unsatisfactory results. For
                                extreme close-ups of magnifications greater than 1:1, and
                                photomicrography, the microprism cannot be used.
View original page 21Related documents and language editions

From the M. Butkus Camera Manual Library. Original publisher and archive notices are retained.
Check the model and edition against your equipment.
PDF verified 2026-10-10.