Film cameras
EXAKTA VX IIb User manual
User manual for EXAKTA VX IIb. 26 pages in English. Read the original PDF, download or print a copy without registration.
26 pagesEnglish1.7 MB PDF
Loading your manual…Open PDF directly
Document details
- Brand
- Exakta
- Model / document
- EXAKTA VX IIb
- Document type
- User manual
- Language
- English
- Pages
- 26
- File size
- 1.7 MB
- Category
- Film cameras
- Document date
- Not specified in catalog
Search available document text
Find a term, then jump to its page in the original PDF. Image-only pages may not be searchable; check the PDF for exact wording and diagrams.
Page 2 · Read text
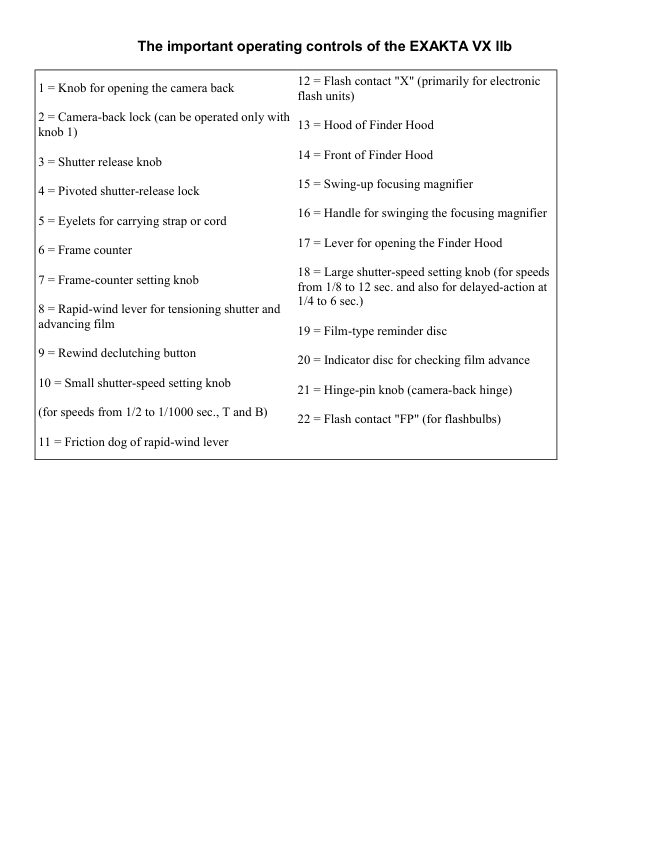
The important operating controls of the EXAKTA VX llb

                                         12 = Flash contact "X" (primarily for electronic1 = Knob for opening the camera back
                                                    flash units)

2 = Camera-back lock (can be operated only with
                                         13 = Hood of Finder Hoodknob 1)

                                         14 = Front of Finder Hood3 = Shutter release knob

                                         15 = Swing-up focusing magnifier4 = Pivoted shutter-release lock

                                         16 = Handle for swinging the focusing magnifier
5 = Eyelets for carrying strap or cord

                                         17 = Lever for opening the Finder Hood
6 = Frame counter

                                         18 = Large shutter-speed setting knob (for speeds
7 = Frame-counter setting knob                                          from 1/8 to 12 sec. and also for delayed-action at
                                                1/4 to 6 sec.)
8 = Rapid-wind lever for tensioning shutter and
advancing film                                         19 = Film-type reminder disc

9 = Rewind declutching button                                         20 = Indicator disc for checking film advance

10 = Small shutter-speed setting knob                                         21 = Hinge-pin knob (camera-back hinge)

(for speeds from 1/2 to 1/1000 sec., T and B)                                         22 = Flash contact "FP" (for flashbulbs)

11 = Friction dog of rapid-wind lever
View original page 2Page 4 · Read text
34 = Film-wind sprocket

23 = Red aligning dot on camera (for changing lenses)
                                            35 = Film guide runners

24 = Depth-of-field scale or automatic depth-of-field
                                            36 = Film gate with blind of focal-plane shutter
indicator

                                            37 = Film-cutting knife4.butkus.org
25 = Distance-setting (focusing) ring

                                            38 = Knob of film-cutting knife
26 = Aperture-setting ring

                                            39 = Rewind crank
27 = Release knob or rocker of lens

                                            40 = Dog of rewind crank
28 = Lens

                                            41 = Chamber for cassette containing unexposed film
29 = Red aligning dot on lens (for lens changing)

                                            42 = Hinged, detachable camera back
30 = Lens locking lever

                                            43 = Exchangeable film pressure plate
31 = Flash contact "F" (for flashbulbs)

                                            44 = Tripod bush
32 = Take-up spool

                                            45 = Penta Prism
33 = Chamber for take-up spool or cassette

                                            46 = Eyepiece of Penta Prism
View original page 4Page 5 · Read text
We are delighted that you have chosen an EXAKTA VX and we wish you every success with your new camera.

We would like to advise you however, to read this instruction manual carefully before you start using your

camera. In this way you will obtain the greatest possible service from it, since you will eliminate from the outset

the possibility of operating it incorrectly, and possibly damaging the mechanism. The EXAKTA VX is a high-

quality precision instrument which con naturally only be expected to answer all your requirements when it is

always handled correctly.

Fold out the opposite page to the left to reveal the itemized guide to the camera controls; in this way you can

keep constantly referring to this first illustration whilst you are reading the text.

We recommend you first to get thoroughly familiar with the EXAKTA VX by practicing with the camera

unloaded before you insert a film. Get used to the operation of the shutter, the technique for opening and closing

the camera, selecting the subject and focusing it, with both the Finder Hood and also the Pent Prism. Handle the

camera just as you would if it contained a film. Lastly practice inserting a new film; here it is advisable to get

accustomed to the technique by using an old, scrap film.


The EXAKTA VX operates on the single-lens reflex principle, which was first introduced into miniature

photography by Ihagee. Inside the camera there is a small, pivoted mirror which up to the moment of pressing

the release button reflects the image formed by the taking lens on to the focusing screen. Only in this way is it

possible to eliminate all parallax between the reflex image and the final picture and so be able to select your

subject and focus the image with complete confidence by means of the reflex viewfinder alone.


Keep in touch with your photographic dealer so that he can keep you constantly informed about all the latest

developments in our production range. Naturally, we are always ready to give you any advice and information

you may need, whenever you require our assistance on particular points regarding the use of the EXAKTA.


IHAGEE KAMERAWERK AG
View original page 5
Page 6 · Read text
Opening and closing the camera back


                              Pull out knob (1) as shown in Fig. 5 turn it either to the right or left
                            disengage the catch and then swing open the camera back (42). To
                              close the back (42), gently press it shut, then turn the knob (1) either
                                to the right or left until it springs back to its original position. If you
                          wish to detach the back (42) from the camera completely, then open
                              the back and withdraw the hinge pin by means of knob (21). To re-
                               attach the back, hold it in position against the camera and guide the
                             pin back into the hinge.


Opening and closing the Finder Hood

The Finder Hood (13) is opened by pressing on the lever (17). To close the hood, press the front (14) backwards

until it locks. The focusing magnifier (15) can be swung into either the working or rest position by means of

handle (16). For further information on the use of the Finder Hood see page 13. The image will only be visible

on the ground-glass focusing screen in the Finder Hood when the shutter is tensioned. See next section for

instructions on tensioning the shutter. 4.butkus.org


Shutter and film advance


                             These are coupled together, eliminating double exposures and
                                blank frames. Swing the shutter release lock (4) out of the way,
                                 then release the shutter either by pressing directly on the shutter
                                   release knob (3) or indirectly by depressing the release knob or
                                 rocker arm (27) on the lens.


The shutter is tensioned and the film wound on by operating the rapid-wind lever (8). This lever should always

be swung right up to its stop (Fig. 6) and will then spring back of its own accord. It is impossible to release the

shutter before it has been tensioned fully and the film wound on.
View original page 6Page 7 · Read text
Neither can the film be wound on until the shutter has been released it will not be possible to operate the shutter

release when the rapid-wind lever (8) is at an intermediate point of its travel. Never force the rapid-wind lever

back to its rest position or the mechanism will be damaged. Should the lever not spring back automatically

when the comer a is empty, then open the back (42) and turn the film-wind sprocket (34) a little the direction of

the exposed-film chamber (33); this will cause the rapid-wind lever (8) to spring back. Restrain the lever with

your thumb during its return travel.


When you have finished taking pictures, swing the shutter-release lock (4) so that it covers the shutter release

knob (3).


Operating the shutter


                                          Shutter speeds from 1/30 to 1/1000 sec.: Lift the
                                              smaller shutter-speed setting knob (10)-- see Fig. 7--
                                                                             , turn it in the direction of the arrow until the desired
                                          speed value is opposite the setting dot on the central
                                                disc and then allow the knob (10) to spring back.
                                           This operation may be performed either before or
                                                     after tensioning the shutter.


The figures represent fractions of seconds: for example 30 = 1/30 sec. Intermediate speeds cannot be set.

Exposures from 1/30 to 1/1000 sec. can safely be taken with a hand-held camera i.e. without a tri pod. Longer

exposures (see next paragraph) should only be taken when the camera is placed on a tripod or other firm

support.


Time exposures of any desired length: Set the smaller shutter-speed setting knob (10) to either T or B (either

before or after tensioning the shutter). T = the shutter will open when the release knob (3) or the release

mechanism on the lens is operated and will close again upon a second pressure. B = the shutter will remain open

so long as pressure is maintained upon the shutter release knob (3) or on the release mechanism of the lens.

Lenses with fully-automatic diaphragms should be adjusted for normal manual aperture setting; otherwise the

diaphragm will open prematurely. When taking time exposures with the f 2.8/50 mm Domiplan lens, use either

the B setting and if necessary a cable release with locking device, or the T setting and an additional locking

knob for the release rocker. For further details see the sections dealing with the various lenses pages 7. .

.12. The Band T settings are very important for taking night and indoor exposures.
View original page 7Page 8 · Read text
Shutter speeds from 1/8 to 12 sec.: Tension the shutter. Set the smaller shutter-speed setting knob (10) to T or

B. Turn the larger shutter speed setting knob (18) in a clockwise direction--see Fig. 8--until it stops; this

tensions the speed-regulating mechanism. Then lift the outer ring of the shutter-speed setting knob (18), turn it

until the red mark is opposite the desired black speed value and then let the outer ring spring back. The small

figures 8,4 and 2 signify fractions of seconds, e.g. '/a, 1/4 and 1/2 sec. The larger figures from figure 1 to 12

represent whole seconds.


After a fairly brief exposure (e.g. 1/8 sec.) has been used, the speed-regulating mechanism will be only slightly

run down; despite this it should always be wound right up by turning the knob as far as it will go. Lenses with

fully automatic diaphragms should be set for normal manual aperture adjustment, to prevent premature opening

of the diaphragm. Use an additional release-rocker locking knob with the Domiplan f 2.8/50 mm lens.


Using the self-timer (delayed action release)

(a) At shutter speeds from 1/4 to 6 sec.: tension the shutter. Set smaller shutter-speed setting knob (10) to T or

B. Turn the larger shutter speed setting knob (18) as far as it will go and select the desired red shutter-speed

setting as described above. The small figures 4 and 2 represent fractions of seconds, 1/4 and 1/2 sec.

respectively. The larger figures from 1 to 6 signify whole seconds (the 3-second setting is represented merely by

a dot).


(b) Shutter speeds from 1/30 to 1/1000 sec.: tension the shutter. Do not set the smaller shutter-speed setting

knob (10) to T or B. but to the desired shutter e.g. '/'as sec. Then rotate the large speed setting knob (18) as far

as it will go and set it to any of the red figures as described above.


The black figures on the larger shutter-speed setting knob (18) indicate "immediate" exposure settings, whereas

the red figures represent delayed-action exposures (with which the shutter opens approximately 12 seconds after

pressing the release). 4.butkus.org


Whenever delayed-action exposures are made with lenses which have fully-automatic diaphragms, these should

be set for normal manual aperture adjustment in order to prevent the diaphragm from opening prematurely.

With the f2.8/50mm Domiplan lens an additional locking knob for the release rocker must be employed.


For all shutter speeds of 1/8 sec. and slower, a tripod should be used or else the camera should be placed on a

firm support (table wall). The camera should also be supported suitably to eliminate shake when taking delayed-

action exposures. The tripod bush (44) is in the base of the EXAKTA VX.
View original page 8
Page 9 · Read text
Cable releases (with long plunger) may be screwed into the shutter release knob (3) on the camera or into the

release mechanism on the lens. This is particularly important when using shutter speeds of '/e second and slower

and virtually indispensable when employing the B setting.


Although unintentional double exposures cannot occur; it is, however, possible to take double exposures on

purpose (e.g. for trick photography). After the first exposure, the shutter can be re-tensioned without winding on

the film as follows: turn the smaller shutter-speed setting knob (10) as far as it will travel in the direction of the

arrow, without lifting it; the knob should be held to prevent it from springing back. The frame counter (6)

always indicates the number of exposures and will, therefore, record two exposures for an intentional double

exposure.


Operating the lens


                              The lens (28) is exchangeable: press the locking lever (3)
                                   towards the lens, turn the lens to the left (Fig. 9) until the red
                                       aligning dots (23 and 29) are opposite one another and then
                                                      lift off the lens towards the front. To insert a lens, proceed in
                                       the reverse sequence: position the lens with the red dots in
                                             line, then turn the lens to the right until it engages. If, when
                                 removing or inserting the fully-automatic lenses from Jena
                                       the adjusting screw of the release knob (27) should foul any
                                         part of the camera, then the remedy is simply to set the lens
                                         to "Automatic" as described on page 10.

Focusing is performed by turning the distance setting ring (25); where the ring bears two engraved scales, the

lower numerical values indicate meters, the larger values feet. The focus definition is checked by observing the

ground-glass screen in the Finder Hood or Penta Prism: When using the Fresnel Lens, critical focusing is done

by means of the patterned ring, situated in the important image center, which don't show the fine structure lines

of the viewfinder-field. When the definition of the reflex image appears at its sharpest, then the distance of the

focused subject (in feet or meters) will be opposite the red index mark on the scale. This distance is measured

from the subject to the camera back. Cameras fitted with a Fresnel Lens also permit to use for sharp Focusing

the microprism field, and obtain with him a double focusing-security. Details see on page 16.
View original page 9Page 10 · Read text
The aperture is adjusted by means of the aperture-setting ring (26). The numerically-smaller aperture values,

e.g. 2.8,4, represent relatively large lens openings these permit fast shutter speeds but give only limited depth of

field. The larger aperture values, e.g. 16, 22 conversely indicate relatively small lens openings, which require

longer exposure times but give greater depth of field.


                              What does "depth of field" mean? Briefly, the situation in
                                  which objects at varying distances from the camera appear
                                     uniformly sharp in the picture. More precise information is
                                     provided by the depth-of-field scale (24) on the EXAKTA
                       VX lenses: on either side of the red distance setting index
                                mark will be found a series of aperture values (f/Nos.). The
                                        distance figures on the feet (or metro) scale which are in
                                            line with the aperture values corresponding to the lens
                                    opening actually used indicate where the depth-of-field
                                      "sharp zone" begins and ends. 4.butkus.org

If the aperture figure on one side is opposite the infinity symbol (00) or even beyond it (reading outwards from

the center), then the depth-of-field zone extends to infinity. The f 2/50 mm Pancolar lens from Jena is equipped

with automatic depth-of-field indicators.


Two examples

Distance setting 00, aperture f 8 = depth of field extends from about 24 fl (7 m) to infinity; see Fig. 10.


Distance setting 8 ft (2.5 m), aperture f 16 = depth of field extends from about 5 ft (1.5 m) to approx. 36 ft (11

m); see Fig. 11.


Use a large lens opening (= lowest aperture value) for focusing on the reflex image in order to obtain a brilliant

finder image, and then stop down immediately before taking the picture. This operation does not involve

lowering the camera from the taking position, since the lens is provided with a fully-automatic spring or

pressure diaphragm.


The fully-automatic pressure diaphragm of the Domiplon f 2.8/50 mm lens (Fig. 10):


The fully-automatic pressure diaphragm is used at full aperture for focusing and observing. Preselect the desired

smaller diaphragm aperture by turning the diaphragm-setting ring. The appropriate numerically-larger aperture

value must be opposite the red triangular mark. It is also possible to set intermediate values between any two
View original page 10Page 11 · Read text
f/stop figures. By pressing on the release rocker the lens is stopped down automatically; when the release rocker

is released, the diaphragm opens up to the maximum aperture. The rocker should not, however, be released until

the shutter has closed (most important when using the slower "instantaneous" shutter speeds). For longer

exposures, both when using the-large shutter-speed setting knob (18) and when employing the B and T settings

on the small speed-setting knob (10), and also for all delayed-action exposures, either of the following

procedures should be adopted:


a) Screw a cable release with a long plunger and time-exposure lock into the release rocker. In this way pressure

can be maintained on the release rocker or body shutter release for any desired period without having to keep

one's finger constantly on the release (also eliminating camera shake).


b) Alternatively, a special locking knob (available as an accessory) can be screwed into the release rocker; by

propping up the lower part of the rocker the automatic diaphragm mechanism will be disengaged. The lens is

then stopped down (i.e. a numerically-larger aperture value is selected) by turning the aperture setting ring. The

lens opening will remain stopped down according to the extent to which the ring is rotated.


Operating the fully-automatic spring diaphragm of the T f 2.8/50 mm (Fig. 11) and Pancolar f 2/50 mm lenses

from Jena (Fig. 12):


Focusing is performed by turning the front, distance-setting ring.


                                       Set the lens either for fully-automatic spring diaphragm or
                                   normal diaphragm setting. When using the fully-automatic
                                        spring diaphragm the release knob (27) on the lens must
                                            project, together with its mount, by about 1 cm or 1/4 in. in
                                           front of the black housing. If necessary press the mount of
                                         the release knob gently in the direction of the camera body
                                  and turn it to the right (looking at the camera from the
                                             front): the mount and the release knob will then lock into
                                         the "automatic" position.


The automatic diaphragm mechanism is disengaged as follows: press the mount of the lens release knob (27) in

the direction of the camera and turn it to the left (looking at the camera from the front); when the release knob

and its mount have been pressed back into the release mechanism housing and locked in this position, then the

diaphragm can be stopped down (i.e. a numerically-larger f/No. selected by turning the diaphragm-setting ring

(immediately in front of the camera body).
View original page 11Page 12 · Read text
The diaphragm will then remain stopped down according to the amount by which the ring is rotated (this is

important for time and delayed-action exposures). The diaphragm-setting ring has click stops at all aperture

values, including the intermediate values which are not engraved on the scale. The desired aperture value must

be set opposite the red  mark.4.butkus.org


In order to ensure that the release button on the camera is always depressed sufficiently, an adjusting screw is

provided on the lower side of the lens release plunger so that the latter can be set to the required length by

means of a screwdriver. If this adjusting screw should foul any part of the camera when the lens is being

inserted or removed, then the lens need only be reset to "Automatic".


When employing the fully-automatic spring diaphragm, the lens is always used at its full aperture for focusing

and observing the reflex finder image. It can then be stopped down to the pre-selected smaller aperture

(numerically larger f/No.) just by pressing the release. This aperture value, at which the exposure is to be made,

is selected by means of the diaphragm setting ring. By pressing the release knob (27) on the lens, first the

diaphragm closes down to the pre-selected smaller aperture and then the camera shutter is released. By taking

your finger off the lens release knob (27), the diaphragm automatically opens up to its maximum aperture; the

knob should, therefore, not be released until the shutter has closed completely (this is particularly important

when using the slower instantaneous speed settings). For taking time and delayed-action exposures the lens

should be set for normal diaphragm operation; the cable release (with long plunger) can be screwed into the

release knob (27) on the lens.


                                   For checking the depth of field during focusing when the
                                        lens is set for automatic diaphragm operation, the release
                                knob (27) on the lens should be depressed just far enough to
                                       close the diaphragm down to the desired aperture without
                                        releasing the shutter.


The Pancolar f 2/50 mm lens from Jena is provided with an automatic depth-of-field indicator (see Fig. 12).

After the aperture and distance settings adjusted, the have been adjusted, the two red pointers will indicate the

extent of the depth-of-field range. Observe the positions of the red indicators and note whether they are in the

center of the alternate black and white guide bands or at the division between two bands.
View original page 12Page 13 · Read text
Then follow the appropriate band until it meets the distance scale the distance figure on the left will show where

the depth of field begins whilst the figure on the right shows where the zone ends. Practice this operation by

setting your own lens as follows: aperture f 8 distance 5 meters (approx. 15 ft) = depth-of-field range extends

from less than 3 metros (approx. 9 ft) to over 15 meters (actually 23 meters or 76 feet).


Focusing when using infra-red film

When using infra-red-sensitive film first focus the image on the ground-glass screen. Then note the indicated

subject distance (in meters or feet, or infinity) and rotate the distance setting ring so as to move the subject-

distance figure from the normal red index mark to the red dot either to the right or to the left of it.


Using the Finder Hood

Upon looking into the Finder Hood (13) of the EXAKTA VX you will see a brilliant, upright and enlarged

image on the ground-glass screen. This image can be used both for selecting and framing the subject and also

for focusing and checking the depth of field by provisionally stopping down the lens. The magnifying ground-

glass screen fitted in the Finder Hood will generally give a large enough image for normal view finding

purposes, but for accurate focusing it is advisable to employ the additional focusing magnifier. The pivoted

focusing magnifier (15) will spring into its working position when the Finder Hood is opened, but can be folded

back out of the way by operating handle (16); see also page 2. For the use of the Fresnel Lens see page 16.


                                                          Normally, the EXAKTA VX is
                                                             held at chest or shoulder level (Fig.
                                                                  13). The method of holding the
                                                      camera when using the
                                                          supplementary focusing magnifier
                                                                               is shown in Figs. 14 and 15. When
                                                               taking vertical pictures with the
                                                            Finder Hood it is possible to shoot
                                                                         at right angle.

(Fig. 15). This is particularly useful for working inconspicuously since the photographer can remain in

concealment (Fig. 16). The Penta Prism (see next section) makes it possible to take vertical pictures with a

direct line of vision and also provides a laterally-correct and upright viewfinder image. The image on the

ground-glass screen of the Finder Hood (13) can also be observed from below when the camera is held above

the head. This will prove very useful when taking pictures over walls or the heads of a crowd.
View original page 13Page 14 · Read text
The EXAKTA VX is a multiple-system camera: the Finder Hood can be detached, allowing the Penta Prism

(45) to be fined red--as explained above. There is also the Lens Magnifier for close-up photography and

photomicrography and the "Stereflex" Stereo View Finder for 3-dimensional photography; see pages 33 and 35.

When exchanging viewfinder units, the Finder Hood (13) must first be closed. Lift off the Finder Hood by

pulling it smoothly upwards (Fig. 17). When re-inserting the Finder Hood, it must be introduced so that it is

exactly vertical and then pushed down until it locks, never employ force.


Users who normally wear glasses should use their close-up (reading) spectacles for focusing with the Finder

Hood.


Using the Penta Prism


                        The Penta Prism (45) (see Fig. 1), is the other principal focusing
                           system of the EXAKTA VX and is primarily intended for taking
                                pictures of moving subjects such as sporting events (for which it is
                                 virtually indispensable). The Penta Prism (45) is inserted into the
                          camera and removed in exactly the same way as the Finder Hood.
                        The camera is always held at eye level when using the Penta Prism;
                               the eyepiece (46) can be put to either the left or the right eye. The
                                 reflex image on the ground glass screen will invariably be upright
                          and laterally-correct no matter whether the camera is held
                               horizontally or vertically; this is particularly useful when taking
                                pictures of moving subjects since the image in the viewfinder will
                       move in the same direction as the subject itself.

                         With very rapidly-moving subjects the camera can thus be "panned"
                         by swinging it gently in the direction of motion of the subject (as for
                            example, with racing cars).


                                             For, normal horizontal and vertical pictures the EXAKTA VX when fitted

                                         with the Penta Prism (45) is preferably held in the left hand, using the right

                                    thumb and forefinger for focusing. Additional support can be given with

                                              the left hand, employing the left forefinger for releasing the shutter (Figs.

                                    18 and 19). For taking horizontal pictures the camera can also be used

                                          upside down: press the back of the EXAKTA VX against your forehead to

                                           prevent camera shake. Photographers who normally wear spectacles should

                                          use their distance glasses for focusing with the Penta Prism. For using the

                                            Fresnel Lens see page 16 in detail.
View original page 14Page 15 · Read text
An invaluable accessory for use with the Penta Prism is the flexible

                              eyepiece cup (Fig. 20): this is fitted to the eyepiece (46) of the

                            Prism and shields it from distracting stray light. It is also helpful for

                               spectacle-wearers since vision-correction lenses made by one's

                                 optician can be inserted into the mount, making it possible to focus

                              without wearing glasses.


Exchanging the Ground-Glass Screen and the use of the Fresnel Lens

The magnifying ground-glass screens for the EXAKTA VX viewfinder units are interchangeable. Before

removing the screen from the Finder Hood, the hood must be closed.


To remove the viewfinder unit from the camera, grasp the ground-glass screen by the longer sides and lift it out

of the viewfinder. When inserting the ground-glass screen, it should once again always be grasped by the long

sides (never touch the matted surface) and pushed home between the retaining springs in the viewfinder. When

inserting the screen into the Finder Hood, first close the hood. 4.butkus.org


                                                       Instead of the ground-glass magnifying
                                                        screen, the Fresnel Lens screen can also be
                                                 used in the Finder Hood, Penta Prism and
                                               Lens Magnifier. This screen contains a split-
                                              image rangefinder in the centre of the image
                                                                 field, which doubles the accuracy of
                                                       focusing; they are, therefore, particularly
                                                        useful for persons with defective vision and
                                                          for taking pictures under unfavorable
                                                          lighting conditions.

When the lens is focused correctly the two half-images in the circular rangefinder field must be aligned

accurately, without any displacement, either above and below or alongside each other (Fig. 21). Do not use a

smaller aperture than f 5.6 for focusing, or otherwise one half of the rangefinder field will appear dark.

The eye used for viewing must be positioned exactly in the centre of the viewfinder eyepiece when using the

Penta Prism, and directly over the centre of the magnifying lens when using the Finder Hood or Lens Magnifier

an oblique angle of view will result in incorrect focusing and unsharp pictures.


Instructions for use of the Fresnel screen with microprism field see p. 37.
View original page 15Page 16 · Read text
Loading the film


                            Use perforated miniature film 35 mm in width. 1.6 meters (5 ft
                             4 in) of film gives 36 exposures, 24 mm x 36 mm in size. To
                                  ensure trouble-free film transport it is essential to use only
                                        faultless film cassettes When using film from daylight loading
                                     spools, these should only be inserted in cassettes made by the
                             same manufacturers. Remove the camera back in the manner
                                   already described, and pull out the rewind crank (39) by means
                                   of its knob.        4.butkus.org


Place the cassette containing the unexposed film in the chamber (41), swing out the rewind crank (39) and push

it back into the camera body by depressing the knob; whilst doing so twist the knob gently in the direction of

the arrow so as to make the dog (40) engage with the bar in the cassette core. Then guide the film over the film

guide runners (35) towards the take-up spool (32); the emulsion side of the film must face the lens. It is

advisable to lay the camera down if possible whilst securing the end of the film; as shown in Fig. 22, the take-

up spool (32) can be removed for attaching the film: it can be detached easily from the friction dog (11) of the

rapid-wind lever (8). Push the beginning of the film under the clamping spring of the take-up spool (32) and

then wrap one half turn round the core of the spool., Replace the take-up spool (32) in the film chamber (33)

and turn it slightly in the wind-on direction so that the friction dog (11) of the rapid-wind lever couples with the

bar in side the spool core and allows the spool to be pushed right home into the chamber (33). If you leave the

take-up spool (32) in the camera whilst attaching the beginning of the film, then turn it so that the clamping

spring is facing upwards.


                                    Now swing the rapid-wind lever (8) right
                                               up to its stop (if necessary first releasing
                                                          the shutter) so that the film is pulled as
                                                               tightly as possible from the feed cassette,
                                                     over the film guide runners (35), thence
                                                     over the film wind sprocket (34) and on to
                                                          the take-up spool (32). The teeth of the
                                                     film-wind sprocket (34) must engage with
                                                          the perforation holes on both sides of the
                                                        film (Fig. 23).
View original page 16Page 17 · Read text
Close the camera back, and now expose two blank frames to wind on the fogged leader length at the beginning

of the film: swing the rapid-wind lever (8) as far as it will go (if necessary first releasing the shutter), allow it to

spring back, then press the shutter (to take the first blank frame); follow this by swinging the rapid-wind lever

(8) up to its stop once again, allow it to return and then press the release once again to take the second blank

frame. Finally swing the rapid-wind lever (8) as far as it will go for a third time and let it spring back: an

unexposed frame will then be positioned in the film gate (36). In conclusion, set the frame counter (6) by

turning the setting knob (7) in the direction of the arrow with your index finger until the stroke-mark

immediately before "Fig. 1 " is in line with the index mark. (The counter operates after each exposure.) The

camera is now ready for action.


In place of the take-up spool (32) an empty standard-type film cassette may be placed in the take-up chamber.

Take care to check the condition of this take-up cassette thoroughly: the core should move easily within the

shell of the cassette and must not jam (if necessary the friction points of the cassette core may be lubricated by

rubbing them with paraffin wax).


When using a take-up cassette proceed as follows: attach the leader tongue of the film to the core of the cassette

spool, and insert the cassette so that the friction dog (11) of the rapid wind lever (8) engages with the bar in the

core of the spool. Then check that the film is pulled taught between the two cassettes and is wound up with its

emulsion side inwards (Fig. 24).


                                     It is not necessary to trim the beginning of the film specially. Any shape
                           of leader can be used with the take-up spool of the EXAKTA VX, either
                           the narrow tongue provided on standard commercial cassettes, or, even
                               better, a straight cut-across end as obtained when cuffing lengths of film
                       from bulk rolls.


When employing a take-up cassette the film must be trimmed to suit the core of the cassette spool; for various

trimming patterns see Fig. 25.


In order to check that the film is being advanced correctly, observe the indicator disc (20): the disc with its red

mark will rotate when the spool of the feed cassette is turning. Immediately after loading the film, set the film-

type reminder disc (19) so that you do not forget what type of film is in the camera (Fig. 26). Turn the reminder

disc in the direction of the arrow until the appropriate reference is opposite the black triangular mark on the

shutter speed setting knob (18).
View original page 17Page 18 · Read text
Use the figures from 12 to 30 for black-and-white films rated in DIN values, the figures from 25 to 400 for

black-and white ASA ratings, the black letters for daylight type color films (C = reversal film, NC for negative

films) and the red letters for artificial light color films (as before, C = reversal, NC = negative). The example

shown in Fig. 26 illustrates the correct setting for a negative color film intended for use by artificial light.  4.butkus.org


Changing the film


                                         After taking the 36th exposure it may be possible to take
                                    one or two more pictures before the film cannot be
                                     advanced any further. Whilst advancing the last frame it
                              may happen that the rapid-wind lever (8) will stop part
                               way through its travel; in this event press the rewind
                                         declutching button (9) and the rapid-wind lever (8) con
                                        then be swung right up to its end-stop. The rapid-wind
                                           lever will then spring back to its rest position. When the
                                        take-up spool (32) is being employed, the film must now
                                     be rewound: hold the camera with the left hand and
                                        maintain a constant pressure on the rewind declutching
                                        button (9).


                            Swing out the rewind crank (39) and with the right hand turn it in

                                   the direction of the arrow at an uniform and not excessively-fast

                               speed (Fig. 27). If the film is rewound too quickly, there will be

                                a danger of electrostatic charging which may cause the

                                appearance of dark jagged or branching lines on the negatives. It

                                           is possible to see whether the film is being wound back correctly

                            by observing whether the indicator disc (20) and the screwdriver-

                                     slotted spindle of the rapid-wind lever (8) are rotating.
View original page 18Page 19 · Read text
When the film is rewound this spindle will stop turning As soon
                                   as the rewind declutching button (9) is released it will spring
                               back info its original position of its own accord. The camera is
                                  then set for advancing the next film.

                      Now open the camera back, pull out the rewind crank (39) by
                            means of its knob (Fig. 28), and remove the cassette containing
                                   the rewound film from the camera. Depress the knob on the
                               rewind crank (39) once again to push it back. When using an
                             empty cassette in place of the take-up spool, it is not necessary
                                     to rewind the film. As soon as the end of the film is reached
                             (when the rapid-wind lever (8) cannot be operated), cut off the
                                   film on the feed side of the film gate (36) with the built-in film-
                                    cutting knife (37). This is done by unscrewing the knob (38) and
                               withdrawing it by about 1 3/4 inches from the camera body (see
                                     Fig. 29); then push knob (38) home once again and screw it up
                                        tightly.

By operating the rapid-wind lever and releasing the shutter twice in succession, the end of the film con be

wound right inside the take-up cassette. The film cutting knife (37) should also be employed in the manner

described whenever it is desired to remove a take-up spool containing a partially exposed film from the

camera.4.butkus.org


Taking flash pictures

The EXAKTA VXllb has three synchro contacts for connecting flashlight units: an X contact (12) for taking

open-flash pictures with electronic flash tubes and flashbulbs, and the FP (22) and F (31 ) contacts for using

expendable flashbulbs in conjunction with the faster shutter speeds. The FP and F contacts take info account the

definite pre-ignition delay encountered with the various types of flashbulbs. Further details of the shutter-speed

settings required will be found in the following table. The synchro-cable of standard flashguns or electronic

flash units should be inserted into the appropriate socket on the camera as indicated in the table. It is advisable

to tension the shutter before plugging in the flash unit. Fig. 30 shows the EXAKTA VX with an electronic flash

unit. If a flashbulb should fail to fire, i.e. through poor contact in the bulb holder, then the bulb should be

removed after the shutter has run off. Never insert a new bulb until the shutter has been retensioned.


When using electronic flash units, the synchro-cable should be connected to the X contact (12) and the shutter

set to ,/60 sec. or a slower speed. When using electronic flash units without storage condensers, designed for

mains operation only, the shutter must be set to 1/60 sec.
View original page 19Page 20 · Read text
Tables for connecting flash units to the three

flash synchro-contacts of the EXAKTA VX llb

Care of the camera and lenses


                           Always keep the camera in its ever-ready case with the lens (or
                                  lens cap) and viewfinder unit in position; alternatively it may be
                                kept wrapped in a fluff-free cloth. All parts which are easily
                                  accessible from the outside should be kept clean and dusted with a
                                     soft brush. This applies particularly to the film guide runners (35),
                                  the film-wind sprocket (34), the film chambers (33 and 41) and
                                  also the camera back (42) including the pressure plate (43). The
                                    reflex mirror should only be dusted when absolutely necessary,
                                using a clean soft brush without applying any pressure; do not
                               allow the brush to touch the lightly-greased metal surround of the
                                  mirror. Protect the camera against moisture, dust, wind-borne
                                 sand, etc. Never touch the glass surfaces of the lenses, the
                                focusing magnifier or the eyepiece of the Penta Prism or the
                                mirror with the fingers. These glass surfaces should be cleaned
                         when necessary only with an extremely soft piece of wash-leather
                                 or a soft, fluff-free linen cloth. It is highly inadvisable to attempt
                                   to interfere with the mechanism of the camera; repairs should be
                               undertaken only by authorized servicing agencies. 4.butkus.or g


Accessories

Accessories increase the versatility of the EXAKTA VX and are absolutely indispensable for many typos of

work.


                           Leather Ever-Ready Case (Fig. 31)

                              This ensures complete protection for the camera whilst it is stored
                         away or being carried, without affecting its readiness for immediate
                                  use. The tripod screw enables the camera to be mounted on a tripod
                                 whilst in its case.

                          Lens Hood (Fig. 31 )

                               Indispensable for protecting the lens against side light and also
                                often against light shining straight info the lens, particularly when
                                taking color pictures. It also serves to keep raindrops and
                              snowflakes off the surface of the lenses.
View original page 20Page 21 · Read text
The Ihagee Lens Hoods are of the latest rectangular design, providing a highly efficient shielding effect and are

available with M 35.5x0.5 mm thread (37 mm push-on mount diameter), M 40.5 x 0.5 mm thread, (42 mm

push-on diameter) and M 49 x 0.75 mm thread (51 mm push-on diameter).


Giant Release Button

This increases the contact area of the camera release button, so that it con be operated easily even with fingers

stiffened by cold or when wearing gloves. It is invaluable for use in winter. (When using lenses fitted with a

large release knob or release rocker of their own, these practical devices make it unnecessary to use the Giant

Release Button.)


Accessory Shoe (Fig. 30)

The Accessory Shoe is fitted over the Penta Prism eyepiece of the EXAKTA VX and makes it possible to fit

accessories, such as a flash unit, exposure meter, etc., on to the camera.


Polarizing Filter

A special filter for eliminating reflections from non-metallic surfaces such as glass, water, varnish, etc. The

filter is supplied in a screw-in mount for the EXAKTA VX lenses. The polarizing filter will only be effective

when the photograph is taken at an acute angle to the reflecting surface (with glass, at approximately 35°). The

filter must be rotated in front of the lens until a position is found in which the reflection is eliminated; its effect

con be observed in the reflex image. (The exposure must be increased by 2--3 times.)


Special-purpose Lenses

Fully-comprehensive photography is scarcely possible without special typos of lenses, but only the single-lens

reflex camera makes it possible to exploit fully all their potentialities in such a simple manner. The reflex

viewfinder image of the EXAKTA VX always shows the exact area covered by the lens as well as the image

definition and depth of field.


Wide-angle lenses (with a short focal length) embrace a wide angle of view' allowing you to get plenty info

your picture although every thing appears relatively small (Fig. 32). They are invaluable for indoor pictures,

architectural work, broad landscape scenes, copying pictures in art galleries, etc.
View original page 21
Page 22 · Read text
EXAMPLES OF LENS LENGTHS


Long-focus lenses include both those of normal construction and also true telephoto lenses; they have a long

focal length and make distant objects appear nearer, they, therefore, record a relatively narrow section of the

subject on a larger scale (Fig. 32). They also tend to reduce the effects of perspective. These lenses are

frequently used for taking portraits, in child photography, for photographing sporting events, wild animals and

also for landscape work and many other typos of photography. Fig. 33 shows the EXAKTA VX fined with the

popular S f 4/135 mm lens with fully-automatic pressure diaphragm from Jena.


                                                 If an ultra-high-speed lens is required, the Bf 1.5/75 mm
                                        lens from Jena is also obtainable. The standard lens is
                                removed in the manner already described and the special-
                                    purpose lens fined in its place. For certain lenses of very
                                    long focal length the outer bayonet of the EXAKTA VX is
                                   employed. The distance-setting scales of these special lenses
                                        are also graduated to indicate the distance from the camera
                                  back to the subject.


Bayonet Adapter Rings and Extension Tubes


                               The single-lens reflex camera comes info its own when
                                      taking close-up pictures, since in this field, too, the reflex
                                 image always shows the exam area covered by the lens.

                               The Bayonet Adapter Rings and Extension Tubes may be
                                             fitted in any desired combination between the camera and
                                       the lens (Fig. 34) and enable the lens to be focused down to
                                       the very shortest distances.
View original page 22From the M. Butkus archive. Original publisher and archive notices are retained.
Check the model and edition against your equipment.
PDF verified 2026-10-10.