Sewing machines
Finkle & Lyon — User manual
User manual for Finkle & Lyon. 15 pages in English. Read the original PDF, download or print a copy without registration.
15 pagesEnglish4.4 MB PDF
Loading your manual…Open PDF directly
Document details
- Brand
- Finkle & Lyon
- Model / document
- Finkle & Lyon
- Document type
- User manual
- Language
- English
- Pages
- 15
- File size
- 4.4 MB
- Category
- Sewing machines
- Document date
- Not specified in catalog
Search available document text
Find a term, then jump to its page in the original PDF. Image-only pages may not be searchable; check the PDF for exact wording and diagrams.
Page 4 · Read text
DIRECTIONS.


             Starting the Machine.

  OBSERVE closer the threading of the machine
 when received. See how the upper thread is
 passed through the holes in the tension-bar and
 the various eyelets; also, how the under thread is
passed from the bobbin in the shuttle. Having
 placed the machine in the table, with the driving-
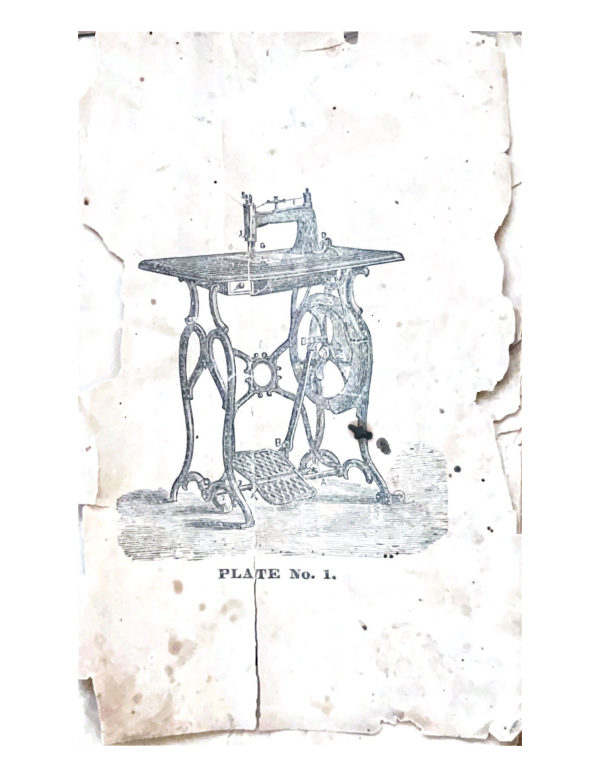
 belt on both pulleys (1, Plate No. 1), work the
machine until the treadle motion becomes easy
 and uniform. Place the centre of the foot (one
 or both) directly over the treadle-rod (2-2, Plate
No. 1), so that both heel and toe may be used in
turning the machine. Start the machine by tak-
ing bold of the balance-wheel (3, Plate No. 1)
 with the right hand, always turning from you, con-
View original page 4Page 5 · Read text
10
                                                 11
tinting the motion thus given to the feet by a
                                               Uhread strainbe fronel, both eyelets in the lon
pressure of the lee and toe alternately. Do not
 Attempt to sew until a regular motion is aequired.             sion-bar, the thread iving straight and parallel
If it is difieult to get a regular motion at first,                                                      with the tension-bar, and back of the tension-bar
 throw the belt off and operate the balance-wheel         and its set-screw, and thence through the eyelet
 only, until a perfectly even motion becomes easy                                                onthefronteyeletofnearthe theface-platebottom of(9),theandface-platedown through(10) ;
 and natural. Then replace the belt and operate
 as before. Be careful that the presser-foot (4           thence(11), underthroughthe springthe holeoninlowerthe thread-controllerend of the face-
Plate No. 2) is raised up when running the ma-                                                                plate (12), and under the spring on lower end of
 chine and not sewing.                                   needle-bar (13), then through the eye of the
           Setting the Needle.                         needle, from left to right. Then turn the tension-                                                      bar from you once and a half or twice around,
   Loosen the serew at the lower end of the needle.           and fasten it by turning the set-screw on the top.
bar (5, Plate No. 2) by turning it towards you             If wheel tension is used, pass the thread under
with the screw-driver. Hold the needle with the            the spring between the two pins; then over and
                                                 around the wheel; them continue to thread as thumb and finger (with the long groove to the
left), and push the shank of the needle up into           above directed.
 the needle-bar as far as it will go, and then turn
 the screw from you until the needle is firmly held;
pass the thread through the eye of the needle from
left to right. To sew very coarse cotton or linen
 thread, the needle may be set a little lower, - say
 one sixteenth of an inch.                                                            Threading the Shattle.

         Threading the Machine.                                                      Take the Shuttle between the thumb and finger
  Place the spool on the spool-pin (6, Plate No.             of the left hand, with the frame swung back to the
 a standing on the top of the arm, to the right;
View original page 5Page 6 · Read text
12


 right; place the bobbin in frame (see Fig. No. 1),


                                                                            Fig. No. 2.
                                                          then back through the same slot in end of frame
                                                     (D, Fig. 2), then thread out through the slot in
                                                                  shuttle (E, Fig. 2), and pull the frame down into
                                                          position by the thread, as shown in Fig. No. 3,


                                                                          Fig. No. 3.
                    Flg. No. 1.                                                                pulling the thread through about two inches.
                                                   The tension of the shuttle is regulated by turn-
                                                          ing with the shuttle screw-driver (see Fig. No. 4)
 then pass the thread over the curved side and up
 through the thread-slot in side of frame (see A.
 Fig. 1), then through the thread-slot on the end of
 frame (see B. Fig. 1), then under and arou
 once between the disk and end of frame (see
Fig. 2),
View original page 6Page 7 · Read text
15
youthe nutas indicatedon the endby ofthethearrows,frame.thus,Turning-    from
                                               bobbin in even, regular layers, like the ordinary
                                                  spool if possible, ° as careless, uneven, winding
                                                    renders good sewing impossible. Care should be
                                                        taken,they shouldnot onlynotto bewindwoundthe bobbingtoo full,smoothly,-just evenbut

                                                    with the brass ends of the bobbins.

increases the tension. To decrease it, turn in the                Operating the Machire.
 opposite direction.                               With the needle mised to its highest point,
  To remove the shuttle from or place it in the                place the work under the presser-foot (1, Plate
 carrier, draw out the slides (20-20, Plate No. 2),
                                             No. 2), then drop the presser-foot by raising the one or both.                                                      litter on the opposite side of the face-plate (17,
                                                      Plate No. 2). Never commence sewing until the
           Spooling the Bobbin.
                                            work is on the feed and the presser-foot dropped.
  Take the thread from the eye of the needle, or        Always start the machine by turning the balance-
 else remove the shuttle from the carrier, to avoid        wheel (3, Plate No. 1) from you.
tangling the threads, and raise the presser-foot
 (1, Plate No. 2). Place the spooler (14, Plate
                                                      Regulating the Tension.No. 2) in such a position, that, when the bobbin is
placed in the spooler, the rubber ring (15, Plate       When the tension is right, the two threads aro
No. 2) will be crowded on to the top of pulley or       locked together and drawn to the centre of the
balance wheel (16, Plate No. 2). Wind the bob-        fabric, as represented in Fig. 1,-
bin from the spool on top of the arm, or from
 another spool put in its place. of the same size or
number; work the foot-treadle the same as when                   Fig operating the machine, taking care to wind the
View original page 7Page 8 · Read text
16
                                         17
   ze the under thread is not sufliciently drawn up
 sides,to theleavingwork toit asmakerepresentedthe stitchin Fig.alike2, on bot                                                                    stich,downit thewillupperbe foundstitch.necessarygo Toto makehave thea tensionsperfect

                                                           of both threads as nearly alike as possible.


                 Fig. 2.

 tighten the upper thread by turning the tensions         Lengthening and Shortening the Stitch.
har (7-7, Plate No. 2) from you; and if the upper                                               To lengthen the stitch, pass the hand under the
 thread is not drawn down enough, as represented
                                                            table and turn to the left the nut, or Stitch-Regu-
 in Fig. 3,                                                        lator, on the vertical screw in front and below the
                                                machine (18, Plate No. 3). To shorten the stitch,
                                                         turn the Stitch-Regulator to the right.
                   Fig. 3.

 then turn the tension-bar toward you, until the
upper and under threads are drawn into the work
 alike on both sides; but should the tension be so                    Missing Stitches.
great as to break the upper thread, then the shut-
                                                                       If the machine is properly adjusted there will tle-tension must be lessened and the upper tension
                                              be no trouble; but should there, at any time, bemade to correspond. To tighten the under ten-
                                                     skipped or long stitches at intervals, the occasion sion, turn the nut on the end of shuttle-frame
                                      may be that the eve of the needle may be toofrom you: to loosen, turn the nut towards you,
                                                      small for the thread, or the point of the shuttle oras explained under head of « Threading the Shut-
                                                    needle may be dull: if so, they can be polishedde," on page 11. The upper thread draws up
                                              by a hone or needle-stone used in sharpening bat-
the lower stitch, while the under thread draws
View original page 8Page 9 · Read text
18
                                             19
 tered points of needles. The needle may be
tle,crookedso thatsotheas toshuttlestanddoesbacknottoo catchfar fromthe theloop:shutif
                                                     Family sewine seldom calls for cotton coarse
                                                          used.than No.Silk30;is Nos.used50,with60,the70, same80, andfacility30 areasmost!col
 so, epring the needle gently towards the shuttle.
                                                                               ton. The size of thread to be used must corre
            Breaking Threads.                     spond with size of needle.

   When the machine breaks the upper thread, the
                                                         For No. 00 needle, use Nos. 100 to 150 cotton
 needle is too fine for the thread, or the tension is             For No. O needle, use Nos. 80 and 20 cotton.
too tight, or you may be using a large needle and            For No. 1 needle, use Nos. 60 and 70 cotton.
 thread with the fine throat-plate, the hole being            For No. 2 needle, use Nos. 40 and 30 cotton.
  so stall that the needle cannot pass through with.             For No. 3 needle, use Nos. 30 and 36 cotton.
 out cutting or chafing the thread against the sides.
                                                       For No. 4 needle, use Nos. 30 and 21 cotton.  Should the shuttle thread break, make less tension
                                             When very coarse or linen thread is to be used,
 on the shuttle.                                                                      set the needle one-sisteenth of an inch lower than
                                                               for ordinary sewing.
         Removing the Work.
    Raise the needle to the highest point; take hold                     Tightening the Band.
 of the thread just forward of the tension-bar, and                  If the band becomes loose, so as to turn without
 draw from the spool about three inches of slack           driving the machine, it may be tightened by eut-
 thread, then raise the presser-foot and with the            ting off a piece where it is joined together, and
   left hand draw the goods from the back side out           fastening the ends again. The band should be
 wards about three inches, then cut both threads.            thrown off when the machine is not in use.

         Size of Needle and Thread.                                       Presser-foot.
   Machine-sewing does not require so coarse a          The Presser-foot, or part that presses on the
                                                              cloth when sewing (4, Plate No. 2), is regulated thread as hand-sewing, every stitch being double,
View original page 9Page 10 · Read text
20
                                                 21

by the screw on top of the presser-bar (19, Plate               wheel, C; the hole just behind the bobbin-winder, No. 2), by turning down for heavy goods and up                                               D, and between the spool-post and tension-bar
 for very light goods. The Presser-foot is raised
  br the little lever at the back of the face plate (17.        E; also the hole where the gauge-screw fastens
 Plate No. 2). To raise the foot, press the lever        on, F; the needle-bar, G; the slot in controller,                                                              El; the lifter of the presser-foot, back of the face- down; to lower it, raise the lever up.
                                                               plate, I; the shuttle-mce and face of shuttle (to
                                                       get at that, remove slide J. Then throw off' the
                                                             driving-belt, and turn the machine back on the
                  Plate Gauge.                                                                table, as represented in Plate No. 3. Oil the slot
                                                           in the cam K, the cam-roller L, the bearings of  The Plate Gauge (21, Plate No. 2) is attached
                                                           the eccentric M, connecting shafts of shuttle-car-
 by the screw (22) passing through the long slot.                                                                      rier and feed N N, the bearings of the feed where
 Place the gauge the same distance from the nee-
                                                              there is friction, especially the flat spring where it de that it is desired that the line of stitching
                                                     bears against the bed-plate O, the piece that should be from the edge of the fabric, and turn
                                           moves the feed back and forth, P. The shuttle-
 down the screw so as to secure it firmly in place.                                                      driver race T T.
Keep the fabrie close up to the face of the gauge
 while sewing.
                                                                                     It is very necessary that all the wearing parts be
                                                          frequently oiled. The shuttle-race (remove slide
                                                                            J, Plate No. 1), the slide-slot in controller I (Plate
     Cleaning and Olling the Machine.                                                     No. 1), the needle-bar G (Plate No. 1), and press-
  When in constant use, all working parts of the           er-bar, S, should be oiled very often when the ma-
machine should be well cleaned with cotton waste,        chine is in constant use. Do not apply too muck
 and then oiled with the best Sperm Oil wherever          oil: a surplus is almost as objectionable as a
                                                                 deficiency.there is fiction, which is in the following places:
See Plate No. 1,- 'The bearings of the treadle,
 A A; the pitman, B B; the two holes in fly-
View original page 10Page 11 · Read text
gin to run out of the hemmer, carry itto the RIGHT;
                                                       shouldto the tooLEFT.much run into the hemner, carry the edge


        lemming (Narrow Hem).
  Take the Presser-foot off, and fasten the hemmer
to the presser-bar, in place of the foot, in the
same manner that the foot was fastened. Be sure
 that the hole (A) in the hemmer is directly over             lemming (Wide Ilem).
the hole in the needle-plate.                          Fold (by band) the width of hem required,
 Pass the edge of the cloth into the hemmer in       turning onE fold only, adding about one-eighth of
 the manner shown in the illustration, drawing it       an inch, which will be turned under by the hem
through the hemmer as far as the needle-hole (any       mer. Introduce the edge of the cloth in the same
sharp-pointed instrument, a needle for instance,      way as for a narrow hem, and proceed in the same
can be used to do this, if necessary); raise the       way, holding the goods in the right hand (in the
                                            manner shown in the illustration). Should thepresser-bar while doing this. Then drop the
 presser-bar, and operate the machine as usual.       edge of the cloth begin to run out, carry it to the
 Hold the goods with the right hard, as shown in      LEFT; should loo much run into the hermer, carry
the illustration. Should the edge of the goods be-         the cdge to the RIGHT.
View original page 11Page 12 · Read text
26                                                  27

illustration), and stitch it upon the goods as in      through small tube or cord guide (1), drawing

ordinary sewing. Braid should be used the same
width of the slot in the braider.                   twoAttachor threethe Corderinches ofsothethatcordthethroughneedle thewillguide.pass

              Gathering.                    through the centre of small hole (C) in cord-                                                  presser or thick end of Corder. After the cloth
 Run the machine slowly with a loose upper                                                 has been prepared, either by creasing or stitching
tension, leaving under tension same as in ordinary                                                  thea seam,otherplaceunderthetheclothcord-zuide,one thicknessand theoverwholeand
sewing; make the stitch very long, and sew about                     )
one-fourtb of an inch from the edge, then draw      under cord-presser. Press the cloth to the left as
  the under thread.                                        far as it will go, then let down the presser-foot,
                                                and stitch as usual, keeping the goods well to the
                                                           right while sewing.


                                             "Goodrich" Tucker. Price $3.00.
          Corder. Price $2.00.                       Attached to the Tucker-wire is a small book
  'Threail the corl through the eyelet at the end      with an evelet; slip this over the needle and up
                                                      to the bottom end of needle-bar (as shown atof the Corder (shown at A in illustration), thence
View original page 12Page 13 · Read text
A in illustration). Put the gauge-screw through
   the slots of gauge and Tucker (B), and turn near-
   Ir down; and, after having adjusted all to the
   desired width of tuck, turn the screw down
   firmly.
    The rule to take any width of tuck when you
   wish to have the edge of tuck just meet the line
   of stitching, is to place the gauge of the Tucker to

   right of the needle just the width of the tuck

   desired, and then move the creasing-blade of the

   Tucker twice the width of tuck to left of the

   needle. If n space between the tucks is desired,
  move the creasing-blade just as much farther to
   the left as you would have space between.
     After having made the first luck, and folded the

  nextplacedoneit underby thethecreasegauge,justput made,the edgeandof thehavingsaid
   first tuck under the small horisontal spur. This
  prevents it from running upon the creasing-blade,
  thus insuring a better crease in the cloth, because
      only two thicknesses are passing over the creasing.
  blade, instead of four, as in the case when the,
   edge of the tuck just made is not put under. This
3 arrangement of the cloth in the Tucker assists very
  much in guiding the cloth straight, and keeping it
   • to the gange. Never run the machine with the
  presser-foot up when the Tueker is attached.
View original page 13Page 14 · Read text
OU

              place by the ordinary gaug
 The pies of cloth which is to form the .
 should pass through the baster, over A, and under
 and C, and also under both parts of the Rufler.
The piece of cloth which is to form the binding
   should pass over B and under C, and between the
  plates of the Rufler. Turn the screw to the right
 until the plates of the Rufller are so far apart that
     cloth is gashered vory little, if any. Then, by
    rning the screw to the left, regulate the gather-
 ing as desired.


      "Chaplen's". Binder. Price $3.00:
            of up:
View original page 14Page 15 · Read text
Crandell's Rufller. Price $1.50.
   The Ruftler should be so placed on the plate of
 the machine that the needle may pass through
 the centre of the hole (). The baster is, placed
over the Ruffler, as a guide for the slath, and both
View original page 15
Related documents and language editions
From the ISMACS International. Original publisher and archive notices are retained.
Check the model and edition against your equipment.
PDF verified 2026-10-11.