Film cameras
Ricoh Color Back 225 User manual
User manual for Ricoh Color Back 225. 14 pages in English. Read the original PDF, download or print a copy without registration.
14 pagesEnglish1.4 MB PDF
Loading your manual…Open PDF directly
Document details
- Brand
- Ricoh
- Model / document
- Ricoh Color Back 225
- Document type
- User manual
- Language
- English
- Pages
- 14
- File size
- 1.4 MB
- Category
- Film cameras
- Document date
- Not specified in catalog
Search available document text
Find a term, then jump to its page in the original PDF. Image-only pages may not be searchable; check the PDF for exact wording and diagrams.
Page 2 · Read text
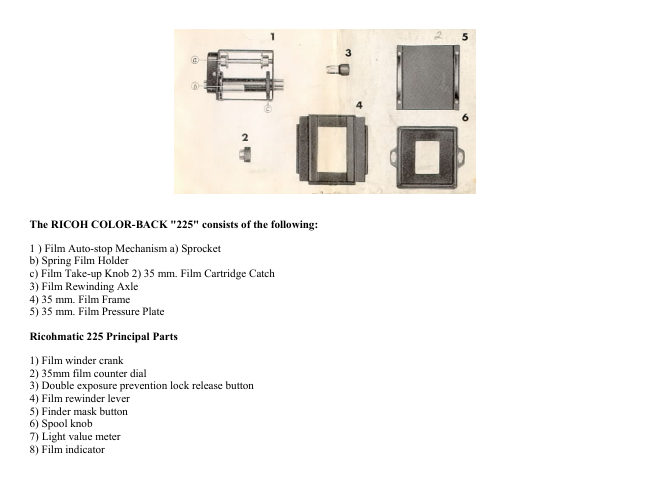
The RICOH COLOR-BACK "225" consists of the following:

1 ) Film Auto-stop Mechanism a) Sprocket
b) Spring Film Holder
c) Film Take-up Knob 2) 35 mm. Film Cartridge Catch
3) Film Rewinding Axle
4) 35 mm. Film Frame
5) 35 mm. Film Pressure Plate

Ricohmatic 225 Principal Parts

1) Film winder crank
2) 35mm film counter dial
3) Double exposure prevention lock release button
4) Film rewinder lever
5) Finder mask button
6) Spool knob
7) Light value meter
8) Film indicator
View original page 2
Page 3 · Read text
www.butkus.us


9) Auto-stop knob
10) Auto-stop release lever
11) Film rail
12) Film pressure plate
13) Film rail
View original page 3
Page 4 · Read text
Mike Butkus                Digitally                                                                                                      DN:email=mike@butkus.org,Date:cn=Mike2023.05.17signedButkus,by14:44:55Mikeo=ButkusButkusc=US-04'00'camera manuals, ou=butkus.org,


ATTACHING THE COLOR-BACK "225"
Open the Back Cover and remove the 120 film spool from the camera.

1 ) Attach the 35 mm. Film Cartridge Catch onto the inner end of the Spool Knob (Fig.1).

2) Raise the Film Rewinding Lever. While turning the Lever in the direction of the arrow, screw in the Film Rewind Axle (Fig.2).
View original page 4
Page 5 · Read text
www.butkus.us


3) Inserting the and with the V-shaped spring first at the bottom of the camera, place the 35 mm. Film Frame on the Film Rail
(Fig.3).

4) Next attach the Film Auto-stop Mechanism as shown in Fig. 4.

Pull out the Auto-stop Knob and insert the left end first. Then engage the other end while turning the Film Winding Crank.
View original page 5
Page 6 · Read text
This completes the COLOR-BACK "225" attachment.


LOADING THE FILM


1) Insert the 35 mm. Film Cartridge while pulling on the Spool Knob as shown in Fig. 5.
View original page 6
Page 7 · Read text
www.butkus.us


Make sure the 35 mm. Film Cartridge Spool and the Film Rewinding Axle ore properly engaged by turning the Film Rewinding
Lever a few times.


2) Return the Spool Knob to its original position. Make a final check to make certain that both ends of the 35 mm. Film Cartridge
Spool ore properly in place.

3) Pull out a little film from the 35 mm. Film Cartridge. Insert the tip of this film under the Spring Film Holder (Fig. 67.
View original page 7
Page 8 · Read text
If the Spring is first brought into correct position by turning the Film Take-up Knob this process is made much easier.

4) Turn the Film Take-up Knob until the film perforations are properly engaged on bath sides Of the Sprocket (Fig. 7).

5) After making sure the film can be wound without slipping off the Spring, place the 35 mm. Film Pressure Plate over the film
(Fig.8). (With the four corner legs pointing downward).

Now the Back Cover is closed. Before latching the Film Pressure Plate it is a good practice to wipe it clean of fingerprints and dust
with a soft brush or gauze.

6) When using the COLOR-BACK "225" the circular 35 mm. Film Counter Dial on the Film Winding Crank is used.
View original page 8
Page 9 · Read text
www.butkus.us


Match up the "S" mark with the white dot (Fig.9).

7) When the Film Winding Crank is fully turned until it stops, one frame is wound and the shutter automatically wound.

8) The shutter will not work unless the film is wound. This is the same as when you use 120 film.

However, when you use the COLOR-BACK "225" there is one more additional operation.

9) Every time the film is wound and the Shutter Release Button is pressed the Auto-stop Knob must be depressed (Fig. 10).
If this Knob is not pushed it is impossible to wind the next frame.

10) Repeat this operation until the number "1" on the 35 mm. Film Counter Dial is matched with the white dot.
Now, the camera is all set for photography.
View original page 9
Page 10 · Read text
Note:

· After the camera has been loaded make sure the Film Indicator matches your film ASA number. If you neglect to do this, the Light
Value Meter will fail to show the proper exposure.

· While photographing, adjust the Auto-stop Release Lever with the red line. If this is not done, the Sprocket will become free and
there is danger of the film becoming loose.

· At this point, if the Knob is left depressed, the Auto-stop is in disengaged position so be extra careful.

· When winding film, always turn the Crank until U comes to a stop.

· Double (Multiple) exposures are taken in the some manner as when 120 film is used. Pull the Double Exposure Stop Release
Button and turn the Crank in the opposite direction.
View original page 10
Page 11 · Read text
www.butkus.us

FOCUSING GLASS

The enjoyment of o twin-lens reflex is that the image of the subject to be photographed can be seen in natural color in the Focusing
Glass.

Looking into the Focusing Glass two vertical and two horizontal lines can be seen. The rectangle formed by these lines in the center
of the Focusing Gloss is the 35 mm. area photographed with the COLOR-BACK "225" attachment.

The size of the print is 36X 24 mm. (1 1/2 X 1)


WHEN YOU HAVE FINISHED TAKING PICTURES


1 ) Turn the Auto-stop Release Lever to the right and match up with the black line (Fig.l l ).

2) While pressing the Auto-stop Knob, turn it to the left and match the Lever with the rod line (Fig. 12).
View original page 11
Page 12 · Read text
3) In this way, the Knob in depressed position will come to o stop releasing the Auto-stop Mechanism.

4) Raise the Film Rewinding Lever and turn it in the direction of the arrow and rewind all the film back into the film cartridge
(Fig.13).

5) When the film has been completely rewound, the Lever will suddenly became light. Now, the Back Cover can be opened in
safety.
View original page 12
Page 13 · Read text
www.butkus.us


After taking out the exposed cartridge, always match up the Auto-stop Release Lever with the black line and return the Knob to its
former position.

If you neglect this step, the Auto-stop Mechanism will become free and cause unexpected failures when taking photographs again.
View original page 13
Page 14 · Read text
There are many camera positions such as the Chest-level and Eye-level positions.

Only a twin-lens reflex can take photographs at higher than Eye-level and Ground-level positions.

When taking photographs at Eye-level position Match the 35 mm. Finder Mask to the Finder Cover (Fig. l4).


Note:

When using the COLOR-BACK "225", because of its mechanical structure, it is only possible to take 18 exposures from a 20
exposure cartridge and 34 exposures from a 36-exposure cartridge.
View original page 14
From the M. Butkus archive. Original publisher and archive notices are retained.
Check the model and edition against your equipment.
PDF verified 2026-10-10.