Film cameras
Graflex Roll Film Holder User manual
User manual for Graflex Roll Film Holder. 5 pages in English. Read the original PDF, download or print a copy without registration.
5 pagesEnglish2.7 MB PDF
Loading your manual…Open PDF directly
Document details
- Brand
- Graflex
- Model / document
- Graflex Roll Film Holder
- Document type
- User manual
- Language
- English
- Pages
- 5
- File size
- 2.7 MB
- Category
- Film cameras
- Document date
- Not specified in catalog
Search available document text
Find a term, then jump to its page in the original PDF. Image-only pages may not be searchable; check the PDF for exact wording and diagrams.
Page 1 · Read text
GRAFLEX ROLL FILM HOLDERwww.butkus.usINSTRUCTIONS

                                                                                                                                                                                    i
                      The roll film holders,    can be attached to Graflex or Graflok backs. To fit to the
                             Graflok back, a Graphic Roll Holder is required. To remove the Graflok focusing
                                panel, press in on the two arms to unhook them and slide the panel to the right and
                                   off. Fit the roll hclder to the back of the camera and hold in place by means of the
                         upper and lower slide locks. The Graphic Roll Holder can also be used with
                           Graphic backs equripped with the Spring Kit. Attach the roll holder according to
                          the instructions accompanying this kit. The Graflex roll holder can be fitted di-
                                  rectly to the Graflex back and held in place by means of the slide locks.
                       The roll film holders can be left on the camera or removed for loading.

                TO LOAD THE HOLDER
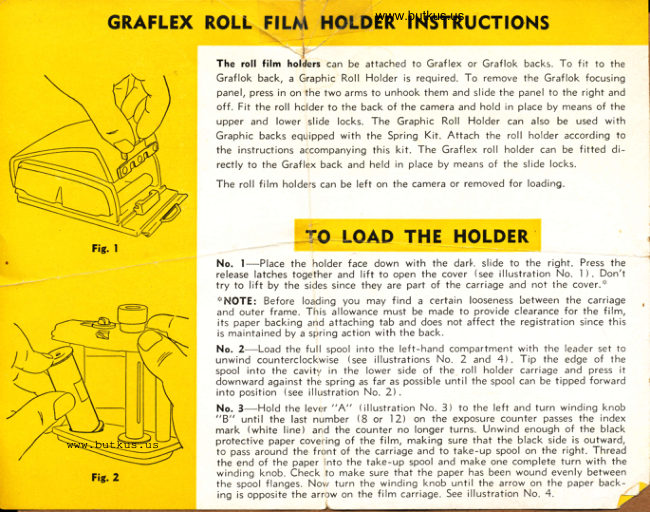
                      No. l-Place the holder face down with the darl.. slide to the right. Press the
                              release latches together and lift to open the cover (see illustration No. l).  Don't
                                try to lift by the sides since they are part of the carriage and not lhe cover.':'
                             ':'NOTE: Before loading you may  f ind a certain looseness between the carriage   .
                        and outer frame. This allowance must be made to provide clearance for the film,
                                      its paper backing arrd attaching tab and does not affect the registration since this
                                        is maintained by a s;,rring action with the back.
                     No.2-Load the full spool into the left-hand compartment with the leader set to
                        unwind counterclockwise (see illustrations No. 2 and 4). Tip the edge of the
                            spool into the cavit' in the lower side of the roll holder carriage and press it
                         downward against ther spring as far as possible until the spool can be tipped forward
                                into position (see illustration No. 2)   .
                      No.3-Hold the lever "A"  (illustration No. 3) to the left and turn winding knob
                        "B" until the last number (8 or l2) on the exposure counter passes the index
                      mark (white line) ar,d the counter no longer turns. Unwind enough of the black
                               protective paper covering of the film, making sure that the black side is outward,www.butkus.us                             to pass around the front of the carriage and to take-up spool on the right. Thread
                             the end of the paper into the take-up spool and make one complete turn with the
                            winding knob. Check to make sure that the paper has been wound evenly between
                           the spool flanges. Nor.r turn the winding lcnob until the arrow on the paper back-    -/                             ing is opposite the arr'rw on the film carriage. See illustration No.4.
                                                                                                                                                /
View original page 1Page 2 · Read text
No.4-Turn the exposure counter to "S" by turning the domed indicator in the
    direction of the arrow until it snaps into place and cJnnor be tu.ned further. lf  it            coNTROtS
     is necessary,to anchor the pap.er backing of the film more securely cnto the take-
   up spool before the cover is closed, the winding knob may then .ti turned but not                                        Winding Knob "B'
   more than one full turn before the cover is closed to prevent togging the film.
    No' S-Return film compartment to the holder and close cover. The film winding
    knob can then be turned in the direction of the arrow until it stops automatically  ai
    the figure l, indicating that the film is in position for the makiig of the first ex-   www.butkus.us    posure. In this position, however, the end of the film strio is beniaround the idler
       in. the direction opposite to its normal curl, introducing considerable strain on the
    adhesive strip holding the film to the paper backing. UnZer certain humid and other
    unfavorable conditions, the film strip can loosen. To avoid this possibility, do not
    wind the film through to the No. I position, until the first exposure can-be made
   and the film then wound beyond to the No.2 position.
   No. 5-To make the next picture, move the Lever "A" to the left in the directron
    of its arrow and release. Turn the film winding knob until the lrck re-engages in-
    dicating that the film is in position for picture No.2. Continue the seque-nc-e until
     all the exposures have been made. After the last exposure, movq lever "A" to the
     left and release. The knob wrll then turn freely permitting ihe rcll to be completely
   wound through. After removing the full spool frcm il-re right lde of the carriage
   and wrapping to prr.riect rt before processing, it is a good idea to switch the empty
    spool immediately to take-up chamber making the carriage rea(ry for reloading.
     SPECIAL INSTRUCTIONS FOR ''6 EXPOSUKE" ROLLS.                                                                                                                              Typcrnnnof ASA Filrn
   When using film marked "6 Exp." wind the  f ilm off after making six 2 t/q x 31/q          Storling orrowrr-
   or nine 21/c x Zt/q exposures. Holding the release lever "A" to the left will keep
   the automatic spacing lock disengaged until the counter dial turns past the last
    number.                                                                                Fis.4


      Ncw York Branch, Servlce                                                                             Wortorn Dlvldon
      50 Rockefellet Plaza, Suite 922                                                                     E00 N. Gole Avr.          Nev York 20, N. Y.        GRAFLEX, INC.                       Hollyvood 38, Gellf.
         Grafler of Canada Limited                ROCHESTER 8, N. Y., U. S. A.                             Mldwcrl Dlvirlon
.               | 37 Wcllington Slreet, Wert                                                                             32O lYert Ohio 5t.
\             Toronto, Ontario                                                                                                ?n L'.o                               2llDtl255                         Chlcogo lO,  lll.
View original page 2Page 5 · Read text
GRAFLEX ROLL FILIT HOLDER INSTRUCTIONS

                                                                                                                        l
                  The roll film hokfers can be attached to Graflex or Graflok backs. To fit to the
                        Graflok back, a Graphic Roll Holder is required. To remove the Graflok focusing
                          panel, press in on the two arms to unhook them and slide the panel to the right and
                             off. Fit the roll hclder to the back of the camera and hold in place by means of the
                     upper and lower slide locks. The Graphic Roll Holder can also be used with
                      Graphic backs equipped with the Spring Kit. Attach the roll holder according to
                     the instructions accompanying this kit. The Graflex roll holder can be fitted di-
                            rectly to the Graflex back and held in place by means of the slide locks.
                   The roll film holders can be left on the camera or removed for loading.

              TO LOAD THE HOLDERFig. I
                  No. l-Place the holder face down with the darl.. slide to the right. Press the
                         release latches together and lift to open the cover (see illustration No. I ). Don't
                           try to lift by the sides since they are part of the carriage and not the cover.':'
                        ':'NOTE: Before loading you may find a certain looseness between the carriage   .
                    and outer frame. Tlris allowance must be made to provide clearance for the film,
                                its paper backing and attaching tab and does not affect the registration since this
                                 is maintained by a sg,rring action with the back.
                 No.2-Load the full spool into the left-hand compartment with the leader set to
                    unwind counterclockwise (see illustrations No. 2 and 4) . Tip the edge of the
                       spool into the cavit" in the lower side of the roll holder carriage and press it
                     downward against ther spring as far as possible until the spool can be tipped forward
                          into position (see illustration No. 2)  .
                  No.3-Hold the lever "A"  (illustration No. 3) to the left and turn winding knob
                     "8"  until the last number (8 or l2) on the exposure counter passes the index
                  mark (white line) and the counter no longer turns. Unwind enough of the black
                         protective paper covering of the film, making sure that the black side is outward,
                        to pass around the front of the carriage and to take-up spool on the right. Thread
                        the end of the paper into the take-up spool and make one complete turn with the
                       winding knob. Check to make sure that the paper has been wound evenly between
                       the spool flanges. Nory turn the winding knob until the arrow on the paper back-    -/                         ing is opposite the arr,>w on the film carriage. See illustration No. 4.
                                                                                                                                         /
View original page 5Related documents and language editions
From the M. Butkus archive. Original publisher and archive notices are retained.
Check the model and edition against your equipment.
PDF verified 2026-10-10.