Photography reference
Graphic & Linhof guide Pt 2 Product booklet
Product booklet for Graphic & Linhof guide Pt 2. 50 pages in English. Read the original PDF, download or print a copy without registration.
50 pagesEnglish4.5 MB PDF
Loading your manual…Open PDF directly
Document details
- Brand
- Linhof
- Model / document
- Graphic & Linhof guide Pt 2
- Document type
- Product booklet
- Language
- English
- Pages
- 50
- File size
- 4.5 MB
- Category
- Photography reference
- Document date
- Not specified in catalog
Search available document text
Find a term, then jump to its page in the original PDF. Image-only pages may not be searchable; check the PDF for exact wording and diagrams.
Page 2 · Read text
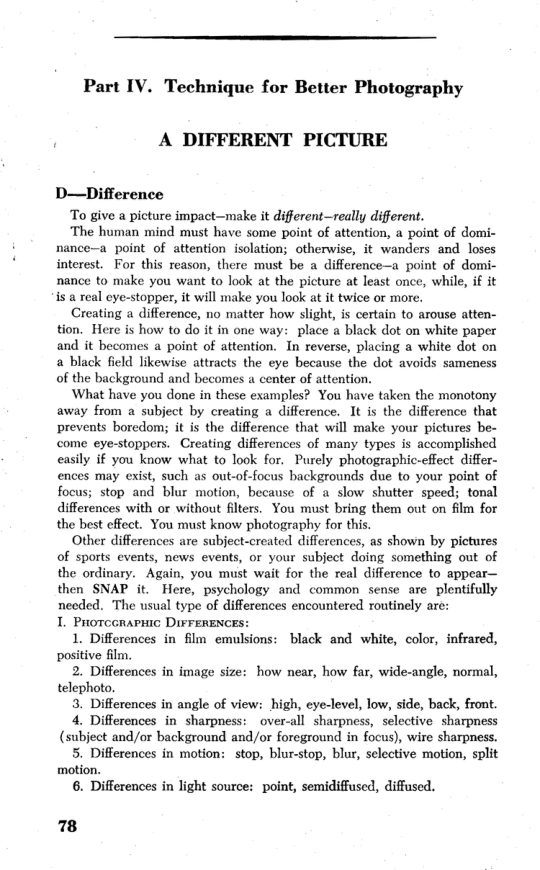
7, Differences in lighting contrast: uniform, contrast ratios of 2:1,
4:I, or more.
  8. Differences in development contrast,
  9. Differences in composition placement.
 10. Differences in design, pattern.
  ll.  Difierences in high-key, middle-key, and low-key lighting. Low-key
pictures usually are made with only one lamp, no fill-in; medium-key  at
l:4 to 1:8 ratios, high-key at 1:1 ratios with as uniform illumination
as possible.
 12. Difierences in color (hue) contrast of subjects or lights.
 13. Differences in tone that filters can reduce or create contrast with
various colors.
 14. Differences of highlight and shadow ratios as the film sees it.
II. Sunyncrrvr DrrrnnrNcns:
   1. Differences of size: as a baby's hand holding an adult's thumb.
  2. Difierences in sex: a single boy in a group of girls.
  3. Differences in emotion, expression.
  4. Difierences of action and reaction.
   5. Difierences of age: a child in an all-adult group.
   6. Differences of the known (a fan'rous personality) and the unknown
(crowd).
  7. Differences of various peaks of efrect as motion (a batter swinging)
or emotion  ( a child crying ).
  Consider this series as an excellent project for illustrating these themes.
You will really learn, then-the only way, the best way-by doing it
yourself.
E-Emphasia
   Bring out the difference where it can be seen on the film.
   After a little practice, finding something difierent becomes easy. How-
ever, how to make your film see what your mind thinks becomes a chal-
lenge to your skill. Emphasis of difference can be broken into types that
are ( 1) both photographic and (2) subjective.
  Both must be blended for effective results. The balance from one to
the other can shift quickly, so you must always be keenly alert.
    l. Photographic emphasis may take form in the control of lighting,
 filter, difiusion, taking angle, etc., to make the subject stand out from
 its surroundings.
   2. Subjective emphasis  is produced by such things as the expression,
 clothing, appearance, construction of the subject.
  The natural lovable expression of a child can create far more emphasis
 than many spectacular photographic lighting techniques.
   First, you must study your subject. Select the applicable basic shot,
 then decide what must be done to emphasize any difference that exists
 or can be brought to prominence by your technique. A difference must
bqemphasized; otherwise, your picture will  l-'e run-of-the-mill.
   Next, the subject is A-Arranged-composed  for its most pleasing balance
                                                79
View original page 2Page 3 · Read text
within the frame. Finally, you must recheck your camera settings, etc.
A-Arrangement
   Place your subject in a pleasant spatial presentment.
   Composition is the subject's arrangement in a pleasing manner within
 the framed border of your film, Much can be written, but it all boils
 down to getting when you can as best you can. The painter has far
 greater freedom because he starts with a blank canvas and arranges  his
 subject where and how he wishes, often disregarding perspective. The
 photographer must take life as he ffnds it. He cannot move mountains
 for better compositions; cannot drain lakes if the shoreline is in the
wrong place.
  A sure-fire help for good arrangement is to divide the viewffnder into
 thirds and place your object, whieh shows the difierence that you are
 emphasizing, at one of the dots in the frame. Usually this will ensure a
dynamic, interesting cbmposition.
R-Recheck
  Remember to check your setting for every picture.
  A painter can take years to paint his picture. On the other hand, the
photographer often has only one opportunity to SNAP his picture.
Minimize any errors by quickly rechecking your settings:
  S-Shutter Speed
  N-Nearness (Focus)
  A-Aperture
  P-Peak of action, expression, or pose.
  Now you know what makes a different picture, You will soon know
how to take any of the six basic shots.


80
View original page 3
Page 4 · Read text
A WELL.COMPOSED PICTT]RE

 Basic Composition
  To repeat, good composition is the pleasing arrangement of subject
 matter within the borders of the film frarne. This simple definition should
 always be kept in mind whenever the subject of composition is discussed,
 There are many theories for creating a pleasing arrangement; there are
 many mathematical  arrangements which will help achieve a pleasing
 arrangement; yet these cannot do the composing for you because you
 alone must decide what pattern the subject represents.
  As your subject must be arranged within a frame, learn to arrange
 it efficiently and artistically by studying this chapter, then practice what
 it teaches. You must know the exact useful proportions of your final
 frame size so that you will either automatically frame an active subject
 moving within this area or set up a composition within its measured
 area, For example, acceptable print sizes are generally 10,, in size. This
 means a 4:5 or a 1:1.25 ratio. Enlargements  will look right if we
 compose within this proportional outline beforehand. As the standard
35mm size is  J. x llz, this means that our regular 24x36 format is too
 long for the standard 8x10" size. It can be corrected to. a 24x30
 proportion ( 1:1.25) for the 35mm size in this way:
    l. Detach the removable 35mm ground-glass focusing screens and
 score the under side with a pencil so that 3mm from each side are
marked off just like the diagram.
   2. Mask off the tops of nondetachable 35mm ground-glass focusing
 screens with transparent celiophane tape so that 10% of the total area
 is covered on the left side and l0% on the right. Thg cellophane tape
 permits full viewfinding, yet it is sufficiently distinguishable  to force
your composition within the unmasked area.
   3. Likewise mask all 35mm optical viewffnders with transparent
cellophane tape; l0% on the right side and I0% from the left side.
For example, if the viewffnder measures 14mm wide, mask it 1.4 from
either side.
   4. Mask the 21/a, x 2lt size in a  lay'. x 2Ye proportion on the ground-glass
or approximately l0% less from either side of an optical viewfinder.
   5. Mask the 2r/t x3Ya format to 21/Ex2aA s\ the ground-glass or 8%
from either long side of the optical viewffnder.
  This masking step is important. Do it now, You need do it only
once, and the proportions for better framing of your compositions will
be set for all time.
                                              8t
View original page 4Page 6 · Read text
After your masking outline has been made, you must ffll it auto-
 matically with pleasing shapes and figures. The term "automatically"
 has been used because you have relatively little time to ask yourself
 what the compositional pattern should be while you are shooting dynamic
 pictures of living objects. If you compose your.subjects automatically,
 then you will change the image size, the angle, and the arrangement of
 your subject within the frame without thinking about it. The minute you
 have to think what pattern should be used, that moment is forever  lost
 for photography.
  The only way to learn is to do. Therefore, you must shoot lots of
 fflm to practice these arrangements to the point where they shape them-
 selves automatically. You can also learn acceptable composition by
 analyzing art masterpieces  in your local museum or by borrowing books
on paintings from your library. The fundamental patterns can be
 discussed here, Their actual use must be done with your camera-now!
 It is immaterial whether you first select the pattern motif and then
 place it in its most advantageous position or vice versa. After practice
you will do both simultaneously.
  The proportions and the positions for efficient composition can be
 simplified by dividing the 4:5 ratio into vertical and horizontal thirds
-the subject should be placed at one of the strong point intersections.

Eye-Squint Practice
   If you will squnt your eyes ,rt iil th"y are mere slits, you will ffnd
that subject detail in any scene is lost and you can evaluate the weight
of one mass against another,
    l. DourNeucn. One major area, one major emotion, one major pat-
tern, one center of interest should be most important. you should shoot
the picture to project this dominance for instant impact. Dominance
can be secured through a difierence in subject position, subject size,
subject emotion, subject tone, etc.
   2. UNrry. The dominant motif must be compatible with the remain-
ing portions of the picture.  It must occupy the ,best position within
the frame so that it appears to have belonged there all the time.
  3. Henuowy. Besides dominating the picture and fitting well into the
proportions, the subject must blend together with the secondary subiects
within the picture. While these must be subdued by comparison with
the dominant motif, they must be in harmony with the dominant efiect
and not challenge it with too aggressive position, tone, mask, etc. Were
the challenge too great, then your picture would have two centers of
interest and lose vitality because attention would be diverted from one
point to another.
  4. There should be lead-in and conffning lines to keep the eye rov-
ing, These keep the picture dynamic-keep  it from becoming static
and uninteresting.

                                               83
View original page 6Page 7 · Read text
Blaek-and-White Compoeition
   White, black, and intermediate tones are the elements that can create
 shades and shadows of interest in black-and-white film photography.
 For this reason, landscapes are usually disappointing because, rvhile our
 eyes see the scene in color contrasts, black-and-white  fflm records moSt
 colors in similar shades of gray. The scene therefore becomes monoton-
 ous when photographed with black-and-white  film.
   Black-and-white filters are the means to increase the contrast. A
 yellow, orange, green, or red filter changes the neighboring contrast
 effects of otherwise similarly recording colors. The increase in contrast
 creates an increase in interest by preventing the merging of various tones.
    Therefore, when checking the composition of your subject, think of
 the tonal qualities of the recorded film image. Use black-and-white
  fflters to increase the tonal spacing and so prevent colors merging in
' tones of gray and spoiling the tonal as well as subject mass balancing
 of your picture.

 Color Composition
    Color fflm presents problems entirely different from those of black-and
 white  fflrn, because, even though the lighting ratio of highlight to shadow
 may be uniform (1:l), the color contrast of the subject is sufficient to
 create a good composition which will be an interesting one besides.
   Color composition involves color harmony and color contrasts: cool
 and warm colors; advancing and receding colors,
   The color wheel is a starting point for selecting colors that harmonize
 or contrast with one another. Opposite colors on the color wheel are
  contrasty while adjacent colors harmonize.
    '[he wann colors are yellow, orange, and red; the cool colors are
  violet, blue, and green.
   Receding colors are at the blue end of the spectrum, The adoancing
 colors are at the red end. Notice how much nearer a fiery red sky
 seems to be in contrast with a blue sky. The blending of these color
 elements into the general scheme of the picture will occur when you
 both think and practice using colors.


 84
View original page 7Page 8 · Read text
DEVELOPING THE EXPOSED FILM;
      DEVELOPING BY INSPECTION

Developere and Development
  There is an undisputed chemical fact that a developing solution must
accumulate bron'ride and ultrabiproducts  as a number of fihns are devel-
oped in it. A replenishing system may help maintain the activity potential
of developer, but the "fine-edge" of contrast, imag-contour,  grain, and
image quality does eventually suffer. The ideal answer  is to use the devel-
oper only once and then throw it away. The "one-use method is the only
scientific method to provide a consistency  of result because the developing
potential  is always at the very highest, oxidation  is minimized, there are
no by-products, and therefore quality must be at its optimum.
  Developing solutions are the least expensive item in photographic
costs. Yet, it is pitiful to watch someone trying to "extend" the life of
the developer for just one more roll and risk losing the results of a travel
tour or the expense of travel and time of a model that may have cost
a few hundred dollars. The moral of this paragraph is: always use
fresh solutions, it is inexpensive: it is wise! It produces better pictures.
  Achieving a technique for doing so, after it is agreed that it is the
best, often is more difficult than deciding that which is the best pro-
cedure. You can achieve this quality if you will:
   l. Make up sufficient solution for the day or for the week's develop-
ment. Do so for the minimum time before oxidtrtion becomes  effective.
  2. Use powders as reserves because all liquids must oxidize in time.
You really do not know the exact strength of a liquid solution which
may have been on your shelf for some time.
  3. All liquid solutions should be rebottled into fully fflled small units.
That is, filled completely to the cap, to limit oxidation which would
occur if the bottle were partially used.
  4. A "one-shot" solution is the best, as their potency always is known.
However,  if a liquid stock solution is used for dihrtion into "one-shot"
strength, then the stock solution must be kept in small completely  filled
bottles which are so calculated that I oz. of stock solution can be diluted
to make 16 oz. of working solution; in this wny the l-oz. bottle is used
efficiently, and no oxidation will .result from its being partially used.
  5. Date your bottles and number the ffhns developed in it so that
any liquid developer should be used up and/or thrown away in 3
nronths as a safety measure.
  6. Buy a reliable thermonreter. Check it at least twice a year. An
incorrect reading of 3' may rucrrn thirt achievement of fine-edge quality

                                              B5
View original page 8Page 9 · Read text
or clogged highlights and/or muddy shadows.
   7. Have a reserye supply of powder developers handy and avoid the
emergency "stretching" of developing capacity of old solutions.
   8. Maintain a uniform temperature for developer, hypo, wash water,
etc., to avoid reticulation.
Be Safe-Develop by Inapection!
   Professional photographers cannot afford to take the chance of under-
developing or overdeveloping their negatives. They develop their films
by inspection, lighting the daikroom with a No. 3 Wratten dark-green
filter over the safelight.
   Inspection requires a certain amount of experience to judge the end-
point of the development.
  There is a short cut to acquiring an experienced eye for this technique:
    l. Select a successful negative that shows fine gradation in the high-
lights as well as in the shadows. This will be your comparison negative.
The short-cut technique that will make you adept consists of binding
this negative to the front of the green safelight. This will duplicate the
approximate appearance of the negative as it is being developed while                                                                            J
the green anti-halation backing is still part of the fflm.                                                                                                                                                                                                       l
  2.    The safelight                 must be fitted                               a Wratten                                                                               fflm                               with                                          No.                                                The                                        3 fflter.
   loaded                                                                                                                               it.                            it,is                                      developing          in the darkroom                             into the                                         made                      FR                                              tank                                                                 for
The green light is turned on while the fflm is being developed so that
you may become accustomed to it. After abott 5O% development has
been completed (i.e.,5 min. if the normal developing time is 10 min.)
the tank is opened, the reel lifted, and the fflm quickly unwound from
the reel. The film is held about 2' from the safelight with the emulsion
side up. The shadow area where you will want detail is compared with
the shadow area with the green safelight's comparison negative. Look
down at the comparison negative. The appearance of the shadow of
the developing negative will tell you whether the film was properly
exposed and how soon the development will be completed.
  3. The maximum of l0 sec: is permitted for this decision. Actually,
you should be able to do it in 2 or 3 sec.
  4. The first quick look will give you some idea of how much further de-
velopment is required. After the approximate time has elapsed, you can
take another quick look to d'ecide  if the negative is properly "cooked."
  5. Your initial glance at the fflm will suggest these alternatives: (a)
The film has been grossly overexposed, and the film should be rinsed
immediately and placed in the ffxer.  ( b ) The film is developing norm-
ally and will be ffnished within normal developing time. (c) The film
has been grossly underexposed and requires a vigorous developer such
as DK-60a, either in a 1:9 dilution or even at full strength, to "bring up"
the image so that the negative will be usable.


86
View original page 9Page 10 · Read text
BETTER COLOR PICTURES

        The color ffdelity of color pictures is easily achieved if you remember
        the one woid; color balance. You should use outdoor color fflm outdoors
        because the color of the outdoor light matches the color balance of the
         fflm. In this way, no fflters are required. The chances of making sharp
        pictures are improved, however, whenever the lens is unencumbered
      by fflters. Better color pictures are possible for our (matching) various
        basic shots by observing this color balance.

      Color TernperaturFA  New Problem
          Color fflm must be made speciffcally for daylight pulposes with sun-
         Iight or else matched to tungsten illumination of a speciffc type. Color
        temperature is the quantitative number in degrees ('K) which ffxes the
         color quality of the light in comparison with a heated black body. There
        are four types of color film matched to four difierent color temperatures
         (daylight film at 5500'K; Type F at 3800'K, Type A at 3400"K, and
       Type B at 8200'K). The color temperature of the light source must
       match the color temperature of the color fflm; otherwise, results will be
         too blue or too red. You must check the name of the color fflm to light
       the subject correctly. The new problem is only a minor one because
          the. instruction sheet wrapped with the fflm usually tells you the color
        temperature balance of the ftlm and the recommended light sources
         or fflters which correct for it.
         Because every fflter keeps a certain amount of light from reaching
        the fflm, we cornpensate for this loss of light with the fflter factor. The
           fflter factor should be set immediately, as when Ektachrome, Type F, is
         corrected for floodlamps or for outdoor use with an 85C filter; Koda-
        chrome, Professional Types with an 85A.
          Cor-on Besrc Sxor I. A daylight type fflm should be used to match
         the color balance of daylight.
ll        resultsCor-onwithBesrca daylightSnor II.typeThefilm.available-lightThe reds appearshot oftenmoreproducessaturatedbetterand
        the blues have a more vivid depfh. Once again, no color fflters are
        needed in front of the lens,
           Cor-on Besrc Srror III. Color with direct fash requires careful match-
        ing of the fflm to the light source if fflters are to be avoided. With
         direct flash, then, a Type F emulsion should be used with Class M
        lamps. If the direct flash is taken with a speedlight, then the daylight

                                                     87
View original page 10Page 11 · Read text
color emulsion should be used because  it matches the color balance of
the daylight fflm.
  Flashlamps No. 5M and 25M are preferred because they synchronize
with all shutters, they are very compact and powerful, are usually avail-
able everywhere, and the duration of the flash is I/50 sec. which in
itself will stop motion.
  Flashlamp Sgnchronization.' Setting at L/25 for a No. 5M.
   Speedlights. A small speedlight is suitable for closeups because it  is
sufficiently powerful to permit a narrow f/opening for a wide depth of
sharpness. There are many variables in the use of speedlights. The sug-
gested distances and l/openings work only with the unit mentioned. If
your speedlight unit has the same guide number,  it only may-and again,
may not-perform the same way for you due to the many variables.
However, you must start somewhere, so begin with the same setting for
a unit of the same guide number rating. In any case, read your instruc-
tion speedlight book thoroughly for its suggestions.
   Speedli,ght SEnchronization:  Setting X.
   Cor-on Besrc Snor V-Floonr-evp Prcrunrs. Electronic flash or regu-
Iar flash is preferred for living subjects, while photoflood lamps like the
BFA-375 or even household lamps of 100-watt strength will suffice for
inactive still objects.
  Cor-on Basrc Snor IV-Colon BouNcr Prcrrmrs. A bounce shot,
while easy to take with black-and-white fflm, has certain innate color
co,rnplications  that can be answered only after careful scrutiny of the
following factors:
   1. Color of background
  2. Color of wall and ceiling
  3. Color balance of fflm
  4. Color balance of lamps
  5. Highlight-to-shadow  lighting balance
   If the color of the background  is unsuitable or underlighted, it may
photograph an undesirable purple hue. If walls and ceiling are not
white but pink or blue, this color cast will reflect from the face or the
clothes of your object. The results usually are not pleasing, but you
often must take what you can get.
   If the fflm has an outdoor color balance and the room lighting is very
strong with artificial light, then the color cast will be far redder than
you actually see it.
   If the color balance of the lamp is not matched to the color balance
of the fflm, then the picture will also be too warm or too cold. Finally,
if you catch your subject so that part of the face is in shadow where the
lighting balance will be too great, then the shadows will be much too
dark, or the color will not be true. Color balance should be practiced
only in rooms that have light gray or, preferably, white ceilings or walls.

88
View original page 11
Page 12 · Read text
Floodlamps that burn at 3400"K may be used with either Daylight
       Type 808 or Type F 82A when the lens is fftted rvith appropriate con-
          version filters. Remember-it is more satisflng to use indoor film outdoors
         than vice versa,
         The Filter Chart in the Factopedta tells you what fflters are needed to
           restore or natch the color balance of the light source to the film.
          Closeup Direct Flash. Use a flash at least 3%, from the subject,
          regardless of its size. Floodlight has its advantages, too.
          Mixed Lighting onthe Same Roll of Color Fitm. lf Basic Shot I (the
        outdoor daylight shot) and Basic Shot III  (color with direct flash)
        must be made on the same roll, then a compromise is required. It  is
         wiser to use a color Type  tr' and convert it to outdoor use than to try
        to use the daylight type emulsion with Type F flashlamps because
         conversion from the indoor to the outdoor type of light source hardly
         reduces the emulsion speed. However, when the outdoor type of emul-
          sion is used indoors with a conversion filter, the film speed is drastically
        reduced by a factor of 4, which means that the l/opening must be
         increased 2 stops or the shutter speed slowed 4 times. Therefore, it
         is better to standardize with an indoor color film and convert it to
        outdoor use.
       Do not mix indoor and outdoor lighting in the same shot as the fflm
        can do justice to only one color temperature.
         High-Speed Ektachrorne  is available on a daylight type emulsion.
           It is the fastest color film (ASA 160) available without "pushing." It
       can be "pushed" to a rating of ASA 400 with special development,
        Ask your dealer for this service.
       Colored Lighte-Working  with Colors
       An entirely new ffeld for projects is waiting for anyone learning to
       use colored lights. While photography originally started by making
         pictures with only the snap of the shutter, its new possibilities become
         stimulating. Colored lights offer another example of how one interesting
       problem leads to an array of new problems. Experiment with colored
         lights. You will be pioneering.

       Color Peychology
           Colors have visual emotional efiects strong enough to make interest-
         ing, stimulating pictures from otherwise boring black-and-white  versions.
         Differences in color can take advantage of psycliological  factors to add
      a subtle ffnal effect to the slide. These color difierences are initially
         divided into the two basic groups of advancing and receding colors. The
        advancing colors-yellows, oranges, reds-by the nature of their name,
        tend               to be exciting, stimulating, disturbing. Calming to actually depress-          -moods        ing        are created by the receding group ranging from green to
         purple.

ll                                                  89
)
View original page 12Page 13 · Read text
T
  AnveNcrxc Cor-ons (ron Fonrcnouvos):                                    I
    l. Deep purple: Mid-point change (changeooer from rcceding to
      adrsancing)
   2. Red: Violence, lust, love, vitality, fear, danger
   3. Pink: Femininity
  4, Orange: Warmth, magniffcence, benevolence, plenty, harvest
   5. YeUow: Sunlight, aspiration, cheer, hope
   6. Green: Rest, germination, spring, new life (change-orser from
     adoancing to  r eced.ing)
  7, Blue: Calm, quiet, cool, distance-subduing, niasculinity
  RscnorNc Cor-ons (ron BecrcnouNDs):
    l. Viobt: The unknown, the baffiing
  2, Indigo: Discouragement, depression
   3. Bl.ack: Despair, the hidden, dignity
  4. Broan: Decay, aftermath of life
  5. GraE: Indecision, concem
  6. White: Purity, cleanliness
  To integrate these colors for their maximum photographic and psycho-
logical efiect, carefully selpct the background so it enhances the mood        t
of your picture. The color of a dress, the color of a tie, the color of the
                                                                                                                                                                                                                                                                Ileaves of a tree-all can infuence the emotional effect of a picture. A
picture is supposed to equal a thousand words. A color picfure can
bridge bald, bare words with a rainbow of every stimulating emotion.
   MooNr-rcrrr on Frnrr.rcnr Nrcrrr Errncrs wrrrr Cor-on Frr-rrl:
  Moonlight (taken in daylight):
  L During the day, use Type F in daylight without any fflters.
  2. Underexpose t% to 2 stops,
   3. SideJighted effects produce the best results because the shadows
     are dark in just the same way as we see them at night.                                                       i
  Fireli,ght:                                                                                                            i
    l. Use outdoor fflm with tungsten illumination.
  2. Light with a single light source.                                          )
  3. Underexpose 1% to 2 stops to heighten the efiect.
Color Filtere
    l. The color balance of the fflm in the camera is matched with (a)
    a color-conversion  fflter, (b) a color-compensation  fflter, or (c) a
      color-correction  fflter,
  2. Place the fflter over the camera lens.
   , 8. Calculate the exposure without the fflter.                                                                                    :
  4. Add the fflter factor if necessary.
  5. Add any other exposure-increasing  factors.                                                                                                                      I
  6. SNAP the picture.


90
View original page 13Page 14 · Read text
Digitally signed by Mike Butkus
                                                                                                                                                         DN: cn=Mike Butkus, o=Butkus camera manuals,
                                                                                                                                                                                    email=mike@butkus.org,                                                                                                                                                                              c=US                           Mike Butkus ou=butkus.org,Date: 2024.05.06                                                                                                                                                                                                   21:03:38 -04'00'

           BETTER PICTURES WITI{
           BLACK.AND.WHITE FILTERS

            Filters can be used indoors and outdoors,
          .A filter is a screening device of glass, gelatin, water cell, etc., which
        permits certain colors or polarized rays to pass through  it while retarding
        or stopping others. The exposure must be increased, because the fflters
         retard or stop some of the full amount of light from entering the camera
        lens. The exposure increase restores the density of the negative to
         normal,
        In black-and-white photography, all colors are represented in fflm
        terms as a gray scale ranging from white through light gray to black.
         Filters can serve two basic functions: to increase contrast or to decrease
         contrast of these tones. These effects can create "differences" of inter-
        est. The usual panclrromatic  fflm reproduces colors by daylight with
        approximately the same gray values as the human eye sees them, A
      medium yellow fflter in daylight holds back blue colors better to register
      them in the same tone as the eye sees them. Some workers, for this
        reason, always place a medium yellow fflter over the lens for outdoor
        black-and-white  pictures to decrease the inherently great contrast.
      A sharp picture and a well-exposed picture  still are the criteria for
     a good fflter picture in additjon to its tonal increase or decrease of
        contrast. First, the tonal difference must be determined in this way:
              l. Look at your subject and decide whether the tonal values that
         exist will photograph the way you want them to. Will the rerl be the
         correct shade of gray, will the blue be sufficiently contrasted from the
        green, etc.? If the relationship  is already good, then shoot the picture
       without a fflter.
          2. If your main subject will photograph too light or too dark, then
       use the fflter that will increase or decrease  its contrast. As an example,
     a sunburned portrait produces a dark-gray tone. The dark-gray skin
        tone can be slightly lightened with a light-red  filter.
        With filters, the gray values of other colors within the picture will be
        altered. But as all of life-as well as photography-is a series of com-
        prornises, we must be satisfied to accept what we can as long as the
       dominant subject of interest has the tone that we want.
      Treating a Subjeet with Filtere:
              l. Bring out differences in the background (a) clouds; (b) darkened
        sky; (c) penetrate haze; (d) show detail in snow.
                                                     9I
I
View original page 14Page 15 · Read text
2. Increase differences of foreground contrast: (a) separate tones of
 similar colors; (b) change tonal relationship in terms of their gray scaie
 for dramatic effects.
   3. Make abrupt color differences disappear. Yellow stains on photo-
 graphs or prints disappear when photographed with a yellow-to-red  filter.
   4. Emphasize differences with filters. BIue print contrast is increased
 with a red filter. Illuminated manuscripts can be made more contrasty
 even though some of the colors have begun to fade.
 Uee Filtera for Better Pieturee
    Filters make it easier to secure desired ranges of tone directly on the
 negative instead of having to spend many hours in later darkroom man-
 ipulation in an attempt to create the same effect, Get in the habit of
 asking yourself each time your subject has been posed and lighted:
    l. What is the color of the main subject?
   2. How does it photograph?
   3. Will a filter accentuate or decrease the contrast of the subject in
 relation to the other objects within the picture?
   4.                 filter should    What                     be used?
       a question                                involved?                                   I   5. Is                    of sharpness
   6. What is the filter factor so that I may continue to have a well-                                                             I exposed picture?
   The question of a sharp picture and a well-exposed picture, as you see,
 is with us again. A filter that is not plano-parallel can produce an un-
 sharp picture. Filters require exposure increase, as you have been told,
 because every filter stops some light from entering the lens. The
 increase in exposure for every fflter is known as the filter factor and is
 usually supplied by the filter manufacturer or the film manufacturer  for
 their specific combination. As an example, a medium yellow fflter usually
 has a filter factor of 2X with panchromatic  fflms. So, after the basic
 exposure has been read, a yellow fflter fftted over the taking lens requires
 a slower shutter speed, a wider f/opening, or a nearer lamp position to
 compensate for the necessary increase of exposure.  If a single fflter is
 used, then the listed factor is applied. If multiple fflters are used, then
 you can multiply the individual factors, e.g.,2X and an 8X ftlter requires
a l6X increase in exposure. In this case, this would mean a 4-stop
 increase in lens opening or a shutter speed l6X as long.
  What has been said so far can be summarized in this review of black-
 and-white  fflter mechanics:
  L Select the filter effect to lighten or darken a color.
   2. Place the required  fflter over the lens.
   3. Secure a sharp picture with careful focus.
   4. Produce a well-exposed picture by first calculating the basic ex- posure without a filter, and                                            I
   5. Add the specific filter factor by widening the lens opening or by              f,
 using a slower shutter speed.

92
View original page 15Page 16 · Read text
6. Compensate  for any other factor such as a lighter or darker subiect.
   7. Snap the picture when you feel that it is really DIFFERENT.
 Polarizing pihsls-I{eutral   Density Filters
  A polarizing  fflter is a glass, optical photographic device which screens
 light rays so that only those vibrating at angles greater or smaller than
 33" are locked out and do not enter the lens of the camera. Their outward
 appearance is similar to the yellow, orange, red, etc., filters used fot
 black-and-white  photography. However, they are neutral gray and do
 not affect the colors of the subject.
   Polarizing fflters are used with all color and all black-and-white  fflms.
   Color films must have polarizing filters only to darken the sky or to
 remove unwanted reflections by rotating the polarizing fflter in front of
 the lens. Otherwise, a colored filter would cast its color onto the picture.
  B&W film reacts to the polarizing filter the same way as does color
 fflm. However, with B&W film, yellow, green, and red fflters can be
 used in addition for creating tonal contrast differences as well as
 decreasing unwanted reflections and glare.
   Exposure increases, too, are necessary because any filter stops deffnite
 quantities of light irrom entering the camera. A polarizing 2.5X to 4X
 exposure filter factor is needed.
How to Use Filterg
    l. DenxnNrNc Srv CoNrnor. You can readily prove to yourself that
the polarizer darkens the sky by'holding it in front of your eye, looking at
the sky, and then rotating it for its maximum efiect. The polarizer is then
placed over the lens in the exact position when the maximum darkening
effect occurred. Select the degree of darkening. Here again you can
create the degree of difference that you want for its optimum  efiect.
Remember to use the polarizing filter factor to increase the exposure.
   2. Rrrr,rcrroN Corqrnor.. Reflections on glass, water, highly polished
wooden furniture, etc., cause a glare effect that destroys details or pic-
tures. If a glare is wanted, then you need never use a polarizing filter.
More often, however, the filter is a must to make your subject clear to
have colors attain the maximum color purity and saturation. Maximum
polarization  is secured by pointing the camera at an angle of 33' to the
surface of the sub;ect. These polarizing efiects are achieved with other
angles. Exact 33' angle measurements are unnecessary, because you can
check the degree of polarization  visually through the fflter itself.
  3. Serunarso Cor,on Rrsur-r.
  4. PrurrnerroN oF nezp is efiected with a polarizing fflter. Look
through and rotate it for the best efiect.
  5. Mexrnruu coNTRAsr AND BRTLLTANcT  of color paintings are achieved
photographically by polarizing the light sources and the lens of the
camera. The maximum effect again is viewed visually through the taking

                                               93
View original page 16Page 17 · Read text
fflter. The exposure factor, when both lamps and lens are polarized,
is l6X. However, the two-filter system is worth the extra time in
equipment, setting up, etc., because the ffnest possible results are thus
obtainable. E. Leitz manufactures the lens polarizing fflter, while
Eastman Kodak produces the copying light polarizing filters.
   6. Nnurnar DnNsrrv Errrcr. The polarizing filters are placed over
the lens in any position and are used to decrease the exposure where
otherwise the shutter speed is too fast or the iris opening cannot be
further'narrowed. The factor is 2.5X.
   7. Lrusrs cAN BE pRorEcrED from grit, dust, etc., by always leaving
the polarizing  fflter in place, as it can be used with all fflms. Always com-
pensate for its filter factor.

Neutral Deneity Filterg
  With film so fast that an  f /L6 opening necessitates speeds of 1/500 or
f/1000, a special filter called a neutral density filter can be placed in
front of the lens so that less light is admitted through the lens. A lOX
neutral density filter is good to have in your gadget bag when a wide
opening is wanted to throw the background out of focus. 2X, 4X, or 8X,
etc,, are among others available.


94
View original page 17
Page 18 · Read text
THE FACTOPEDIA


   Black-and.White Corrected Film Expoeure fn{s>(6g-
           Ready for Expoeure Calculation

       Kodak Sheet Films:          ASA Speed      Tungsten

Panchromatic Films:
   Panatomic-X-                                 64/4.5"
   Portrait Panchromatic-----                   r25/5"
  Super-XX Panchromatic                   200/6"
                                          25O/6.
                                              400/7.
                                             400/7"
                                            t250/8.5.


Blue-Sensitioe and
Orthochromatic Films:
   Commercial.-                               50/4            t6/2.5.
  Commercial  Ortho.-------------------------------        80/4.5"          25/3"
  Super Speed Ortho  Portrait-----------------       r25/5"          64/4
  Royal Ortho                               400/7"          250/6"

  Universal Additive Unit System. Eastman Kodak is now marking their
fflm speeds in accordance with the Additive Unit System, which is based
on logarithmic increases as the numbers are doubled. A fflm index of
200, for example, is 6'. A fflm index of 400 is 7'. The new number
now follows the old, as for exarnple: 200/6"; 400/7", etc. Exposure
meters will soon follow suit and be marked likewise,


                                               95
View original page 18Page 20 · Read text
Color Tenperaturec (oK) of Common Light Sourees
              and Decamired Values (DMV)


   2200"         45        Drying, heat, red ray lamps
2400-3100'        36     Home incandescent light lamps
   3200"          31       Commercial photographic color lamps
   3300:         30      SM-SF flash lamps
   33500         30     CP lamps for color photography
   3400'          -29        Photofloods
   3500'         28       White fluorescents or sun, t hour after sunrise
   3800'          26       Begular photoflash
   4400'         23       Sun, 2 hours after sunrise
   4500'         22        Bright-white  fluorescents.
   4800'         20        Blue daylight photofloods
   5500'         18       Average noonday sun
   6000"         16       Bluc (daylight) photoflash
   6500'         15        Speedlight
   70000         t4      Uniform overcast sky
  10,000o          10       Blue sky
  20,0000            5       North blue sky


                                               97
View original page 20Page 22 · Read text
Color Conversion Filters-Continued
 85  Converts Type A 1 Color film for outdoor use
 85B Converts Type B )Color film for outdoor use
 85C Converts Type F I Color film for outdoor use
 808 Converts Daylight color film for 3200o K or 3400o K photoflood use
 80C Converts Daylight color 6lm for 3800o K clear flash use

   Kodek Color Light Balancing Filterc (Courtesy, Eastmrn Koddr Co.)
            Btuish              Exposure                                    Exposure
             Filtnc                 Incrcasc               Tcllouish               Inacasc
    Wrail.n      DMV     in Stops*                Filtas               in Stops'
   No. 82 (CC3)   82             Y3       No. 8l (CC13)    R2          Y3
  No.82A (CCa)  82             Y3       No. 81A (CCl4)   R2          Yg
   No. 82B (CCs)  B3           /s       No. 8lB (CCl5)   R3     %
  No.82C (CC6)  B5           Vs       No. 8!C          R5          Vs
                                 No.8lD          R5         ls
                                  No.81 EF        R5        Yt
  rThcsc valucs arc approximate. For critical work, thcy shoutd bc checked by practical
   tests, cspecially  if more than one 6lter is uscd.

              A.S.A., B.S.I., DIN Conversion Chart
    A.S.A,       8.S.L                    A.S.A.      A.S.I.    DIN
          1        8110     D10         125     8320    D22"
      2        8140     D4"        250     8350    D250
      4        Bl7'     D7"        500     8380    D28'
      8        820'      D100       1000     8410    D310
     16          B.230      D13'       2000     8440    D340
     32           8,26"       D16'        4000     B.47"    D37'
     61        B2g"       Dlgo       8000      850'       D,l0o
B.S.I. rating :  Every additional B3o rneans an increase of 100% in the B.S.I.
               Exposure Index. Every B1o indicates % difference in speed
               between adjoining ratings.
DIN rating:  Every additional DIN 3o means an increase of 100qi in the
           DIN Exposurc Index. Every Dlo indicates a /r difference in'               speed between adjoining ratings.
As an example, A.S.A. 80 would be B30", or D10o
                A.S.A. 100 would be B31o, or D21o-
                A.S.A. 160 would be B33o, or D23o
                A.S.A. 650 would be B39o, or D29o


                                                99
View original page 22Page 25 · Read text
Complete Camera f  Lena Outfite (U.S.A. Only)
 The following complete one- two- and three-lens outfits comprising the most desirabie
 lenses, are normally available for prompt delivery from stmk. Savings resulting
 from factory-installation  are reflected in the prices which include the camera, lenses
 listed, and all necessary parts and labor for lens installation and rangeffnder coupling.
 cat. No.       SUPER TECHNIKA 23 (21/+x31/+) witb:
  f LX033     l05mm l/5.6 Technika Symmar lLX021.     l05mm l/3.5 Technika Xenar
 LLXO27     lO5mrn l/2.8 Techniktr Xenotar
 fLX030     100mm l/2.8 Technika Planar (Zeiss)
 1LXO34       l05mm l/5.6 Symmar AND 65mm l/6.8 Technika Angulon
 lLxo22       l05mm l/3.5 Technika Xenar AND 65mm f/6.8 Technika Angulon
 lLx028       l05mm l/2.8 Technika Xenotar AND 65mm l/6.8 Technika Angulon
 lLx03l       lo0mm l/2.8 Technika Planar (Zeiss) AND 53mm l/4.5 Technika
                       Biogon (Zerss)
 lLX023     l05mm l/3.5 Technika Xenar AND 65mm l/6.8 Technika Angulon
               AND l80mm l/5.5 Technika Tele-Arton
 1LX029     l05mm l/2.8 Technika Xenotar AND 65mm l/6.8 Technika Angulon
               AND l80mm l/5.5 Technika Tele-Arton
 lLX032     l00mm l/2.8 Technika Planar AND 53mm  f /4.5 Technika Biogon
               AND I80mm l/4.8 Technika Sonnar (Zeiss)
              SUPER TECHNIKA 4x5 with:
 2LXOst       l50mm  f /4.5 Technika Xenar
 2LX056       l5omm l/5.6 Technika Symmar
2L0080       li0mm f/4,5 Technika Tessar (Zeiss)
 2LX046       l35mm l/3.5 Technika Xenotar
2L0083       135mm l/8.5 Technika Planar (Zeiss)
2LX06r       l50mm l/2.8 Technika Xenotar
 2LXO524      l5Dmm l/4.5 Technika Xenar AND 90mm l/6.8 Technika Angulon
 2LX052S{     l50mm l/4,5 Technika Xenar AND 90mm f/8 Technika Super
                      Angulon
2LX057r      l50mm l/5,6 Technika Symmar AND 90mm l/6.8 Technika Angulon
2LX057So     l50mm l/5.6 Technika Symmar AND 90mm l/8 Technika Super
                      Angulon
 2LXO47.      I35mm l/3.5 Technika Xenotar AND 90mm l/6.8 Technika Angulon
 2LXO47S+     l35mm l/3,5 Technika Xenotar AND 90mm l/8 Technika Super                       Angulon
2L0084       135mm l/3.5 Technika Planar (Zeiss) AND 75mm l/4.5 Technika
                       Biogon (Zeiss)
2L0085       I35mm l/3.5 Technika Planar AND 75mm f/ 4.5 Technika Biogon                  .      AND 250mm  f /5.6 Technika Sonnar (Zeiss)
             The                      marked                           outffts                                                           as                                     (*) above                                 may                                                                         three-lens  outffts                                      be ordered                  ')                                                                                             prices                  adding                                 following                        the                                         telephoto                                                   lenses.            by                                           The                                                                        all-inclusive
                  Iisted below apply only if the third lens is included in the original
              camera order. Otherwise regular installation charges apply.
2LT090       240mm l/5,5 Technika Tele-Arton,  including installation  to make up
                          3-lens outfft.
2LT09t       270mm f/5.5 Technika Tele-Arton,  including installation  to make up
                          3-lens outfft.
                             '   LINHOF-COLOR 4x5 with:
2L0095       l50mm l/5.6 Technika Symmar
2L0096       180mm l/5.6 Technika Symmar
2LOO97       2l0mm l/5.6 Technika Symmar
toz
                                                                 I
View original page 25Page 32 · Read text
Making a SAFE.SET Chart

         4" Lens
        2r/a x 9r/t" Camera       1/100   ASA lOO    # 5.25      #160

Head & Shoulders------                              31/z'          f/22 + 2 TWH*
Head & Arms..  .-,                                o'            f/22 + r TWH
% Body---------                                               7',                   + /9q.
Full Body------                            t0'            f/16


  o TWH = Thin White Handkerchief.
  This is a sample SAFE-SET Chart for a 4" lens or a 27/+x3Ya size
camera. You can make a SAFE-SET Chart for any camera by following
these simple directions:
   1. Take a wide piece of adhesive tape and at the top mark the film
     used and the shutter speed.
  2. On four different  lines, mark Head and Shoulders, Head and Arms,
     3/aBody, and Full Body. Keep the Field Size Chart nearby.
  3. Take the chart with the film speed, guide number, flash lamps, etc.,
    and then choose the l/number which is closest to the distance for
    any particular field size.
  4. Fill in the information. Paste the chart on to your flash lamp
      reflector, and you are ready,
  5. Pre-set the camera to any body size that you want, and you need
     only move it into focus, wait for the peak of action or expression,
     then shoot.


                                              l09
View original page 32Related documents and language editions
From the M. Butkus archive. Original publisher and archive notices are retained.
Check the model and edition against your equipment.
PDF verified 2026-10-10.