Light meters
Hasselblad Film Winder Meter User manual
User manual for Hasselblad Film Winder Meter. 15 pages in German, French, Swedish. Read the original PDF, download or print a copy without registration.
15 pagesGerman, French, Swedish0.9 MB PDF
Loading your manual…Open PDF directly
Document details
- Brand
- Hasselblad
- Model / document
- Hasselblad Film Winder Meter
- Document type
- User manual
- Language
- German, French, Swedish
- Pages
- 15
- File size
- 0.9 MB
- Category
- Light meters
- Document date
- Not specified in catalog
Search available document text
Find a term, then jump to its page in the original PDF. Image-only pages may not be searchable; check the PDF for exact wording and diagrams.
Page 3 · Read text
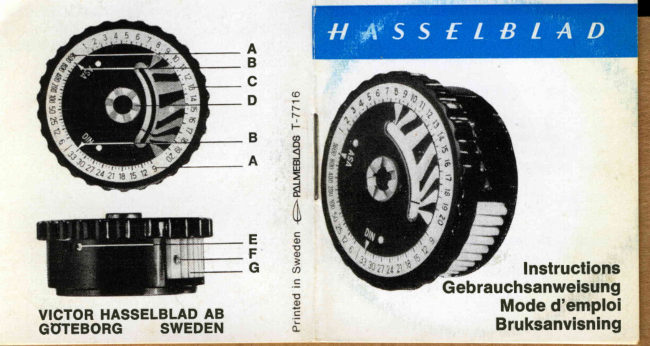
FILM.WINDING KNOB WITH
           EXPOSURE METER
               1 Attach the exposure meter knob in
                 the same manner as the standard
                kn o b .
               2 furn  the camera so that the meter
                 faces you.
               3 Turn  the  slotted  disc  (D), e.9.,
                  with  a  coin.  so  that the  white
                  triangles (B) point to the DIN/ASA
              numbers (A) corresPonding with
                 the film speed.
               4 Decide  the  measuring  method
               you will use. Check the Position
                    6f translucent sliding cover (G).
               Note  that  this  cover  is  locked
                  with catch (F).
               5 Detach the exposure meter knob,
                                 if necessary, to make your read-

www.orphancameras.com
View original page 3Page 6 · Read text
3 Check that the needle points to       BEDIENUNGSRAD MIT EINGE.
  the  small  white   line   at  the        BAUTEM BELICHTUNGSMESSER
  extreme  left of the scale.               Gebrauchsanweisung
4 When making adjustments, turn                          l Den  Belichtungsmesser an  det
  the set screw (E) carefully until          Kamera genau wie das Standard-
  the needle  is correctly aligned.            rad befestigen.
                                             2 Die Kamera so drehen, dass der
                                           Belichtungsmesser  lhnen  zuge-
                                          wandt ist.
                                             3 Den geriffelten Griff (D) mit einer
                                              Mr.inze so  drehen,  dass  beide
                                          Dreieckmarken (weiss) (B) einen
                                          Wert auf der DIN- oder ASA-Skala
                                                  (A) bezeichnen.
                                             4 Messmethode bestimmen. Jalou-
                                                    sie  (G) kontrollieren. Beachten:
                                            Die  Ja lo u sie  wird   mit  einer
                                            Sperre (F) verriegelt.
                                             5 Belichtungsmesser wenn notwen-
                                                  dig abnehmen und messen.
View original page 6Page 12 · Read text
b pour  les sujets tres  clairs, ac-       2 Gouvrir  la cellule du posemdtre
   croitre I'indice de lumination de        avec la main.
   t/z unit6.                               3 V6 rifie r q u e   I' a ig u ille co incide
   Eviter que les radiations solaires        avec le petit trait blanc d gauche
  ne viennent directement frapper        su r l' 6 ch e lle g ra d u 6 e .   le diffuseur, par exemple en te-                                                       proc6der                                                               au                                                                            r€g-                                              n6cessaire,  nant          la         main                d                une                       distance                             de       4 Si                                                                               (E)                                                                sur  la                                                                                vis                                            lage                                             en agissant  30      a        50          cm                de                           que                   manidre
   I'ombre de  la main soit projetde           ju sq u ' d ce  q u e  la  p o sition de
  sur le diffuseur.                                I'aiguil le soit correcte.
Si   I ' o n  ut ilis e u n   t 6 l 6 o b j e c t i f ,  il
convient de  proc6der aux mesu-
rages,  le posemdtre 6tant autono-
me. Ainsi on 6vitera tout risque de
r€flexion. (Le_ mesurage par' 6qui-
vatence -  voir 4, ci-dessus -  con_
vient g6n6ralement dans ce cas.)

VERIFICATION DU POSEMETRE
1 Masquer l'6clairage ext6rieur au-
     Qu" possible.
,o,un,
View original page 12Page 14 · Read text
3 OmfAng                        MATNING AV DIREKT LJUS
For kontroll av att sAvdl hogdagrar       Skiut lalusin for mdtarens fotocell'
som skuggor  ligger inom expone-      Mdt ldmpligast med losstagen md-
ringstoleransen. Gor grdnsmdtning-        tare. Mdt frAn motivet med mdtaren
ar pA bAda och  vailj sedan medel-      vdnd  mot   ljuskiillan.  Observera
vdrdet. Allmant kan man rdkna med        fo lja n d e :
att filmen tAl 3 stegs clverexpone-
ring och 2 stegs underexponering.       a Vid  morka  motiv, minska med
Om filmens tolerans dr mindre dn           t/z-1 exponeringsvdrde.
motivets         ljusomfAng                   exponera                                      for                                           mycket ljusa motiv, oka med                                          b Vidden    mest          betydelsefulla                         delen. (Se                                             1/2exponeringsvdrde.2   Detalj.)                                             Jalusin bor avskdrmas mot direkt
4 Kompensation                          so llju s  g e n o m  sku g g n in g m ed
                                                      t.ex.  handen PA 30-50 cm  av-
Ofta kan Ni pA grund  av motivets         stAnd.placering  eller  karaktdr  ej  gora
6nskad ndrmdtning. Mat da pA n6-
got ndrbeldget foremAl med samma      Anvdnds teleobjektiv mdt med loss-
fdrg och belysning. Ex. mdt pA Er       taoen matare. Detta eliminerar ris-
hand  for  att  bestdmma  exp.  vid        ke'n fOr rellexer.  (Miitning enl.4
portrdttagning.                         Kompensation, dr hdr ofta l?implig.)
24                                                                       25
View original page 14Page 15 · Read text
KONTROLL AV MATAREN1 Avskdrma  ytterbelysningen  sA           !l
  mycket som  mojligt.
2 Tdick med handen over matarens
  fotocell.
3 Kontrollera  att visaren pekar pA
  det  lilla vita strecket  liingst  till
  vanster pi  skalan.
4 Vid  justering skruva pA  juster-
  skruven (E) tills visaren stAr rik-
    t ig t .


                          www.orphancameras.com
View original page 15From the M. Butkus archive. Original publisher and archive notices are retained.
Check the model and edition against your equipment.
PDF verified 2026-10-10.