Film cameras
Honeywell Pentax H1 / H3 User manual
User manual for Honeywell Pentax H1 / H3. 20 pages in English. Read the original PDF, download or print a copy without registration.
20 pagesEnglish4.7 MB PDF
Loading your manual…Open PDF directly
Document details
- Brand
- Pentax
- Model / document
- Honeywell Pentax H1 / H3
- Document type
- User manual
- Language
- English
- Pages
- 20
- File size
- 4.7 MB
- Category
- Film cameras
- Document date
- Not specified in catalog
Search available document text
Find a term, then jump to its page in the original PDF. Image-only pages may not be searchable; check the PDF for exact wording and diagrams.
Page 3 · Read text
www.butkus.us


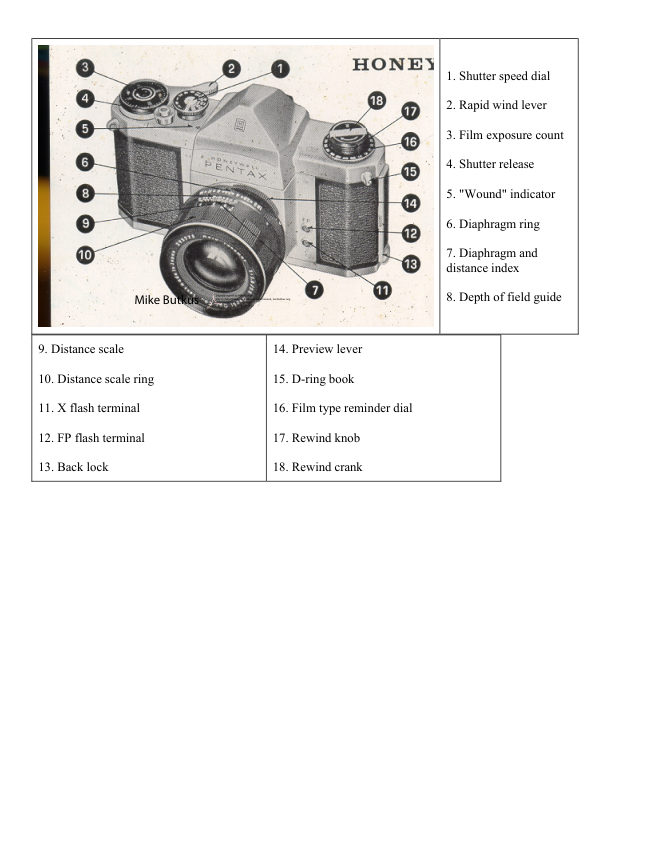
                                                           1. Distance index

                                                           2. Depth of field guide

                                                           3. Diaphragm winding lever

                                                           4. Distance scale

                                                           5. Distance scale ring

                                                           6. Diaphragm ring

                                                           7. Diaphragm index


                                  IMPORTANT...read this First!

1. The "R" on the rewind knob (17) of recent Honeywell Honeywell camera bodies is green instead of red
as on the previous models. Please note that the Auto-Takumar 55mm f/1.8 fully automatic lens with serial
number smaller than 462500 can not be used correctly on such recent models due to modification of the
Instant-Return Mirror and automatic diaphragm mechanism.

2. When advancing the film, be sure to stroke the rapid wind lever all the way until it stops.

3. Do not touch the surface of the mirror. If the mirror gets dusty, use a blower to dust it off, or dust
lightly with a good camel's hair brush.

4. It your PENTAX should need repair, don t try to fix it yourself. Take it to the Honeywell PENTAX dealer
from whom you purchased it. Further refer to the Warranty Policy described on the last page.
View original page 3Page 4 · Read text
HOW TO HOLD YOUR CAMERA

                   As a general rule, your camera should be held more firmly by the left hand
                      which does not release the shutter. If you hold your camera with the right
                        hand-- the hand which releases the shutter - it may cause movement. Very
                             often, pictures which are not sharp are due to movement of the camera.

                When you focus with the camera held horizontally, hold the lens barrel as
                          illustrated in photograph. Put the camera on the root of your left hand thumb
                    and little finger. Turn the distance scale ring with your thumb and index finger.


When holding the camera vertically, some people release the shutter. with the thumb (Photo A), while
others release it with the index finger (Photo B). Position B is more desirable for fast focusing and
shooting. With the PENTAX whether held vertically or horizontally, you can see your subject image
through the taking lens, and this enables you to compose, focus and shoot faster than with any other type
camera.
View original page 4Page 5 · Read text
www.butkus.us


1. Wind the rapid wind   2. Compose your         3. To view exact depth   4. Select the F stop you
lever.                     picture                  of field at-different      want by setting the
                                                   apertures with the H.3,   diaphragm ring
                                     move the preview lever
                                                     to "M" and view your
                                                   subject while turning
                                                   the diaphragm ring. On
                                                   the h-1, simply turn the
                                            diaphragm ring.


5. Set the proper          6. Set the H-3's           7. Focus                  8. Trip the shutter.
shutter speed.          preview lever on "A,"
                         or wind the 6 H-1' s
                      diaphragm lever for
                           full-aperture viewing.
View original page 5Page 6 · Read text
FILM LOADING
Avoid direct sunlight when loading your film

1. Open the back by pulling out the lock [13].

2. Pull out the film rewind knob [17] completely, place the film cassette into
the cassette chamber [23] and push back the rewind knob. Draw out the film
leader and insert it into the slit [20] of the take-up spool [21] If the slit is not
in a proper position to insert the film leader, turn the take-up spool with
your finger.

3. Turn the rapid wind lever [2] and make sure that both sprockets have
properly engaged the film perforations. Close the back and fasten the lock
E]


FILM WIND AND REWIND

To wind the film
4. Before turning the rapid wind lever, slowly turn the film rewind knob clockwise until a slight resistance
is felt. This prevents loosening or warping of the film.

5. The first portions of the film cannot be used for picture taking as they have already been exposed to
light. Generally, two blank exposures should be made before taking your first picture. Wind the rapid wind
lever until it stops. Watch to see that the rewind knob is turning counter clockwise. This indicates that the
film is moving from cassette to take-up spool. Trip the shutter and again wind the rapid wind lever. Set
the exposure counter [3] to 0, and trip the shutter again. Your camera is now ready for the first picture.
When winding the rapid wind lever for the first picture, the exposure counter automatically turns to '1',
indicating that the first picture is ready to be taken.
ALWAYS WIND THE RAPID WIND LEVER COMPLETELY WITH A FULL STROKE.
View original page 6
Page 7 · Read text
www.butkus.us


6. Turn the exposure counter dial
[3] in the direction indicated by
the arrow. DON'T TURN IT IN
THE OPPOSITE DIRECTION.
After the final picture on the roll
(20 or 36 exposures) has been
taken, the rapid wind lever will
not turn all the way as you stroke
it. This indicates that the final
picture has been taken on your
film.


7. After the final picture has been
taken, DON'T open the back or
all exposed frames will be
ruined.
View original page 7
Page 8 · Read text
8. Unfold the film rewind crank [18]

9. Depress the film rewind release button [25] shown in photograph 7 Turn the rewind
crank to rewind the film-into the film cassette. The film rewind crank permits rewinding
at a smooth, even rate. Under some atmospheric conditions, erratic or too rapid
'rewinding will cause static electricity' marks on the film. You will feel the tension on the
rewind crank lessen as the leader end of the film slips off take-up spool.

Stop rewinding when you feel this happen. AVOID DIRECT SUNLIGHT WHEN
UNLOADING YOUR FILM. (The rewind release button [25] will return to normal
positions you load your next film and turn the rapid wind lever.)

10. Open the back, pull-out (he film rewind knob [17] and remove the film cassette.
Bend the leader end of the film to indicate that the film is exposed and ready ' for
development.


BRIGHT FIELD FOCUSING

11. With the recent Honeywell Pentax camera with the
green "R" marking on the rewind knob, you can start
viewing and focusing before and after winding the rapid
wind lever. When the preview lever [14] on the H-3 is set
on "A", the diaphragm is fully open except for the
moment- of exposure.' On the H-l, turn the diaphragm
operating lever to fully open the diaphragm for bright
viewing and focusing.

12. Turn the distance scale ring (Ed on the H-3; ~ on the
H-l) until your subject image is clearly in focus. It is not
always necessary for you to view and focus with the
diaphragm fully open. In bright sunlight, you can easily
focus with the diaphragm closed to fl5.6 or fl8, and still
observe the depth of field. It is easier, however; to focus
with the diaphragm fully open as your subject image is
much brighter.


AUTOMATIC DIAPHRAGM

When the H-3's preview lever is set on "A" (Automatic), the fully automatic diaphragm is at its largest
aperture (f/1.8) at all times, except for the instant of exposure, no matter what aperture is set on the
diaphragm ring. When you release the shutter, the diaphragm automatically stops down to the
predetermined aperture-and the shutter curtains start traveling instantly. When the exposure is
completed, the diaphragm reopens to maximum 'aperture completely-automatically, and you are ready to
compose, focus, and shoot your next picture. If you wish to visually check exact depth of field before
making the exposure, move the preview lever to "M" (Manual).
View original page 8
Page 9 · Read text
www.butkus.us

This stops the diaphragm to the aperture selected and shows you exactly how much depth of field will
appear in your picture. The preview lever may be moved back to "A" before- or after making your
exposure, or, if you are making pictures in bright sunlight, it may be left on "M", which permits a constant
check of depth of field.

The diaphragm of the Pentax H-1 is semi-automatic and is opened to its maximum aperture by means of
the diaphragm winding lever. When the shutter is released, the diaphragm automatically stops down to
the preselected aperture. To fully open the diaphragm again, turn the diaphragm lever each time before
you trip the shutter. You may turn the H-l's diaphragm lever any time - before or after winding the rapid
wind lever, setting the shutter speed, or focusing. After the diaphragm winding lever of the recent H-1
with the green "R" marking has been wound to fully open the diaphragm for bright viewing and focusing,
the diaphragm will not be closed down manually to check the depth of field. Check the depth of field
before winding the diaphragm lever.

                             You may turn the H-1's diaphragm ring and
                                   change the preselected aperture after winding
                                         the diaphragm lever. For example, you may
                                   change the diaphragm ring setting from f/11 to
                                               f,/5.6 after winding the diaphragm lever; the
                                   diaphragm will automatically stop down to f/5.6
                               when you trip the shutter.

                            NOTE: When you do not intend to use your
                                   Honeywell Pentax H-l for a lengthy period of
                                          time, turn the diaphragm ring to its smallest
                                       aperture (f /22) to protect its spring mechanism.
                                     Don't keep the diaphragm winding lever open.
                                                      If it is opened, turn the rapid: wind lever and
                                        release the shutter button to release the spring
                                          tension.
View original page 9Page 10 · Read text
SHUTTER

                     The Pentax H-3 is equipped with the following shutter speeds: T. B.
                           1,1/2,1/4,1/8,1/15,1/30,1/60,1/125, 1/250, 1/500, and 1/1000 sec. The H-1
                         has identical speeds with the exception of 1/1000 sec. On both cameras,
                        only the figures 1, 2, 4, 8, 15, etc. appear on the shutter speed dial.

                      Adjustment of shutter speeds

                      Turn the shutter dial [E clockwise or counter-clockwise as you like, to the
                          desired shutter speed. The shutter speed may be set either before or after
                       winding the rapid wind lever. As you wind the shutter by turning the rapid
                      wind lever, the "Wound" indicator [3] becomes red showing the shutter is
                      wound. The indicator window blacks out as you trip the shutter button. For
                         use of the X setting on the shutter dial, refer to page 24.


With the shutter speed dial set on B (bulb) the
shutter will stay open as long as you depress the
shutter button. As you release your finger from the
shutter button, the shutter closes. When a long
exposure is desired while using the B setting, attach
a shutter release cable with a locking device to the
shutter button. This will permit "Time Exposure."
With the shutter speed dial set on T (time), the
shutter stays open after the shutter button is
released. To close the shutter, turn the shutter speed
dial in either direction. Unless you turn the shutter
speed dial? the shutter will not close.

CAUTIONS
1. At slow speeds - slower than 1/30 - support your
camera rigidly or use a tripod to prevent movement
of your camera.
2. To protect the shutter mechanism, trip the shutter
release before putting the camera out of use for any
extended period.
View original page 10Page 11 · Read text
www.butkus.us

MAINTENANCE OF YOUR CAMERA

1. Protect your camera from humidity, salty air and dust. Hot temperatures above -120°f and low
temperatures below - 55°f will affect the shutter performance. In extremely hot weather, try to keep your
camera cool. Never put it in the glove compartment or on the rear window sill of your car. When
extremely cold, try to keep the camera warm.

2. To remove grit or dirt from the camera body, use a soft brush or a dry soft piece of cloth. For the lens,
use only a spray of air, soft lens tissue, or a camel hair brush. For the reflex mirror, use a spray of air or a
soft camel hair brush only. Never wipe the mirror or lens surface with cloth.

3. Never use oil in your camera and do not touch the shutter curtains.


COMPETE SYSTEM OF PHOTOGRAPHY... from -photomicrography to macro photo .
. .
from macro photo to close-up . . .
from close-up to infinity . . .
with a complete range of accessories and lenses.


                  MAJOR FEATURES OF THE PENTAXH-1 AND H-3

Here's why Honeywell Pentax cameras are the outstanding values in their field:

Type: Single lens reflex.

Film size: 35mm; 20 or 36 exposures.

Picture size: 24mm x 36mm.

Standard lenses: ~ H-1: Auto-Takomar 55mm f/2.2 with semi-automatic diaphragm. H-3: Auto-
Takomar 55mm f/1.8 with fully-automatic diaphragm.
View original page 11Page 12 · Read text
Shutter: Focal plane shutter; single, non-rotating shutter speed dial.

  Speeds--H-1: T (Time), B (Bulb), 1, 1/2,1/4,1/8,1./15, 1/30, 1/60, 1/125, 1/250 and 1/500 of a
second.

  H-3: Same as H-1 with the addition of 1/1000 of a second.

Finder and Focusing: Pentaprism finder with microprism Fresnel lens brightened ground glass. Life size
image viewing and focusing with standard 55mm lenses.

Reflex mirror: Instant return type.

Rapid film advance: Single-stroke rapid wind lever transports film and winds shutter.

"Wound" indicator: When shutter is wound, a red disc appears-in a small window along side the shutter
speed dial.

Film rewind: Rapid rewind crank speeds film take-up.

Double exposure: Coupled film "wind set" prevents double exposure.

Lens moue: - Threaded lens mount for interchangeable lenses Adaptor rings are available for the use of
Leica-type and Asahiflex lenses.

Flash Synchronization: FP and X flash terminals.

Film type: Color coded film type dial with ASA ratings for color, black and white, and special films.

Accessory Clip: Grooves located on both sides of the viewfinder window frame accept accessory clip and
90° finder, available as accessories.

 As shown on page 2, Honeywell Pentax
cameras have a Fresnel lens with a-
microprism center underneath the ground
glass. As you look through the finder,
you will see that the Fresnel lens consists
-of many concentric rings which provide
the brightest possible image on the
ground glass.

The microprism is the portion pointed out
in this diagram. When your subject is in
focus, the image in the microprism will
be sharp and perfectly clear. If your
subject is not in focus, the H-3's
microprism will break the image. up into
many small dots, much like an engraver's
screen, while a number of parallel
diagonal lines will appear in the
microprism of the H-l. You can focus on
your subject at any portion of the ground
glass of either Pentax model.
View original page 12
Page 13 · Read text
www.butkus.us


DEPTH OF FIELD

Depth of field is the range the nearest
and farthest distances which are in
focus at different lens apertures. With
the Pentax, you can determine the
depth of field in advance by looking
through the camera's taking lens with
the diaphragm stopped down to the
desired opening.


DEPTH OF FIELD GUIDE

If you want to know how great the
depth of field is at a certain aperture,
look at the depth of field guide (8,2).
In figures 16 and 17 both the H-3 and
H-1 have their distance scales (9,4).set
at 10 feet . . . the lens is focused on a
subject 10 feet away. The figures on
each side of the distance index (7,1)
correspond to the diaphragm setting
and indicate the range of in-focus
distance for different lens apertures.
For example, if the lens opening of f/8
is to be. used, the range on the distance
scale ring covered within the figure 8
indicates the area in focus at that lens
opening. You will note from the depth
of field guide that the range from 8 to
14 feet is; in focus. Note that as the
lens apertures change, the effective
depth of field also changes. For the
depth of field when using extension
tubes, refer to pages 22, 23.
View original page 13
Page 14 · Read text
FILM TYPE REMINDER DIAL

                                   The ASA film speed rating of all 35 mm
                                            films is given in the data sheet packed with
                                        each roll of film. As the ASA number
                                              increases, the sensitivity of the film also
                                              increases. For example, for two films of
                           ASA 50 and ASA 200, the ASA 50 film
                                             requires 4 times more exposure than the
                           ASA 200 film.

                                   Use the film type dial (located beneath the
                                       rewind knock) to show what type of film is
                                              in your camera. Simply set the ASA number
                                           of the' film you Are using opposite the -
                                               pointer. Use white figures or black and
                                         white film; red figures for color film; and
                                         green figures for special film, such as
                                             positive film, copying film, etc. To check
                                       whether the camera is loaded, turn thy film
                                          rewind. knob clockwise. If it turns freely,
                                            the camera is not- loaded.


Depth of Field Table for Auto-Takumar 55mm F/1.8 Lens - F/1.8 F/16
View original page 14Page 15 · Read text
www.butkus.us


Depth of Field Table for Auto-Takumar 55mm F/2.2 Lens - F/1.8 F/22


                      FLASH SYNCHRONIZATION

                           The PENTAX has two sets of terminals--FP and
                             X. The table below shows which flash contacts,
                             which shutter speed and which flash bulb maybe
                             combined for maximum lamp efficiency.. Unless
                                  these combinations are rigidly followed, there will
                              be a failure in flash synchronization. Note the "X"
                                     setting between 61) and 30 on the shutter speed
                                        dial.

                           The speed of this X setting is 1/50 of a second,
                             and this indicates the highest shutter speed at
                             which Honeywell Strobonars or other electronic
                                    flash units may be used.
View original page 15Page 16 · Read text
INTERCHANGEABLE LENSES

The PENTAX offers many interchangeable lenses, all
of which are widely respected by professional and
amateur photographers for their fine resolution. The
photographic coverage of the various Takamar lenses is
illustrated on the next page. With focal. lengths longer
than 55mm, the subject image is seer' through the
viewfinder larger than its life size. Regardless of the
lens selected for the PENTAX,. there is never need for
an accessory viewfinder, ordinarily required for
rangefinder type cameras.

When interchanging lenses, hold the lens by the
distance scale ring (A) as shown in photograph 20.
When attaching a lens; filter, or lens hood, do not
screw it too tightly, as you may find it difficult to
unscrew.
View original page 16
Page 20 · Read text
Easily attached to the pentaprism housing of
                                     Honeywell Pentax H-1and H-3 cameras, this meter
                                          couples directly to slotted shutter speed dial and is
                                           extremely. convenient to use. Cadmium sulfite, cell
                                               offers high sensitivity; measures an angle of only
                                               9°, which results in complete exposure control.
                                         Operates on one 1.3v Mallory 640-R battery.
                                     Complete with battery and leather carrying case.

                                  See this link on a Wein Air replacement
                                        battery.


                     RESOLVING POWER OF TAKUMAR LENSES

Resolving power of all Takumar lenses is factory-tested by skilled engineers. There are three types of .
tests: microscopic aerial test, projection test and photographed film test. Resolving power of a lens shown
by LPM (lines per mm ) varies depending upon the method of resolution test. Takumar lenses have been-
tested for resolving power to conform to Asahi standards, which are higher than those set by J - Japan
Industrial Stand-: arcs). All Takumar lenses bear the seal of the Japan Camera Inspection Institute Which
insures the performance, standards. :

When testing' your lens performance .... Use a slow-speed fine grain film.

Generally, high speed films are grainy and are not suitable for resolution test. Support your camera on a
good tripod. Use a shutter release cable to prevent movement of the "camera. The definition of the picture
on the negative film may decrease if exposure and developing time are not proper. Time your exposure
and development correctly.

If you do your own developing and enlarging, see that your enlarger uses a fine quality enlarger lens.: If it
is not of a fine quality, your-pictures can never be sharp no matter what superb lenses are mounted on
your camera. Usually, the diaphragm of tine' enlarger should be closed down to f/8 or f/11.
View original page 20From the M. Butkus Camera Manual Library. Original publisher and archive notices are retained.
Check the model and edition against your equipment.
PDF verified 2026-10-10.