Sewing machines
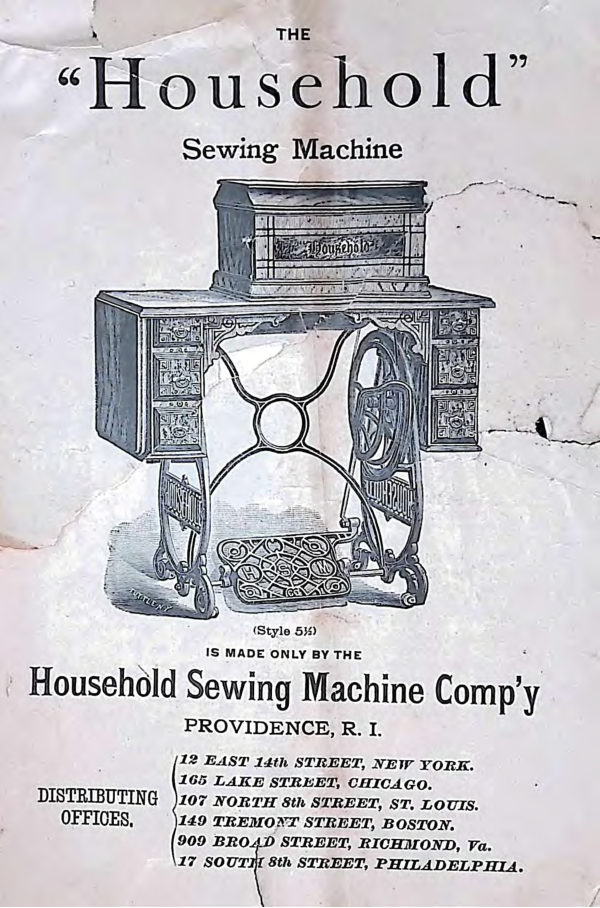
Household 5½ — User manual
User manual for Household 5½. 28 pages in English. Read the original PDF, download or print a copy without registration.
28 pagesEnglish4.2 MB PDF
Loading your manual…Open PDF directly
Document details
- Brand
- Household
- Model / document
- Household 5½
- Document type
- User manual
- Language
- English
- Pages
- 28
- File size
- 4.2 MB
- Category
- Sewing machines
- Document date
- Not specified in catalog
Search available document text
Find a term, then jump to its page in the original PDF. Image-only pages may not be searchable; check the PDF for exact wording and diagrams.
Page 2 · Read text
ifrAE
                                                              .,                        ''               ''
            Sewing Maehine.

                     •                                   Style  1,
   • Binck Walnut Table, .a-Polished,S!Dnll Drawer, Nickcl-Plntcd.
                               St-yZe 1¼,
   Snmo us No. 1, ,vith long~   'l'nblc, and with Lcuf nddcd on b:ick side .                                                   .
                                                ,     Style  2,
    Black Walnut Table, v:ith Drop i,caf, Gothic CoYcr, Small Drawer, Nickcl•Plated  .                                                   ..
                                                l!J'..,7.~le ~ ¾,
   Same as No. 2, except the Table is longer, ~~d the Leaf is'on the back side instead of
        end.   It bus also n Nest of Two Dra,vers.'"°'
                                                                                                                                             '                                  Style  3, -  ""
   F l.ack Wulnut Table, with Drop Leaf, Gothic Cover, Nest ol Three Drawers, Polished,
      •  -~ull ~i~kclcd.                                                              •,
..    ,                          SmJle 8¼,   •
   Bameas N~,   c~cr.pt with Extra Finish nnd Nickeled Ring Handl~s."'
                                  Style  4,                                                                                           •                                                                         .
    Black Walnut  Table, with Drop Leaf, Gothic Cover, Two Nests of Two                        "
        ench, Polished, Full Nickeled.                                                                              ,
                                  Style                               o,                           \  ••
    Black Walnut  Table, with Drop Leaf,  Gothic Cover, T,vo Nests of Three Draw~~
         each, Polished, Full Niclteled.
                              Styles  4¾ and 5-¾.
   Axe similar to Nos. 4 and 5, with Extra Finish and Nickeled Ring Handles, also with
       Ornamented Brackets  added.  Tho Drawer Fronts and Cover are  Stenciled, as
       shown in cut upon title page of this book.
                                   Style  6,
    "Three-Quarter Cabinet," with Gothic Cover, Drawers and Cupboards, Full Nickeled
       and Highly Ornamented Machine.  Pearled  ''Head.''
                                  Style  7,          •
     Full Cabinet, Highly Finished, Gothic Cover, Full Nickeled and Highly Ornamented
         ~   ?tiachine.     '' Head'! Full Pearled.
                                                                                                                                                                                           •
                                   Style  8,
   New ''Patent  Rolling Top Cabinet."   After using  the machine, the Rend  is readily
        dropped below the surface of the table: !Ind the   '' Rolling Top" is drawn up over
             it.   It is particularly adapted  to the use o~ those who have not the room or do
        not care to multiply pieces of furniture.                                                                                   '
View original page 2Page 4 · Read text
4                                                                                              •


                                Tf.fE
                                                                          •        I  l                                                                 0 ''                0           ''  o use.

                                                      ...
                                 iI\g  tl1e jY.[acl1iI\e.
                                                                                              •


                                                                                      •
                 To  Oil    lie- Maclii1ie.
     .lat.   Oil is needed wherever n t  oving surface comes in contact  with nnotber.  Run
            .. •ue   . wly as the oil is J);(t on,  to distribute    it  well  in  all the  bearings,  using
on\y.tbe  best oft~-  ~hl"'; ~nn_l:,ebnd of nll our agents .. Oil daily, or oftener,  if required.
Whene\9er the Mncbinc runs  hnrd,   it  is a suro  indication   that  more  oil  is needed, but
bt!fore oiling wipe off all the old oil, dirt  CJ' lint,  nnd if the  oil bns become dry or gum-
my, from long standing, use kerosene  oil o..• ~:?rpcntine, in the same manner as in oiling,
then use the ?tlachine a. few minutes  wi1:ri•!-ho Presser-foot  up o.nd the  Shuttle  out of the
race, nfler which wipe off clean nnd  "i! anew  with  sperm oil.  The plnccs for oiling are
numbered from 1 to  l '1,inclusive.   Nos. 1"1 nnd 12 arc oiled from the top of tbc liacbine
 at places  not shown  in the cut.  There nre three  oil holes  in tho  stand, one  in the hub    -
 of the Wheel, nnd one nt en.ch end of tho  Pitman.   The bearings of the Treadle  on the
 Treadle-rod  never need oiling.        .
     2nd.  The Shuttle should be oiled by moistening  n.woolen cloth with  oil and rubbing
 it across the  flat surface of tbe Shuttle  race,  (No. 45,) n.t least \wice n day, when  in con-
 stant use .                 •

                To  .A..cq1iill•e t11,e 1':l.otio1i.

       1st.  Raist  'he Presser-foot  by bringing  the  Lifter-handle  toward you, unthread  the
 needle and take  out tba  shuttle,  then  loosen  Nut No. 39 (sec cut page 5 ), turn  the
 Band-wheel, No. 38, fr,,m you,  start and stop the Machine until yon can readily  start and
 run the llacbine  in tt:'e "ight direction.
      Practice  first n-ith the belt  oft' and then with  it on, until you acquire the foot motion,
 having the Wheel turn from you.
     2nd.  Fasten  Wheel Yo. 38 with Nut No. 39 to  the  !lacbinc and place a piece of
 cloth on the Feed,  let down the Presser-fc,. c. O':l, the  cloth  nnd again  practice,  starting
and  stopping  the  lfacbine   until you do so  witti lease,  using  either one or both feet on
 the treadle.                                                                                                  '                                                                                                 •
                                                       I
View original page 4Page 7 · Read text
'
                 Xo  Pli1•ead,   tlie  J.1:Cacliine.

                                      (SEE PAGE  6.)

       1st.  Ruise tho Needle to tho highest point.

     2nd.  Place  the Spool on the Spool-J1in nnd pnss the thread  into the  slot in  the
 Tension-spring,  cnrrying  it to the  left, nnd under the Wire Thrend-goide,  back of the
 Ncedle-bnr, and then through the top or Necdlc•bnr  (19).

     Sd.  Cnrl")-rthe tbrcnd behind tho Tbrcnd Staple, then with the thumb and forefin-
 ger of the left hand draw  it through  the Thread  Staple, slip the loop thus formed over
 the Tnke-up Hook, then cnrry the thread back of the pin in the front of Needle-screw
                                             •
 nnd into the eye of the Needle.
                                                ,
                 To Tl1/1·ead  tlie  S1iiittle.         •

   We have further impro,~cd our Shuttle, mal,ing  it n man-el of simplicity.

    Only t"·o movements nrc nccessnf)' in thrcnding.                                                                                •

    Hold  the Shuttle in the left hand "·ith the 1>oint to,vnrd  }"OU, nnd the  th,read-slot
1.1ppcrmost; pnss the en<Iof the thread  through  the hole nt the end of the· thread-slot,
ns sbo"·n in Fig. 1, drop the bobbin into the Shuttle so that tho thrcnd  in sewing will
draw from the under side, then gently urnw tl1e thread towards you.                                                                                                                                                                                     ,...


                                         •


      •

                                          FIG.    t.                                                                                                                                    -•
   By putting a little  11rcssurc upon  the end of the bobbin  so it cannot  turu,  the
tbrcnd  ,vill be forced  lt.ndcr the lip of the shuttle  spring,  as in Fig. 2.


       •                     •


                                                                                                                                             •

                                          FIG.  2.


                                                                                              11   Do not pnss the thi-ct~tltb1·ough the  '' Spring-sword   or  .. nuido."

                            •
View original page 7Page 9 · Read text
9

                         Eo1• ,Sc111l11tf/•

     Pince tho work on the Feed nnd lei the  Presser-foot   dc1,vn upon  it.   Guide  the work
with the loft hnnd,  st.nrting  the ~lachine  ,vith  tho  right  hn.nd hy turning  ,vhccl  from you,
keeping  the work  free, so n.s not to drug or hold bnck on the Feed.
    NoTt~. The si1.e of the thrcn<l or,linl\rily used ndnpls  the  tension  to tbc ,vork,  thnt  i:1,
using n. coo.rac thrcnd   tightens  tho  tension, without  changing   the  llachinc,  nnd using n
fine tbrcncl loosens  tho  tension,  but  on some  \\'Ork  it.  is  nccc~sary  to turn  the Tension
Screws   j  for cxnmplc,  in sewing  laces loosen the  tension.

                        Tlie   Le1igtl1,  of"  Stltcl1.

    The Stitch  Rcgnlnting  Scrc,v  is bnck or tho Ncccllc ,\rrn  base.   (Sec  cut, page  6.)  To
lengthen  the Stitch,  turn  tho stitcb-scrc,v  to tho left;  to shorten    it, turn  to the right  .
                                                                            ....

            To  .11£1:jiisttlie   P1·cstJ'ltl1'e    011,  JY01•li.

    Hcnvy goods require more pressure  tnnn  light  goods.
    To increase  tho  pressure,  turn  Presser  Scro,v  nt  top  of  )lachine   to the   right;   to
decrease   it, turn  to the  loft.   (Seo cut, page 6.)

          To Raise   tmid   Loive'I'  tlie  Feeit  BOJJ•.

    Turn  the 1\lnchinc Rend bn.ck.  Tho link nttuchn1cnt  underneath   will be fountl  to laold
it securely.  On tho end of Feed-lever  will be found Lwo ...\djusting  Screws,  loosen the 3ma11
one on upper  side  of Jover, then  turn  IJLrgc sere,,~ to  tho  right.  to raise  Feed,  to the  left
to lower tbc Feed, then  tighten  the  small screw.   (Sec  cut, pngc 3.)
    The Feed only requires  to be raised in sc,ving very thick  goods.

                                                                             I
                 To  Beo1ilate    Te11sio1i     •                                                 .
    The ben.nty of the  stitch  depends  lnrgcly upon  the  tbrcnd  being  drl\wn evenly  into
the goods, so tbo.t it will show  o.like on both  sides  of the   \\"'Ork,  and  this  depends  upon
the tensions.    If the  thrcn.ds  used  nre  of the  proper  size  for  the  material  sewed  nnd
both tensions  nrc  cqunlly  tight,  the  threa_ds "~ill be drawn  together  and  locked   i~  tho
centre of the goods, o.s shown  in Figure  1.
                                       Jfig.I.
            3 ..:-~-

      If tbc  thread  should  be  straight  along  the  under  side  of the  g-,,od-s. as shown  in
Figure  2,


 it  is bccn.uso tho  Shuttle-tension     is  too  tight,   or   bcc,,uso   the  Up1,er-tcn~ion   i:: tM
 loose.
View original page 9Page 10 · Read text
10

       If  the  thread  should bo  strniigh, al.ong the  upper  side  of  tho  goods,   n.s shown
in Figura 31


 1t  is because  tho Sbulllo-tension  Is too  loose,  or  because   the  Upper-tension    is  too
 tight.
    When tho tensions nru ouco 11ro11crlyadjusted   it  is rarely necessary  to change  thctu;
when  it. is needed, obscr\'O the foUo,ring directions   :
       1st.  To niter tho Shuttle-tension:  Turn the  tension-sere"'   in point. of Shuttle  to the
 1·ight to iucrcnsc, nnd to the left, to lessen the tension.
     2nd.  To niter the Up11er.tcnsion:  Turn  Thumb-scre,v  (28) to  tbc right  to incrcnse,
 to tho left to lessen the tension, ns indicated'   by nrro,v.   (Sec cut, page 6.)
     :As tho Shuttle-tension  hns been set right  for general work ,,·hen the l\[achine lea'\"cs
 our hnnds,  as before e~i,luined, nny regnlntion  of the  tension  in  this respect should be
 ma.de by changing  the u11pertension i if, however,  "'ben the upper tension  is so regulntcd
 that the lock  is in the centre of the goods, both threads  appear to be loose nnd the stitches
 and senm  nut s1nooth and  firm1 then both  icnsions   arc  too  loosr  and cacJt should  be
 equally  tightened.
   •  If tho under thread cannot ho properly drawn  up  ,vitnom.••11:lvingtbe  upper tension
 so tight  that the thread  brenks,  or  if, when  the  tcn'stons arc e,·enly  balanced  the goods
 arc  "drn,\"n"  or "puckered,''  (w·hicb will occur only when sewing very light  or "slnzey"
 fabrics,)  tl1e Shuttle-tension   is too tight and  should  be loosened by turning  the Shuttle-
 tension screw to tbe left.   If necessary, adjust  tho upper tension (28) to· correspond.

                          Tlic  Belt   l\ro.  48.

    The l(achine  works best and runs lightest  with  tbe  Belt as loose  as will servo to
 drive the needle through  tho goods.   If too  tigbt    it cnn be stretched  n. little by pulling
 on the Belt, care being taken not. to pull so lu\.rd as  to  tc.ar tho book  out;   if too loose,
 unhook the Belt and  cut  off enough to tighten   it  properly,  then  with  an  n.wl or some
 pointed instrument  puncb a.bolo in the end of the  Belt in order  to hook the Belt-hook  in
 again.  The Belt should not be twisted when booked.

                       Neetlle  011id Tlt1•ead.
      NoTF..  Every genuine Needle bns H.S,M,Co. stamped  on the shank.
      1st.   Select the thread to suit  the goods,  next  select n Needla suited to both thread
 and goods.
     2nd.  To secure tho greatest  strength of n. seam  both  threads should be alike, but a
good effect in the n.ppen.ranccof the stitch is sometimes  obtained by using n. different size
from that used below. In stitching with silk for ornamcntnl work only, and where strength
 is not requircd 1 it is economical to use cotton  thread  in  the  Shuttle,  ,vhicb should be of
good quality.   The  " Household"  docs not  require  do  large  n. thread as in hand sewing·
                                                                                                                                                                                                      • to give the same strength  of seam.
     3rd.   'rhe Needle should be of such n. size ns to admit  tbc free passage of the thread
tbrougb  the eye.   If too  large, stitches might  be missed,  as tbe loop formed i3 not kept
1quarewith  the  Shuttle,  and  it  is  difficult  to  force a large  Needle through goods of n.                                                                       ..
View original page 10Page 11 · Read text
11

close fine texture.    If too small,  tho  thread  will  wear and  break  in passing  through  the
~ye, while  the Needle will break  in the goods.

             To  Select  Needles  a111,clPl111•eatl.
    The follo,\"ing table  ,vill be found useful as a general  guide,  "·hich  nuiy be varied as
experience  nncl judgment  suggest.   ~ro.ny operators  are satisfied  to use ono or two medium
size Needles for nll their  ,vork with  this iracbine.
    Examine  table on Cloth Plate,  but tbo following mny be  t\ useful guide:
For -Heavy Woolen  Clothing,       .    .    .    .  20 to  30  Cotton.              No. 6 Needle.
For Hct\YY,, 7oolcn Clothing  nnd Flannels,  40 to  50    "      B Silk.  No.5   "
For Dress  linking,      .    .    .    .    .    .    .    .  00 to  80    "   0  or  i\.   "   No.4    "                                                                                             ccFor bluslin  or Linen,      .    .    .    .    .    .    .  90  to 110     "    0  or  ,\   "   No.a
For  fine f.,incn Under  Clothing,       .    .    . 120 to 150    "  00  or 0   "   No.2                                                                      "
For F.mbroidcry, Lawns,  ~\-:c. .    .    .   •    . 200  to  :'100    "      000   "   No. l                                                                      "
   When first-class  smooth  running  cotton   i:-; nsed,  needles  one  or two  1111111hersliner
than  tho nbo\"e described  tuny be nscd nlso.
   A plo.tc ,vith  extra  large  needle  hole  is furnished  when  the  i\facbine  is wa.nted for
hen '"Ywork.
                                                                                                                                                                                                    •
         To Re11iove  Wo1•lc f1•01111  tlie  .llfacliinie.
     Rnisc the Needle-bur  to highest  point.   Take hold of upper  thread  at left or Tension-
spring,  \\rith forefinger of right bnnd, pulling  the tbrend towards  you.   Should  tbc thread
bo drawn from under  the Spring,  it  will  return  to its pince  ,,·hen  the llachine   is started.
'i,ift the Pre&scr-foot, draw  the work  out from you and  to  the  left,  cut  or  break both
threads nbout three inches from the Nccdle.
    Be careful not to bend or spring the Needle.


                                                                                    raise  the  Presser-    Stop  the  ~lncbine  ,vithout  raising.  the Needl~ out of the work• ,
foot and  turn  the wr.,rk in the manner  desired, using  the Needle  as a pivot.
View original page 11Page 15 · Read text
15

 on n line with  the Needle,  nncl so ready to be stitched  down.   Secure  the Hemmer in


                                                                                                                                                                        9
                                                                                                                                                                                                                                                                                                                                                       , pince by n1enns or the Guide-screu   nnd proceed ns in ordinary hemming.

         ,\ bo:t, containing  n  set  of Plate Hc1nmers, cnn he obtained  at small  cost of any of
 our ngents.


                                    Felli11.y.

                                                                                                                                                                       •   •                                 (SEE P,\GF. 13.)

       If the Foot-Hemmer (which  is also the Feller)  is on, it can be used simply as a Presser-
 foot in running  up the seam, the edges of which  should  be trimmed   if necessary,  ns in
 bnnd felling.

    Open the work  fint, wrong  side  up,  tbe senm stnnding up straight,  a.nd taking  the
 work near the beginning  of the  first seam in tue  left hnnd, and the ends of the  thread  in
 the right  llnud, dra,,  the edges into the Feller, nnd let down the Feller,  without  disarrang-
 ing the "·ork.

      Slightly lengthen  the stitch, and sew the second senm.

                                                                                                                                                                                            •
     NoTr.. Tbc wido edge should be of such n size ns to just  fill the Feller 1 and should be
 kept smooth.  The narrow edge should be trimmed ns close as secu.rity permits.   In sew-
 ing the second senm or n. fell, the  first senm should pass close to the left-hand  edge of the
 opening in the  Feller,  O'\'er which  both edges of th c cloth should be mnde to pass.  The
 Feller nuLy be adjusted  to the  right  or  left, so as to sew close on the edge of the  fell, or
near  the  first seam, as desired.
                                                                                      •


                                                                  ..
                                          (SEE  PAGE  16.)

     Attncb  the Binder t.o the Bed of the ~lacbinc by the Guide-screw.   The Screw mnst
be set down very firmly, so that the Binder will not mo~e.

     For Binding with Dru.id, pnss the braid through  the scroll,  o.s in the engraving  .
 •
     .After the Binding hns been  drn,vn through  the  Binder nnd nlong under  the Needle,
place the ,York between  tho  t,vo scrolls, nnd pnss  it along under the Needle, within  the
folds or the  Bindei:.  Drop the Presser-foot and begin to sew.

    When you ,\·ish  to put on a hem binding,  cut your  binding  material  about  three-
fourths of nn inch  ,ride, pince tho binding  in  the  scrolls,  o.n<l the mntcrinl  to be bound
between the scrolls, lot do,vn the Presser-foot  nnd hold your  "'Ork in the position shown
in  illustrntion,  keeping  the  edge  to  be bound   bct,'"ecn  tho  scrolls  und  well  buck
against  the binding.  The binding  sbo,·ld be cut bins.   Ordinnry  binding,  nboni  three.
,eighths of nn inch wide, cnu nlso bo put on '\\·ith this Binder.
View original page 15Page 17 · Read text
17,


                         •                                       0111, (lllt(l             Sewi?i(J  Lace                                                                           HCJll'l)'l      i Jl{/,
                                             i1i    011,e  01>e-1•<1tio11.

   When the heln  is ,vcll stnrted,  rnisc the Presser  on the Low  I~ifter, nnd nl$o rais~  the
Needle.  Then pnss the enu of the lncc tl1rough the slf1t in the siuc of tbe Hcn1ml'r, carry-
ing  it back under  the Needle, nnclcr the back of tho Rcn1n1er, nthl  on top of the hen,.

    Be sure  tbnt  the hc111 is not  displnccll  in the  Ilon1n1~,-. t\ntl   that  the ~ccdlc  will  !?"'
down through   lncc  nnJ  hc1n together.    'l'h~n  let  do\\·n  th~  l'r,~~~'-'r. :\nll  ~ui<lc the L\,'e
oYcr the front of tho Flc1nn1cr, kooping  it "· ..•11into  tth,  slot.
                                                                                                                                      •
View original page 17Page 19 · Read text
19


      Attach  tho Tuck-~larkcr to the M11cbino,vitb Guirlc-scrc,v.   Connect. tbe Tucker  to the                                                        .
  Needle ,vith  the s1111111hook  on  the  arm.  The  figures  on  the Gauge  sbo,v tho width  or
  tke tuck.  The figures on tbe  ~larker  show  tbo width  of space.
     To make tucks  just meet, of any desired  \\•idtb, pince the Gauge  and  llo.rker so that
  the Jnclicntor  "'ill 11oint to the same figure on both  lfnrkcr  and Gauge.
     Tho space cnn be regulated by moving  tl1e ~larker  to  the  left  the same distance  ns
  the  desired  space.   For  cxiunple,  to make a three-eighths   ihch tuck  \'fitbout  any space,
  let  Indicntor  point  to the  figures ¾ on botb li(nrker and  Gauge.   Tben  if a. c,ne-fourtb
  inch spncc  is desired, moYc tbc  }larker  to the  left. one-fourth  of an inch,  the indicator
  ,vill then 11oint to ½ inch on i\lnrker.
      In commencing,  fold  the  cloth  to bo tucked  nnd  pince  it between  the  upper  and
  tower p:atcs of the ~larker  close  to  the Gauge;   after  sewing  this,  fold  the cloth  at the
 murk and proceed  ns before, being  careful to place  the edge of the tuck  just made so it
                                ~                                                                                                    .
  will run  underneath   the mnrking   blade,  so as  to  prevent  more  than  two  thicknesses
  of the  cloth  pnssing  over  the  blade  while  being  creased.   BJ~attending   to  this  a  far
 more distinct  crease  ,,ill  be obtained.
•       NoTE.  When no space  is desired between  tucks,  it  will, of course,  only be ne~essar-1
  to moYc  the  creasing  end  to  th-   left of tbc Ncooie  a. distance  equal  simpiy  to double
  the width of the  tuck.


                                                                                                                     •

                                        ~
                                                                                                                                                     i:-   •-i                                                                                                                                   •                                                                                                                                                                                        --,-._~-                                                                              - ~-


       '


                                                                                •
                                                           '' Maolii1ie  Head.''
                     •
View original page 19Page 20 · Read text
20


                                                                                          -""•··                                  -
                                                                                        •
              ..


 .       ::-·~:-~, ;?;, .~  ....  . .


                                                                                                                                                                                                    •


                                Quilti1ig.
                                                        I
     Pa.ss  the  Quilter  through  bole  in  Presser-bar,   adjust  the  Quilter-guide  to tho
right of tbe Needle according  to the desired spnco bet"•een scams, and high enough to
allow  tbe goods  to 1>nss freely  under   it, and  then  fnsten  the  Quilter  securely.
     In  starting  to quilt,  use the outer edge  of  the  cloth  for. the  first guide,  or  else
crcns_e the  cloth  on  the right  nnd lot  the  Quilter-guide   follo,v tbe  crease, quilt  the
remainder by keeping tho Guide in a line and over the seam Inst stitched.
    NOTE.  Large quilts should be mo.de in squares  or sections and then se,ved together.
In quilting  squares or dintnonds the sen.ms should be on an equal bias.
                                                                                                                                                        •
View original page 20Page 21 · Read text
21


           •

   Remove the Prcssor-foot and attach  the Corder to the  Presser-bar  so that the Needle
will  pass  through  the  centre  of  the  Needle-hole.   Pass  the  cord  through  hole  into
the tube of the Oorder, which  is  slotted  so that  t.be cord can be easily pulled  into  the
tube;  always draw the end of the cord back of the needle before commencing  to sew.
   To commencecording, a. seo.mshould first be mo.de in the cloth, or else fold the piece
to be corded and  place   it  so that  the  under-pieco  will come under  the  foot of the
Oorder, o.nd the other  piece  will come over the tube  of  the  Oorder;  then draw  the
cloth close up to the end of the tube  and  let down  the  foot without  disarranging   the
work;  then proceed to sew,· holding  the work slightly  to the left and keeping   it smooth
in front of the Needh:, so as to lay· the cord firmly o.gu.inst the  fold.
    The Corder has a groove in ,vhich the last seam or cord made should pnss.
View original page 21Page 22 · Read text
22


                                                                           _.


     Braiding is the act of sewing Braid to patt-ern,  r..c; shown by the word "Household.••
                                                                                      •     Raise the Needle to the highest point.   Insert  Braider  in the hole  in the Prcsscr-bo.r
and fasten same as Quilter;  then insert short end of crooked wire in hole ~n top of Face-
plate, and p]acc Epool of Braid upon  it.  Next  insert  Braid  in  flat tube of Braider and
pass it under the foot about two inches.  •Lay your  stamped  pattern under  the foot and
proceed as in p]ain sewing, guiding the material   to the Jine.  In turning  short. corners nr
curves, raise the Presser-foot  sJlgbtJy, and then pull back on the Braid to take up the slack.
View original page 22Page 23 · Read text
23
                                                                                    •

     ---    ·--
                                                                                                                                                            •     •


                                             Ri1,jfiil1ig    •

    Attach the Ruffler in its place with  screw, first  connecting Lever-arm on th~ Needle-
screw •nut.   Adjust  it so the Needle ,vill pass down through  the Needle-bole  in its centre.
    In common or plain ruffling, o. strip of material  {cotton  or muslin  is most generally
osed) Js placed under the Feeder, and far enough back under the Presser-foot  so the Feed of
the  ~Io.chine will  catch  the goods ;  then  !o,ver the Foot and  proceed  to  opera.to the
Mo.chine as in ordinary sewing.
                                                                  '   To mnke· the  rufflo or gather  fuller, move Lover on  the Ruffler  to  tbe  right.  To
make ruffle or gn.tber not as full, movo Le  er to tbe left.
                                                              \
View original page 23Page 24 · Read text
24

                      B1iffl,Vll,(J Bemoeen Pwo Bwnds.

       Insert.  the edge of the pieco to be gathered  or  ruffled under and  next  to Feeder  ;
 place one band next to and over tho Feed of tho  ~lacbine, or, in other  words, under the
 piece  to be  gathered;   then place tho edge of the  other  bnnd over and n.bove Feeder.
 Let. down the foot and so,v as usual, being careful  to hold tho bands straight and smooth,
 with  the  ruffle in proper position.


      Attnch  the  Ruffler same as before explained.   Push Lever  to  the  right  to mako o.
•
  very  full  gather.   Have stitch  a  little  shorter  than  ordinary.   Use Lonsdale  cambric
   if the trimming  is being made for white garments   tbnt  nro to be wnsbed.    It can be
  made  of  other  materials Bnd in colors: n.nJ. in  this  manner, either straight  or scalloped,
  forms n. beautiful trimming for children's dresses,  ladies' underwear, &c.
      Out the Lonsdale cambric or other material  in  strips  about an inch wide, and cross
   the goods i  fold the strip in tho center nnd press  tho folded edge down smooth.  Pass
   the folded materinl with folded edge to the   left,  under  the  feeder and proceed to sew.
  While sewing, move the goods to the right and  left alternately  far enough to make tho
   scallops  as deep as desired.  The scallops cnn bo mndo uniform  in length  by counting
   tho snme number of stitches between each alternate  movement to the right and left.

       This  pleated  trimming can be ,made oitber  straight   or  in  scallops, and sewed on
   to the goods or gnrments desired to be trimmed  in one operation, by placing the goods
   the same aa in gathering and sewing on.

                       BiijJl,1111u a,,1itl  Sew'illig   01i.

       Place the piece to be gathered or ruffled under  tho Feeder,  and the piece or garment
   to which the gather  or  ruffle Is to be stitched  must  be placed next to the Feed of tho
   Machine, or under  the piece to be gathered.   Then sew as  in  plain  ruffling,  holding
   the lower piece slightly, so it will not be "puckered."                                     •
                                                                                                                                               r..

                 Po Mal.·e Hemstitcli.                                                                                                                                                              •
       Fold  blotting-paper,  which can be readily done, until you have a thickness  corre-
   sponding  to the  opening desired in tho hemstitching   ; put one of the  pieces of goods
   under tho paper and the other above it;  put  all under. the Foot and sew through  all.
        After being sewed remove the paper cnrefully  and open the hemstitching, one edg...
   of each, or either piece may be cut and ptiSsed through  tho Hemmer or n. row of stitch-
   ing can be passed alongside tho hemstitch and the double edge finished as you choose.

              To  Enib1•oidet•   with    Oli~1iille  .                                   .
      Wind the chenille on the Bobbin and drop the Bobbin in the Shuttle as usual; loosen
   the Tension-screw of the Shuttle so ns to remove  all tension and place it in the Shuttle
   earner u  usual.  For your upper tbrend use  sil}c of the same color as the chenille, sew ..
   ing with a tight upper tension, so thnt it ,~ill dro.w tho under tbrend, or cbenillet till  it can
   just  bo seen through the cloth.  Bnve the  po.tt~rn you wish to embroider stamped on tho
View original page 24Page 26 · Read text
26

        GENERAL  INSTRUCTIONS    .
                                                                                        •
•                      Ca1·c  of'  tit c  1liacl1lt1ie .
       E,cry  1\Iachine, before leaving the fnclory, hus uecn  cnrcfully ndjustcd, nnd minutely
  lnspected,   hn,·ing  been tested  "rith  lioth  conrsc and  fine thrcnd,  and  it is sent out ,vitb
  a sample of "·ork  under  the  Presser-foot,  nnd  the  ~fnchinc properly  thrcnded .
            ..\.fter using  t.hc )Ja(',hinc, sec th:1t it is nl,vnys  \\·ell clcnncd before putting   it o.way.
       Before commencing  to  scu·, sec  if. your  ~lnchinc runs  hen\"ily, nnd  if it does, oil as
   instructed  on pngc -t.    J\. )lnchinc  that  bns stood  idle  for n day or t,vo should always
  be cleaned nnd oiled before using  it ngnin.
     Do not tamper  ,,ith  the adjustments  of the  :'tlachinc.  Serious  trouble  is almost sure        •
   to  result  from nny unnecessary  meddling  "·ith  the  ndjustmcnts   of tho  llachine  by an
  inexperienced  person.

                                                                                   '"  May be caused  by the llnchine  being ,vrongly  thrended,  or the Tension  being too tight,
   or by the Needle being  too small.  Tbc "Household"   drn,vs a  tight   stitch   ''°ilh much
   lighter  Tension thnn most )fncbines.   Sometimes roughness  in the eye of the Needle may
   occasion  the  breaking  of the tltrend, or the hole in tl;c Needle-plate may be roughed  by
   the breaking  of n. Needle, or the Presser-foot mny be turned  so that  the Need]e touches  it,
   or the Needlo bent so ns to rub in passing through the bole in the Needle-plate  .

   ••
                                B1•eltl-,'il1ig    tlie  U1itlm• Tli1·eaa
   l[ny be cnused by the Shuttle being \Yrongly threaded,  or by  the Bobbin  being  loosely
  wound nnd the thread tangled, or bJ~its being woun.d too. full so as not  to turn freely iu
   the Shuttle.
                         Special   hist1•iictio'lis.
      Be  careful  to use  perfect Needle~ of proper  size for the  thread  (see page 11)1 and
   not to pull upon the ,vork while sewing.
         If the Tensions nrc cqunl 1 tbe  stitch   ,vill be  alike and  unifornf-o-.1both sides of the
   material.   (See page 91 Fig.  1.)           •
       For seams which may require  to be rav.elled out, len.ve the upper Tension loose;  the
   Shuttle  thread will then  lie straight• on t}le'.under side of the material sewed, o.nd mny be
  drawn out.   (See page 9,  Fig. 2.)                  '
     To run a. go.thering  tbread,  lea.ve the upper Tension  loose, and use coarse thread  in
   the Shuttle.
      The Belt should alwn.ys be removed from  tl~c wheel  (38) when  the Machine is not   •
  1n•  use.
                     Me'J'''l'iclr,'s BeatltlJ-  Woul1itl  Bobbinis
  For family  or manufacturing  11sc, can be  obtained  of us  or any of our Agents.  They
   so.ve the frequent re-winding of Bobbins.   Price, 0 cents  per box (3 bobbins, 200 yards.)     .
                                                                                                     •
        •                                                                                                                                                        •
  For Leather Work, are furnished by our ,\gen;.; .
      The "Household"    .t\gcnts  also supply   all  tho  various  .t\ttnchments   tho.t mo.y bo
   required.                                                               J   •
View original page 26From the ISMACS International. Original publisher and archive notices are retained.
Check the model and edition against your equipment.
PDF verified 2026-10-11.