Film cameras
ICA Polyscope User manual
User manual for ICA Polyscope. 14 pages in English. Read the original PDF, download or print a copy without registration.
14 pagesEnglish4.4 MB PDF
Loading your manual…Open PDF directly
Document details
- Brand
- Ica
- Model / document
- ICA Polyscope
- Document type
- User manual
- Language
- English
- Pages
- 14
- File size
- 4.4 MB
- Category
- Film cameras
- Document date
- Not specified in catalog
Search available document text
Find a term, then jump to its page in the original PDF. Image-only pages may not be searchable; check the PDF for exact wording and diagrams.
Page 1 · Read text
www.butkus.us
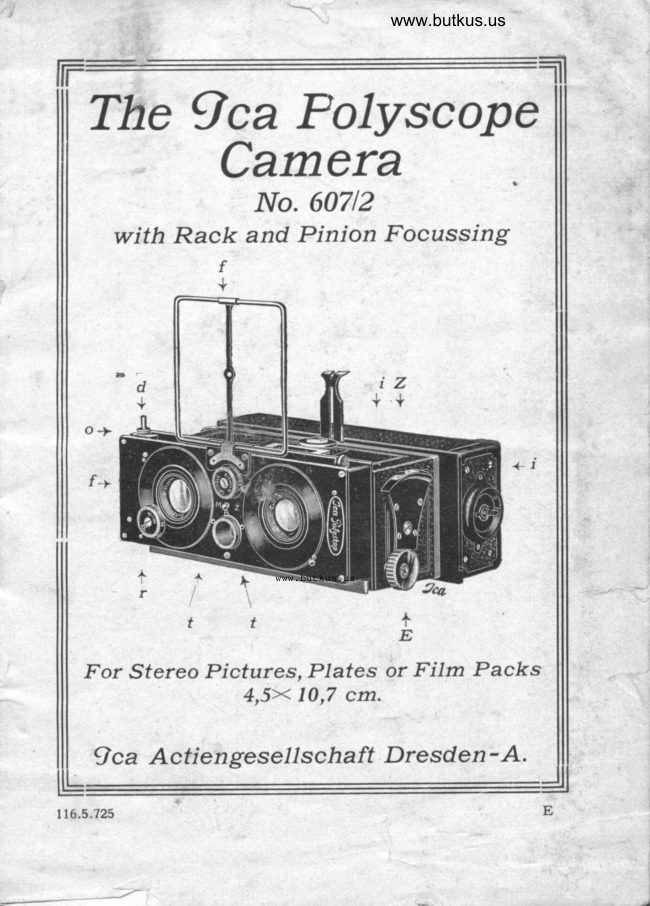
The 0ca tolyscope
     Camera
              /Vo. 60712
  with Rack and Pinion Focussing
                     f
                +


o->

 f->


                               www.butkus.us
      tta
For Sfereo Pictures, Plates or Film Packs
             4,5x 10,7 cm.

                                             orr - A. ?ca Actiengese// sehaft Dresd
View original page 1Page 3 · Read text
www.butkus.us


        Fis. r


                                                DN:ou=butkus.org,Date:cn=Mike2021.04.16signedButkus,email=mike@butkus.org,by18:53:24Mikeo=ButkusButkus-04'00'camera manuals,c=USMike Butkus   Digitally


       !


      {
             L
View original page 3Page 7 · Read text
IMPO        NTOTICE      ^RTAAITff r's indispensab/e to get familiar with the working of the
camera and changing box, with this book of .rnsfrucffons
   before one, before taking a single picture with it.


Focussing (see Illustration on cover)
The Polyscope may be racked in and out so as
to focus sharply on all distances from one yard
up to infinity oo.
Having guessed or measured the distance as well
as possible, the fine focussing is done by means
of the rack and pinion, which is released by the
knob E, on both sides of the camera, so that it
is convenient for left-handed people.
On the front right-hand side of the camera, over
this knob E, there is an engraved metallic scale,
on which are the figures 1, lrlz, 2,3, 4, 6,8 and
10, also the sign oo meaning infinity.
The infinity sign ineans that when the indicator
is on this point, the lens is sharply focussed for
all distances beyond 10 meters (l t yards).
Even for objects a little nearer the camera, it is
sufficient to stop the lens down a little to get a
thorough depth of focus, so that the plate appears
sharp all over.
There is a little indicator Z that runs over the
meter distance scale while the camera is being
racked out, so that the number of meters at which
things are quite sharp may clearly be seen.

4
View original page 7
Page 8 · Read text
www.butkus.us

The Finders
The camera is fitted with two finders, one the
ordinary brilliant view-finder built into the body,
used when one can hold the camera breast-high
and look down on it, and a direct vision wire-
frame finder, that lies flat when not in use.
To use the latter it is sprung up into position,
the back-sight behind the spirit-level pulled up,
and the range found by peeping along the little
groove on the top of the back-sight held in line
with the central hole in wire frame.
As both finders show exactly the same picture as
that on the plate, everything that is actually on
the plate must be visible in the finders.
Rising front (nig. 1)
In certain cases, such for instance as the taking
of high buildings, spires or trees, it is necessary
to raise the lens or lenses, and our Polyscope
Carneras Nos 60T12 and 607 13 are thus provided.
This is easily done by holding the camera in both
hands and pushing the front part of the camera,
that carries lenses and shutters, up with both
forefingers at once.
Then by pressing down on the top with both
thumbs, the front falls into its normal position,
after the picture has been taken.
View original page 8
Page 9 · Read text
THE CIIANGING BOX
Taking out the plate-holders
                        (Figs. 2, 3 and 4)
The little button B (Fig. 2) must first be placed
over the word "Offen". The exact position is shown
by a little engraved notch.
The two ends of the cross-bar C must now be
placed opposite the O's, and the little door can
then be taken out.
The Changing box should then be taken in the
left hand, with the handle to the right, and the
number-dial F (Fig. 4) on the upper side.
By means of the handle D (Fig.5), the drawer is
pulled out as far as it will go and then pushed
in again.
As it is pushed in (nig. 4), one of the plate-holders
falls out of the open end. This movement is con-
tinuedtill all are out, and the box is empty.
When three or four plate holders have been re-
moved in this way, the others generally fall out
easily of themselves.
Loading the Changing-box
The dozen empty holders are loaded in the dark
room with the sensitive plates. The film side
must lie outwards and be carefully freed from
dust.
If the recording dial (f ig. 4) does not sta nd at 12,
the drawer must be slid in and out until it does
show this number.

6
View original page 9Page 10 · Read text
www.butkus.us

The changing box should then be turned upside
down and the loaded plate holders slid in, with
the film side uppermost, and the slightly turned
up edge of the holder towards the inside (Fig. 3),
in the broad groove of the open end, each holder
under the other.
Each holder that is pushed in presses those al-
ready in the changing box upwards. When filled
up, the box is easily closed by replacing the little
door and turning the cross bars again to Z (nig. S).
Closing the Changirg box
In order to close the changing box perfectly light
tight, place the button B (fig. D on the word
"geschlossen" pull out the drawer as far as it
will go and push it in again.
It  will then be seen that the changing box is
hermetically sealed by a slide of blued spring steel.
If extra precaution is needed so that no one shall
meddle with the changing box, or so that it shall
not be opened accidentally, the button .B simply has
to be pushed farther on to the word "gesichert".
Attachirg Changirg box to Camera
Take the apparatus in the left hand, with the
knob E (see cover) on top, and the changing box
in the right hand, with the recording dial upwards,
place it under the camera, with its two grooves
pressed against it, and, pushing aside the cross-
bolt A (nig. 6), push it along till home. It  is
then held fast by the cross bolt A.
View original page 10
Page 11 · Read text
Separate dark-slides or plate holders, and film
pack holders are attached in exactly the same way.
Exposure
                                                           if it .lt"=To get the box ready for an exposure'
been closed with the button .B on the wolgs "ge-
;t.h;foi-g"."rtf""r"rr", turn this now to "offen",                                 go and pushpull the drawer out as far as it will
                  done to remove the blue steelit in again. This is
slide and to set the top plate free for exposure'                                                seeFor instructions in the use of the shutter'
farther on.
Changing Plates (r'ig. s)
The exposed plate should always be changed
immediately     the picture has been taken.                 "ft"r                  in the left hand, with the lensTake the camera
 upwards, handle D to the right, pull the drawer
 right out as far as it will go, and slide it in again.
 This operation places the sheath with the exposed
 plate under-n.rttt all the others and brings the
 next new Plate into Position.
 The recording dial shows the number of plates                             (nig. +)' that have been exPosed.
 Care must be taken to draw the inner part of the
 changing box out as far as it will go each time,
 and to press it back home again. If the pulling
 out and in are only partly accomplished at any
 time, it may lead to disorganizing the whole
 working.

 8
View original page 11Page 12 · Read text
www.butkus.us

 If the thing should get blocked as a consequence
of above having been neglected, there is nothing
to be done but to take the changing box back into
the dark room and open it there, unload, and load
up again.
 If  it is desired to stop using the changing box
before all the twelve plates have been exposed,
so as to use single plate-holders or the film pack,
the last exposed plate must not be changed
before removing the changing box, but the button .B
should be slid to the word "geschlossen" and the
box closed, as already described, by sliding the
drawer in and out once.
When it is desired to go on again with the chang-
ing box, as soon as it is fixed on the camera
again, push the button ^B to "offen", remove the
steel slide by one to and fro movement of the
drawer, whereby the next plate comes up for
exposure.
Removal of the Changing box (Fig.6)
First of all place button B at"geschlossen" (Fig. 2),
which renders it light tight, then take the camera
in the left hand, with handle D on the left and
lens on top. The cross bolt A is then pressed
with the thumb of the left hand in a backward
direction, and the camera slid away from the
changing box with the right hand.
If this is done in the dark room, of course it is
not necessary to make the changing box light
tight beforehand.
View original page 12
Page 13 · Read text
The changing box changes the plates in any
position whatever, without any effort at all having
to be made.
                                                   force.It is thus totally unnecessary to use any
                                             beIf anything should seem to stick or there to
a hitch of any kind, just take the apparatus into
the dark room, and empty it out and reload. The
source of the trouble will thus be found and
removed.


10
View original page 13Page 14 · Read text
www.butkus.usr
                 Instructions
     for using the Stereo Compur Shutter
                  (See illustration on Title Page)
    z  Long Time Exposures         -
      Place pointer f on letter z and press the release. This
      opens the shutter which remains open till it is pressed again.
     The second pressing on release closes the shutter.
    B - Short, or Ball Time Exposures
      Place pointer f on letter rl and press release. This opens
      the shutter and it closes again when you take your finger       off release.
     Shutter Release
       Pressure on the plug d or on the wire releaser that screws      in at o suffices to release the shutter.
    The fris Diaphragm
     The aperture of the iris is regulated by turning the ring
      round until the figure of focal aperture desired (orr plate f)
       is opposite the small white line at the side.
 :          lt/[ : fnstantaneous Exposures
      Place pointer f on letter M. Then turn dial R until the
^     speed-figure in fractions of a second, that is required, stands
      opposite the white line. To set the shutter press lever i
      sideways, and it is ready for release as above.
 i    For instantaneous work, the lever i must always be sef.
{    To be able lo sef it, pointer f must always be oi  letter M.
        It the pointer t happens to be on Z or B, the lever  i
      cannot be sef.
    And when the pointer stands at lW, it is impossible to take
    any time exposures, so that it is practically impossible to
     make any mistakes with the working of this shutter.
                                                                                                ll

                                         -4
View original page 14From the M. Butkus archive. Original publisher and archive notices are retained.
Check the model and edition against your equipment.
PDF verified 2026-10-10.