Light meters
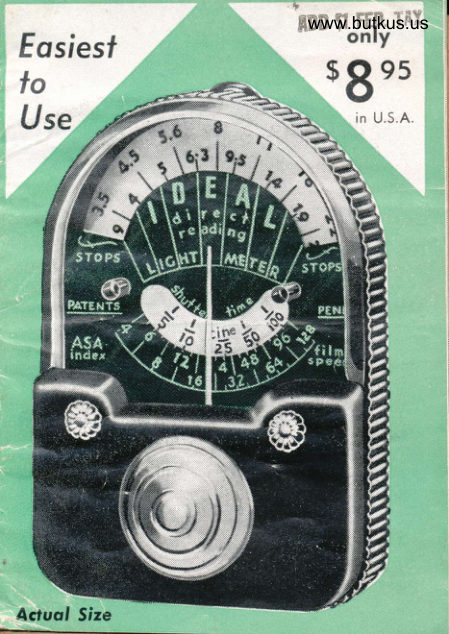
Ideal Direct Reading Meter User manual
User manual for Ideal Direct Reading Meter. 13 pages in English. Read the original PDF, download or print a copy without registration.
13 pagesEnglish2.7 MB PDF
Loading your manual…Open PDF directly
Document details
- Brand
- Ideal
- Model / document
- Ideal Direct Reading Meter
- Document type
- User manual
- Language
- English
- Pages
- 13
- File size
- 2.7 MB
- Category
- Light meters
- Document date
- Not specified in catalog
Search available document text
Find a term, then jump to its page in the original PDF. Image-only pages may not be searchable; check the PDF for exact wording and diagrams.
Page 2 · Read text
EASIEST TO USEI

The IDEAL Direct-Reading Photo-Elecric LIGHT
METER is by far the simplest and easiest-to-use.
Just hold the Meter up to the subject, facing the
camera. Instantly the Nf eter shoq's the best lens
setting directly in f-stops.
No guess-work or computing, no "light values" to
interpret. A child can use this Meter as well as an
expert photographer.
The IDEAL EXPOSURE METER is a true incident
light photo-electric meter. That means it measures
all light that falls on the subject, not just reflected
light. Experts consider incident light the most accu-    i
rate and dependable method of insuring correct
exposure.                                                                              1
This Manual explains how the Meter helps get per-
fectll' exposed pictures every time, u'ith:
                                                        ?
   Any camera    |d6yie, still, or box type.                   -   Any lens                   Fast, slow, telephoto, etc.                                                    {llL               -   Any film    Color, or black-and-white.               -
Any shutter speed, indoors or outdoors, daylight
or artificial light, whenever there is light enough to
take pictures with your equipment.
                -2-
View original page 2Page 3 · Read text
www.butkus.us


 X,,.'
 i+i.

ffi
fii
   o OUTDOOR PICTURES .
   Just hold the Merer up to the subject's face, or the
  main object, with Meter facing the camera.
   Pointer indicates correct f-stop for the lens on the  outer         ring.
  Do not''ellowshaJe oi cover the Collecter Lens over the
   photocell. Be sure Shutter Time and Film SpeeJ
   settings are correct as described on page 4.
View original page 3
Page 5 · Read text
Turn the knob in back of Meter until Shutter
Time you want is opposite ASA film speed of
the film you use. This single adjustment in-
stantly matches the Meter to your camera and
eliminates all further calculating. This setting
need not be changed until you wish to use a
different shutter time or film speed.
Film Speeds of commonly-used lilms    See page ll.Shuttei time    Movie Cameras use-  Cine/25 fornormal speed -(t6 frames), 1./1.0 for fast motion (8
frames) 7/50 for slow motion (32 frames). These
values are approximate, but close enough for excel-
lent results. Box cameras and folding cameras with
only a single shutter speed use Cine/25. Cameras
with adjustable shutters use Cine/25 or I/50 for
ordinary snapshots, with slower shutter speeds for
posed pictures in poor light, and higher shutter
speeds for pictures of moving objects or people in
good light or with fast lens.                            Mike Butkus  Digitally                                                                                                                                                                 DN:ou=butkus.org,Date:cn=Mike2022.05.12signedButkus,email=mike@butkus.org,by21:48:33Mikeo=ButkusButkus-04'00'camera manuals,c=US
                     EXAMPLE.
                   AS SET FOR:
                                  1,/10 sec. ASA 4
                          Cine/25 ASA 12
                           1/50 sec ASA 24
                                1/100 sec ASA 48
                               l/2OO sec ASA 96
View original page 5Page 6 · Read text
www.butkus.us


i!    O INDOOR PICTURES O
     Just hold Meter up close to subject's facq or to the
    main object, with Meter facing the camera, so that
    same amount of light falls on the Collector Lens as
   on the subject. The pointer indicates correct lens
      setting. Be sure Shutter Time and Film Speed settings
    are correct. If  indicated setting calls for a larger
     f-stop than maximum camera lens opening, move
     iights closer or increase illumination, or use slower
     shutter soeed.
View original page 6Page 7 · Read text
THE IWAL RANGEFINDER

                         require                            per-Sharp,         brilliant                .pictures                        $aD                               95- -                  as correctfect focus          as well                     exposure.                                                         tThe IDEAL Rangefinder insures perfect    't-                          fr
focus everv time.                      in U.S.A.                 II


No need to guess at distances when you have the IDEAL
Precision Rangefinder. This  beautiful  optical  instrument
measures distance when you look through it. For all cameras
 having a distance scale. Available in feet ot rneters. No attach-
ment to carnera, very easy to use.
                                                             t
   3-YEAR SERVICE GUARANTEE
     The IDEAL Range-6nder is very durably built and                   ll
       will -iheeive excellent service for manv vears  if  used      with      care due an optical instrument. If   it  is
     dropped or banged, the scale may shift  slightly.
     This may be corrected by turning the set-sclew
     on the dial, or return Range-finder to the FAC'
    TORY with 50c to cover postage and handling,
       for resetting and recalibration. Address package to:
   FEDERAL INSTRUMENT CORP.
     14-02 Broadway, L. I. City 6, New York
View original page 7Page 8 · Read text
www.butkus.us

                 use fDe        ff's Ecsy              fo I                                           I   [1               RANGE-FINDER         ,DEAL
 $
          /,../'


$
 II

     Hold Rangefinder level, with fingers away from rear       lenses,ffiand look at subject through the square eye-
       piece. Locate subect in white circle. A double image
       will appear. Turn dial until double images come
i.      together into single image, and read distance on the
       dial opposite the white pointer. It is easiest to focus
     on a vertical line.                       _:_
View original page 8Page 9 · Read text
I,,
    GETTING BEST


                                                                                                                                                                                                                                                                                                                                                                                                                                                                                                     iSENSITIVI'I\' -- For easiest operation. there are                            ';:,1no separate "bright" and "dim"^ lieht icales. The
Meter covers all usable light ve lueJ. f ight that jsnot strong enough to re6;ister on the IDEAL Ex-                           i::
posure Meter is not strong enough to allow prop-
erly exposed pictures with ordin"ry fitm an.l carir..ras
at cotrrnior.r lr'-used shutter speeds.
If Meter indicates a larger f-stop than your lens. set
tr4eter shutter speed to a slower value, and take
another reading. If camera sl-rutter cannot be set tt,
a slower speed, as with movie or simple box an<l
folding cameras, then there is not         light for
picture-taking v'itlr 1'our equipment. ".to,rgh
If you cannot get close to the subject for a Mcrer
reading, and the light  is coming frorn the sun or sky,
                         hold Meter up between           t
                           the subject and the cam-        $
                            era, facing the camera,                $.
                      so that the sunlight or
                        skylight falls on the
                            Collector Lens. Be sure
                        Meter is not in the shade
                             unless the subject is alscr
                          in the shade.

                    Attaching
                 Neck Cord.
View original page 9Page 10 · Read text
www.butkus.us

    ACCURACY  The IDEAL Exposure Meter  is
       carefully tested and calibrated to gfue perfect expos-
       ures. However, all mete.rs are affected bv errors in
         the- marking or rating of camera shutters, filni speeds,
     and lenses.
      For example, camera shutter speeds may actually be
      slower or faster than their markings. Film speed is
        affected by age of the film and by me-thods of divelop-
      ment. Lenses vary if they have been coated, or aie
      dusty behind or between elements, or if the cement
      between lens elements has become cloudy. Often
      these errors cancel out, but they may add up and
      cause under- or over-exposufe, no matief what-expo-
      sure metef is used, if not compensated  for.
      The rem,edy is ve{y simple with the IDEAL Exposure
       Nleter. If your first pictures are under-exposed or      over-exposed, just make
     your Meter film speed
       setting a little lower (for
     more exposure) or high-
     er (for less exposure)
       than the rated film speed
       until the exposures are
      "on the nose."

       Always Hold
       Meter-l
    UP
View original page 10Page 11 · Read text
PROPER CARE OF YOUR METER
6r-

 The.IDEAL Exposure Meter is carefully constructed
  to give many years of excellent service if treated with
  the care that a sensitive instrument deserves. TREAT
 IT AS YOU \UTIOUID A GOOD WATCH.
 Do not store Meter close to other meters. All expos-
  ure meters contain strong magnets, which are weak-
 ened or affected by the lontinued presence of other
  magnets.
 No zero adjustment is necessary with the IDEAL
 Exposure Meter. Slight variationi of the zero point
 do not appreciably affect the Meter's accuracy.
 No compensation  is necessary for light or dark back-
 grounds or for telephoto or wide-angle lenses.
  Filters are rated 2X, 3X, 4X, etc. If you use a filter,
  increase the exposure as many stops as the number
 in its "filter factor" rating.
 Inexpensive cameras often have one, two, or three
  "hole" stops. The No. 1 stop (largest hole) is usu-
  ally f-t6, No. 2 is f-22, No. 3 is f-jz.
 Do not point the IDEAL Exposure Merer at the sub-
  ject, or hold horizontally or use otherwise like a
  reflected-light typ. meter. The IDEAL Exposure
 Meter is an incident-light meter and should bb held
  only UP FACING THE CAMERA with the same
  light falling on the Collector Lens as on the subiect."
View original page 11
Page 13 · Read text
3-YEAR SERVICEI CGUARANTEE
    The IDEAL Exposure MMeter is carefully
      constructed and tested. an<and will give many
      years of excellent serviceice if used with the
      care due a sensitive instrrstrument. It should
     be handled with the samerme care as a watch
     or fine camera.
      This Meter is guaranteeded  ragainst defects in
      material and workmanshir;hip for a period of
      three years from date of'of purchase. Should
      your meter fail to operateate properly, pack it
       carefully and return it dirrdirect to the factorv
     with $r.00 to cover posta)stage and handling
      for a complete recheckk aand aii necessary
        repalrs.
      Address your packhge to:
      FEDERAL INSTRUMIMENT CORP.
          14-02 Broadway, L. I.I. City 6, N. Y.

                      Sold By


*t-             Made in u. s. A. by
     FEDERAL INSTRUMENT CORP"
       14-02 Broadway, Long Island Ci::, ( N.  -i'.
View original page 13From the M. Butkus archive. Original publisher and archive notices are retained.
Check the model and edition against your equipment.
PDF verified 2026-10-10.