Film cameras
Jem Jr User manual
User manual for Jem Jr. 4 pages in English. Read the original PDF, download or print a copy without registration.
4 pagesEnglish0.5 MB PDF
Loading your manual…Open PDF directly
Document details
- Brand
- Jem
- Model / document
- Jem Jr
- Document type
- User manual
- Language
- English
- Pages
- 4
- File size
- 0.5 MB
- Category
- Film cameras
- Document date
- Not specified in catalog
Search available document text
Find a term, then jump to its page in the original PDF. Image-only pages may not be searchable; check the PDF for exact wording and diagrams.
Page 1 · Read text
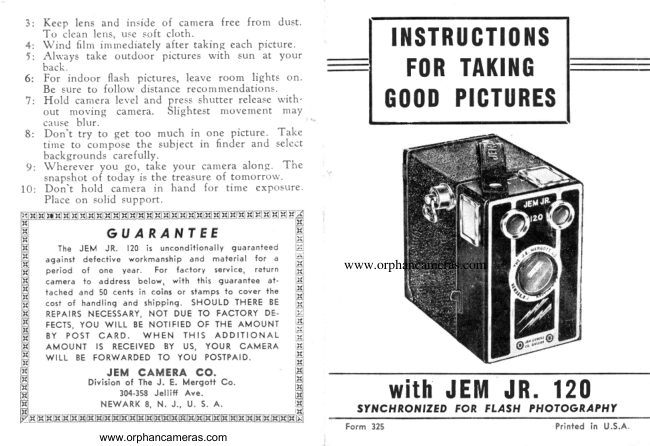
J :  Keep lens and inside of camera free from  dust.
    To clean lens, use soft cloth. 4 : Wind  film imrnediately after taking each picture.       tl{sTRUCTr0ilS
 5 :  Al',vays take outdoor  pictures with  sun  at your
    back. 6: For indoor  flash pictures, leave room  lights on.       F(IRTAKIl{G
    Be sure to follow distance recommendations.
 7 : Hold camera level and press shutter release with'     out  moving  camera.  Slightest movement may       GII{ID PICTURES
     cellse blur.
 8 :  Don't  try to get too much  in one picture.  Take
     tirne to t,r-po.e  the -subject in  finder and select
    backgrounds carefully.
 9 : Whe-iever you Bo, take your camera along. The
    snapshot of today is the treasure of tomorrow.
1 0 : Don't  hold camera in hand   f or  time exposLlre.
    Place on -.olid support.


                                                www.orphancameras.com


IE         JEM CAMERA CO.                   lxl
tE            Division-"  '''-"^:.'of rhe J. E. Mergott':-''-"   Co.               IxltE                           --:-  :',.:;                                lxl                  304-3s8Jelliff Ave.E                                 120                            with                       JEM                                 JR.
                                                                    APHY                                                    FOR FLASH                                                          PHOTOGRt E I         N E W A R K 8 , N . J . , U . S . A .        HH         SfilCHROtrf                                                          |ZED
ETxsTtrtrtrEEEEEtrEBtrEEBEEEEEtrEEEtrEtrEH                                                            Form 325                                     Printed in U.S.A.
             www.orphancameras.com
View original page 1Page 2 · Read text
HOW TO USE YOUR JEM JR. I2O             of empty  spool  to  key  side of  camera, making  sure                                                              winding  key  is in  "Out"   position.  Close back tightly
    With  the  following  instructions you  will  becorne       and turn winding key in direction of arro'"v, pushing in
thoroughly acquainted with your Jern Jr. 120 and be         at the same time to engage film spool. Turn  film  until
able to take excellent oiciures inrnrediatelv.                No.  1 appears in red         You are now ready to
   The Jem Jr. l20  iamera takes cigl'rt 2/a" *3tA:'         take your  first picture."vindow.
negatives on standard size 120 roll  film,  'uvith or with,
out the Jem Flash Unit.  Picturcs can be taken indoors
or ouidoors at any time, and may bc cnlerged.
    Taking  good flash pictures is easy. Snapshots may
be taken of children  in the home, or friends r.vho visit
in  the evening, or even outdoors undcr unfavorable
pirotographic conditions.  The  cost of  modern  flash
bulbs is snrall compared to the satisfaction of securing
good pictttres whcncver you want tirem.                                 fHi     l $ l
        LOADINIGTHE FILM
                                                                                                                  fi   Never load your JEM JR. Cqmerq  in direEf sun.
light.
   Grasp the ridges on the sides of the camera back
betrveen the thumb  and middle  finser  of one hand.
Press the carrrerabodv  itrst ahead of the latch on the
top  of  the can-rerabict   u'ith  other hand and open.
Turn  the ',vinding key  in the direction shou,n by- the
arrow and pull out  at the sarne tine.  Film  guide  wiil                       Above llluslrafes Film Guide.
then  slip out of the body.
   Make sure the slotted end of the empty  film spool             TAKING PICTURES
is exposed through  the  large hole  in  eitirer spool
bracket.  Place the  fre-.h snool  of  film  in  the  other          Whether  or  not  flash unit  is used, make sure the
spool bracket so that the papcr rolls ofi the top of the        stop is at "I".  (The  "T"  setting is used only for tak,
spool in the direction of the  film plane (directly be,        ing time exposures.) Hold  canrera firnrly aga:'nstbody
hind the large opening).  Break seal and feed end of          at waist level.  Sight your  subject  in  the view  finder
film paper behind film plane, inserting tapered end of        and, when ready, press shutter lever gently but  firmly
paper into slot of empty spool and turn spool between      down as far as it  rvill go; then  let  it return.  (For time
thrrmb  and  forcfinger, making  one  compiete  turn.        exposure, rest can)era on a solid surface and hold do',vn
(Illustration.)  Put  film guide back in body wich slot          firmly.)  You have taken your  first picture.
             www.orphancameras.com
View original page 2Page 3 · Read text
Now  turn  the windin g key  until  No.  2 on the  film          Do  not take pictures closer than  six feet frorn the
appears in the red rvindow at the back of the camera.        subject.
After each picture, make sure to turn  film to the next           Using Orthochrornatic film (A.S.A. speed i0),  the
number  to avoid the  possibility  of  double exposures.      Jem camera will  take excellent pictures under normal
You  will get eight piccures to each roll  of  film.                 lighting conditions. The Jem camera has an f/16  lens
                                                        opening with  l/ZJ  second shutter. For best pictures
                      llmt  sroP                      Yrtncat                     the suhject shc,rrldbe in  full sunlight.
                                    vrEw flND:l                 When  taking  indoor  or  outdoor  pictures  (poor
                                                                       sunlight),  always follow  Bulb  Chart Guide  or recom,
         rtY              tor                                               mendation  of  flash bulb manufacturer.        nr.t        wtND
                                         FTASH PICTURES
                                                                   This camera is equipped with a synchronized shut,
      HOttzoNtAl                                                               ter to be used in conjunction with a Jem Flash Unit.
     YIIW;INDTR                                 PAR,TSOF JEM FLASH UNIT

                                                                 A-Refleclor

                                             coNNrctots                                                  toR               B-Baftery Case
                                              fIASH GUN
                                                      C-Base Cap
    After you have taken eight pictures, continue wind,
ing until  all the paper is wound on the spool engaged
by the winding key. Then remove film guide by grasp,      D-Lamp  Socket
ing the ridges on the sides of the camera back between
the thumb and middle  finger  of one hand.  Press the       E-Connection Plugs
camera body just ahead of the latch on the top  of the
camera back with  other  hand  and  ooen.  Turn  the
winding key in the direction shorvn by the arrow and        F-Adapter
pull out at the same time.  Film guide will then slip out
of the body.
   To take wider pictures, turn the camera rvith wind,
ing key topside and sight with the finder then showing.
              www.orphancameras.com
View original page 3Page 4 · Read text
INSERTINGTHE BATTERIES
   Remove the  reflector from  the battery case. Push
in and twist the base cap.   It  u'ill then remove easily.
Inscrt  t',vo (2)  "C"  size Photo  Flash Batteries, metal
tips both facing toward  ttre lamp socket' Replace base
cap. Snap reflector bacli on battcry case.
   Always use fresh dated photo-flash batteries.
   Replace batteries every three months, or after every
100  flashes. whichever   is  sooner.  Remove  batteries
when not in use.
                                                            Hold Jem Jr. Carnera and Jcm Flash Unit as shown
                                                  when winding  film and changing bulbs.
    ATTAC}IING UNIT TO CAMERA                                       BULB CHART GUIDE
    Plug Jem Flash Unit  securely into  camera con'                                    Bulb         RecommendaiionDistance
nectors as slrorvn in  illustrati<tn, stith  re{lector  front               Bulb Size          Adapter             to  Subiect
 (A)   in  direct parallel rvicir front  of camera.                                                               Sylvania #25                                                                         Yes           8 to 12 ft.                                                                  G.E., W. #5
       INSERTINGTHE BUIB                       Sylvania #0        No            8 to 12 ft.
                                                               Sylvania #40        N o             l2 to  l5  ff.
   The Jem Flash Unit   is also equipped  with  an ac'        G . E . , W . # t l        N o             l0 to  l2  ft.
cessory midget bulb  adaptcr so that  thc  small con'
                                                               Return defective bulbs to bulb manufacturer.venient type flash bulbs may be used in the unit'
                                   FOR BESTRESULTS.FOLLOW   The Jem Flash Unit  must be pushed securely into
the camera before any bulbs are screrved into the lamp          THESESIMPLE RULES
 socl<et. Screw the  bulbs  or  adapter  firmly  into  the             Don't load or unload camera in direct sunlight.
 socket. ' Be sure unit  is pushed  in  securely and held            Attach paper leader of new film to empty spool,
 firmly, as shown in  illustration.                                          firmly and evenly.
           www.orphancameras.com
View original page 4From the M. Butkus archive. Original publisher and archive notices are retained.
Check the model and edition against your equipment.
PDF verified 2026-10-10.