Film cameras
Agfa Karat 36 User manual
User manual for Agfa Karat 36. 12 pages in English. Read the original PDF, download or print a copy without registration.
12 pagesEnglish1.4 MB PDF
Loading your manual…Open PDF directly
Document details
- Brand
- Agfa
- Model / document
- Agfa Karat 36
- Document type
- User manual
- Language
- English
- Pages
- 12
- File size
- 1.4 MB
- Category
- Film cameras
- Document date
- Not specified in catalog
Search available document text
Find a term, then jump to its page in the original PDF. Image-only pages may not be searchable; check the PDF for exact wording and diagrams.
Page 2 · Read text
which will satisfy all requirements. Thanks to its collapsible rapid-feeding lever that sets the shutter and ensures
speed in setting and releasing it again, the Karat 36 has become the ideal camera for all amateur and
professional photographers and for all. press work. 4.butkus.org

The idea behind the construction of this camera was to produce an absolutely fool-proof camera, simple in its
mechanism and easy to handle. But never forget that you have in your hands a first-class optical instrument of
precision construction and that careful treatment is no more than its due.

We would, therefore, request you to read these directions carefully. They have been kept as helpful and short as
possible. Practice the operations in the illustrated part, first without a film in the camera. You will then be able
to manipulate your camera quickly and steadily in all circumstances. Get accustomed to switch the rapid-
feeding lever with an even, firm jerk. This will enable you to achieve maximum speed in making exposures.
Practice focusing too. After a short time you will find that you have no difficulty in focusing even tiny objects
quickly and satisfactorily.

Never use force! Protect your camera from dust and never expose it too long or unnecessarily to sunlight. Avoid
touching the lenses with your hands, to clean the outer surface of the front lens and the window of the view-
finder, use only a clean, soft linen rag.
Strictly speaking, all this advice goes without saying But keep it in mind and this excellent miniature camera
will give you constant delight. You will be amply repaid by your results, whether in the fascinating field of
black and white art or in the wonderland of color photography.

A close study of the illustrated pages following these hints will make you familiar with the mechanism and
show you how to handle the camera. You will find other details worth knowing in the second part of the
booklet.


AGFA CAMERA WERK, MUNCHEN


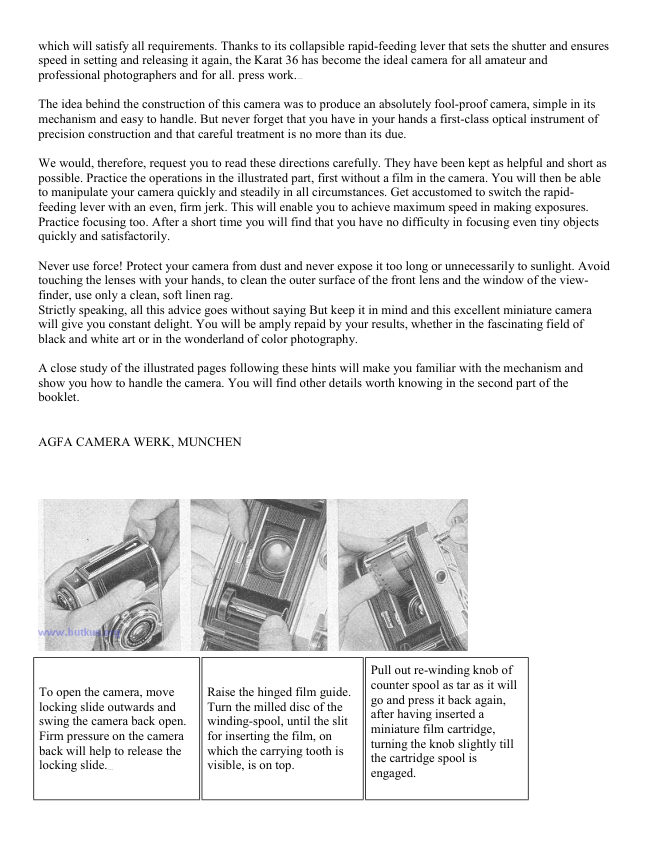
                                                                 Pull out re-winding knob of
                                                             counter spool as tar as it will
To open the camera, move      Raise the hinged film guide.
                                                     go and press it back again,
locking slide outwards and     Turn the milled disc of the
                                                                        after having inserted a
swing the camera back open.    winding-spool, until the slit
                                                             miniature film cartridge,
Firm pressure on the camera     for inserting the film, on
                                                               turning the knob slightly till
back will help to release the    which the carrying tooth is
                                                                the cartridge spool is
locking  slide.4.butkus.org                    visible, is on top.
                                                          engaged.
View original page 2Page 3 · Read text
The Karat 36 is fed with the standard miniature film cartridge, It will not take the special 12-
exposure "Karat Cartridge" of the Karat 12 model.


Insert flap of film in slit of
spool up to second film
perforation with which the
carrying tooth must engage
correctly. Turn milled disc of   Close camera firmly, but
                                                      Turn film counter disc
spool until the film is tightly    without force. Before closing
                                                           clockwise to "A" by pressing
stretched. The film must be      the camera make sure that
                                                                  finger on small milled knob
pulled out of the cartridge in    hinged film guide is lowered.
its full width by about 1/2"
and must lie within the edges
of the film channel. Then
lower hinged film guide,


Press the brace-lock device
                        With thumb or forefinger turnwhich makes the lens board
spring forward into position    rapid-feeding lever as tar as it                                                             Press the release button down steadily
for taking pictures. At low      will go. (Simultaneous film                                                     and completely with the upper joint oftemperature lens board may    transport and shutter cocking).
                                                               the forefinger, putting the top of theneed a gentle pull.            Don't obstruct knob of re-
                                                                 finger firmly on the camera. Repeat                         winding spool which turns with
                                                      above operation. The counting deviceImportant! It is only in this     the lever. Double exposures as
                                             now points to a mark before "1".postion that the rapid-         well as ,,blanks" are prevented
feeding lever can be         by special blocking device.4.butkus.org
operated.
View original page 3Page 4 · Read text
For time exposures set shutter at
                                                                 ,,B". Pressure on the release button
                         Set exposure time by turning   opens the shutter which closes
                           the milled ring with exposure  when the button is set loose. To use
Set lever for lens
                         times engraved on it to the     a cable release, unscrew flat cap on
aperture at the desired
                            triangular mark. In order to     release button. For long-time
number of aperture
                        save the shutter, always set     exposures, lock depressed release
scale.
                        time of exposure before        button by means of lever "T".
                            setting shutter.               Important: Lever "T" must
                                                       otherwise always be in horizontal
                                                             position.


                                                           Adjust by focusing lever
                                                                       until I the two halves fit to
In order to focus, bring range
                                                      form an undivided image.
view finder close to eye and      If the object lies beyond the
                                                           This is a sign that the camera
direct camera towards object.    distance set, its image
                                                                              is at the right focal distance
Take knob of focusing lever     appears in the viewfinder as
                                                      which can be verified by
between tips of middle and      divided horizontally into two
                                                            looking at the scale in feet on
ring finger of your left hand to  halves that do not fit.
                                                                the valuation ring seen from
operate lever.
                                                       above in the small window
                                                    on the lens board.
View original page 4Page 5 · Read text
When taking upright
                                   pictures, the little finger of
                                 the left hand holds back the
                                      lid of the Ever-ready case.
Set rapid-feeding lever once                            There are three things to
more, the counter disc now                            remember:
shows the number 1 and the
first exposure can be made.                           To close camera, push back
                                      a. aperture and exposure time
Camera must be kept level.                                    brace-lock and press down
                           must be set
Hold it steady with both                                         lens board on both sides.
hands. Before making
                                   b. film must be moved
exposure check aperture and
                             forward which automatically
exposure time once more.
                                   sets shutter,

                                      c. lens must be focused and
                                    shutter. released.


                                                      Keep locking-knob "R" on
                                                            bottom of camera depressed and
                                                                      turn re-winding knob in the
When the picture counting disc
                          To re-wind film pull out milled    direction of the arrow, until the
shows the number "36" the film
                                 re-winding knob halfway, to      film is wound up. This is
has advanced for the last
                                         facilitate manipulation.            indicated by the fact that re-
exposure.
                                                             winding knob can be turned,
                                                            even if locking-knob is
                                                                         released.
View original page 5Page 6 · Read text
Take out film cartridge after   Wrap up exposed film
Open back of camera by        re-winding knob has been      cartridge immediately in foil-
releasing locking-slide. Firm    pulled out to its full length.     lined paper or the like, so as
pressure on the camera back    Close camera. Never forget     to protect it from light, and
will help to release the           to lower hinged film-guide,    mark it as exposed film.
locking slide.                   as otherwise the camera will   Secure camera in Ever-ready
                               not close.                     case by screw at bottom.


             FURTHER IMPORTANT HINTS AND TECHNICAL DATA

Up till now, dear Karat friend, you have been listening to a lightning lecture on the mechanical handling of the
Karat 36. In the following paragraphs we wish to give you additional important hints of a general kind which
we urgently recommend to your occasional study.
View original page 6Page 7 · Read text
GENERAL REMARKS

The right film is the customary 35 mm Standard Miniature Film Cartridge for black and white or color pictures,
size 24 x 36 mm. The "Karat Cartridge" specially made for the Karat 12 camera cannot be used.
Dented cartridges cause obstructions! So don't use cartridges in which the film is jammed so that it does not
come out smoothly. It is advisable to insert the cartridge in diffused light.

By operating the rapid-feeding lever, the film is moved at one jerk for the length of a picture, and at the same
time the Compur shutter is set. Operate rapid-feeding lever only with opened camera (position for exposure)!
Simultaneously with the operation of the rapid-feeding lever, the re-winding knob turns (this is the sure sign
that the film is being fed properly). See, therefore, that this knob is not inadvertently impeded while film is
being fed. A locking device prevents the annoyance of double exposure or unexposed film.


                          OPTICAL EQUIPMENT

The Karat 36 is made in three types, with the Xenon f/2.0, the Heligon f/2.0 and the Xenar f/2.8. Focal length
for all types is 50 mm.

It is scarcely necessary to say anything about the quality and efficiency of these lenses which are known and
appreciated all over the world. They are special lenses for miniature cameras, minutely calculated constructions
in which the most exacting demands on optical equipment - for instance in color photography - have been taken
into consideration.

The coating of the lenses consists of an inconceivably fine layer on the lens surface. On the one hand, this
protects and enhances the great transmissive capacity of our lenses, as reflection losses which can never be
entirely avoided are greatly reduced, on the other hand it eliminates the disturbing reflexes (flare spots and
"ghosts") that are apt to appear on many pictures and on the most interesting ones in particular, namely in
exposures against the light.

It is, therefore, understandable that such exquisitely fine optical instruments should need most careful treatment.
Avoid touching the lenses with the hand and immediately remove any dirt or finger marks which are by no
means as harmless on such highly polished lenses as is commonly supposed. In cleaning, use only a suitable
piece of chamois leather or soft linen which must be absolutely free from dirt, oil or dust. Wind the cleansing
material round your finger or over a small, pointed wooden rod. Never use an instrument with a sharp edge or
made of metal.

It stands to reason that lenses with the anti-reflex coating require still greater care. Remember that the coating
has only a thickness of about 1/1000 mm. This does not mean that the coating is particularly susceptible to
injury, but it is just as easily damaged by wrong treatment as is the highly polished lens. 4.butkus.org

Bear in mind that when temperature changes are abrupt clouded lenses will only become clear again when the
whole camera has accommodated itself to the new temperature.

Never try to take the lens asunder.
View original page 7Page 8 · Read text
THE COMPUR-RAPID-SHUTTER

The shutter of the Karat 36 allows exposures of 1, 1/2, l/5, 1/10, 1/25, l/50, 1/100, 1/250 and l/500 second. The
numbers engraved on the shutter ring stand for fractions of seconds, for instance: 2 = 1/2 sec., 50 = 1/50 sec.
etc.

As a rule the speed of exposure desired should be set before cocking the shutter by means of the rapid-feeding
lever. For the same reason, namely in order to save the exceedingly delicate mechanism of the shutter, the
camera should always be stored with its shutter unset. Make it a habit to set the shutter only immediately before
making an exposure.

For time-exposures the camera should be set on a tripod or at least on a firm support. In such cases it is
advisable to use a cable release which is screwed into the nipple of the shutter release after the flat cap has been
removed.4.butkus.org

The lever "T" that serves to arrest the release button when making long-time exposures must always be swung
back to its horizontal position after the exposure has been made. Before closing the camera, make sure this lever
is in the correct position. Never try to close the camera when the lever is upright.


                              LENS STOPS

The aperture scale on the Xenon and Heligon types comprises the following apertures; 2 2.8 4 5.6 8 11 and 16;
in the case of the Xenar the apertures can be set in the same gradation from 2.8 to 16.

The lens stops serve as a control of speed and depth of field. Therefore remember:

low aperture numbers, e.g. 2.8 = high speed, but small depth of field,

high aperture numbers, e.g. 16 = less speed, but large depth of field.

The aperture scale has been so graded that between one aperture number and the next higher one, the speed of
the lens is reduced by half. 4.butkus.org


                           DEPTH OF FIELD

The short focus lenses employed in the Karat 36 have a particularly good depth of field Study of the depth of
field problem cannot be too strongly recommended. Familiaiity with it will increase your self-reliance, extend
your possibilities and enable you to enjoy to the full all the advantages of your camera.

You know already that with a large lens aperture (low aperture number) the -depth of field is smaller than with a
high aperture number. It is also important to know that for close-ups the depth of the focus zone is smaller in
extent than for distant views. Set yourself some tasks with different zones of sharpness and distances and solve
them with the aid of the depth-of-field-table You will soon master the law of depth of field and the right use of
the table without being a mathematician.
View original page 8Page 9 · Read text
The depth-of-field-ring on top of the Karat 36 is another valuable help always available. It is easy to handle.
The stationary inner disc has engraved on it the distance numbers from 3 feet to CD (infinity), the movable
knurled outer ring shows the aperture numbers corresponding with the zones of sharpness. These zones are
narrowest with low aperture numbers and widen progressively with the higher aperture numbers, according to
the law that with a small aperture number, the zone of sharpness is narrow and widens with a higher aperture
number.

If, for instance, by turning the knurled outer ring, the aperture number 16 is set at number 4 (feet) of the inner
disc, the zone corresponding to aperture indicates the respective zone of sharpness between the two limit marks,
that is from about 3.5 to 5 feet. Now if you set the lens of the Karat 36 at aperture 16 and a distance of 4 feet
you will obtain a picture in which everything lying within the range of 3.5 to 5 feet will be sharply defined.

Conversely, by means of the depth-of-field-ring, the aperture number necessary to obtain a desired zone of
sharpness can be ascertained.

The two point focusing method is a most convenient way for sticking to two distinct zones of sharpness On the
aperture scale between 8 and 11 a red point is visible, while on the distance scale the numbers 10 and 30 are
marked in red. Now set the aperture lever at the red point and the distance scale-- according to whether the
picture is to be a close-up or a distant view-- at the red number 10 or 30.

You will then get the following zones of sharpness:

distance set at 10 feet = from 7 ft. 4 1/2 in. to 15 ft. 6 1/2 in.

distance set at 30 feet = from 14 ft. 5 in. to oo (infinity).

For most snapshots two-point focusing will suffice.

                       THE RANGE VIEW FINDER

The range view finder of the Karat 36 is a combination of view finder and coupled range finder, providing
accurate focusing from 3 feet to co (infinity). Its use is considerably facilitated by focus sing for broad-view
pictures on the vertical lines of the object focused, while for upright pictures, it is preferable to keep to the
horizontal lines.

The sharp image seen in the view finder shows on a reduced scale the exact field covered by the camera. In
close-ups however, there is a slight deviation, the so-called parallax, which can be easily adjusted after a little
experience, and it practically only occurs as a disturbance in pictures taken within a range of 3 to 6 feet. It is
compensated by slightly lowering the center of the image in the view finder which can be done by simply tilting
the camera up in the direction of the view finder.

When the camera is held in vertical position the same divergency appears as a lateral deviation which is
adjusted likewise by slightly swinging the camera sideways in direction to the view finder.


                      TAKING CARE OF THE CAMERA

Regular care lengthens the life of your camera. It should at least be examined and freed from dust frequently.
Before inserting the film, remember always to remove from the interior of the cartridge any cartridge-dust and
film-splints that may have accumulated.
View original page 9Page 10 · Read text
MISCELLANEOUS

The rectangular socket on top of the camera is for holding accessories.


                   SHUTTER LOCKED INADVERTENTLY

Should the-shutter have been released by an inadvertent touch on the release mechanism of the lens-board, the
result is a complete stop or jam, i. e. neither the feeding lever nor the release can be operated To remedy this, set
the focusing scale at 3 feet, so that the cocking mechanism on top of lens board becomes accessible and you can
easily press it with your finger tip Thus the shutter is set again and can now be released by the body release in
the normal way.


                       ORDER NO. - KARAT 36


2017/30 Xenar 1:2.8 coated lens, F = 50 mm, Compur-Rapid shutter

2017/35 Xenon 1:2.0 coated lens, F = 50 mm, Compur-Rapid shutter

2017/37 Heligon 1:2.0 coated lens, F = 50 mm, Compur-Rapid shutter


                                          Flash Contact

The Karat 36 is provided with a 1/8 - in. (3-mm.) nipple to which a flashbulb release cable may be attached.
Automatic synchronizing ensures that the flash coincides with the exposure. As a great variety of flashbulbs is
available on the world market, all of them having different delay- and flashing-periods, it is recommended,
when using a flashbulb, to set the shutter for 1/25 second.
View original page 10From the M. Butkus archive. Original publisher and archive notices are retained.
Check the model and edition against your equipment.
PDF verified 2026-10-10.