Movie cameras & projectors
Keystone KA-1 - KA1A User manual
User manual for Keystone KA-1 - KA1A. 13 pages in English. Read the original PDF, download or print a copy without registration.
13 pagesEnglish6.3 MB PDF
Loading your manual…Open PDF directly
Document details
- Brand
- Keystone
- Model / document
- Keystone KA-1 - KA1A
- Document type
- User manual
- Language
- English
- Pages
- 13
- File size
- 6.3 MB
- Category
- Movie cameras & projectors
- Document date
- Not specified in catalog
Search available document text
Find a term, then jump to its page in the original PDF. Image-only pages may not be searchable; check the PDF for exact wording and diagrams.
Page 1 · Read text
www.butkus.us          'fl
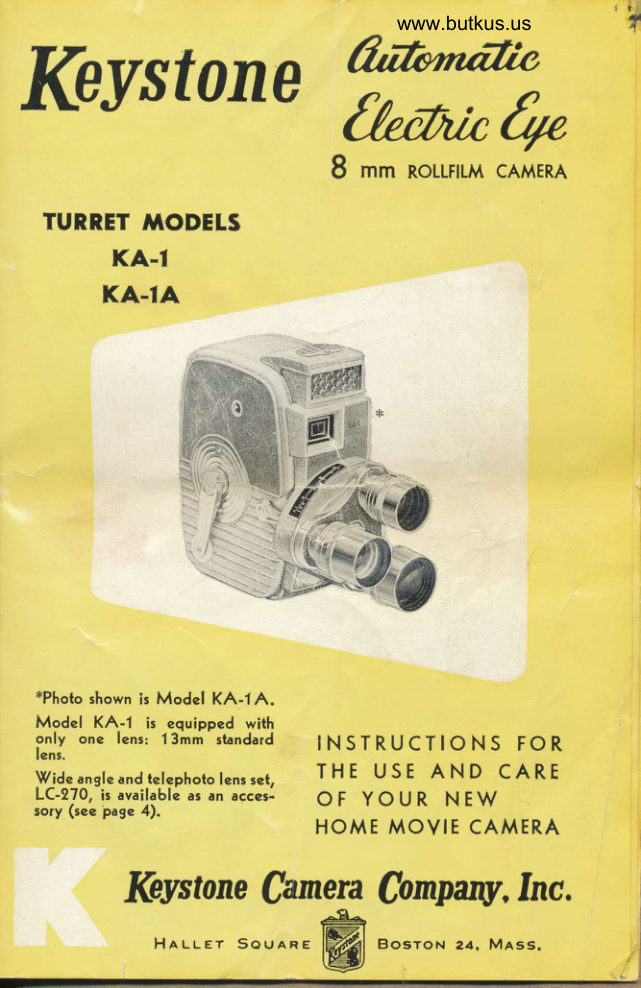
Keystone
                8 r'n Ro[tFnM cAMERA       ffi
 TURRET TODETS
      KA-T
     KA-IA


*Photo shown is Model KA-1A.
Model KA-1 is equipped with
only    onc lensr 13mm sbndard   INsTRUCTIONS FOR lens.
)(/-idc angle and telephoto lcns set,   THE USE AND CARE
LC-270,            availablc             ir                    ar an rccer-  OF YOUR NEW        page     (reesory                 4).
                 HOME MOVIE CAMERA
                       (omparry, Inc,     Kewtone Qamera
                             BosroN ea. Mass.
View original page 1Page 2 · Read text
fnslructions
Before attempting to operate your eamera get to know it. Read and fol-
low the instructions and you will easily produce the finest movies.
The short length of practice film in your camera is supplied so that you
may become acquainted with the proper threading operations. Exposure
cannot be made on this film.
        Here's How ll's Done


                                      Before loading the film wind your
                                 camera motor. Lift the winding
                                   handle out of the recess in the
                                 case and flip it over into the
                                    winding position. Turn the wind-
                                ing handle clockwise until the
                              camera motor is fully wound.
                                   After winding turn the winding
                                   handle counter-clockwise and re-
                                turn it into the recess in the
                                             c&se.
                  Fig. I
                                              COVER LATCH
   To Open

To open the camera cover turn
the cover latch'to the left and
lift gently.


                                                              Fig. 2
                                          Page 1
View original page 2Page 3 · Read text
www.butkus.us
        looding the Ccrmercr
IMPORTANT: Always load or unload the camera in subdued light.

                              Swing the footage indicator lever
                                 toward the rear of the camera (note
                              arrow) and remove the take-up
                                     spool from the take-up spool shaft.
                         Remove the purchased spool of
                                           film from the metal container. Save
                                   this container for returning the
                                       film to your dealer for processing.
                            Hold the spool securely and un-
                               wind approximately 1 foot of film
                                   as a leader for threading purposes.
                               Hold the film with both hands as
                              shown and place the spool on the
                                     supply spool shaft. The center hole
                               with the four notches should be
                                   facing up and the film should be
                                         inside the film guard.

                  Fis. 3

Move the pressure plate back
(note arrow) with your forefinger
and insert the film between the
pressure plate and the aperture
plate. Release the pressure plate.
Check to insure that the light side
of the film is facing towards the
front of the camera and that the
upper edge of the film is under
the guide arm. Press down on
the operating lever (Fig. f) and
release after running about 3 in.
of film through the camera in or-
der to check the proper film
position.
                                                       Fis.4
                                             Page'2
View original page 3Page 6 · Read text
www.butkus.us
       Using the Yiew Finder


                                         FIELD OF VIEW
                              9 MM WIDE ANGLE LENSiF
                                   FIELD OF VIEW (RED RECTANGLE)
                             25MM TELEPHOTO LENS ,F
                                   FIELD OF VIEW     ( YELLOW  RECTANGLEI
                                     I3MM NORMAL LENS


What you see in the view finder you will see when you proiect your movies
on the screen. The view finder is designed so.that you may see at a glanee the
                                                             nentire field of view that you wish to photograph.
When using the l3ult normal lens (YELLOW rings on lens barrel), the field
of view is sighted within the area outlined by the large YELLOW rectangle.
When taking movies with the ZSrurvr telephoto lens* (RED rings on lens barrel),
the field of view is sighted within the area outlined by the small RED rectangle.
When the 9uu wide angle lens* is used (BLACK rings on lens barrel), the
total area sighted in the view finder represents the field of view.
       Your Comercr lenses
l3rrart NOR\,[AL LENS-May be used for photographing all subjects and
scenes. This lens is used most freqttentlir 611 8Mu cameras.
9uu WIDE ANGLE LENS*-Particularlj useful when movies are to be
taken in confined spaees, such as home interiors, where a greater field of view
is desirable. By decreasing the image size the 9urvr wide angle lens* increases
the field of view by aOTo compared to the l3ntru normal lens.
25uru TELEPHOTO LENS*-Performs the same function for the eamera that
a pair of field glasses does for the human eyes-it magnifies the image and
brings it much closer. The 25rurvr telephoto lens* doubles the image size eom-
pared to the 13urvr normal lens. The telephoto lcns is particularly useful for
taking distant shots. A movie c&mera should alway-. be held steady but this
is particularly important when using the telephoto lens. Use a tripod  if possible
and don't panoram rtnless absolutely necessar.y. Where possible shoot-stop
the camera-move  it to the new position-then run.camera again.
 Your camera lenses are designed erclusiuely for u.se with this comera. The lenses
cannot be used, on other makes or models nor can other type lenses be used with,
 th,is camera,.
*Model KA-1A is equipped with the 3lenses described above. Model KA-l is
eqtripped with one lens: 13utr standard lens. The wide angle and telephoto
lenses are available as an accessory. See your Keystone dealer and ask for the
LC-270lens set.
View original page 6Page 7 · Read text
;
          Adiusting lhe lurret
                                Mounted on the turret are S lenses
                                           indispensable for all-around movie-
                                    making. Determine the lens to be
                                     used and rotate the turret so that
                                         the lens is in the "taking" position.
                                        This is done bjr grasping the lenses
                                            (See Fig. 8) and rotating the turret
                                            in either direction..When adjusted
                                           correctly the turret will click into
                                                 position.
                                 The 25mm tebph,oto lens is easily
                                  idenri@ bA thc RED rings on lzns
                                              ba:mel, the 13mm nomnal lms by thn
                         YELIOW rinqs an Imw barrel, and,
            (REVOLVE TURRET TO         the ?mm wid,e anAl,e lms by tlo             ,,TAKING" POSITION)                          BLACK rhrys on lerx bonel.
                         Fig. 8
     Electrie Eye Setring for Film lype
  Your "electric eye" is designed for use with 8uu color, movie film. Each
   film type is designated by an exposure index number set by the A.S.A.
   (American Standards Association). These indexes are shown in the table
                                                                                                                                                                                                                        i  below and are also in the pamphlet packed with your film.

                                                         A. S. A. Iixposunp INonx            Frr,u       Tvpp
                                                              D,rvr,rcut            TuNcsrrcN
     Koo,l,cnnoun, D,l,vr,rcnr Tvpn                            t0                     5+
    Kon,rcnnoup. Ttpr: A                                                                                       1{i
    tWith photoflood  filter no. 80B; with no. 8OA, use index of 2.5.   trwith ilaylight corrvergion 6lter for type A color film.

  Move film indicator to ASA 10 when
  using daylight type color film with or
  without haze filter.
  Move film indicator to ASA 16 rvhen
  using indoor type A color film.
  Move film indicator to ASA 10 when
  using type A film outdoors with the
  type A fiIter.                                                                     Fig' e                                             Page 5
View original page 7Page 8 · Read text
www.butkus.us        T         Auloncrtic Opercrtion
For fully automatic operation rotate the
lens opening dial until the red dot on the               LENS OPENING
dial is directly opposite the red dot on the
camera. All that remains to be done to
obtain perfectly exposed movies is to aim
the camera at the scene or subject to be
photographed and shoot.                                                              Fis. 10
                            As soon as the operating lcver is pressed your                                          t'electric                                       eye" in-stantly adjtrsts to the-correct
                                 lens onenin     film is wasted. The lens                              openins ("fit number) is plainlv visible at all
                                  times oipi<isite the white needle indicator.
                                            If the wirite needle indicator is hidden from
                             view (below /1.8 settingl do notzttemq!  -to                                take movies as there will be insufficient light
                                       for orooer exposure.
                                While in ttte '''auto" position the meter deflec-
                                  tion is from /1.8 toirt.   This is the normal                                 opera[ing range. For experienced photogra'-
                                  oh"rr len"s opeiings bc.vorid/11 to/16 may be
                                                                         pagp.8).                                                                  effects (see                                                    for-specill                                           l"t  -utt,r"lly                                                                                      visible                                                                                                    is not                                                   needle indicator                                  Nofe.'The                                             v6llow
                               in the "arito" position and is hidden below              Fig. 1l                                 the "I.E" setting.
For perfect movies follow the steps listed below:
1. REMO\TE LENS CAPS.
2. WIND CAMERA
   I\,{OTOR.
3. ADJUST TURRET.
4. FRAME SUBJECT IN                               Iv,r*:ii
  VIEW FINDER.                                      {j,iil5iili"'.d::i'\*,t.r
5. HOLD CAMERA
  STEADY AS SHOWN
  AT RIGHT.
6. PRESS OPERATING
  LEVER.
7. WIND CAMERA
  MOTOR AFTER EACII
  SCENE.
                                                          Frg. 12
Caution: As with all 9mm moaie carnffas panrving is not recommended-
especially in the telephoto position. Wheneuer possible shoot-stop the camera
            it to the new position-then run the cqrnerq again.
-m,oue                                       Page 6
View original page 8Page 9 · Read text
t
     f,EYSfOl|E 8mm ilOYIE PnOtECTOnS
     SEE YOUR KEYSTONE DEALER FOR ONE OF THESE FINE
       PROJECTORS TO MATCII YOUR KEYSTONE CAMERA


         xroDEt K-60              xroDEL K-too
    The new Keystone "Sixty" which is iighC     All operationg electronically controlled bv      weieht, is less than a foot tall in ite com-     eingle, SelectroMatic Control Knob   .  .       pletely self-contained, luggage'type case. It     forward, reverae, rewind, still, stop. No'      brojects in direct-line, with undiminished      individue  I switches. Precision Focusing Knob
       light from its Soo-watt lamp.                     for hair-fine accur&cy. Light, compact, the
     Without reel 'arms, the Keystone "Sixty"     K-Ifi) has foldaway arms, room-light switch,
      handles 3OGft. reels on built-in reel spindles.     rheoetat speed control and easy threading
    A single powerful motor drives the projector    6lm gate. Precision geared film wind, brilliant
      at a constant speed, and cools the housing,    lQGwatt lamp and 400.foot reel capacity.      assuring complete safety from heat. Optical     Self-enclosed  all-metal case.
     glass condensers are easily removed for   New Magna-Scope ,f1.6 Lens gives Bis,      cleaning. Fast rewind is accomplished with    Moviee to 6ll a 4d' screell from 13 feet. -
     a flick of a switch. I.lfotor and lamp are con-
       trolled in one switch to prevent the lamp Ironr
     being on without ventilating action. Fl.6
      Magna-Scope leng fills 4O"screen from 13 feeL


        xroDEL K-ro5              xroDEr K-togD
     Only projector at this low price with reverse    Completely re.styled, this "complete home     operation, geared film wind and 750-watt     movie workshop" has more of eoeruthing  fot    lamp. Prccision Focusing Knob for razor-     the home movie fan. Ea"y to operate, with
     sharp accuracy. Superbly engineered for     forward and reveree geared 6lm wind. Pre-      sharp, rock-steady pictures and a lifetime of     cision Focusing Knob for hair-fine accuracy
      trouble-free performance. Forward and re-     aharp, clear pictures. TSGwatt lamp civer-     verse geared film wind. Room-light switch     brieht, easy-to-see pictures. Rooh-Iieht
     turns lights on, projector ofr, simultaneouely.     switch turns projector on, room lights ofr,
      40G'ft. reel capaeity. Complete with hand-     simultaneously.  Built-in Splicer and Editor-
     some, two-tone luggage 6nish carqring case.     Viewer, Safety glass heat filter permits safe,                                                      bright stills. 4OO-ft. reel capacity. Sleek,
                                              modern sppearance.
                                               Page 7r
View original page 9Page 10 · Read text
rr!
                                  www.butkus.us                       r             f,lcrnucrl Operotion
Manual operation is recommenderl onl.r'for the expcrienced photographer who
knox's when to vary from the arrtomatic exposure control u'hich the camera
provides. \\'hile the automatic exposure eontrol provides the proper exposure
unrlcr most normal conditions, t,here are situations.under which the exposure
can be improved by a manual setting.
An experienccd photographer may rlso u.ish to obtain a special photographic
effrcteffrct eithereither dclibcratelydclibcratelv under-exnosedunder-exposed oror ovcr-exDoscdovcr-exposcd andand forfor thisthis Durnose.purpose,
a manual setting will also be nccessary.              trnil   ,i:.:.:ii.,:.,:l
fn ordcr to determine the rtnge of manual operfl-                      LENS
tion, cxperimentally rotate thc lens opening dirl
             while there is tro film in the ca,mer&.
-prefcrablyPleasc notc that when the rcd dots are lined-up
(Scc l'ig. l0) the c&mera is on automa,tic opcr&
                 needle      Thc'r'cllorv                        indieator                                           is                                 not visitrlctiorr.                                                 in             ffi'-,:            position                 andthr)                                is hiddcn                              below                                     thc/1.8   "auto"
settulg.                                                          Fig. 13
                           As you rotate the lens opening dial you will
                                note the yellow needle indicator coming into
                                     vierv. The first manual setting is whcn the
                              yellow necdle indicator is at /1.8. As the                                   ycllorv needle indicator moves across the
                                      suric frorn/1.8 to/16 and then back to/1.8,
                                            it corrt,rols the lens opening (exposure).
                        Thc normal exposure is indic:r,ted by the
                                whit  r or automatic needle indicator. As soou
                            as the yellow needle indicator comes into
                              vicw, this is the one which indicates the
                                actual cxposure at which the camera will
                              take pictures. Please note the various con-
                                      ditions:
            Fig     14          lil3Tl,l;,Tll::i';"i1l:;i#::ir?hi':#                               '    . deliberate over-exposttre provitled                                            th:rt thc white nccdlo indicator is not
   disphced from the rrormal oxposure position.
2. \\'hen the yellow needle indicator comcs ttp to rvhere the white needle
   indicator is, the manual and automatic exposure will be the same.
3. When the yellow needle indieator begins to push the white needle indicator
   rhead of it, it will be deliberate under-exposure.
Some of thc conditions under rn'hich it may bc preferred to use a manuat
setting rlrther than the automatic are:
lVhcrr &n auerage or dark subjcct is to bc photogr:rphcd situated against a light
brrckgrotrrrd  :r,t:r, distancc from the c:rmerl, :ur exposurc increase oI Yz to I full
'f" numbcr is recommended for proper exposurc balance.
Uxertpl,s: If 1'otrr "auto" needle indicator reads/5.6 and you are photograph-ing:rn average subject, inerease exposure t5ttlti numbcrby rotafing th''e ltns
operrirrg ditl until the "mtnual" ncedle indicator reads 1/z way betrveen /5.6
arrd /-1. If I'ou tre photogruphing a dark subject increase exposure-     a full 'f"number by po-sitioning the "m&nuol" necdlc indiclltor at /4.
Convcrscl.y, rvhen an auerage or light subject is ag:rilrst a dark background an
exposure decreasc  of. Yz to I full 'f" numbcr is recommended. Set "ma,nual"
                                          Page 8
View original page 10Page 11 · Read text
Fr   needlc indicntor                           between /5.6 and /g for en average subject or up to             k y"v    /8 for a light subject.
    Another situation is when the light is not directly- behind the camera but     gonltBg from.one side or behind thle subject.
    In this ca,sg, i{ the.subjec.t's fpee is desir6d to be adequately exposed, move up
     to.the subject and "re&d" the proper exposure by viewiig the white needlb
     lndleetor ln the     opening rvindow rvhile the eamera, is in thc same shade    as the subject's faee.^lens
    Jh.c 5'cllorv necdle indicator is then moved up to match the white needle     lndlc:ttor.
     I\Iove back to the "shooting" position and thcn take your movies.
    FenrNc: For the professional fade effeet slowll, rotatc the lens openins dial
     mantrall.y u'h.ile taking movieF-. Ttr "frrle in" iotate from /16 to fhe n8rmal     expostlre setting. To "fade out" rotate from thc normal expoiure setting to/16.
     Caution.: pelore fading -be sure that the lens opening d.iat is olf the "o1tto" position.     lVhen it is rwt required ln operate lhe canera maiuallu, sei'the lens oneiino d,ial
     at th.e.'.'aul.o" position. Youi canrcro wilt |hen be readylor use und,er riist rirmal     conditions.
           Operoting trever


               Fig. 15                      Iig.lig. 1616                     Fig.Fig. 1717
     RUN       RUNRUN IOCKIOCK     SINGLESINGLE FRAMEFRAME
    Fig. 15 shows.the operating lever in the RUN position. This is the NORMAL    operatlng posltlon.
    Fig. tQ shows the-o-perating lcver in the LOCK RUN position. This position    is.particularly.usefu[when t-he camcra is mountcd on a tripotl and tire;fi;6;   wishes to get into the movies.
   Fig. u shows the operating lcver in the SINGLE FRAMtr position. Sinsle
   frame operation iS simil:rr tb that of a dtill camer& in that oric picturc i.;*-                            is particularly useful for making animated titles or other   pose9 -ata timc. It    special effects.
     Use of Film Filters                       FILTER
  TYPE A COLOR FILM FILTER-Type A color film
    (indoor film) ma1' be converted to outd-oir use with the
   type A color film filter. This is aceomplished merelv bv
   rotating the filter dial until "type-c6rrcctlyAt' is visible in ttrl:   di.{ gpqning. Whpt, adjusted          the filtcr dial   wlll clrcl( rnto posrtron.
   lVotc the'f" setting of the lenses remains the same.             Fig. 18
                                              Page 9
View original page 11Page 12 · Read text
COLOR FILM IJAZE FILTER-The haze filterwww.butkus.usmay be used when photo-
 graphing outdoor scenes with Kodachrome film, daylight type. The haze filter
 reduces bluish haze, adds warmth to distant landscapes, open shade and
 overcast shots. The haze filter is especially useful in snow scenes, aerial and
mountain photography.
To use the haze filter merely rotate the filter dial until "h&ze" is visible in the
 dial opening. When adjusted correctly the filter dial will click into position.
 .Note: The 'f"  setting of the lenses remains the same.
NO I'ILTER USED-The majority of your movies will no doubt be taken
without the use of the built-in filters. When the filters are not in use, the filter
 dial should be rotated until "clear" is visible in the dial opening. When adjusted
 correctly the filter dial will click into position.
           End of Film
'When the figure "O" appears in the center of the footage indicator window
 (Fig. 1), stop taking movies.
Operate the camera until "EXP." (exposed) appears in the center of the
footage indicator window.
Open the camer& cover in subdued light and operate the camera until all the
film is on the take'up spool.
           Second Half
Remove upper (empty) spool. Swing the footage indicator lever toward the rear
of the c&mer& and remove the lou'er (full) spool in :ubdued light. Turn the full
spool over (center hole with four notches will face up) and unroll about 1 foot
of nm as a leader for threading purposes. Place the full spool on the supply
spool shaft and ihread the film as shown and described in Fig. 4. Hold the
e*pty spool so that the center hole with the 3 notches is facing up. Insert the
film into the spool hub slot (Fig. 5) and wind about 3 inches of film around
the spool clockwise. Swing the footage indicator lever back and place the empty
spool on the take-up spool shaft. Proceed as shown and described in Fig. 6.
After the second half of the film has been exposed, remove the take-up (full)
spool. Place the spool into the metal container in which it came. Place the can
into the cardboard container and bring it or mail it to your dealer
for processing.
lVofe; When the camera is not in use, avoid unnecessary tension on the motor
spring by pressing the operating Iever and letting the motor run down.
                  lricrl Film
ft is reeommended when using the camera for the first time that only one film
be exposed and developed. After projection you will have an opportunity to
study the exposure arrd other details of your first film, and make corrections
for use on future films. If there ale any questions we suggest you take your film
to your dealer who will be glad to make recommendations for improvements.
                                         Page l0
View original page 12From the M. Butkus archive. Original publisher and archive notices are retained.
Check the model and edition against your equipment.
PDF verified 2026-10-10.