Film cameras
KIEV-15 User manual
User manual for KIEV-15. 19 pages in English. Read the original PDF, download or print a copy without registration.
19 pagesEnglish8.1 MB PDF
Loading your manual…Open PDF directly
Document details
- Brand
- Kiev
- Model / document
- KIEV-15
- Document type
- User manual
- Language
- English
- Pages
- 19
- File size
- 8.1 MB
- Category
- Film cameras
- Document date
- Not specified in catalog
Search available document text
Find a term, then jump to its page in the original PDF. Image-only pages may not be searchable; check the PDF for exact wording and diagrams.
Page 1 · Read text
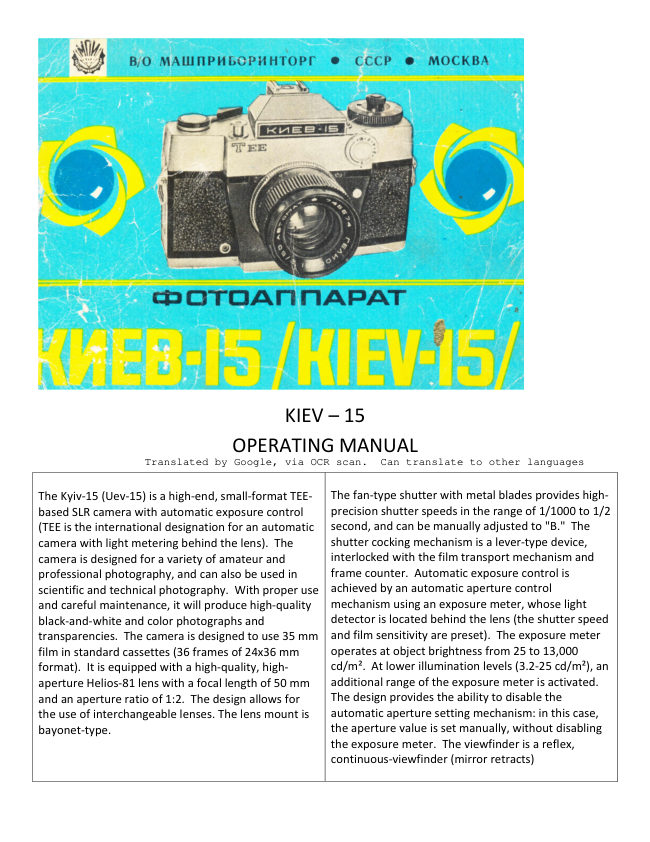
KIEV – 15
                 OPERATING MANUAL
                 Translated by Google, via OCR scan.  Can translate to other languages

The Kyiv-15 (Uev-15) is a high-end, small-format TEE-   The fan-type shutter with metal blades provides high-
based SLR camera with automatic exposure control     precision shutter speeds in the range of 1/1000 to 1/2
(TEE is the international designation for an automatic   second, and can be manually adjusted to "B." The
camera with light metering behind the lens). The       shutter cocking mechanism is a lever-type device,
camera is designed for a variety of amateur and         interlocked with the film transport mechanism and
professional photography, and can also be used in     frame counter. Automatic exposure control is
scientific and technical photography. With proper use  achieved by an automatic aperture control
and careful maintenance, it will produce high-quality   mechanism using an exposure meter, whose light
black-and-white and color photographs and            detector is located behind the lens (the shutter speed
transparencies. The camera is designed to use 35 mm  and film sensitivity are preset). The exposure meter
film in standard cassettes (36 frames of 24x36 mm     operates at object brightness from 25 to 13,000
format).  It is equipped with a high-quality, high-       cd/m². At lower illumination levels (3.2-25 cd/m²), an
aperture Helios-81 lens with a focal length of 50 mm    additional range of the exposure meter is activated.
and an aperture ratio of 1:2. The design allows for     The design provides the ability to disable the
the use of interchangeable lenses. The lens mount is    automatic aperture setting mechanism: in this case,
bayonet-type.                                      the aperture value is set manually, without disabling
                                                  the exposure meter. The viewfinder is a reflex,
                                                     continuous-viewfinder (mirror retracts)
View original page 1Page 2 · Read text
(Only for the duration of the shutter release). Focus   DELIVERY KIT
is achieved using a micro-raster and ground glass       Photo camera with Helios-81 lens ("Helios-81")
viewfinder with the aperture fully open. The            Front lens cap
viewfinder's design allows for viewing without          Rear lens cap
removing glasses. The camera comes with a                Filters: U F-1 x (U V-1 x)
removable eyecup, into which a diopter lens can be     YG-1.4X (YG-1.4")
inserted if necessary. The viewfinder's field of view     Eyecup Adapter ring
                                                                  Sling cablemeasures 22 x 34 mm. The rear panel of the camera
                                                                Insert Caseis hinged and hinged. The frame counter is
                                                              Instruction manual
automatically set to "H" (start) when the rear panel is                                                        Packing box
opened. The camera is equipped with a synchronizing
device for working with flash lamps at shutter speeds
of 1/60 sec and longer. The design of the
photographic apparatus is protected by copyrights.
Before you begin taking photographs, please read this
Manual thoroughly.
View original page 2Page 4 · Read text
www.butkus.us


19 - Exposure meter on/off lever;                   25 - Film sensitivity scale index;
20 - Shutter speed scale index;                     26 - Film advance control window;
21 - Cordless FLASH holder with contact;             27 - Viewfinder eyepiece;
22 - Frame counter window;                       28 - Folding back cover;
23 - Power supply check button;                    29 - Back panel lock button;
24 - Lens aperture setting dial;                     30 - Film rewind handle;
                                             31 - Tripod socket with ¼” thread;
View original page 4Page 5 · Read text
www.butkus.us


19 – Exposure meter on/off lever;                  25 – Film sensitivity scale index;
20 – Shutter speed scale index;                    26 – Film advance control window;
21 – Cordless FLASH holder with contact;             27 – Viewfinder eyepiece;
22 – Frame counter window;                      28 – Folding back cover;
23 – Power supply check button;                   29 – Back panel lock button;
24 – Lens aperture setting dial;                     30 – Film rewind handle;
                                             31 – Tripod socket with LJ/’ thread;
View original page 5Page 7 · Read text
INSTALLING THE POWER SUPPLY

                   A 1.3 V battery with a diameter of 15.6 mm and a
                          height of 6.3 mm must be installed in the camera.
                        (Mercury battery - They are no longer available.
                        There are adapters to take 1.5 v batteries that drop
                        the voltage or hearing aid batteries or Wein Air
                            batteries)

                      Unscrew cap (32) and install the battery so that the
                            positive terminal is facing up. Screw the cap back on
                      and check the battery's serviceability by: turning off
                        the exposure meter by setting lever (19) against the
                        red dot; check that the index of the head (15) is set to
                        the large yellow dot; set the shutter speed to 1/60
                             sec, highlighted in red, film sensitivity to 17 DIN, and
                           lens aperture to 2;
                          Press button (23) and, observing through the sighting
                            device's eyepiece, check the position of the
                         galvanometer's needle relative to the aperture scale:
                        the needle should deflect at least to the point
                         corresponding to aperture f/5.6. If the needle does
                        not reach the indicated division, the voltage is below
                        the permissible value. The element must be replaced.

www.butkus.us              Note: Check the element periodically while using the
                        camera.
View original page 7Page 8 · Read text
Installing Film
Open the back panel by sliding the lock button (29) in
the direction of the arrow until it stops and then
pressing it. Insert film cassette (35) into the slot until
it stops. Thread the end of the film into the spool slot
(36) and secure the film by inserting the spool tooth
into the perforation. Before loading, set the spool
slot to a comfortable position by turning the spool in
the direction indicated by the arrow. Holding the film
and pressing it against the teeth of the film transport
drum with your left hand, turn the shutter cocking
lever (14) and ensure that one of the teeth engages
the perforation and the film is wound onto the take-
up spool (36). Close the back panel (28) of the
camera.
View original page 8
Page 9 · Read text
PREPARATION FOR SHOOTING

                                                   If the automatic aperture setting is enabled (the letter
                               "A" on dial (11) is opposite index (38), the shutter
                                 release button may be locked in low light. Therefore,
                                  disable the automatic aperture setting mechanism by
                                 turning dial (11) counterclockwise until the first dot
                           on the aperture scale (37) aligns with index (38).

                              Note: For convenience, another aperture scale is
                           marked on the cylindrical surface of the dial, allowing
                            you to read the aperture without changing the
                               camera's position. Turn dial (14) twice until it stops,
                                 pressing shutter release button (13) after each turn to
                            wind the exposed end of the film. The next time the
                                 shutter is cocked, the number "1" in window (22) of
                               the frame counter will be positioned opposite the
                                  index, corresponding to the first frame on the film.
                                                   If the film is wound tightly in the cassette, a moving
                                   indicator will be visible in window (26) when the
                                 shutter is cocked.


www.butkus.us
View original page 9Page 10 · Read text
If the film is not wound tightly, the indicator may
remain motionless during the first few frames. Set
the film sensitivity by: turn dial (24) until the aperture
value of the lens installed on the camera appears in
window (40); holding ring (16), turn knob (15) until
the film sensitivity value of the loaded film aligns with
index (25). Note: It is not recommended to set the
film sensitivity value at shutter speeds of 1/4, 1/2,
and 1/4 sec. Activate the automatic aperture setting
mechanism by turning dial clockwise until the letter
"A" aligns with index (38).

SHOOTING
Shooting consists of the following operations: turning
on the power; cocking the shutter; setting the shutter
speed; setting the aperture; focusing; aiming;
releasing the shutter; turning the power off.
View original page 10
Page 11 · Read text
POWER TURNING ON
                        Turn on the exposure metering device by moving
                            lever (19) from the red dot to the green dot. The
                        exposure metering device should only be turned
                     on during shooting.

                  COCKING THE SHUTTER
                       Cock the shutter by turning lever (14) until it stops.
                         For ease of cocking, the lever is first rotated 15°
                         without transferring the movement to the
                       mechanism.  If the shutter is fully cocked, the lever
                           automatically returns to its original position; if not,
                                        it remains in an intermediate position. In this case,
                         the shutter should be cocked further.

                    SETTING THE SHUTTER SPEED
                          Set the shutter speed with the shutter cocked or
                       uncocked by turning ring (16) until the desired
                          value aligns with the index on the top cover.


www.butkus.us
View original page 11Page 12 · Read text
Set the shutter speed to "B" by rotating ring 16
counterclockwise only (the ring is locked between
shutter speeds of 1/1000 sec and "B"). The scale is
fixed at all shutter speeds. When shooting at shutter
speed "B," the automatic exposure control
mechanism should be turned off.

AUTOMATIC AND MANUAL APERTURE
SETTINGS
Automatic exposure is achieved using an exposure
meter. The exposure meter, the main component of
the automatic exposure mechanism, determines the
aperture value for a preset shutter speed and film
sensitivity. The device consists of a light detector, a
galvanometer, and a power source. The light
detector of the exposure meter consists of two photo
resistors, which are located inside the camera behind
the lens. They detect light passed through the lens,
from the entire area of the ground glass.
View original page 12
Page 13 · Read text
The additional exposure metering range is designed
                                                     for shooting in low-light conditions with shutter
                                            speeds from 1/60 to 1/2 sec. The additional range is
                                                  activated only at a shutter speed of 1 s with head
                                                        (15).  Set to the large yellow dot, head (15) must be
                                                   raised and turned until index (41) aligns with the
                                                 small yellow dot on the film sensitivity scale.

                                              Aperture scale (42) and galvanometer needle (43) are
                                                          visible in the viewfinder eyepiece. The galvanometer
                                             needle indicates the aperture that will be set
                                                 automatically when the shutter release button is
                                                 pressed. The dots marked on the aperture scale
                                             correspond to the values of t 1.4; t 2.8; t 5.6; t 1; 22.
                                          The automatic aperture range is limited by the red
                                                    indicators [44] ("too little light") and [45] ("too much
                                                             light").


www.butkus.us
View original page 13Page 14 · Read text
If the arrow is blocked by the (44) pointer at the
beginning of the aperture scale (the "low light"
position), there is not enough light to take a picture.
In this case, the shutter release button is locked (the
shutter does not fire). The shutter release button
may also be locked if the arrow is near the pointer.
To take a picture, increase the shutter speed until the
arrow moves to the next aperture stop.  If the arrow
is blocked by the (45) pointer at the end of the
aperture scale (the "high light" position), the shutter
release button is not locked. To obtain normal (non-
overexposed) negatives, decrease the shutter release.
If the arrow is above one of the aperture stops
between the pointers, you can take a picture.   If the
indicators are set close to each other, you need to                                                     Therefore, when photographing objects with sharply
switch the exposure meter to an additional range.                                                          different brightnesses within the frame (for example,
The exposure meter determines the exposure using                                                a person against a snowy background), the exposure
the integral (total) brightness of all objects in the frame.                                                  metering device may not provide the correct
(This would be called “Average”metering, so it could
                                                 exposure for the main subject. In these shootinginclude exposure of the sky – so watch what is in the
                                                        conditions, it is advisable to set the aperture manuallyviewfinder)
                                                     or adjust the exposure value determined by the
                                                 exposure metering device.  Manually, the aperture is
                                                        set by turning dial (11) until the desired value aligns
                                                   with the index.
View original page 14Page 15 · Read text
FOCUSING
                                                 Focus and set the distance on the distance scale by
                                                      turning the (3)-ring on the lens. Turn the ring until
                                                  the image on the (46) micro-raster and on the ground
                                                           glass is sharp. You can control the depth of field by
                                                    observing the details of the subject in the viewfinder's
                                                                field of view. To do this, press the (13)-ring shutter
                                                       release button to stop down the lens.  If the shutter is
                                                    cocked, press the (3)-ring shutter release button
                                                       gently (not all the way) to prevent it from firing.

                                   SIGHTING
                                                        Sighting and framing of the subject is performed by
                                                      looking through the viewfinder's eyepiece (27) at its
                                              image on the ground glass.


                                                                                                                       www.butkus.us


SHUTTER RELEASE
The shutter is released by gently pressing the trigger button (13) until
it stops. This stops down the lens, automatically raises the mirror,
and releases the shutter, after which the mirror closes. When the
trigger button returns to its original position, the lens aperture
automatically opens.
View original page 15Page 16 · Read text
Note: When shooting with a camera in automatic exposure
mode, it is necessary to: release the shutter after the arrow
has settled in the reticle field; in bright light, try, if possible,
to avoid letting light into the eyepiece, as the location of the
photo resistors in the eyepiece area may introduce an error
in aperture determination. In this case, it is necessary to use
a removable eyecup.

TURNING OFF THE POWER
After shooting, turn off the power by positioning lever (19)
against the red dot.

DISCHARGE (removing exposed film)
Remove film rewind knob (30) from its socket. Press and
release film transport release button (33). Rotate the film
rewind knob clockwise to rewind the exposed film into the
cassette. After rewinding is complete, open the camera
back, remove the cassette, and release the end of the film
from the take-up spool.


 CHANGING THE LENS
 To remove the lens, press the (10) lens release button and,
  by turning the lens counterclockwise, remove it from the
  camera. To attach the lens, align the red dot on the lens
  base with the same dot on the camera body, press the
  release button, insert the lens into the camera bayonet
  mount, turn it clockwise until it stops, and release the
  release button. Then, by turning the lens slightly
  counterclockwise, check that it is securely locked. The
  lens release is kinematically linked to the "low light"
  indicator in the viewfinder eyepiece, and its position
 depends on the aperture ratio of the lens. When installing
 an interchangeable lens, the indicator stop moves so that
  the indicator covers the previous aperture value. For
  example, when installing a lens with an aperture ratio of
  1:2, the "low light" indicator will cover an aperture value
  of 1.4. This will prevent the camera from thinking it has a
  faster lens then the one installed.
View original page 16
Page 17 · Read text
The camera is designed to take into account the aperture ratio of installed special lenses (from 1.4 to 4) using
the (24) dial. After installing an interchangeable lens, its aperture ratio and the sensitivity of the film used are
entered into the exposure metering device using disk (24) and head (15). The camera's design is designed for
the use of interchangeable lenses with a bayonet mount. (This is a specific mount to this and a the Kiev-10.

Lens name                   Focal distance, mm            Relative aperture           Purpose

Jupiter-9 Automatic       85mm                     F2                              Portrait

Jupiter-11 Automatic      135mm                   F4                        Long focal length

"Mir-1" automatic        37mm                       F2.8                       Wide-angle


                                               Lenses with an M39 x 1 thread can also be used as
                                                 interchangeable lenses. The included adapter ring is used
                                                  to mount them on the camera. In this case, the aperture
                                                                     is set manually using the lens scale. The required
                                                aperture value for shooting can be determined using the
                                                     scale in the viewfinder's field of view with the lens fully
                                              open, after first turning on the exposure meter and
                                                      setting the lens aperture.

                             SHOOTING WITH A KOA FLASH LAMP

                                           The camera is equipped with a 12 mm socket and a 21
                           mm contact in a clip for connecting various lamp flashes.

                                                    Flash photography should only be performed with the
                                               automatic shutter speed disabled at any shutter speed
                                           from 1/100 to 1/2 sec. When connecting the flash lamp
                                              through the 12-pin socket to the 21-pin socket, insert a
                                                         plastic insert to insulate the contact. (Typical hot shoe)
                                                             (FYI: Faster shutter speeds will only expose part of the
                                                           film. Slow speeds will create motion blur as the shutter
                                                             will still collect ambient light after the flash fires. This is
                                           sometimes used to “express” motion or speed in the
                                                  image.)

                                               Pg 19
View original page 17Page 18 · Read text
NOT USED WITH LIGHT FILTERS
The "KIEV-15" camera is equipped with UV-1x and YG-t, 4x filters. These filters are used as attachments that
screw into the front of the lens mount (M49x0.75 thread). The UV-tx (UV-1") filter is colorless and is used to
reduce the effects of ultraviolet rays, for example, for shooting in high-altitude conditions. note: The UV-JX
(UV-1") filter is also used when shooting with color film to eliminate the interfering effects of ultraviolet rays.
Light Filter YG-1.4 (YZ-1.4) - yellow-green, light, improves the tonal rendition of multi-colored objects on high-
sensitivity photographic materials with a slight loss of their light sensitivity. In terms of its photographic
effect, it occupies an intermediate position between the YG-2x (YG-2x) and YZ-2x (YG-2x) filters. On
photographic materials at medium light sensitivity levels, practically correct tone rendering of multi-colored
objects is achieved.

PRACTICAL TIPS

When shooting, release the shutter smoothly, without jerking. For long exposures (over 1/30 sec), it is
recommended to shoot from a tripod. Release the shutter button only after the shutter has closed.

For moving objects, it is recommended to use the following shutters:
Motorsports - 1/1000
Winter sports, tennis - 1/1000 - 1/500
horse racing, sports running 1/500
children running – 1/250 or 1/125
pedestrians and standing people – 1/125 – 1/60

If you are taking photos in sunny weather in automatic mode, to avoid draining the power source, we
recommend: removing the lens cap only immediately before and during shooting; Do not point the camera
lens toward the sun; Do not leave the camera in the sun for long periods between shots.

CARE
Store the camera in its case in a dry place and protect it from dirt, dust, moisture, sudden impacts, and shock.
When shooting in freezing weather (below -10°C), do not leave the camera outdoors; wear it under your outer
clothing, removing it only when shooting. Carefully protect the lens from dirt to avoid frequent cleaning of the
lenses, as this may damage the anti-reflective coating. Do not expose the light detector of the exposure meter
to very bright light between shots. When carrying the camera without a case or with the case open, close the
lens cap.


Make sure the exposure meter is turned off between shots. This will prolong the life of the element. When
bringing the camera from a cold outdoor location, do not open it immediately, but leave it in its case for a
while to allow it to warm up. Do not apply excessive force when handling the camera. If you discover any
View original page 18
Page 19 · Read text
defects or damage, do not attempt repairs yourself. Repairs and adjustments to the camera should only be
performed by qualified personnel. When loading the camera, be careful not to damage or deform the shutter
blades. If minor abrasions appear on the shutter during use, do not lubricate them with oil or other materials.


From Serialforeign.photo website: (this states it has a spot-average switch. Maybe
later models ?  It also has it’s own bayonet mount, specific to that camera.)

The Kiev 15 was the third and last iteration of the automatic SLR that began with the Kiev 10.
Mine was made in 1980 (the only year that the model was marked with TTL, in other
production years it was marked as a TEE model). Mechanically it’s very close to the Kiev 10
with the same metal fan shutter and the same bayonet lens mount that was unique to the Kiev
10, 11 and 15 models. (So this is not a Pentax K nor seemingly the special The main differences
are that the big selenium cell is gone in favour of a battery-powered lightmeter, the cold-shoe is
now a hot-shoe and the aperture selector wheel has migrated to the other side of the lens mount.

Like the Kiev 10 it’s a big and heavy camera. Even without the 10’s huge selenium cell on the
front, there’s still a lot of camera here. It’s also slightly less space-age in detailing than the 10.
The 10 has a hidden rewind lever that folds out of the baseplate and hides the door catch, the 15
has them separately and simply recessed into the base. The advance lever on the 10 moves
through a slot between the top plate and the door and an internal dustguard swings aside as it
moves, the 15 just puts the lever on top. The shutter release on the 15 is also a bit more
utilitarian. There are some improvements however, there’s now a switch to select spot or
average metering and there’s a system built into the speed selector dial that allows you to
calibrate the lightmeter for lenses with different max apertures. There’s also a button to activate
the lightmeter (in the photo above, it’s the silver button on the top plate behind the aperture
selector wheel), the 10 didn’t need that because it didn’t have a battery.

Mine came with the standard Helios-81 53mm f/2 lens which is identical to the lens that
shipped with the Kiev 10. It’s a good lens optically although it’s soft at wider apertures and
only gets sharp  all the way to the edges at about f/8 or so. Other Kiev automat lenses are also
compatible and an adapter lets you use m42 lenses but without the shutter priority automation
or TTL metering. Unlike later Kiev SLRs, the automatic lens bayonet mount is not compatible
with Nikon F mount lenses. There is only a very limited range of Automat lenses and they don’t
cover niche uses such as macro or very long telephoto (the longest available is the Jupiter-11
135mm f/4). I have the Jupiter-11 as well as a Mir-1 37mm f/2.8 and the Mir-20 20mm f/3.5
which is (as far as I know), the full set.

Also check out mikeeckman. com/2020/06/kiev-15-ttl-1980/
As usual a long look at this camera and it’s use.
View original page 19
Related documents and language editions

From the M. Butkus archive. Original publisher and archive notices are retained.
Check the model and edition against your equipment.
PDF verified 2026-10-10.