Film cameras
KIEV-17 - (translated) User manual
User manual for KIEV-17 - (translated). 11 pages in English. Read the original PDF, download or print a copy without registration.
11 pagesEnglish3.6 MB PDF
Loading your manual…Open PDF directly
Document details
- Brand
- Kiev
- Model / document
- KIEV-17 - (translated)
- Document type
- User manual
- Language
- English
- Pages
- 11
- File size
- 3.6 MB
- Category
- Film cameras
- Document date
- Not specified in catalog
Search available document text
Find a term, then jump to its page in the original PDF. Image-only pages may not be searchable; check the PDF for exact wording and diagrams.
Page 1 · Read text
www.butkus.us


                Translated via Google from Russian manualKIEV – 17

The camera you purchase may differ slightly in appearance from the photos in this manual, as its appearance and
performance are continuously improved during the production process.

Produced by order of the production association "Arsenal Plant”.

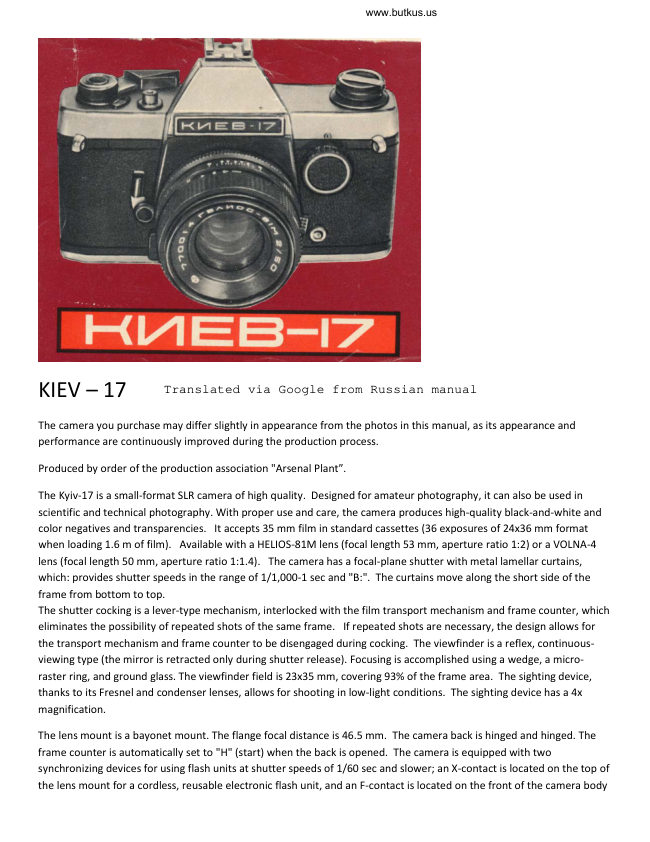
The Kyiv-17 is a small-format SLR camera of high quality. Designed for amateur photography, it can also be used in
scientific and technical photography. With proper use and care, the camera produces high-quality black-and-white and
color negatives and transparencies.  It accepts 35 mm film in standard cassettes (36 exposures of 24x36 mm format
when loading 1.6 m of film).  Available with a HELIOS-81M lens (focal length 53 mm, aperture ratio 1:2) or a VOLNA-4
lens (focal length 50 mm, aperture ratio 1:1.4). The camera has a focal-plane shutter with metal lamellar curtains,
which: provides shutter speeds in the range of 1/1,000-1 sec and "B:". The curtains move along the short side of the
frame from bottom to top.
The shutter cocking is a lever-type mechanism, interlocked with the film transport mechanism and frame counter, which
eliminates the possibility of repeated shots of the same frame.  If repeated shots are necessary, the design allows for
the transport mechanism and frame counter to be disengaged during cocking. The viewfinder is a reflex, continuous-
viewing type (the mirror is retracted only during shutter release). Focusing is accomplished using a wedge, a micro-
raster ring, and ground glass. The viewfinder field is 23x35 mm, covering 93% of the frame area. The sighting device,
thanks to its Fresnel and condenser lenses, allows for shooting in low-light conditions. The sighting device has a 4x
magnification.

The lens mount is a bayonet mount. The flange focal distance is 46.5 mm. The camera back is hinged and hinged. The
frame counter is automatically set to "H" (start) when the back is opened. The camera is equipped with two
synchronizing devices for using flash units at shutter speeds of 1/60 sec and slower; an X-contact is located on the top of
the lens mount for a cordless, reusable electronic flash unit, and an F-contact is located on the front of the camera body
View original page 1Page 2 · Read text
for fast, single-shot flash units. The shutter can be released using the self-timer (the shutter-release time is 7-15 sec).
The lens focusing mechanism is designed to operate in the range from 00 (infinity) to 0.5 m (HELIO-81M) and 0.45 m
(VOLNA-4). Before taking photographs, please read this manual thoroughly.

DELIVERY SET
Camera with a HELIO-81M or VOLNA-4 lens and magazine
Lens cap (front) Lens cap (rear)
UF-1 x filter ZhZ-1 4x filter
Release cable
Shoulder strap
Guide
insert Case Packaging box with a plastic bag
Operating manual set pcs. 1


                                                                                                                                               Digitally signed by Mike Butkus
                                                                                                            DN: cn=Mike Butkus, o,
                                                                                                                        ou=Butkus.org,                             Mike Butkus email=mike@butkus.org, c=US
                                                                                                                              Date: 2025.11.27 21:14:41 -05'00'


MAIN PARTS AND COMPONENTS


1 - Rewind knob;                             7 - Self-timer lever;
2 - Shutter release button;                      8 - Self-timer button;
3 - Shutter cocking lever;                       9 - Lens release lever;
4 - Strap eyelet;                              10 - Sync contact socket for single-shot fast-action
5 - Shutter speed adjustment knob;                   flash units (F);
6 - Camera body;
View original page 2Page 3 · Read text
www.butkus.us


                            www.butkus.us


11 - Repeater lever;                           16 - Frame counter window;
12 - Lens;                                   17 - aperture scale;
13 - Clip with contact for cordless reusable         18 - depth-of-field scale;
    electronic flash unit (X);                    19 - lens focusing ring;
14 - Repeat shot button;
15 - Fold-out grip;


20 - 1/4 tripod nut;
21 - film transport release button;
22 - viewfinder eyepiece;
23 - back panel;
24 - film sensitivity reminder;
View original page 3Page 4 · Read text
www.butkus.us


25 - left camera film cassette slot;                      27 - transport drum;
26 - frame window;                                 28 - take-up spool;
                                                 29 - pressure plate.


HOW TO USE THE CAMERA
Loading the Camera Loading the camera can be done in a bright, dimly lit area (at least in the shadow of your
body). Remove the camera from its case by loosening the tripod screw.  Lift the rewind lever (15) up and
open the back of the camera. Insert film cassette (30) into the left slot of the camera body and, while gently
turning the head 1, lower it so that the fork connected to the head fits into the slot of the cassette spool.
Attach the film to the take-up spool (28) by inserting the end of the film into one of the spool slots so that the
film perforation fits into the tooth located at the bottom of each slot.
View original page 4Page 5 · Read text
Venmo @mike-butkus-camera  Ph. 2083
PayPal Name  Lynn@butkus.org      www.PayPal.me/lynnbutkus
View original page 5
Page 6 · Read text
www.butkus.us

Holding the film and pressing it with your left hand to the teeth of the transport drum 27, turn the (3) cocking
lever.


Turn the shutter and ensure that one of the film's teeth enters the film's perforation and that the film is winding
onto the take-up spool. Close the camera back. Set the film sensitivity by turning dial (24) until the desired
value in DIN or ASA units is reached, aligned with the vertical index located in the central circle of the film
speed guide. The film speed guide has two scales: an inner scale, which indicates the film sensitivity in DIN
units, and an outer scale, which indicates the film sensitivity in ASA units. The film sensitivity in DIN or ASA
units is indicated on the packaging of domestic films. Preparing the camera for shooting To wind the exposed
end of the film, cock the shutter twice by turning lever (3) until it stops, pressing release button 2 after each
cocking.

The next time the shutter is cocked, the frame counter number "1" will be positioned opposite the index in
window (16) of the frame counter. Rewind head (1) rotates while the film is being advanced.  If the film is not
wound tightly in the cassette, the head may not rotate during the first few frames. Shooting The shooting
process consists of the following operations: cocking the shutter and advancing the film; setting the shutter
speed; setting the aperture; viewing and framing; focusing; releasing the shutter. As noted above, cocking the
shutter and advancing the film is accomplished by turning lever (3) counterclockwise until it stops. This
rotates the frame counter scale by one division.
View original page 6
Page 7 · Read text
After fully cocked, the lever automatically returns to
                                                      its original position, and when uncocked, it remains in
                                   an intermediate position. The shutter speed is set by
                                           rotating knob (5) until the selected value is locked
                                          against the red index (31). The aperture is set by
                                         turning aperture scale (17) until the desired value is
                                       locked against the index (32).


                                  The aperture scale is locked at the digital and
                                       intermediate values. Sighting and framing of the
                                         subject are accomplished by examining the image on
                                      the ground glass through viewfinder eyepiece (22)
                                      with the aperture fully open, regardless of the
                                       aperture value set on the scale.  If you need to check
www.butkus.us                         the depth of field while shooting, press the repeater
                                           lever (11). This stops the lens down to the preset
                                       aperture lens clockwise until the index (32) aligns
                                      with the dot on the frame, then remove it from the
                                     camera. To install the lens, align the index (32) with
                                      the dot (33) on the frame, insert it into the camera,
                                  and turn it counterclockwise until it locks into place.
View original page 7Page 8 · Read text
www.butkus.us


Shooting
The shooting process consists of the following
operations:
cocking the shutter and advancing the film;
setting the shutter speed;
setting the aperture;
viewing and framing;
focusing;
releasing the shutter.

As noted above, cocking the shutter and advancing
the film is accomplished by turning lever (3)
counterclockwise until it stops. This rotates the frame
counter scale one notch.
View original page 8
Page 9 · Read text
USING LIGHT FILTERS
                                          The lens comes with UV-1x and ZhZ-1.4x filters. The UV-1x
                                                                 filter is colorless and is used to reduce the effects of
                                                       ultraviolet rays, for example, for shooting at high altitudes
                                                or with color film. The ZhZ-1.4x filter is yellow-green,
                                                              light, and improves tonal quality.
                                          The lens is focused by turning ring (19) until a sharp image
                                                  of the subject is obtained in the viewfinder's field of view.
                                               For more precise focusing, focus wedges are located in the
                                                center of the ground glass, allowing you to focus by
                                                     aligning the two halves of the image.  If the subject does
                 www.butkus.us                       not have pronounced vertical lines, high focusing accuracy
                                                                    is achieved by focusing with the micro-raster ring. The
                                                  shutter is released by gently pressing the shutter-release
                                              button (2). Before the shutter is released, the lens
                                                  automatically stops down to the set aperture. Do not turn
                                                    lever (3) before the shutter is fully released, as this may
                                       damage the camera. When shooting at a shutter speed of
                                               "B" the shutter remains open as long as the shutter-
                                                  release button is pressed.  If necessary, for steadiness
                                          you can use the camera's automatic shutter release, which
                                                                    is cocked by turning lever(7) counterclockwise until it
                                                    stops. To activate the automatic shutter release, press
                                              button (8). Using the automatic shutter release at “B” is
                                             not recommended.


To retake the same shot, press button (14) and, while holding it down, cock the shutter. Caution! Do not press
button (14) until the shutter release lever returns to its original position. To retake the same shot, cock the
shutter as usual, by pressing the trigger button. At shutter speeds of 1/30 sec and longer, it is recommended
to photograph from a tripod, using a cable release to release the shutter.
Unloading the camera
Press button (21) all the way down and release it. The button should lock into place.
View original page 9Page 10 · Read text
www.butkus.us


                                               Fold back knob (15) and rotate it in the direction of the
                                          arrow until the rotation force is suddenly reduced. After the
                                                    film has finished rewinding, open the back panel and
                                       remove the cassette. This operation should be performed in
                                          a dimly lit area. Before closing the camera, inspect it and, if
                                                necessary, clean it with a brush or wipe it with a cloth.


SHOOTING WITH A FLASH
Before using the flash, carefully read the instructions provided with it. The connection between the cordless
flash and the contacts in the camera is established by inserting the flash into the 13-pin connector. A corded
flash is connected via a special adapter block, which can be purchased at camera stores.


                                     The disposable flashlight cable must be connected to socket
                                                  (10). First, insert the insert provided with the camera into
                                           socket 13. Shooting with the flashlight should be done at
                                            shutter speeds of 1/50 sec or longer.


SHOOTING WITH A JIAMPOYA FLASH
In the camera you purchased, the F-contact for fast-acting, single-use flash tubes, located on the front of the
camera body (see pos. 10), has been removed. The camera has two X-contacts (11/Ta) for using various flash
tubes. The central contact, located in the holder (13), is used to connect cordless flash tubes.

For connecting corded flash tubes, there is an additional socket on the top cover. Fast-acting, single-use flash
View original page 10Page 11 · Read text
tubes are installed and connected in the same way as flash tubes. It should be noted that shooting with single-
shot flash units is done at shutter speeds of 1/30 sec or longer. 2. The Kyiv-17 camera is manufactured
according to the specifications

                                      REPLACING THE LENS
                                             To replace the lens, press the lens release lever (9)
                                                                 fully and turn the lens clockwise until the index (32)
                                                           aligns with the dot on the frame, then remove it from
                                                  the camera. To install the lens, align the index (32)
                                                   with the dot (33) on the frame, insert it into the
                                                 camera, and turn it counterclockwise until it locks into
                                                         place.


APPLICATION OF LIGHT FILTERS
The lens kit includes UV-1x and ZhZ-1.4x filters. The UV-1x filter is colorless and is used to reduce the effects of
ultraviolet rays, for example, for shooting at high altitudes or with color film. The ZhZ-1.4x filter is yellow-
green, light, and improves tonal quality.

Reproduction of multicolored objects on high-sensitivity photographic materials with a slight loss of
sensitivity. On medium-sensitivity photographic materials, practically accurate tone reproduction of
multicolored objects is achieved.

CAMERA CARE
Store the camera in its case in a dry place. Protect it from dirt, dust, moisture, and sudden shocks and
vibrations, as these may damage the mechanisms. When shooting in freezing weather (below -10° C), do not
leave the camera outdoors; wear it under outer clothing, removing it only during shooting. Carefully protect
the lens from dust and dirt to reduce the need for cleaning the optics, as this may damage the anti-reflective
layer on the lens surfaces. Do not open the camera immediately when bringing the device from a cold place
into a warm room, to avoid fogging, let it warm up in its case. Do not apply excessive force when operating
the device.  If any defects or damage are detected, do not repair the device yourself. Repairs and adjustments
to the device should only be performed by qualified personnel.
View original page 11From the M. Butkus archive. Original publisher and archive notices are retained.
Check the model and edition against your equipment.
PDF verified 2026-10-10.