Film cameras
Kiev 4 User manual
User manual for Kiev 4. 15 pages in English. Read the original PDF, download or print a copy without registration.
15 pagesEnglish1.8 MB PDF
Loading your manual…Open PDF directly
Document details
- Brand
- Kiev
- Model / document
- Kiev 4
- Document type
- User manual
- Language
- English
- Pages
- 15
- File size
- 1.8 MB
- Category
- Film cameras
- Document date
- Not specified in catalog
Search available document text
Find a term, then jump to its page in the original PDF. Image-only pages may not be searchable; check the PDF for exact wording and diagrams.
Page 2 · Read text
interchangeable lenses, are the characteristics which made these cameras

                        the choice for professional photography for more than 40 years.


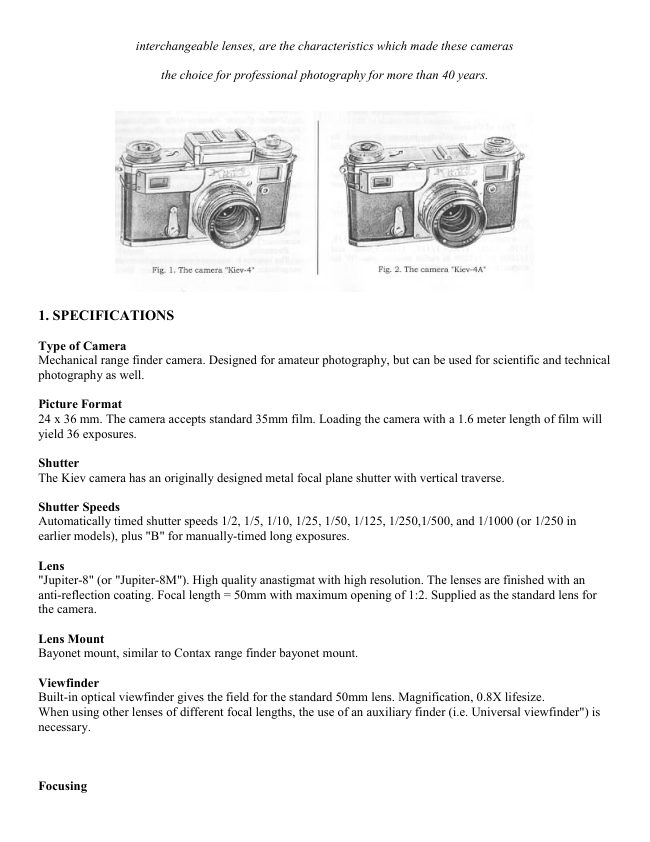
1. SPECIFICATIONS

Type of Camera
Mechanical range finder camera. Designed for amateur photography, but can be used for scientific and technical
photography as well.

Picture Format
24 x 36 mm. The camera accepts standard 35mm film. Loading the camera with a 1.6 meter length of film will
yield 36 exposures.

Shutter
The Kiev camera has an originally designed metal focal plane shutter with vertical traverse.

Shutter Speeds
Automatically timed shutter speeds 1/2, 1/5, 1/10, 1/25, 1/50, 1/125, 1/250,1/500, and 1/1000 (or 1/250 in
earlier models), plus "B" for manually-timed long exposures.

Lens
"Jupiter-8" (or "Jupiter-8M"). High quality anastigmat with high resolution. The lenses are finished with an
anti-reflection coating. Focal length = 50mm with maximum opening of 1:2. Supplied as the standard lens for
the camera.

Lens Mount
Bayonet mount, similar to Contax range finder bayonet mount.

Viewfinder
Built-in optical viewfinder gives the field for the standard 50mm lens. Magnification, 0.8X lifesize.
When using other lenses of different focal lengths, the use of an auxiliary finder (i.e. Universal viewfinder") is
necessary.


Focusing
View original page 2Page 3 · Read text
The camera is equipped with a long base optical rangefinder, working from 0.9 m to infinity. The long base
range finder high focusing accuracy, essential with large aperture or long focal length lenses. Focusing is also
possible with the use of the distance scale.

Self-timer
Mechanically controlled, 9-15 second exposure delay.

Exposure Metering
Built-in selenium cell exposure meter (for Kiev-4 only). Reading angle is 65 to 70 degrees. Acceptable
brightness range is 4 to 16000 cd/m2.

Kiev-4a do not have a built-in exposure meter. Film-speed indication only.

Filters
Threaded, 40.5 x 0.7 mm.

Tripod
3/8" threaded socket (modern 1/4" nut on later models)

Flash Synchronization
1/25 or slower with electronic or bulb flash.
View original page 3
Page 4 · Read text
2. NOMENCLATURE
The basic components of the camera (fig. 3) are: shutter, lens, rangefinder, viewfinder, self-timer mechanism
mounted on the body, and removable back cover.


                                                                                                                                                                                                            Digitally signed by Mike Butkus
                                                                                                                                                         DN: cn=Mike Butkus, o=Butkus camera manuals,
                                                                                                                                                                           ou=butkus.org, email=mike@butkus.org, c=US                            Mike Butkus Date: 2023.01.22 21:18:10 -05'00'


Shutter winding is by turning the winding knob (5). The shutter speed scale (4) is engraved on the winding
knob. The scale has numbers 2, 5, 10, .... up to 1000 (or 1/250), which stands for 1/2, 1/5, 1/10, .... 1/1000
(1/250) sec., respectively.

The shutter mechanism is linked to the film transport and frame counter mechanisms. By turning the winding
knob (5), the shutter is simultaneously wound, with the frame advance and the of the disc counter moves up by
one division. With this design, double exposures are prevented.

The shutter is released by the release button (6) or by activating the self timer release (1).

The shutter release button has a threaded hole to accommodate a shutter release cable.

Focusing of coinciding the second image from right window (2) and left window (11) into one, which is made
possible by an optical compensator in the rangefinder mechanism.

The rangefinder mechanism is connected to the lens focusing mechanism, and thus, when the rangefinder
images coincide, the lens is focused correctly. The compensator turns by rotating the gear wheel (9).
View original page 4Page 7 · Read text
Avoid loading or unloading
film in bright sunlight. Do this
in a shaded area, or under the
cast of your own shadow.

Install the new cartridge into
the left chamber, and the take-
up spool in the right chamber.

Fix the tip of the film leader
into the take-up spool. The film
perforations should engage into
the sprocket teeth of the
transport drum (fig. 9).


                                                           Close the camera back. This has
                                                                      to made in reverse of the
                                                           opening sequence. Replace the
                                                          back cover so that its edges
                                                          engage with the groves of the
                                                         camera body. Hold the edges of
                                                                   the film, push the back cover in,
                                                        and turn the locking keys
                                                                   against the stop and fold them
                                                                back.
View original page 7Page 8 · Read text
Make 2 blank exposures (the
                                                                                          first two frames are on the
                                                              exposed end of the film).
                                                            Turn the rewind knob (13) to
                                                                       the direction of its engraved
                                                              arrow to make the film taut..


                                                 If the camera is loaded properly, turning the advance knob 5
                                         will cause the rewind knob 13 to turn in the direction
                                      opposite its engraved arrow. A stationary rewind knob will
                                        indicate either an improperly loaded film or a loosely
                             wound film in the cartridge or the take-up spool


Finish the loading process by setting the frame counter disk to "0" by turning its movable part (fig. 10).

Note: An empty film cartridge (old type) can be used as a take-up spool.

2.2. Basic shooting

The process of shooting consists of the following operations:

1. Determination of appropriate aperture and shutter speed;

1. Shutter winding;
2. Selection of shutter speed;
3. Selection of aperture;
4. Focusing;
5. Composing;
6. Release of shutter.
View original page 8Page 9 · Read text
2.2.1. Determination of appropriate abutter speed and aperture


                                                 With the Kiev-4, the appropriate shutter
                                                      speed and aperture for correct exposure
                                                     can be determined through its built-in
                                                       exposure meter.


Turn film speed ring 26 so that the speed value (ASA) of the film in use aligns with index marker (27, figure
11). The (ASA) Soviet standard is almost the same as ISO/ASA. If the film in use has an exposure index not
given on the scale, the index can be set between two specified numbers (e.g., ISO 100 can be set between ASA
65 and 130).

Aim the camera towards the subject and open the exposure meter cover by pressing button 30 (fig. 12).

Align the meter's needle 29 with the black diamond mark 9 * by turning ring 25.

From the shutter speed ring 25 and aperture ring 26, choose a shutter speed/aperture combination appropriate
for the exposure.


Note: Red numbers on ring 36 indicate exposure time in FULL SECONDS, and black numbers, fractions of
seconds.


On the exposure meter scale 28 are the multiplier numbers 2 and 4 "EXPOSURE FACTOR NUMBERS".
These should be used if the needle (29) is not able to reach the index * even after a complete turn of ring 25 (in
View original page 9Page 10 · Read text
low light shooting situations). The ring (25) should then be turned so that needle 29 will point to the nearest
multiplier number mark. The correct shutter speed is obtained by multiplying the shutter speed value read off
the scale 36 with the multiplier number. (For example: A combination of 1/60 @ f:2 is read off the scale, and
the meter needle points at "2" The shutter speed should be multiplied by 2, and the correct shutter speed for
proper exposure should be 1/30 (1/60 second + 1/60 second = 1/30 second)].

Note: Close the exposure meter cover immediately after metering. The selenium cell can weaken after long
exposures to bright light] Do not subject the meter to shock.

For the meterless Kiev-4a, appropriate exposures can be determined by several methods: The best way is
through a separate exposure meter. Exposure calculators or tables (as found in film boxes) can also be used.
Visual judgement based on one's photographic experience is also useful.
2.2.2. Winding shutter
Turn the advance knob 5 clockwise (fig. 3)

2.2.3. Selecting shutter speed


                                                            Shutter speed selection is done through
                                                             the knob 6 as follows:
                                                        Raise the knob 6 by the edges (fig. 13),
                                                    and turn it so that the black dot on it
                                                             points to the number of the chosen
                                                                shutter speed, and lower the knob back.
                                                The advance knob should be turned
                                                        clockwise before changing shutter
                                                            speeds. In this state, the shutter speed
                                                      can be set more correctly. The shutter
                                                       speed can be set with the shutter either
                                              wound or fired. However, it is
                                                recommended that the shutter speed be
                                                     changed with the shutter wound.


If an exposure longer than 1/2 second is necessary, the knob's black point should be set against "B". The shutter
will remain open as long as the shutter button is pressed, and will close only upon release. With very long
exposures, the shutter button can be kept down by turning it counter clockwise. Turning back the button (red dot
on the shutter and knob will align) releases it and closes the shutter.

2.2.4. Setting the aperture
The aperture can be selected by turning ring 19 (fig. 4) and aligning the chosen aperture number against the
index mark. The setting should be done before focusing the lens.

2.2.5. Focusing
View original page 10Page 11 · Read text
Adjusting the rangefinder
                                                           image and focusing are made
                                                                  simultaneously by turning the
                                                          movable part of the gear focus
                                                            wheel (fig. 3)

                                                                                                It is recommended (especially
                                                     when shooting at short
                                                                        distances) to coincide the two
                                                             images seen through the range
                                                                        finder window, on the center of
                                                                      the focus field patch, rather
                                                                  than the edges. It will ensure
                                                        more precise focusing.


In situations when the use of the range finder is impractical (e.g., fast-moving objects, objects without sharp
contours, or dim light shooting), focusing can be done by using the distance scale.

Shooting without the rangefinder (visual estimation of distances) can be done successfully only at small
apertures, i.e., when focus errors are compensated by depth of field.

2.2.6. Composing
Composing the image with a 50mm lens is done through the built-in viewfinder. The limits of the field of view
as what would be on the film is seen through the eyepiece.

The universal viewfinder (or other accessory viewfinders) has to be used with lenses of other focal lengths.

2.2.7. Shutter release


                                         The shutter is fired by pressing the shutter
                                                      release button (6) (fig.3).

                                                                        It is necessary to press the button smoothly and
                                                       gently, so as not to jerk the camera during
                                                  exposure.
View original page 11Page 12 · Read text
Using the Self-timer


Turn the lever (18) (fig. 3) counter clockwise against
the stop (fig. 16).
Note: Do not, by any means, turn the self-timer lever
further than the pin. When turning, do not press it
against the camera body to prevent deformation of the
lever and block the pin. When twisted to the left, the
self timer will appear to have a short start and shutter
will not fire.

The self-timer delay is between 9 to 15 seconds. It is
recommended to first set the shutter speed, and then the
self-timer. During the self-timer's run, do not change
shutter speeds. This can damage the shutter.


To prevent blurred pictures, the camera must be used with a tripod (or any suitable support) and a cable release
for exposures longer than 1/25 sec.


2.3. Rewinding film


                                              When the frame counter reads
                                                                  "36", it means that the film has
                                                              reached its end. Stop further
                                                               shooting and unload the camera
                                                                         (for cartridge to cartridge film
                                                                     loading).

                                                             Note: With film lengths shorter
                                                               than 1.6 meters the film end is
                                                                   indicated by an increased
                                                                     resistance in winding with the
                                                          winding knob 8 (fig. 1)
View original page 12Page 13 · Read text
Hold the camera with the left hand, cap the lens, press the film rewind button all the way in with the left index
finger, and turn the rewind knob 13 (fig. 13) to the direction of its engraved arrow (fig. 17).

Turn the rewind knob until a slight resistance is felt, and finally gone, indicating that the film has been pulled
back in to its cartridge.

Then, remove the back cover to take out the cartridge and take-up spool, and detach the film from the take-up
spool if film leader is still attached to the film take-up spool. Replace the take-up spool back into the camera.
Before closing the camera, it is recommended to examine its interiors, and check for dust, bits of film and dirt,
and remove these with a blower brush.

4. FLASH PHOTOGRAPHY
The camera has a mechanism to synchronies its shutter with flash. Before using flash with the camera, it is
recommended to study carefully these instructions.

For mounting flash directly on the camera, there is an accessory shoe 10 and a PC plug outlet 14 (fig. 3). Only
flash with cord connection can be used (for flash with shoe contacts, a special adapter for "hot shoe" to PC cord
connector is available).

Flash exposures should only be done at shutter speeds from 1/25 to 1/2 second. The contacts of the
synchronization circuit are closed with a- fired shutter (connected), and when the shutter is wound, the circuit is
open "off" It is important to turn the flash on (if connected to the camera) only AFTER winding the camera, or
the flash will fire spontaneously. Wind the shutter immediately or turn off the flash after shooting.

Note: Connect the flash only with the flash switched-off, or a wound shutter.


5. INTERCHANGEABLE LENSES
The camera is designed to take in other lenses with [Kiev] bayonet mounts ( lens specifications are given in the
table). The standard lens supplied with the camera is "Jupiter-8", F=50mm, 1:2, but may be replaced with
"Jupiter-3", F=50mm 1:1.5, or "Helios-103", F=50mm, 1:1.8. These standard lenses are mounted on the internal
ring of the focusing mechanism. All the other lenses mount on the external bayonet, with their respective depth
of field scales engraved on their fixed barrels.

When replacing the standard lens with lenses of other focal lengths, the standard lens must first be removed
with the focusing mount set at "infinity", and press the spring fastener (fig. 19). Turn the lens clockwise until
the red ledge below it aligns with the red dots on the focus mount and camera body to loosen, and pull out.

Note: Mounting the standard lens back requires the reverse sequence.
View original page 13
Page 14 · Read text
Each lens, except the "Jupiter-3 and and has its own focusing mechanism, distance, and depth of field scales.
All lenses focus through the aid of the camera's rangefinder.

Before mounting a lens, remove its rear cap. Both the camera's focusing mount and the lens have to be set at
infinity. Put the lens on the bayonet so that the red dot on the lens barrel and the red dot on the camera body
coincide. Push in lens and turn counter clockwise until the latch engages and the locks the lens.


                                             Lens is mounted correctly if focusing wheel 9
                                                                 (fig. 3) turns when lens is turned for focusing.

                                          The lens is removed in a reverse sequence. Set
                                                      the lens to infinity first, press the lens lock
                                                       release found near the lens barrel's mount, and
                                                      turn lens counter clockwise until it disengages
                                                 with the camera body.

                                           With lenses other than the standard 50mm, the
                                                    shot should be composed through the aid of
                                                      the universal or an auxiliary finder. The finder
                                               can be mounted on the accessory shoe (fig.
                                                       20).


Non-standard lenses are focused by turning their respective focusing barrels, NOT the focus wheel (9) (fig. 3)

6. CAMERA & LENSES CARE TIPS
Store the camera in a cool, dry place. In humid environments, store the camera inside its leather case to keep out
dust, moisture, and salt.

Note: In tropical climates, it is better to store the camera separately from its leather case. The leather case
moulds quickly in tropical climates, and will cause the camera to mould as well. Storing the camera in a sealed
vinyl plastic bag with some dessicants (Silica gel, dry rice, etc) will give the it more protection.

If the camera had been exposed to rain or mist, or after shooting near the sea, wipe the camera with a soft, clean
cloth. Don't leave the camera in an excessively hot place. Don't apply excessive force during operation. Do not
subject the camera to strong shock or impact (especially the Kiev-4).

As mentioned earlier, the lenses have antireflection coated surfaces. Because of its extreme thinness, this
coating can be easily abraded with improper wiping or cleaning. To protect the antireflection coatings, the lens
surface has to be protected from contamination so that cleaning is less often. Attaching a colourless "skylight"
1A or UV filter on the lens can give it ample protection. Being colourless, these filters can be permanently left
on the lens. The filter will absorb the brunt of contamination, and are easier to clean. Easier and cheaper to
replace too, if damaged. Protect the lens from, and do not store it in, a damp environment. Dampness can cause
spotting and lens mold, which damage the coating.
View original page 14Page 15 · Read text
Bubbles may be found in complex Soviet and foreign lenses. The process by which the optical glass found in
these lenses is made inevitably causes bubbles to form The bubbles which may be found are very small in size
and quantity, and are within acceptable specifications. They are not considered as defects and will not affect the
quality of images.

If the camera is brought from a cold environment into a warmer one, let it warm first in its case and stabilize to
ambient temperatures to prevent moisture condensation.


If the camera malfunctions, take it to an authorized service center for repair. Do not attempt to do your own
repairs at home.


         TRANSLATED BYANDREY OSTAPENKO FROM ORIGINAL MANUFACTURER'S

                                  MANUALS.

THANKS TO JAY Y. JAWER (PHILIPPINES) FOR IN TRANSLATING.

A A. OCTAITEHKO 2002 r.
View original page 15From the M. Butkus Camera Manual Library. Original publisher and archive notices are retained.
Check the model and edition against your equipment.
PDF verified 2026-10-10.