Lenses & filters
Kodak Vigilant Junior — Kodet lens User manual
User manual for Kodak Vigilant Junior — Kodet lens. 16 pages in English. Read the original PDF, download or print a copy without registration.
16 pagesEnglish2.2 MB PDF
Loading your manual…Open PDF directly
Document details
- Brand
- Kodak
- Model / document
- Kodak Vigilant Junior — Kodet lens
- Document type
- User manual
- Language
- English
- Pages
- 16
- File size
- 2.2 MB
- Category
- Lenses & filters
- Document date
- Not specified in catalog
Search available document text
Find a term, then jump to its page in the original PDF. Image-only pages may not be searchable; check the PDF for exact wording and diagrams.
Page 1 · Read text
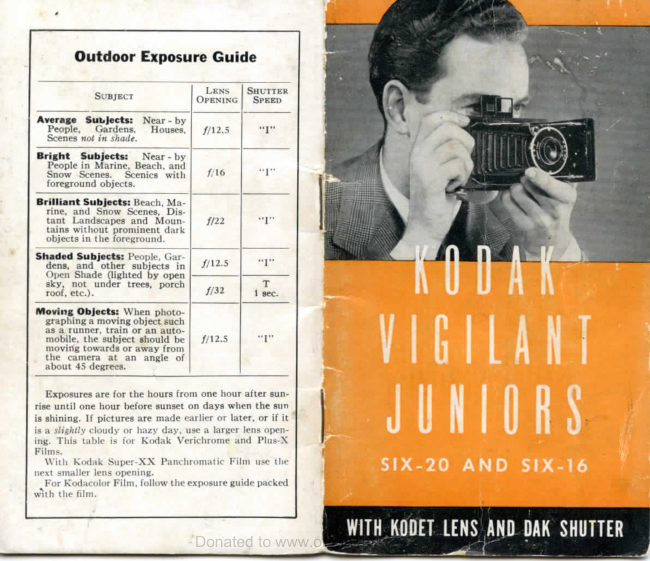
Outdoor Exposure Guide

                              LENS   SHUTTER
           SUBJECT           OPENING   SPEED

Average  Subjects:  Near - by
   People,   Gardens,   Houses,    //1 2. 5     "1"
   Scenes not in shade.
Bright  Subjects:  Near - by
   People in Marine, Beach, and
  Snow  Scenes.   Scenics  with     //1 6      "I"
   foreground objects.
 Brilliant Subjects: Beach, Ma-
   rine, and Snow Scenes,  Dis-
   tant Landscapes and Moun-       f/22       "I"
   tains without prominent dark
   objects in the foreground.
Shaded Subjects: People, Gar-
   dens, and  other  subjects  in    //12.5      "I"
  Open Shade  (lighted by open
   sky,  not  under  trees,  porch          T
   roof, etc.).                                  f/32       1 sec.
Moving Objects: When photo-
  graphing a moving object such
  as a runner, train or an auto-
   mobile, the subject should be    //1 2.5      "I"
  moving towards or away from
   the  camera  at  an  angle of
  about 45 degrees.                   V  I G  I L A N
  Exposures are for the hours from one hour after sun-
rise until one hour before sunset on days when the sun
is shining. If pictures are made earlier or later, or if it
is a slightly cloudy or hazy day, use a larger lens open-
ing. This table  is for Kodak Verichrome and Plus-X                          J U N  I O R SFilms.
  With       Kodak             Super-XX                        Panchromatic Film use the         X-20 Anest     smaller              lens                opening.
  For Kodacolor Film, follow the exposure guide packed
with the film.
                                    WITH KODET LENS AND OAK SHUTTER                   Donated to www.orphancameras.com
View original page 1Page 2 · Read text
THERE A R E


                                  TO GOOD
                                 PICTURES WITH
                YOUR KODAK VIGILANT JUNIOR

                   WITH the Kodak Vigilant Junior clear,
                        sharp pictures can be made right from
                           the  start, outdoors or  indoors,  in  the
                       daytime or at night.
                       The six easy steps to make good pic-
                            tures with your Kodak are given on the
                          following pages. They are simple, and
                         very easily memorized.
                     You  will  find many  illustrations
                      which  will  give you  suggestions  for
                     making similar pictures.

                        Left—Actual  size of pictures made with Kodak
                              Vigilant Junior Six-20. The Six-16 makes pictures
               2H x 4}^ inches in size.

Donated to www.orphancameras.com
View original page 2Page 4 · Read text
Push the metal plate that covers the           The Kodak  Vigilant Juniors, Six-2O
red window on the back of the Kodak          and Six-16, with the Kodet Lens, are
in the direction of the arrow, and turn            fixed-focus models, and  therefore no
the winding knob until a small hand             further  adjustments  for  focusing  arc
$ir*  appears  in  the window. Then            necessary. To get the subject sharp and
turn the knob slowly until the figure             distinct in the picture, the Kodak must
one (i) is centered in the window.                not be nearer than a certain number of
  After  each  picture, turn  the knob              feet to the subject, see table on page  ifi.
until a new number appears in the red
window.  This  prevents  making  two                                SETTING THE SHUTTERpictures on the same section of film.
  The red window should be uncovered
only when winding the film.                                     THE Dak Shut-
                                                            ter  has   three
                                              settings. For
     OPENING FRONT                snapshots or in-
                                                  stantaneous ex-
                                                 posures, move
                PRESS the  button           exposure   indi-
                 near the winding            cator A to  "I."
                 knob  to open  the         For  time  or
                      front of the Kodak;         "bulb"  expo-
                   then draw down the             sures,  move exposure indicator A  to
                  bed carefully until it        "T" or "B," see page  19.
                    locks (Fig. 6). This                   It is recommended  that immediately
                      will bring  the lens              after making a time or "bulb" exposure
                 and the shutter into            the indicator A be moved to letter  "I,"
Fig.                  position.                         to make the Kodak ready for snapshots.

                   Donated to www.orphancameras.com
View original page 4Page 5 · Read text
LENS OPENINGS                   frame. It shows what will appear in the
                                                          picture, but on a much reduced  scale.
                                     When viewing, hold  the Kodak  at aTHE lens open-                                                    distance from the eye which will make ings regulate the                                                    the edges of the rear opening appearamount of light                                               superimposed on the edges of the front passing through                                                   opening. This'will insure proper aiming the lens. The                                                        of the Kodak. When making the expo-openings are en-                                                         sure, hold the Kodak steady by pressinglarged or re-                                                      the hand supporting it against the face.duced by mov-                                  AH vertical lines in the subject should ing the lever B                                                 appear parallel with the vertical sides of at  the  bottom                                                      the front frame of the finder, when the of the shutter.                                         Kodak is held either in the vertical or   For average subjects outdoors when                                                      horizontal position. Unusual effects can the  sun  is shining, move  lever B  to                                             be obtained by tilting the Kodak.//i2.5, and exposure indicator A to  "I."                                                        After composing the picture in eitherThe Outdoor Exposure Guide on the                                                      the direct view or the reflecting finderback cover tells which openings to use                                                        of a subject 10 feet or nearer to  the for other types of subjects.                                        Kodak (see table on page 18),  it will be
                                                    necessary to move the Kodak a little to
     THE FINDERS                       the left  if making  vertical pictures,  or
                                                                              tilt it up a trifle for horizontal pictures.
                                                  This will bring the Kodak to the proper
THE Kodak Vigilant Juniors have two                                                        position to include in the picture what
 finders: The direct view finder and the           you wish to photograph.
 reflecting  finder.                                 The  REFLECTING FINDER  (page  11)
   The DIRECT VIEW FINDER (page 11) is           shows what will appear in the picture,
 brought into position by lifting the rear            but on a much reduced  scale.

                   Donated to www.orphancameras.com
View original page 5Page 6 · Read text
With this finder hold the Kodak firm-            SNAP THE PICTURE
    ly against the body at waist level.
                 Look into the  finder
                 from  directly  over  the       Hold  t h e
                   center of it and include      K o d a k in
                what is wanted by turn-          either the
                   ing to the  right or  left-           vertical or
                  Only what  is seen in         horizontal
    that part of the finder within the dotted          p o s i t i o n ;
    lines in the illustration on the left will ap-         then press
   pear in a vertical picture.                            the exposure
    To make a horizontal                                     l e v e r C.
   picture, turn the finder                   When  press-
  and hold the Kodak in                            ing the lever,
   the horizontal position.                     h o l d   t h e
  Only what  is seen  in                    breath for
   that part of the finder within the dotted             the  instant.  If  the Kodak  is moved
   lines in the illustration on the right will           during the exposure, the picture will be
   appear in a horizontal picture.                    blurred. Hold the Kodak  steady.
                                  A cable release (No. 2) can be used
         HOLD THE KODAK STEADY         with this Kodak  if it is desired to use
                                                        the Kodak  Self Timer  (an  accessory)
                        BELOW: Holding the Kodak            for self-portraiture. To attach the cable                                         for  a  horizontal  picture,
                                  using the reflecting  finder.           release to the shutter, screw  it into the
                                                 opening  directly behind  the exposure
                                                           lever G. Remove  the cable release be-
                                                            fore closing the Kodak.
ABOVE: Holding the Kodak
for a vertical picture, using
the reflecting  finder.

                     Donated to www.orphancameras.com
View original page 6Page 7 · Read text
Working Parts on the Kodak
               CLOSING THE
              KODAK
            To  c l o s e  the
                  Kodak, the reflect-
                     ing finder must be
 \ ^ F in the upright posi-
                        tion; then press the
                  same button  that
    Fig. 7                  is used to open the
                Kodak  (Fig. 7),
raise the bed and snap  it shut. Front
and bellows fold automatically.
REMOVING THE FILM
                   To UNLOAD the
                   Kodak after the
                              last picture has
                      been made, turn
                                  t h e w i n d i n g
                    knob  until  the
       Fig.8             end of the pro-
                           tective paper on
the roll of film passes the red window.
   In a subdued light, open the back of              A. Exposure Indicator      G  Button lor Opening                                                                                               and Closing Front
the Kodak. Hold the end of the paper               B. Lena Opening Lever       H. Bed
taut and turn the knob until all of the              C. Erposure Lever                     I.  Vertical Supporl
paper  is on  the  roll (Fig. 8).  If the               D.  Reflecting Findei                     1.  Lens
sticker folds under  the  roll,  turn  the                 E. Diced View Finder         K  Sbuttei                                                                                F. Lock for Back               L. Winding Knob
knob to bring it up.
                          10
                   Donated to www.orphancameras.com
View original page 7Page 8 · Read text
Take hold of the end of the protective
paper and sticker, draw out the winding
knob and remove the film. Fold under
the end of the paper, and fasten it with
the sticker.
  IMPORTANT: After removing the film,
do not wind  it tightly with a twisting
motion, or it may become scratched.
  The  film  is now ready for develop-
ment, which should be done as soon as
possible. We will be glad to send you
complete  instructions  for developing
and printing.
  Remove  the empty spool and  place
it  in the winding end  of the Kodak.
Push in the winding knob, fitting the
flange on the knob into the slot in the
end of the spool. The Kodak should now
be reloaded with Kodak Film, see pages
14 and 15. Keep a roll in the Kodak and
it  will be ready  at  all times  to  take
pictures.


                                             A suggestion ior an interior story telling picture. Such a
                                                                       picture can be made easily with Photoflood Lamps, see
                           12                                    page 25.
                   Donated to www.orphancameras.com
View original page 8Page 9 · Read text
THE FOUR F I L M S T H A T M E E T   EVERY PICTURE-TAKING NEED

     T/ie A! I-Purpose Film         Fine Groin—Greater Speed              For Pictures at Night              Pictures in Full Co/or
     KODAK       KODAK PLUS-X       KODAK  S U P E R XX     K O O A C O L O R
 VERICHROME FILM   P A N C H R O M A T I C         PAN FILM           FILM
                       FILM


 Has great speed and is        . The high speed and fine         Gives correct color values    Exposed  outdoors  in
 well  balanced  for  re-     grain of Kodak Plus-X           in a black-and-white      bright  sunlight  only,    it
 cording tone values in a   Panchromatic Film           print. Its speed makes it     yields  color  negatives
 black-and-white  print.   make  it the ideal film          ideal for taking pictures    from which Kodacolor
 Its double coating    for general outdoor           at  night  by  artificial                                                                                              Prints can be ordered
 guards against over-    work when panchroma-           light, and outdoor snap-                                                                                through Kodak dealers. and  underexposure. 8      tic results are desired. 8          shots in the shade. 8 ex-
 exposures. V6ao for the    exposures. PX62oforthe          posures. XX6ao for the    6 exposures. C62O  for
 Six-2o  Kodak;  V6i6    Six-20 Kodak; PX6i6         Six-so Kodak; XX6i6     the Six-20 Kodak; C616
 for the Six-16 Kodak.      for the Six-16 Kodak.           for the Six-i6 Kodak.      for  the  Six-i6 Kodak.
 14                                                                                                                15


                     Donated to www.orphancameras.com
View original page 9Page 10 · Read text
SUGGESTIONS ON
   EXPOSURE


SNAPSHOTS                                         For a moving  object
                                                                  the subject should be
WHEN the sun  is shining,  it should be       moving  towards  or
behind your back or over the shoulder;       awayan anglefromofcameraabout 45at
if it shines directly into the lens,  it will        degrees.
blur and  fog the  picture. However,
beautiful  effects  can  be  obtained  by
back or side lighting. When the Kodak
is pointed towards the sun, the lens must
be shaded so that the direct sunlight will
not strike the lens; for the best results,                                         When subject
use the Lens Hood of the Kodak Com-                                                                                  is in the open
bination Lens Attachments, see page 27.                                                     shadesnapshotmakeus-a
  Snapshots should be made during the                                                           ing f/12.S.
hours from one hour after sunrise until
one hour  before sunset.  If  earlier  or
later, the exposures must be longer.
  Sunshine is not needed to make snap-
shots with your Kodak Vigilant Junior.
With the largest lens opening    ( f / i z . ^ ) ,
satisfactory snapshots can often be made         For near-by
with the subject in open shade, and on          thesubjectsbeach onin
slightly cloudy or hazy days.                    sunshine,
  See the Outdoor Exposure Guide on        makeasnap-s h o t w i t h
the back cover of this manual.                      stop f/16.


                   Donated to www.orphancameras.com
View original page 10Page 11 · Read text
NEARNESS OF SUBJECT                 TIME AND "BULB" EXPOSURES
To  get the subject sharp and  distinct         FOR a subject in the deep shade, under
in  the  picture,  the Kodak  must not            the roof of a porch or under a tree, and
be nearer than a certain number of feet          on dark, cloudy days, a time exposure
to the subject. This distance varies with           should be made. Time or "bulb" expo-
the size of the lens opening used; the            sures must also be used for portraits in-
smaller  the  opening  the  shorter  the           doors by daylight and  for pictures of
distance. The nearest distance the sub-             interiors. For all time or "bulb" expo-
ject should be to the lens of the Kodak,            sures the Kodak must be placed on a
with the different lens openings, is given                                                    tripod or some other steady, firm sup-
in the table below:                                            port—do not hold  it  in the hands or  the
                                                     picture will be blurred.     For Kodak Vigilant Junior Slx-20
                                                For short time exposures from  one-     Lens            Nearest Distance
   Opening        from Lens to Subject                 half second to ten seconds, "bulb" ex-
                                                  posures are recommended.     //i 2.5            8    feet                                       To make a time exposure, move the
     //i 6           6K  feet                    exposure indicator A to the letter "T,"
                                                     see page 11, press the exposure lever C    //23              5  feet                                               once to open the shutter and again to
    //32               4    feet                        close  it. For a "bulb" exposure, move
     For Kodak Vigilant Junior Six-16                the exposure indicator A to the letter
     Lens            Nearest Distance               "B," then press the exposure lever C;
   Opening        from Lens to Subject                the shutter will remain open as long as
     //•a-5                        i o    feet                       lever G is held down.
    //i6           8K feet             ROOM INTERIORS BY DAYLIGHT
     //22                 7    feet                 To MAKE a picture of a room interior h
     jfa                  5J4  feet                       daylight, adjust the shutter lor a  tirr:
                                                                                              19
                   Donated to www.orphancameras.com
View original page 11Page 12 · Read text
exposure by moving the exposure indi-
cator A  at  the top of the  shutter  to
"T." Set the lens opening lever B at
/"/i 6 (this opening gives the best aver-
age results).
  Place the camera on a tripod  (it has
two sockets for this purpose, for vertical
or horizontal pictures), or place  it on
some other solid support. The illustra-
tions below show  the Kodak  in  the
vertical and horizontal positions. With
the Kodak on a table, use support I for a
vertical picture. For a horizontal picture          than of the ceiling. Be sure there is no
place some small object under the side           furniture close to the camera lens.
and front of the camera to avoid tilting.            Steady the Kodak and press the ex-
Do not place the Kodak more than two          posure lever once to open the shutter.
or three inches from the table edge, or       When the proper time has elapsed (see
the table will show in the picture.              Exposure Guide below), press the lever
                                                again to close the shutter.  Compose your subject in the finder to
include more of the floor of the room              After the last time exposure has been
                                           made, move the exposure indicator A at
                                                  the top of the shutter to  "I."
                                                  Exposure Guide for Interiors by Daylight
                                       FOR an  interior with medium-colored
                                                   walls and furnishings and two windows,
                                             with the sun shining—make an expo-
                                                   sure of about  4. seconds, with //i6. With
                                           one window, double the exposure, and
                                                                                              21
                   Donated to www.orphancameras.com
View original page 12Page 13 · Read text
if there are more than two windows,            Place a reflector (a sheet or  table-
halve the exposure. If the day is cloudy,           cloth thrown over a screen or chair will
make an exposure of 8 to 16 seconds.          do) a few feet from the subject and  at
  No definite rule can be given for all           the angle shown in the diagram. This re-
interiors because of the great variety of            flects light to the shaded side of the face.
light conditions.  It  is suggested that a         Move the exposure indicator A at the
series of exposures be made from about          top of the shutter to the letter "B." The
2 seconds to  16 seconds, using //i6,           lever B at  the bottom of the shutter
doubling each successive exposure.              should be at//i2-5-
   Interiors by daylight should be made            Place the Kodak in either a vertical or
from  three  hours  after  sunrise until          horizontal position on a solid support
three hours before sunset; if earlier or           (or on a tripod) a little higher than an
later the exposures must be longer.              ordinary  table. The Kodak must not
  The exposures recommended above         be more than two or three inches from
are for Kodak Verichrome, and PIus-X           the edge of the support.
Panchromatic Films; with Kodak Super-           Locate the subject in the finder. The
XX Pan Film give one-half the exposure.
  Best average results are obtained with
//i6. Double the exposures with each
smaller  lens  opening,  and  halve  the
exposures with //I2-5-                                    For large  portraits use a
                                                         Kodak  Close-Up  Attach-
DAYTIME PORTRAITS INDOORS                 ment, pages 24 and 25.
To MAKE an indoor portrait by ordinary             SUBJECT
daylight, similar to that shown on page
                                                                      'REFLECTOR23, have the subject stand or be seated
in front of an unshaded window, with
the body preferably at a diagonal to the                     KODAK
camera.
                n
                   Donated to www.orphancameras.com
View original page 13Page 14 · Read text
subject must not be closer to the lens          from  the  lens. Measure  the distance
than the distance given in the table on           carefully from the lens to the face.
page 18.   If the  subject  is ten  feet  or          The  same exposure  is required  as
nearer to the lens, move the Kodak a          without the Attachment.
trifle after composing the picture in the           Use the Kodak Close-up Attachment No.
finder, as described on page 7.                  6A, with the Kodak Vigilant Juniors
  When  ready  to  take  the  picture,          Six-2o and Six-i6, with Kodet Lens.
steady the Kodak to keep it from mov-                                PHOTOFLOOD PICTURES
ing, and press the exposure lever C to                                         INDOOR snapshots can be made usingopen the shutter. Keep the pressure on                                                Photoflood Lamps which give a steadythe lever for one or two seconds—de-                                                        light of great brilliance.pending upon the quality of the light—•                                        LAMPS—Obtain one No.  i and onethen release the pressure and the shutter                                           No. 2 Photoflood Lamp and suitablewill close.                                                         reflectors from your photographic dealer.
                                                Photoflood Lamps fit all regular lampKODAK CLOSE-UP  ATTACHMENT
                                                    sockets and the No. 2 lamp gives twice
THE Kodak Close-up Attachment makes                                                    the light of the No.  i lamp.
head and shoulder portraits. It can also                                        FILM—For  snapshots  with  Photo-
be used for photographing flowers and                                                    floods, use only Kodak Super-XX Film.
similar subjects.                                    CAUTION: Do not touch the lamps or
   Place the Attachment over the lens          allow them to be in contact with any-
and compose the picture in the finder.          thing while they are in use because they
Turn the Kodak just a little to the  left,         become quite hot.
as the short distance at which the sub-
ject must be from  the  lens makes  it       SNAPSHOTS WITH PHOTOFLOODS
necessary to center the subject by eye        PLACE the subject near a light-colored
instead of by the finder.                      background with a lamp at each side as
  The subject must be about 3^  feet         shown in the diagram. Both lamps must
                        24                                                               25

                   Donated to www.orphancameras.com
View original page 14Page 15 · Read text
be 3X  feet from  the subject and the                                                her of SM or No. 5 Photoflash LampsNo. 2 lamp should be from 2 to 4 feet                                              from your dealer.higher than the No. i lamp.                                                   Place the camera on a tripod or on  Set the Time Lever at the letter "I."                                         some other firm support. The distance  Hold the camera steady and compose                                            between subject and lens should not bethe picture in the finder—be sure the                                                 nearer than 8 feet with the Kodak Vigi-lamps are not included in the picture.                                                     lant Junior Six-2o or  10 feet with the  Press the Exposure Lever just as you                                                    Six-16, unless a Kodak Close-Up At-would to take a snapshot outdoors.                                            tachment  is used. Adjust the shutter to
                                      make a time exposure; see page 19. Set
PHOTOFLASH PICTURES                                                  the lens opening lever at //IS.5.
To make flash pictures, obtain a battery                                            Turn out the room lights. Press down
case with reflector and the'deslred num-                                           on the exposure lever to open the shut-
                                                             ter,  flash  the  lamp,  then  press  the  Exposures with No. 5 or SM Flashlamps                                              exposure lever again to close the shutter.
                Lamp-to-Subject Distance in Feet
     Film                               KODAK COMBINATION LENS         SM Flashlanip    No. 5 Flashlamp
                               ATTACHMENTS
 Verichrome  From 5 ft to 12 ft From 6 ft to 15 ft        THE  Series V Lens Attachments  are                                    7                                                             ft                                                   to                                          18 ft Plus-X           From                   6 ft                             to                         15                                             ft From
 Super-XX            From 8                               ft to                       20                                          ft                           From 9                                                           ft                                                 to                                         25                                                                      ft           used with the Kodak  Vigilant Juniors
                                                Six-2O and Six-i6 with the Kodet Lens.
  NOTE: Distances are from lamp to subject          The Kodak Adapter Ring must be  i yi   for interiors with light-colored walls and
   furnishings and  for use with lens open-             inches in diameter. All Wratten Filters,
   ing//12.5.                                   supplementary lenses, Pola-Screen and
  CAUTION: It is recommended that a pro-           Lens Hood must be Series V.   tective  transparent  screen  be used  in
   front  of the  reflector  as the  flashlamps
  may shatter. Do not  flash lamps in an            EASTMAN KODAK COMPANY
   explosive atmosphere.                                      ROCHESTER 4, N. Y.

                                                                                       27
                   Donated to www.orphancameras.com
View original page 15Page 16 · Read text
Was prepared to help you make
                                                      good pictures right from the start,
                                                    and consequently get more enjoy-
                                                  ment from photography. There are
                                           many Kodak Publications on vari-
                                                        ous phases of photography  avail-
                                                           able  at  your  Kodak  dealer's—
                                                   some  free and some  at a nominal
                                                                  price. Ask for them. Any comments
   "HOW TO MAKE                                                           or questions concerning  your  re-
   GOOD PICTURES"                                                                      sults  with  this  camera  or  your
     Explains every phase of photogra-                               interests in picture making
    phy in which the amateur is likely                                     will he welcome.
     to be interested, including meth-
    ods of making pictures, develop-
     ing, printing, enlarging, coloring,
     interior photography, home por-                                    Sales Service Division
      traiture, etc. Profusely illustrated.              EASTMAN KODAK COMPANY
     Sold at your dealer's.                                           Rochester 4, New York


EASTMAN KODAK CO., ROCHESTER 4, N. Y.

                  Donated to www.orphancameras.comB-4S-CH-CX        PRINT tp IN THE UNITED STATES OF
View original page 16Related documents and language editions
From the M. Butkus archive. Original publisher and archive notices are retained.
Check the model and edition against your equipment.
PDF verified 2026-10-10.