Film cameras
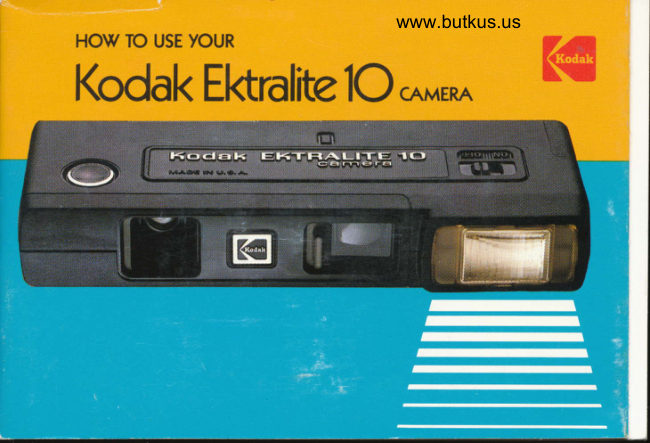
Kodak Ektralite 10 User manual
User manual for Kodak Ektralite 10. 25 pages in English. Read the original PDF, download or print a copy without registration.
25 pagesEnglish2.7 MB PDF
Loading your manual…Open PDF directly
Document details
- Brand
- Kodak
- Model / document
- Kodak Ektralite 10
- Document type
- User manual
- Language
- English
- Pages
- 25
- File size
- 2.7 MB
- Category
- Film cameras
- Document date
- Not specified in catalog
Search available document text
Find a term, then jump to its page in the original PDF. Image-only pages may not be searchable; check the PDF for exact wording and diagrams.
Page 2 · Read text
WELCOME TO THE FAMILY OF KODAK CAMERA OWNERS!
Your new KoonK EKTRALTTe 10 Cam-    lease. For  f lash picture-taking, just in-
era gives you the convenience of    stall 2 AA-size alkaline batteries (page
built-in electronic flash. The camera   2) and move the flash ON/OFF Slide
has a fixed-focus lens from 5 feet to    to ON, wait for the ready light to blink,
inf inity, which means no settings. No   then squeeze the shutter release.
flashbulbs to carry either, because        lf you need more information on
the electronic flash is an integral part   using your camera, please write to
of the camera. You can stop action   Eastman Kodak Company, Photo
indoors using any print film and your    Inf ormation, Department 841S,
built-in electronic flash. For action   Rochester, New York 14650. The war-
scenes outdoors, use a high-speed    ranty and instructions for obtaining
film, such as KooecoLoR 400 Film.    service for your camera are printed at
With film loaded in the camera, all   the back of this manual.
you have to do for daylight picture-    WARNING: To avoid electrical
taking is to position your subject   shock hazard, do not attempt to take
withi n the luminous frame of the view-   this camera apart. See Service For
finder and squeeze the shutter re-   Your Camera, page 15.
View original page 2
Page 4 · Read text
Venmo @mike-butkus-camera  Ph. 2083
PayPal Name  Lynn@butkus.org      www.PayPal.me/lynnbutkus
View original page 4
Page 5 · Read text
the back of  Water spray, sand, dropping, etc, can $ Wnite looking through
  damage the shutter. Check the cam-  the empty camera, press the sHUT-
   era shutter opening every time before  TER RELEASE.
                                                                                                                                                                          f licker of light as  you inseft a film cartrid8".a"urrr*    {  Vou should see a
          SHUTTER RELEASE     the shutter opens and closes. Try thiswww.butkus.us                         procedure a couple of times  if you're
                                        not sure of seeing the shutter open-
                                          ing and closing.
                                                                   lf the shutter is not opening and
                                            closing, read Service For Your Cam-
                                           era, page 15.
                                          Before you take any esPeciallY im-
                                          portant pictures, expose a cartridge
                                                     of film and have it processed to check
 FILM-COMPARTMENT DOOR               the camera and your operation of it.
  1 Pusn the FILM ADVANcE ONCE.      Take pictures outdoors as well as in-
  2 Open the FrLM-coMPABTMENT    doors with flash.
  DooR and aim the camera at a bright
  object-lamp, sky, etc.
View original page 5Page 6 · Read text
ll                                         www.butkus.us|    rousE  | {                                               SHUTTER     I  YOUR CAMERA,
     SIMPLY DO THIS:                          RELEASE
    FILM-COMPARTMENT    DOOR LATCH
   oooR


                                    INSERT a film cartridge into the cam-
                                                   era. Close the door until  it locks with
                                          the camera body.
                                                   Note:.Don't force the door beyond its
   OPEN the FtLM-coMpARrMENr DooR         f ully open position.  lf the door comes off    by depressing the DooR urcx and    the camera, reinstall  it by pressing  it
     lowering the door.                          into olace.
View original page 6Page 7 · Read text
WINDOW


PUSH the FtLM ADVANce repeatedly  NOTE arrows in the wtNDow as
until the first exposure locks into   you advance the film. The numbers
place. You may have to press the   that you see serve as an exposure
SHUTTER RELEASE before advancing    counter.
the film. The lens cover must be fully
open to operate the shutter release.   IMPORTANT: Always operate the film
                                      advance until it locks, in order to take the
                                            next picture.
View original page 7Page 8 · Read text
I                                        www.butkus.us


                         FOR FLASH PICTURES
                                          Set the ON/OFF swtrcH at OFF. Use 2
                                           AA-size alkaline batteries for best re-
                                                sults. Before installing any batteries,
                                            clean the ends by rubbing them with a
                                rough cloth. Slide the BArrERy-
                                 COMPARTMENT COVER in the direction
   Slide the LENS covER as far as it will    of the arrow and remove it. Insert the
   go until it snaps into the open posi_   batteries (one with the + end facing
    tion. See cover foldout. Aim through   out, the other with the - end facing
   the eye-level viewfinder for a brigFt,   out) as shown by the symbols inside
   clear image of your subject. Frime   the BATTERY coMPARTMENT, HoId the
  your subject within the luminous   batteries down and slide the cover
  frame in the viewfinder (page 6).    fully onto the camera.
   Hold the camera steady anO gentiy   Note: Remove batteries if unit is not to be   s-q-u-e-e-z-e the sh utter release.       used for any length of time.
View original page 8Page 10 · Read text
www.butkus.us
 Kooax         Use 11O-size film cartridges. The films listed below are for
 Films            picture-taking with daylight or electronic flash.

 Color         Kooncolon II Film (C110) is a general-purpose picture-
 Prints           taking film.
               Kooncolon 400 Film (CG110) is a high-speed (alt_
                purpose) film that can be used in light conditions ranging
              from bright sunlight to heavy overcast or light shade. lts
              speed lets you stop action at high shutter speeds and
                extend the distance range of your flash pictures.

Color         KooRcnnoue 64 Film (KR110) or Kooax ExrRcxnous 64
Slides          Film (ER110) are for color slides. They are not generally
             recommended for this camera.

Black-and-     Koonx Venlcnnoue pan Film
White Prints     picture-taking in most situations.
View original page 10Page 11 · Read text
VIEWFINDER
ru@M       E-

www.butkus.us
                                     your subject within the LUMrNousw@MHolding the camera as shown, frame
 rRntue in the viewf inder. At normal distances, the image seenwithin this  f rame
 will appear in your picture. At close distances (5 to 6 feet), the camera lens and
 viewf inder "see" slightly different areas. To adjust for this effect, called paral-
View original page 11Page 13 · Read text
Note: Removing and replacing partially
exposed cartridges, even under
darkroom conditions, will result in the
loss of at least one exposure.
                                    vantage of your electronic   f lash, read
DOUBLE.EXPOSURE                the following instructions.
PREVENTION                           ON/OFF Switch-Set the switch at
You never lose a picture bY double-  OFF whenever you are rePlacing
exposing a frame. After taking a pic-   batteries and are not taking flash
ture, you must operate the film ad-   pictures.
vance until it locks before You cantake another picture.                   Installing Batteries-Set the ON/
                             OFF Switch on toP of the camera to
                                  OFF. Use 2 AA-size alkaline batteries
ELECTRONIC FLASH                for best results. Check the batteries
Your camera features easy electronic  when you buy them to be sure that
flash picture-taking. To take full ad'   they are fresh. Before installing any
View original page 13Page 15 · Read text
Recycling Time-The time the bat-   Minimizing Eye Reflections-When
    teries take to charge the unit for the   you take pictures with the electronic
   next flash is called recycling time.   flash on your camera, people's eyes
  When the ready light blinks, you   sometimes appear red (white in
   know the unit is ready for your next   black-and-white  pictures). The red is
    picture. Fresh batteries will charge   produced by reflections from the
    the unit faster than weak batteries. As   retina of the eye. This effect is espe-
    the batteries lose strength or become    cially noticeable when a young sub-
    dirty, recycling time will be longer   ject has light complexion and blue
   and the flash range will be reduced.   eyes-also when your subject is in a
  When the time to recycle becomes   dimly lighted place.
    longer than 30 seconds, clean or re-     Here are two ways in which you can
   place the batteries. See Technical   minimize these red reflections: (1)
    Details, page 24,for normal recycling    turn on additional room lights, and (2)
   time and the correct batteries.        have your subject look directly at one
          lf the unit has not been used for a    of the room lights. This will cause the
   month or longer, the time required to   pupils of the eyes to contract slightly,
   charge the unit the first time will be   reducing the reflection.
    longer than normal.

10
View original page 15Page 16 · Read text
www.butkus.us
 FLASH                             FLASH.TO.SUBJECT
 PICTURE-TAKING TIPS          DISTANCE
 o Wait for the ready light to blink.      Note: When the recycling time becomes
   (See Ready Light, page g.)              greater than 15 seconds, the flash ranqe
                                                           will be reduced. For maximum flasho Use flash only. within the recom_
  mended flash range. (See Flash-      range, wait 30 seconds after ready light
   to-Subject Distance, at right.)            blinks.
r Check the unit recycling time be-    Koorcor-on 400 Film
   fore you plan to use the unit. lf the
   unit approaches 30 seconds  f or the     5ft                                             15ft
   ready lightto blink, changethe bat_
   teries.
r Turn unit off when you are not tak_    Koolcor-on II Film
   ing flash pictures.
. Remove batteries if unit is not to be     5ft                               12ft
  used for any length of time.
r Carry spare batteries with you.           Recommended flash range
                                        Flash picture-taki ng with slide films is
                                      not recommended with this camera.
                                                                                         11
View original page 16Page 17 · Read text
www.butus.us                LENS COVER
                                Your camera has a built-in sliding
                                  LENS covER to protect the lens. The
                                    cover must be fully open to operate
                                    the shutter release.              LENS COVER (open)                                To open the cover, slide it until  it
                               snaps into its fully open position.
                                   Close the cover to protect the lens
                                    and to guard against accidental shut-     AI
                                                ter release when you are not using the
                                      camera.


             LENS COVER (closed)
View original page 17Page 18 · Read text
www.butkus.us


                                       MONOGRAM
                      MONOGRAM
                                  To form your MoNocRnu, peel off the
                                                   initials and put them in the appropri-
                                        ate recesses as shown.
                         UNLOADING CAMERA AND
Attach the supplied wRtsr srRAp to   FILM PROCESSING
the camera by inserting the shorfer   When you have taken the last picture,
looped end of the strap behind the   operate the film advance (about 6 ful/posr. Then thread the longer end    strokes) until black paper appears in
through the shorter loop, and pull the   the camera window-you will feel a
strap tight.                                    stiff resistance on the advance. Do
                                                                              13
View original page 18Page 19 · Read text
Not Force the Advance Any Farther.  CAMERA CARE
    Open the film-compartment door and
    remove the cartridge. Do Not Open   Clean the picture-taking and view-                                          finder lenses by blowing away any    the Cartridge or You'll Ruin your pic-
     tures.                             dust or dirt. Then breathe on the
      For best results, have your exposed   lenses to form a mist, and gently wipe
     film processed as soon as possible.   the mist away with a soft, clean, lint-
    Have your photo dealer arrange for   less cloth or use Koonr Lens Clean-                                    ing Paper moistened with Kooex    processing by Kodak or another labo-                              Lens Cleaner, or an equivalent     ratory, or use the appropriate KooRx
     Mailer, available from your dealer.     cleaner. Keep the lens cover closed
     Color prints from Kooncolon  when you are not using the camera.
    Films (110 size) are usually 31/z x 41/z
    inches. Kodak Color processing    lmportant: Never wipe or rub a dry lens.
    Laboratories return Kooacolon Film   Always form a visible mist before wiping
    negatives (strips of 4l with an at-    with a swab or you can scratch the
    tached form for ordering extra prints    lenses. Never use solvents or any
   or enlargements. When you order    solutionscamera lenses,not designedand don'tforusecleaningchemicallv
    extra prints or enlargements, always    treated tissues intended for eyeglasses.
    return the uncut strip of 4 negatives.
14
View original page 19Page 20 · Read text
www.butkus.us
   SERVICE FOR YOUR CAMERA              OR
                                  Take your camera, batteries,       lf you have questions about your                                               negatives, and prints to a Kodak    camera or are having difficulty in                                   Consumer Center if one is lo-     using it, carefully reread the section                                         cated near you. The addresses     of this instruction manual which per-                                          are listed on pages 20 through     tains to the questions you have. ES-
   PECIALLY be sure to consult the      23.
    Troubleshooti ng Guide which begins              OR                               Send a letter describing the    on page 17. Since many cameras that                                  problem to Eastman Kodak    are returned for repair do not need                                 Company, Department 841S,     service, please carefully review this                                           343 State Street, Rochester, New
     information.                      York 14650. Please enclose
      lf you believe your camera does    sample negatives and prints with
    need service-                      your letter to aid us in helping
     Take your camera with the bat-       you, and be sure to specify the
       teries and several sample nega-     name of your camera. Quickly,ll       tives and prints to your photo      we will provide you with help and
       dealer.                                   return your negatives and prints.
           i

                                                                            15
View original page 20Page 21 · Read text
lf your camera requires repair, you   2. Use a sturdy carton that is large
   may send it through your photo   enough for you to surround the cam-
    dealer or directly to one of our Ser-   era completely with packaging mate-
    vice Centers listed on the back cover.     rial, such as crumpled newspaper.
   Follow the steps below in packing                                         3. Securely fasten the carton with   your camera.                                             tape. Clearly write the address of the
                                        Service Center and your name and
                                       address on the top and bottom of the
                                              carton.   Packing Instructions
                                     4. Remember to insure the equip-   1. lnclude a note with your camera
    giving all details: date and place of   ment to replacement value.
   purchase and a description of the
   problem, as well as batteries and
   sample negatives and prints.
       lf possible, include a telephone
   number where you or another person
   aware of the problem can be reached
   between the hours of 8:00 a.m. and
   5:00 p.m.
16
View original page 21Page 22 · Read text
www.butkus.us
  TROUBLESHOOTING GUIDE
   Taking pictures with your camera is easy and enjoyable.  lf occasionally one of
   your pictures isn't all that you expected, refer to the chart below.
     What Happened         Probable Cause                       Gorrection
       Daylight pictures       Not enough lighl        Subject must be in bright or hazy sunlight.
t      too dark              on subject                         lf not, use the electronic flash. Use a high-speed
                                                             film such as KoDAcoLon 400 Film (page 5).
  I     No picture or           Hand, fingers,          Keep both hands and wrist strap behind
        partial picture           or wrist strap in          front of camera.
                                 front of lens
       Pictures blurred           (a) Camera                (a) Use high-speed  film, such as
                             movement            KoDAcoLoR 400 Film (page 5). Hold
                                                    camera steady; gently squeeze
                                                              shutter release.
                                     (b) Subject                (b) Use high-speed film, such as
                             movement             Koolcolon 400 Film. Subject must
                                                    be stationary or moving very slowly
                                                      toward or away  f rom camera.
                                       (c) Too close to           (c) Keep at least 5 feet from subject.
                                  subject

                                                                                      17
View original page 22Page 24 · Read text
www.butkus.us
        Problem               Cause                           Correction
     Pictures dark       Flash too far              Read Flash-to-Subject Distance (page 11).
                                                                 f rom subject
t                        Flash fired before           Wait for ready light (page 9).
                             unit was ready              For maximum flash range, wait
                                                30 seconds after ready light blinks.
t    Flash pictures      Subject too close            Subject must be at least 5 feet  f rom
     too llght             to flash                                                        f lash (page 11).
     Flare in flash       Hands or fingers           Keep both hands behind front of camera.     pictures            too close to lens
     Recycling time      Batteries weak,             Replace batteries (page  8).
    longer than        wrong type batteries
    30 seconds          Batteries dirty               Clean batteries (page 8).
     Short battery        Batteries weak             Check when you buy them.
      lite             when purchased,
                     wrong type batteries
                         Flash switch               Turn ON/OFF Switch to OFF when not
                           at oN                        taking flash pictures.


                                                                               19
View original page 24Page 25 · Read text
TECHNICAL DETAILS
      Film Advance Two-stroke thumb advance on bottom of camera
   Lens         25-mm, f/8, 3-element, LuueNtzED Lens;
                     fixed-focus-5 feet to infinity
      Film Size     110 cartridge, 12 or 20 exposure, producing
                      13 x 17 mm negatives or transparencies
    Shutter       Mechanical:
                    ISO/ASA 200 and above: 1/210 sec
                   ISO/ASA 125 and below: 1/125 sec
    Electronic  Power source-2 AA-size alkaline batteries or
    Flash        2 AA-size rechargeable NiCad batteries;     (Built-in)    minimum of 100 flashes
                     Recycle time-7 seconds with fresh batteries
                      Flash duration-1/1 000 second
    Viewfinder  Projected frame with close-up indicators;
24                    flash ready light
View original page 25From the M. Butkus archive. Original publisher and archive notices are retained.
Check the model and edition against your equipment.
PDF verified 2026-10-10.