Flashes & lighting
Kodak Flasholder B-1 User manual
User manual for Kodak Flasholder B-1. 9 pages in English. Read the original PDF, download or print a copy without registration.
9 pagesEnglish2.1 MB PDF
Loading your manual…Open PDF directly
Document details
- Brand
- Kodak
- Model / document
- Kodak Flasholder B-1
- Document type
- User manual
- Language
- English
- Pages
- 9
- File size
- 2.1 MB
- Category
- Flashes & lighting
- Document date
- Not specified in catalog
Search available document text
Find a term, then jump to its page in the original PDF. Image-only pages may not be searchable; check the PDF for exact wording and diagrams.
Page 1 · Read text
www.butkus.us

THE KODAK
Pocket Flasholdor, B-1
o This small, eomp.act,
pocket-sized flasholder is rec-
ommended for use with ad-
.iustable-lens flash carneras
only.
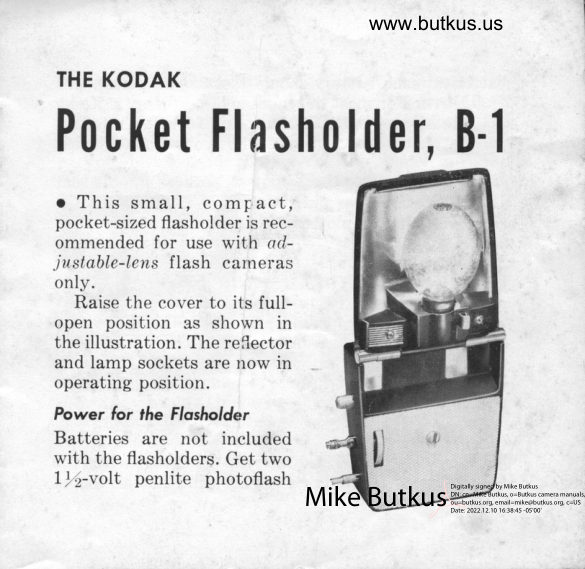
  Raise the cover to its full-
open position as shown in
the illustration. The reRector
and lamp sockets are now in
operating position.
Power for the Flosholder
Batteries are not included
with the flasholders. Get two
ll:2-volt penlite photoflash                                                               Digitally signed by Mike Butkus
                                                                                                                    DN: cn=Mike Butkus, o=Butkus camera manuals,
                                                                                                                                 ou=butkus.org, email=mike@butkus.org, c=US                  Mike Butkus Date: 2022.12.10 16:38:45 -05'00'
View original page 1Page 2 · Read text
batteries (each battery should test 3 /2 amperes).
    Notp: For most dependable lamp firing, a Koda-
      lite Midget B-C Flashpack and 15-volt photoflash
     battery are reeommended. See your Kodak dealer.
Instolling fhe Bofferies
1. Removethe cover plate
after loosening the slotted
serew.
2. Insert both penlite
batteries in the flash-
older with their bases to-
ward the camera side of
the flasholder as shown in
the illustration.
3. Replace the cover plate
and tighten the screw.
Afioching the Flsslplder
The flasholder attaches directly to cameras, such as the
Kodak Pony II, Kodak Pony IV, and Kodak Signet
2
View original page 2Page 3 · Read text
Venmo @mike-butkus-camera  Ph. 2083
PayPal Name  Lynn@butkus.org      www.PayPal.me/lynnbutkus
View original page 3
Page 4 · Read text
www.butkus.us

30,40, and 50, which have Kodalite fittings. Insert the
contact posts on the side of the flasholder in the flash
sockets on the side of the camera; then tighten the
threaded contact post by rotating the TNuRLED KNoB,
part of which extends thlough the front panel, until the
flasholder is securely fastened in place.
  The flasholder can be attached to the Kodak Retina
IIIc,  IIc, Ib, Retinette
f13.5 and Retina Reflex
Cameras by means of a
Kodak Retina Flasholder
Bracket (with cord and
tip). It can also be at-
tached to most other eem-
eras with ASA or Euro-
pean flash connectors  b1'
means of a Kodak Univer-
sal Flasholder Bracket
(with cord and tips).
  Attach the flasholder to
either bracket by placing
View original page 4
Page 5 · Read text
the contaet posts of the flasholder in the flash soekets
on the bracket, as shown opposite; then securely
tighten the threaded contact post by rotating the
knurled knob, whieh extends through the front panel,
until the flasholder is securely fastened to the bracket.
Attaeh either bracket to the eamera by tightening the
bracket screw* into the tripod socket of the eamera.
  Connect the bracket cord to the flash post on the
eamera. Make sure the cord is not in front of the lens.
Some cameras require a eonneetor for European-type
flash posts. If your camera is of this type, remove the
CONNECTOR rlp (for European-type flash posts)
from the envelope; unscrew the slyoNET coNNEC-
ToR from the cord and screw on the other tip. Screw
the tip on tightly to insure proper electrical contact.
Flash Bulbs
The flasholder aeeepts M-2, No. 5, or No. 25 bulbs.
o Insert an M-2 bulb in the small socket nearest the
-r*mot"  the black rva-slrer (univcrsal lJrzrcket) for attaclrmcnt to carnerain cltse.
4
View original page 5
Page 6 · Read text
www.butkus.us

        reflector. Push the base straight down in the socket.
     o Insert a No. 5 or No. 25 bulb in the large front
I      socket. With the pins            base                        bulb         the                    of the        in\                      two                    the         up              with       linedJ
        slots in the socket, push
       the bulb straight down
       until it "clicks" into
        place.


                                            CONNECTOR,ffi*ff."#*
View original page 6Page 7 · Read text
To release a used lamp, press the t.,tlll'RI';t,nasn. 1)o
not totrch used lamps urLtil theq lmre cooled.
  The bulb is flashed when eamera shutter is tripped.
 A strtnt,o, for eye protection from the flash, is pro-
r.ided at the top of the reflector for use with waist-level
finder cameras. Draw out the shield from its storage
slot by inserting the
fingernails of two fin-
gers under its exposededge, pulling it out as     ,rr*.5.1"?,.
far as it will go.
Flash Exposvre                               be
Colculotor                   &
This dial-type calcula-        t:
tor shows at a glance
the correct lens open-
ing or exposure value*                        www.butkus.us
to use for different sub-
iect distances.                                                       -   -,i?-rJit
                                                                                        , -,  li                    rrrr"- -,                    [*
View original page 7Page 8 · Read text
www.butkus.us

        1. Using the surroN, rotate the dial until the name
       of the Kodak film loaded in your eamera appears in
I      the window labeled KoDAK FrLM.

I,        2. The // number (black figures) or the exposure
      value (red figures) to use .,rith No. S or pS lamps will be
    shown aboue the lamp-io-subject distancs in  feet
      (ehrome figures on blackr.
        The f I number (black ligures) or the exposure value
      (red figures) to use with M-2 lamps will be shown
      below the lamp-to-subject distance in feet (chrome fig-
      ures on black).
     For Example: As in the illustration, if plus-X or Veri-
     ehrome Pan Film were set in the window, a lens open-
      ing of .//11 or an exposurc value of 12 would give proper
      exposure for a subject about 10 feet from the camera,
     exposed by a No. 5 or No. 2b lamp.
       The shutter speed of the camera must be set at ll}E
      or 1/30 second.
     Notp: Do not use flash guide numbers published in the
      film instructions, on bulb cartons, oi elsewhere for
      other flasholders.
View original page 8Page 9 · Read text
Gg  GUARANTEE ,%
     Within a year after purchase, any repairs neeessary to
       this Kodak Pocket Flasholdr r due to a defect in mate-
       rials or workmanship  will be r rade or, at our option, the
      flasholder will be replaced without charge. No other
     warranty or guarantee, express or implied, shall be
      applicable to this equipment. Nor are we responsible
       for loss of film, for other expenses or ineonveniences,  or
     for any consequential damages occasioned by the
     equipment.
       In case of unsatisfactory operation, the flasholder
     should be sent directly or thrq,ugh a Kodak dealer to
     Eastman Kodak Company or a repair firm authorized
     by us to make such repairs. It should be accompanied
     by a description of the trouble encountered and other
      available information regarding the flasholder, includ-
      ing the date and plaee of purchase.
    EASTMAN KODAK COMPANY
                      Rochesler 4, N. Y.

3-58-SH-HX                                                      Printed  in the United Stotes of Americo
View original page 9From the M. Butkus archive. Original publisher and archive notices are retained.
Check the model and edition against your equipment.
PDF verified 2026-10-10.